Getting Started
To run locally, either download from Releases or install with Go:
go get github.com/jbrunton/gflows
You can also install in GitHub workflows using the setup-gflows action:
steps:
- uses: jbrunton/setup-gflows@v1
  with:
    token: ${{ secrets.GITHUB_TOKEN }}
- run: gflows checkFirst, you'll probably want to run the init command to bootstrap GFlows. To use ytt as the templating engine:
$ gflows init --engine ytt
     create .gflows/workflows/common/steps.lib.yml
     create .gflows/workflows/common/workflows.lib.yml
     create .gflows/workflows/config/git.yml
     create .gflows/workflows/gflows/gflows.yml
     create .gflows/config.yml
(You can also use jsonnet with gflows init --engine jsonnet.)
This generates:
- A workflow called
gflowsdefined ingflows.yml, which will run against PRs and your main branch to ensure your workflows are kept up to date with their source templates. - Some common code factored out into library files in the
config/andcommon/directories. - A
config.ymlfile to customize build and validation options (see Configuration for more details).
At this point, you should update the common/git.jsonnet (Jsonnet) or common/values.yml (Ytt) file to reference the correct name of your main branch.
Finally, run the update command to create the gflows workflow:
$ gflows update
     create .github/workflows/gflows.yml (from .gflows/workflows/gflows)
You can find examples of the workflows generated by the init command in the .gflows/examples directory:
- default-jsonnet, which generates the ex-default-jsonnet-gflows workflow.
- default-ytt, which generates the ex-default-ytt-gflows workflow.
If you want to import your existing workflows, you can use the import command:
$ gflows import
Found workflow: .github/workflows/my-workflow.yml
  Imported template: .gflows/workflows/my-workflow/my-workflow.yml

Important: imported workflow templates may generate yaml which is ordered differerently from the source. You will need to update the workflows before validation passes.
  ► Run "gflows update" to do this now
Note that the yaml generated will be a little different from your existing workflow so you'll need to run the update command to regenerate your workflows:
$ gflows update
     update .github/workflows/my-workflow.yml (from .gflows/workflows/my-workflow/my-workflow.yml)
At this point you can commit and push your changes. If you create a PR against your main branch you should see the gflows workflow checking your workflows are up to date.
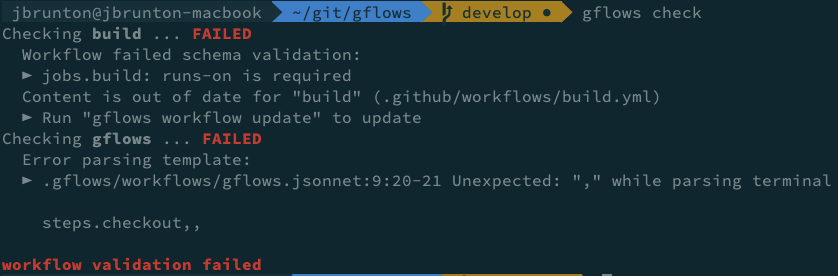
You can validate and verify your workflows with the check command:
$ gflows check
Checking gflows ... OK
Checking my-workflow ... OK
Workflows up to date
By default this command will check, for each workflow:
- That the source templates (jsonnet, ytt) are valid.
- That the content of the generated workflow file in .github/workflows is up to date.
- That the workflow is validated by the github-workflow schema from schemastore.org. (Note that this schema is comprehensive but may fail for occasional edge cases. You can disable schema validation on a per workflow basis if need be.)
If it fails any of the validation checks, you'll see clear errors describing the problem:
GFlows makes it easy to refactor workflows using the chosen template engine. See Refactoring Workflows for more.
For more about templating, see Templates.