A workshop for WOMEN WHO CODE Sydney, which will be held on July 12th 2017.
https://www.meetup.com/Women-Who-Code-Sydney/events/240653030/.
- node
^5.10.0 - yarn
^0.23.0or npm^3.0.0 - Install redux devtool chrome extension
- Editor of your choice, preferably VSCode
Only do the following if you don't have node and yarn installed
$ /usr/bin/ruby -e "$(curl -fsSL https://raw.githubusercontent.com/Homebrew/install/master/install)"$ brew install nvm $ nvm install v6.8.1$ brew install yarnhttps://code.visualstudio.com/download
https://chrome.google.com/webstore/detail/redux-devtools/lmhkpmbekcpmknklioeibfkpmmfibljd?hl=en
$ git clone git@github.com:jchappypig/repair-center.git
$ cd repair-center
$ yarn$ yarn startI am using rails-style structure in this project. Because for smaller project, this structure is flatter. And it's just easier to find things when you know the basic of redux about how it works. You can choose your prefer project structure. Javascript/Redux is not opioninated about it. http://redux.js.org/docs/faq/CodeStructure.html
.
├── build                    # All build-related code
├── public                   # Static public assets (not imported anywhere in source code)
├── server                   # Express application that provides webpack middleware
│   └── main.js              # Server application entry point
├── src                      # Application source code
│   ├── index.html           # Main HTML page container for app
│   ├── main.js              # Application bootstrap and rendering
│   ├── normalize.js         # Browser normalization and polyfills
│   ├── actionsAndReducers   # Collections of reducers/constants/actions
│   ├── assets               # Assets required to render components
│   ├── components           # React Components (May or may not be connected to actions and store)
│   ├── routes               # Bootstrap main application routes with store
│   ├── store                # Create redux store with reducers and middleware
│   └── styles               # Application-wide styles (generally settings)
.
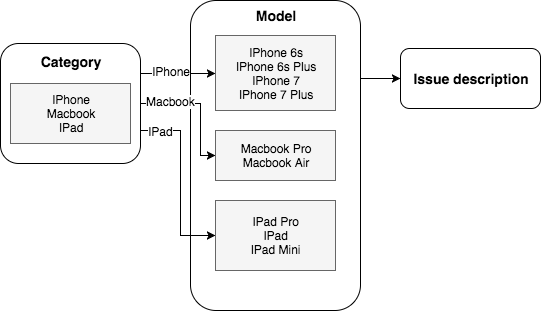
In this workshop, we will be using React and Redux to create web app for a repair center. Customer can visit the web app and log a ticket about the repairing device, including its category, model and issue description.
The owner of the repair center has requested to build the web app with some sort of intelligence — based on what customer answered previously, the next set of questions should change dynamically.
Example flow is like this:
- Create Category components (Category.js) under src/components
import React from 'react'
import { Link } from 'react-router-dom'
const Category = () => (
<div>
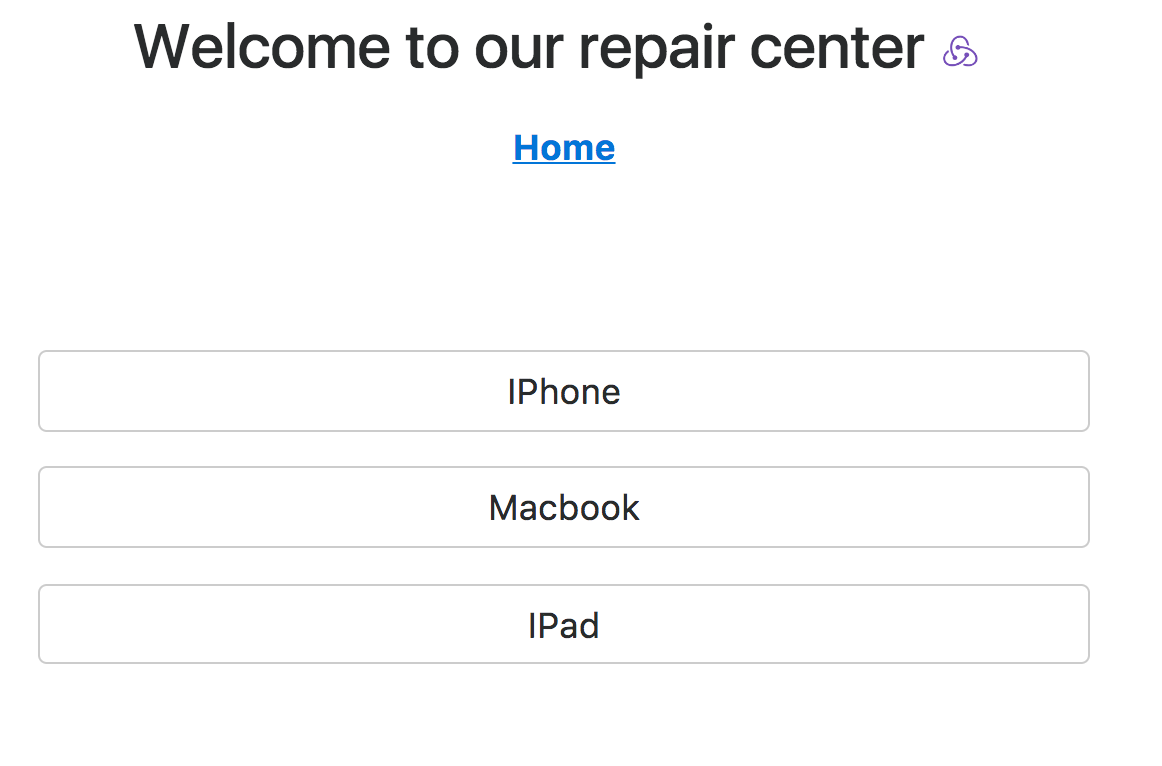
<Link to='#' className='btn btn-secondary d-block'>IPhone</Link>
<Link to='#' className='btn btn-secondary d-block'>Macbook</Link>
<Link to='#' className='btn btn-secondary d-block'>IPad</Link>
</div>
)
export default Category- Create route to go to category page
Go to src/routes/index.js and add the following route
import Category from '../components/Category'...
<Route path='/category' component={Category} />On your web browser, click on 'New ticket' to go to category page, where you should see:
- Time for action and reducer
Create a file called ticket.js under src/actionsAndReducers, which will be in charge of storing actions and reducers for ticket state
// ------------------------------------
// Constants
// ------------------------------------
export const SET_CATEGORY = 'SET_CATEGORY'

// ------------------------------------
// Actions
// ------------------------------------
export function setCategory (category) {
  return {
    type: SET_CATEGORY,
    category
  }
}

export const actions = {
  setCategory,
}

// ------------------------------------
// Action Handlers
// ------------------------------------
const ACTION_HANDLERS = {
  [SET_CATEGORY]: (state, action) => ({ ...state, category: action.category }),
}

// ------------------------------------
// Reducer
// ------------------------------------
const initialState = {}
export default function ticketReducer (state = initialState, action) {
  const handler = ACTION_HANDLERS[action.type]

  return handler ? handler(state, action) : state
}- connect reducer with redux store
Go to src/store/createStore.js
import ticketReducer from '../actionsAndReducers/ticket'Add ticket reducer to store by putting it in combineReducers. See as below:
  const store = createReduxStore(
    combineReducers({
      location: routerReducer,
      ticket: ticketReducer
    }),
    initialState,
    composeEnhancers(
      applyMiddleware(...middleware),
      ...enhancers
    )
)- Connect
Categorycomponent with redux and map the needed action to its props
Go to src/components/Category.js
...
import { connect } from 'react-redux'
import { setCategory } from '../actionsAndReducers/ticket'

const mapDispatchToProps = {
  setCategory
}

export default connect(null, mapDispatchToProps)(Category)- Now
setCategoryis available inCategoryas a prop. DispatchsetCategoryon clicking buttons
...
const Category = ({ setCategory }) => (
<div>
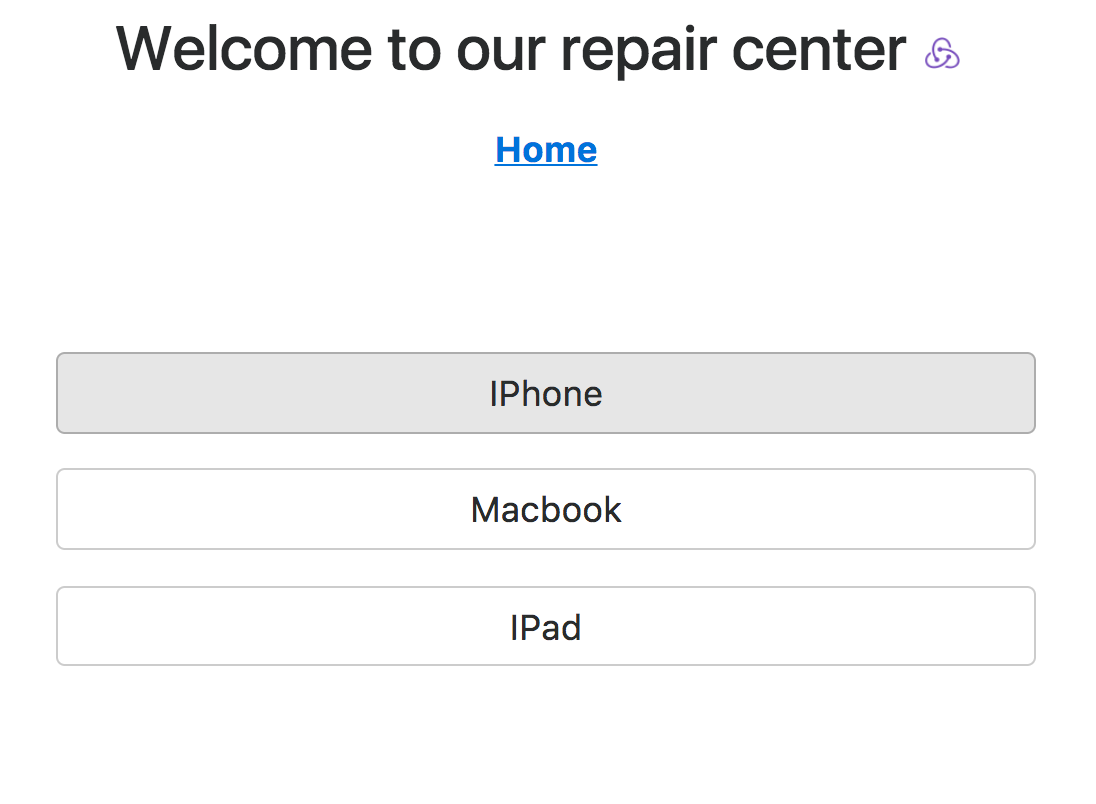
<Link to='#' className='btn btn-secondary d-block' onClick={() => setCategory('IPhone')}>IPhone</Link>
<Link to='#' className='btn btn-secondary d-block' onClick={() => setCategory('Macbook')}>Macbook</Link>
<Link to='#' className='btn btn-secondary d-block' onClick={() => setCategory('IPad')}>IPad</Link>
</div>
...
- On UI, we need to show the button as active when a category is selected
We want know what category has been selected, so we need to pass the redux state to the Category component. So on src/components/Category.js
...
const mapDispatchToProps = {
  setCategory
}

const mapStateToProps = (state) => ({
  ticket: state.ticket,
})

export default connect(mapStateToProps, mapDispatchToProps)(Category)
Now that we can read tick state from redux store in the component, we want to see which button is clicked, and maybe do some styles to the selected button. Go to src/components/Category.js and update Category to:
const Category = ({ ticket, setCategory }) => (
  <form>
    {['IPhone', 'Macbook', 'IPad'].map((category, index) => (
      <Link to='#'
        className={`btn d-block btn-secondary ${category === ticket.category ? 'active' : ''}`}
        key={index} onClick={() => setCategory(category)}>{category}
      </Link>
    ))}
  </form>
)

...
Proptypes (needs brief explaination): Import proptypes by putting the following line at the the top of file:
import PropTypes from 'prop-types'Then define the type:
Category.propTypes = {
  ticket: PropTypes.object.isRequired,
  setCategory: PropTypes.func.isRequired
}
... ....
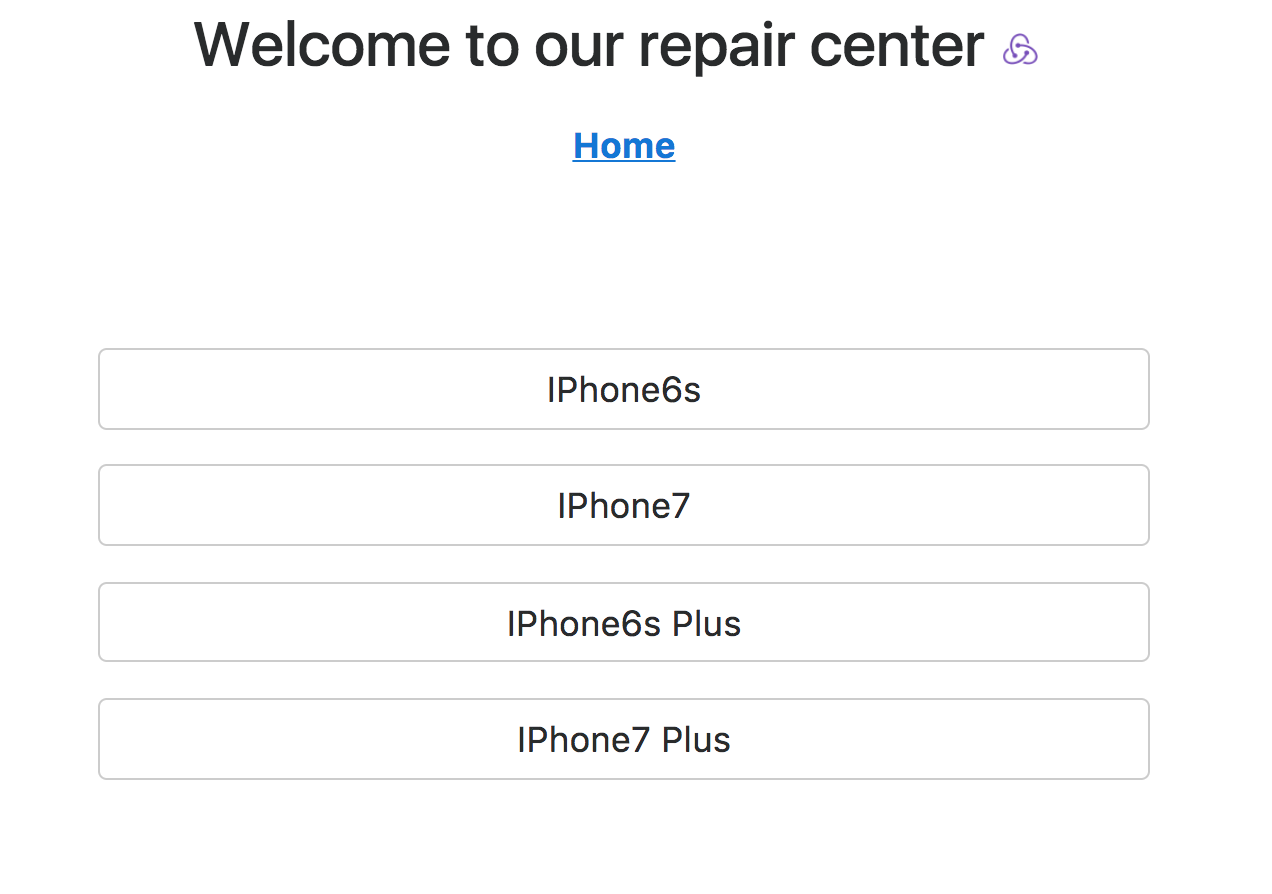
It's your turn to create a page that describe what model of your device. For the start, you will need to have a few buttons to be chosen from - 'IPhone6s', 'IPhone7', 'IPhone6s Plus', 'IPhone7 Plus'.
Hint:
- Reference how we create Category
- To do list: component, action, reducer, route
- solution is right afterward. DO NOT LOOK. Try it yourself first.
.
.
.
.
.
.
.
.
.
.
.
- Link Category to Model page, go to our created Category.js, and add a url to
Linkcomponent:
const Category = ({ ticket, setCategory }) => (
  <form>
    {['IPhone', 'Macbook', 'IPad'].map((category, index) => (
      <Link to='/model'
        className={`btn d-block btn-secondary ${category === ticket.category ? 'active' : ''}`}
        key={index} onClick={() => setCategory(category)}>{category}
      </Link>
    ))}
  </form>
)- Create Model components (Model.js) under src/components
import React from 'react'
import PropTypes from 'prop-types'
import { connect } from 'react-redux'
import { Link } from 'react-router-dom'
import { setModel } from '../actionsAndReducers/ticket'

const Model = ({ ticket, setModel }) => (
  <form>
    {['IPhone6s', 'IPhone7', 'IPhone6s Plus', 'IPhone7 Plus'].map((model, index) => (
      <Link to='/description'
        className={`btn btn-secondary d-block  ${model === ticket.model ? 'active' : ''}`}
        key={index} onClick={() => setModel(model)}>{model}
      </Link>
    ))}
  </form>
)

Model.propTypes = {
  ticket: PropTypes.object,
  setModel: PropTypes.func
}

const mapStateToProps = (state) => ({
  ticket: state.ticket,
})

const mapDispatchToProps = {
  setModel
}

export default connect(mapStateToProps, mapDispatchToProps)(Model)- Add missing action setModel and reducer in src/actionsAndReducers/ticket.js
...
export const SET_MODEL = 'SET_MODEL'...
export function setModel (model) {
  return {
    type: SET_MODEL,
    model
  }
}
...
export const actions = {
  setCategory,
  setModel,
}
...
const ACTION_HANDLERS = {
  [SET_CATEGORY]: (state, action) => ({ ...state, category: action.category }),
  [SET_MODEL]: (state, action) => ({ ...state, model: action.model }),
}- Add route for /model under routes/index.js
...
import Model from '../components/Model'...
<Route path='/model' component={Model} />- Finally, we need to make the model page a bit smart. It should be able to change the set of models according to different categories. The category has been stored in ticket state. We can make use of it and create a mapping.
go to src/components/Model.js and update
const models = {
  IPhone: ['IPhone6s', 'IPhone7', 'IPhone6s Plus', 'IPhone7 Plus'],
  Macbook: ['Macbook Pro', 'Macbook Air'],
  IPad: ['IPad Pro', 'IPad', 'IPad mini'],
}

const modelsForCategory = (category) => {
  return models[category] || models.IPhone
}
const Model = ({ ticket, setModel }) => (
<form>
{modelsForCategory(ticket.category).map((model, index) => (
<Link to='/description'
className={`btn btn-secondary d-block ${model === ticket.model ? 'active' : ''}`}
key={index} onClick={() => setModel(model)}>{model}
</Link>
))}
</form>
)
This time, no more select buttons. You will create a page called Description with textarea, which allows customers to describe what is wrong with the device

Hint:
- Reference how we create Category
- To do list: component, action, reducer, route
- Use <textarea> tag and as a button to submit
- Use onBlur/onChange event in <textarea>
- get value of the textarea content using
event.target.value - Hint on Description component is right afterward. DO NOT LOOK. Try it yourself first.
.
.
.
.
.
.
.
.
.
.
. Create a Description.js under src/components
import React from 'react'
import PropTypes from 'prop-types'
import { connect } from 'react-redux'
import { Link } from 'react-router-dom'
import { setDescription } from '../actionsAndReducers/ticket'

const Description = ({ ticket, setDescription }) => (
  <form>
    <textarea name='description'
      placeholder='describe your issue'
      rows='3' cols='50'
      defaultValue={ticket.description}
      className='form-control d-block'
      onBlur={(event) => setDescription(event.target.value)} />
    <Link to='/summary' className='btn btn-primary'>Submit</Link>
  </form>
)

Description.propTypes = {
  ticket: PropTypes.object,
  setDescription: PropTypes.func
}

const mapStateToProps = (state) => ({
  ticket: state.ticket,
})

const mapDispatchToProps = {
  setDescription
}

export default connect(mapStateToProps, mapDispatchToProps)(Description)Create a summary page, which displays the detail of the repair ticket created.

- This project is build on top of boilerplate https://github.com/davezuko/react-redux-starter-kit