This repository contains a firmware implementation of a composite USB device.
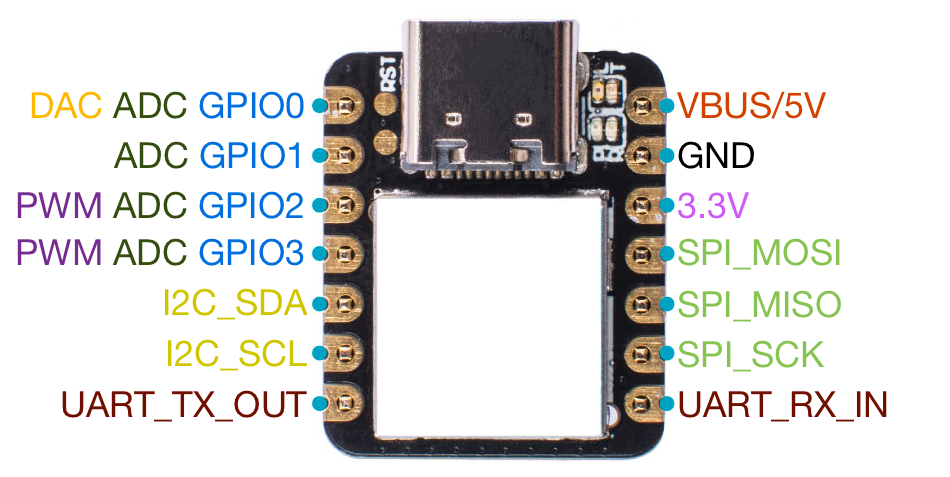
It is designed to be used with the seeeduino xiao (ATSAMD21G18A). When flashed with the correct firmware, this will be hereafter referred to as a polyglot-turtleboard or just turtleboard.
Important notes:
- The seeeduino xiao supports 0V to 3.3V signals. Connecting signals outside this range will likely cause permanent damage to the device.
- Not all UART baud rates will work, as the clock source in the microcontroller has a fixed resolution. The following baud rates have been tested as working:
- 1200, 2400, 4800, 9600, 19200, 38400, 57600, 115200, 128000, 230400, 256000, 460800, 500000, 675000, 921600, 1000000
- The USB-to-UART does not support hardware flow control on the UART side.
- The I2C interface does not have built-in pullup resistors. Use 4.7k external resistors on SDA and SCL (or other values as appropriate).
- The ADC and DAC are limited to 0V to 3.3V range only.
- Both PWM pins are driven by independent, 24bit PWM hardware. As such, each pin can use a different PWM frequency.
- Both the VBUS and 3.3V pins are outputs.
- The 3.3V regulator on this device is not designed to supply a high current. Keep the current draw under 100mA or so.
- Download the firmware file
polygot-turtle.uf2from the releases section of this repository. - Connect your seeeduino xiao to your computer with a USB C cable.
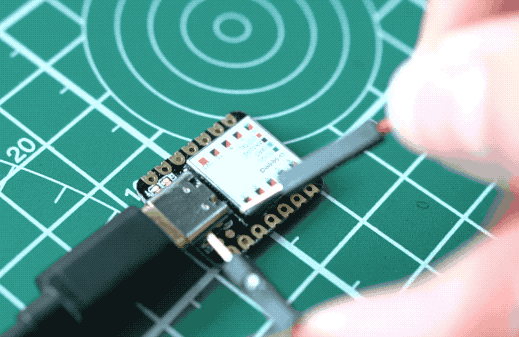
- Force your device into bootloader mode. To do this, you need to take a wire and connect the RST and GND pads together twice in quick succession. These two pads are located next to the USB connector on the board. See the animation at the end of this list for an example.
- A new USB storage device will appear connected to your computer (likely called "ARDUINO" or something similar)
- Copy and paste the
polygot-turtle.uf2file onto the new storage device - The device will reflash its own firmware and then disconnect the storage device. You're now ready to go!
- (Your device may need a power cycle to start correctly the first time; just unplug and replug the USB cable.)
To use the USB to UART converter, simply connect the device to a free USB port on your computer. Drivers should be automatically installed on all platforms that need them. The device will appear in your operating system as a serial port.
Please see python-polyglot-turtle for more information.
There are four LEDs next to the USB connector.
- The green LED indicates that the board is powered on.
- The yellow LED indicates that it is receiving commands from or sending data to the PC.
- The two blue LEDs correspond to UART TX and RX activity.