Built with Platformio espidf and ESP32-Arduino as component (git clone https://github.com/espressif/arduino-esp32.git), ESP32_HTTPS_Server library in lib folder, PubSubClient library as lib_deps and https://github.com/tasmota/platform-espressif32 as platform, NAT router, TinyMqtt and App in main folder, all with some fixes
- this allows to combine IDF and Arduino code in (currently) compatible versions with small changes e.g. on crypto includes. Partition table has been set to 1.5M for app.
Typical size:
RAM: [= ] 12.3% (used 40340 bytes from 327680 bytes) Flash: [======== ] 80.2% (used 1231825 bytes from 1536000 bytes)
It combines
- a configurable WIFI to WIFI NAT router
- with configuration server (192.168.4.1), GPIO23 low at start erases configuration
- with a simple MQTTS broker on port 8883
- and a sketch for a local MQTTS client (must connect to 127.0.0.1) and application (e.g. relay control)
A lot of fiddling on details made it compileable in Platformio as espidf/Arduino merge.
Tested: NAT router, MQTTS broker for few clients, local MQTTS client for local app, configuration and erasing by GPIO23
based on
- TinyMqtt broker library from https://github.com/hsaturn/TinyMqtt modified to make use of SSL connections by ESP32 HTTPS Server
TinyMqtt is a small, fast and capable Mqtt Broker and Client for Esp8266 / Esp32 / Esp WROOM
- Very fast broker I saw it re-sent 1000 topics per second for two clients that had subscribed (payload ~15 bytes ESP8266). No topic lost. The max I've seen was 2k msg/s (1 client 1 subscription)
- Act as as a mqtt broker and/or a mqtt client
- Mqtt 3.1.1 / Qos 0 supported
- Wildcards supported (+ # $ and * (even if not part of the spec...))
- Standalone (can work without WiFi) (degraded/local mode)
- Brokers can connect to another broker and becomes then a proxy for clients that are connected to it.
- zeroconf, this is a strange but very powerful mode where all brokers tries to connect together on the same local network.
- small memory footprint (very efficient topic storage)
- long messages are supported (>127 bytes)
- TinyMQTT is largely unit tested, so once a bug is fixed, it is fixed forever
- Max of 255 different topics can be stored (change index_t type to allow more)
- No Qos because messages are not queued but immediately sent to clients
- install TinyMqtt library (you can use the Arduino library manager and search for TinyMqtt)
- modify <libraries/TinyMqtt/src/my_credentials.h> (wifi setup)
...
- ESP32 HTTPS Server library from https://github.com/fhessel/esp32_https_server (put into lib folder) (used as library together with modified parts of it to link it to TinyMqtt)
This repository contains an HTTPS server library that can be used with the ESP32 Arduino Core. It supports HTTP as well.
- Providing support for HTTP, HTTPS or both at the same time
- Handling requests in callback functions that can be bound to URLs, like for example in Express or Servlets.
- Abstraction of handling the HTTP stuff and providing a simple API for it, eg. to access parameters, headers, HTTP Basic Auth etc.
- Using middleware functions as proxy to every request to perform central tasks like authentication or logging.
- Make use of the built-in encryption of the ESP32 module for HTTPS.
- Handle multiple clients in parallel (max. 3-4 TLS clients due to memory limits).
- Usage of
Connection: keep-aliveand SSL session reuse to reduce the overhead of SSL handshakes and speed up data transfer.
The library is self-contained and just needs the Arduino and ESP32 system libraries. Running the examples requires the WiFi library in addition to that.
The steps to install this library depend on the IDE you are using. PlatformIO is recommended as you have more options to configure the library (see Advanced Configuration), but the library can be used with the plain Arduino IDE.
...
and 3) also based on ESP32 NAT Router from https://github.com/martin-ger/esp32_nat_router to set up a WIFI to WIFI router (console interface removed)
This is a firmware to use the ESP32 as WiFi NAT router. It can be used as
- Simple range extender for an existing WiFi network
- Setting up an additional WiFi network with different SSID/password for guests or IOT devices
- Convert a corporate (WPA2-Enterprise) network to a regular network, for simple devices.
It can achieve a bandwidth of more than 15mbps.
The code is based on the Console Component and the esp-idf-nat-example.
All tests used IPv4 and the TCP protocol.
| Board | Tools | Optimization | CPU Frequency | Throughput | Power |
|---|---|---|---|---|---|
ESP32D0WDQ6 |
iperf3 |
0g |
240MHz |
16.0 MBits/s |
1.6 W |
ESP32D0WDQ6 |
iperf3 |
0s |
240MHz |
10.0 MBits/s |
1.8 W |
ESP32D0WDQ6 |
iperf3 |
0g |
160MHz |
15.2 MBits/s |
1.4 W |
ESP32D0WDQ6 |
iperf3 |
0s |
160MHz |
14.1 MBits/s |
1.5 W |
After first boot the ESP32 NAT Router will offer a WiFi network with an open AP and the ssid "ESP32_NAT_Router". Configuration can either be done via a simple web interface or via the serial console.
The web interface allows for the configuration of all parameters. Connect you PC or smartphone to the WiFi SSID "ESP32_NAT_Router" and point your browser to "http://192.168.4.1". This page should appear:
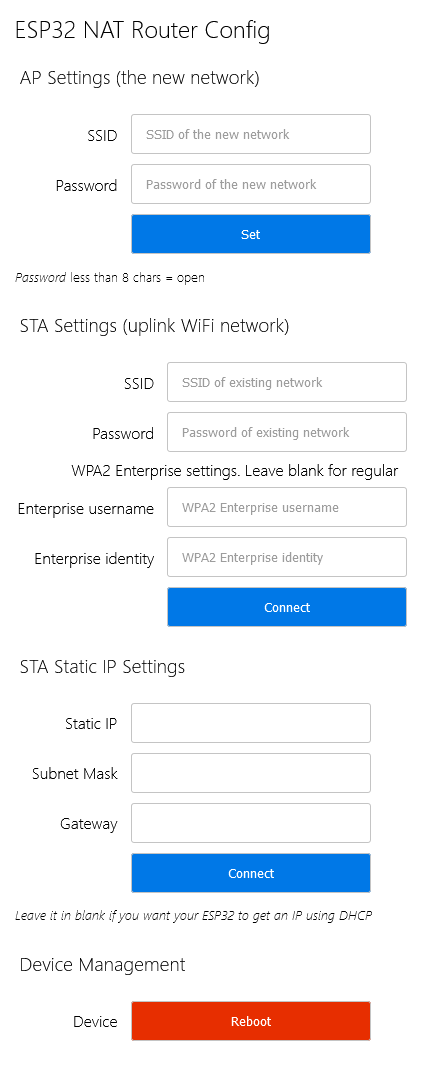
First enter the appropriate values for the uplink WiFi network, the "STA Settings". Leave password blank for open networks. Click "Connect". The ESP32 reboots and will connect to your WiFi router.
Now you can reconnect and reload the page and change the "Soft AP Settings". Click "Set" and again the ESP32 reboots. Now it is ready for forwarding traffic over the newly configured Soft AP. Be aware that these changes also affect the config interface, i.e. to do further configuration, connect to the ESP32 through one of the newly configured WiFi networks.
If you want to enter a '+' in the web interface you have to use HTTP-style hex encoding like "Mine%2bYours". This will result in a string "Mine+Yours". With this hex encoding you can enter any byte value you like, except for 0 (for C-internal reasons).
It you want to disable the web interface (e.g. for security reasons), go to the CLI and enter:
nvs_namespace esp32_nat
nvs_set lock str -v 1
After restart, no webserver is started any more. You can only re-enable it with:
nvs_namespace esp32_nat
nvs_set lock str -v 0
All parameter settings are stored in NVS (non volatile storage), which is not erased by simple re-flashing the binaries. If you want to wipe it out, use "esptool.py -p /dev/ttyUSB0 erase_flash".
...