Josiah Hester, Timothy Scott, Jacob Sorber
School of Computing, Clemson University
Our paper, "Ekho: Realistic and Repeatable Experimentation for Tiny Energy-Harvesting Sensors" describes the design and evaluation of a new tool for recording and replaying energy harvesting conditions. Energy harvesting is a necessity for many small, embedded sensing devices, that must operate maintenance-free for long periods of time. However, understanding how the environment changes and it's effects on device behavior has always been a source of frustration. Ekho allows system designers working with ultra low power devices, to realistically predict how new hardware and software configurations will perform before deployment. By taking advantage of electrical characteristics all energy sources share, Ekho is able to emulate many different energy sources (e.g., Solar, RF, Thermal, and Vibrational) and takes much of the guesswork out of experimentation with tiny, energy harvesting sensing systems.
This paper received the BEST PAPER Award at the 12th ACM Conference on Embedded Networked Sensor Systems (SenSys 2014), held in Memphis, Tennessee November 3-6, 2014.
For more information on the concept, design, and evaluation of Ekho, checkout the presentation, notes, and the paper itself.
- Mac or Linux
- Arduino version 1.0.5 or 1.0.6.
- Teensyduino 1.19+
- Teensy ADC package installed
- GNU Scientific Library (GSL)
- 2x Teensy 3.1 Dev Boards
- 1x MCP413X/415X/423X/425X Digital Potentiometer / Rheostat. From Digikey [1], [2], or Mouser
- Breadboard, headers, jumpers, iron will
On a Mac, after installing the XCode command line tools, and then Homebrew, install GSL with:
brew install gsl
On Ubuntu install GSL with:
sudo apt-get install gsl-bin libgsl0-dbg libgsl0-dev
If you are using other Linux distros, then you already know what to do.
Once the PCB is in hand, you can either:
- Hand solder the parts on the board (requires intermediate soldering skills). Cheapest option!
- Order a stencil from OSH Stencils and stencil the board.
- Have Advanced Assembly (or a similiar low-volume fab house) assemble it for you. Just send them the gerbers, the BOM, and the XYRS file (.mnt inside board/).
For a version of Ekho that can be deployed for long periods of time (for example with an existing sensor network deployment) order the Mobile Version of Ekho from OSH Park.
The recording interface allows you to record energy environments (represented as IV-surfaces) in real time. At its simplest the record program just serves to pipe data (specifically: IV-pairs) from the Teensy to the desktop. The bulk of the remaining code is concerned with converting sets of IV-pairs to IV-curves (using simple polynomial regression) and saving them to a file, and then finally rendering the result in near-real time with OpenGL. The generated files can be analyzed, or emulated at a later date. For more information on how recording works, and the novel techniques we use to explore an IV-surface, check the paper..
 To record an IV-surface with the desktop version of Ekho, first load the firmware on the Teensy:
-
Flash the Teensy 3.1 with the
firmware/record/EkhoRecord_t3.inoimage using the Arduino application. -
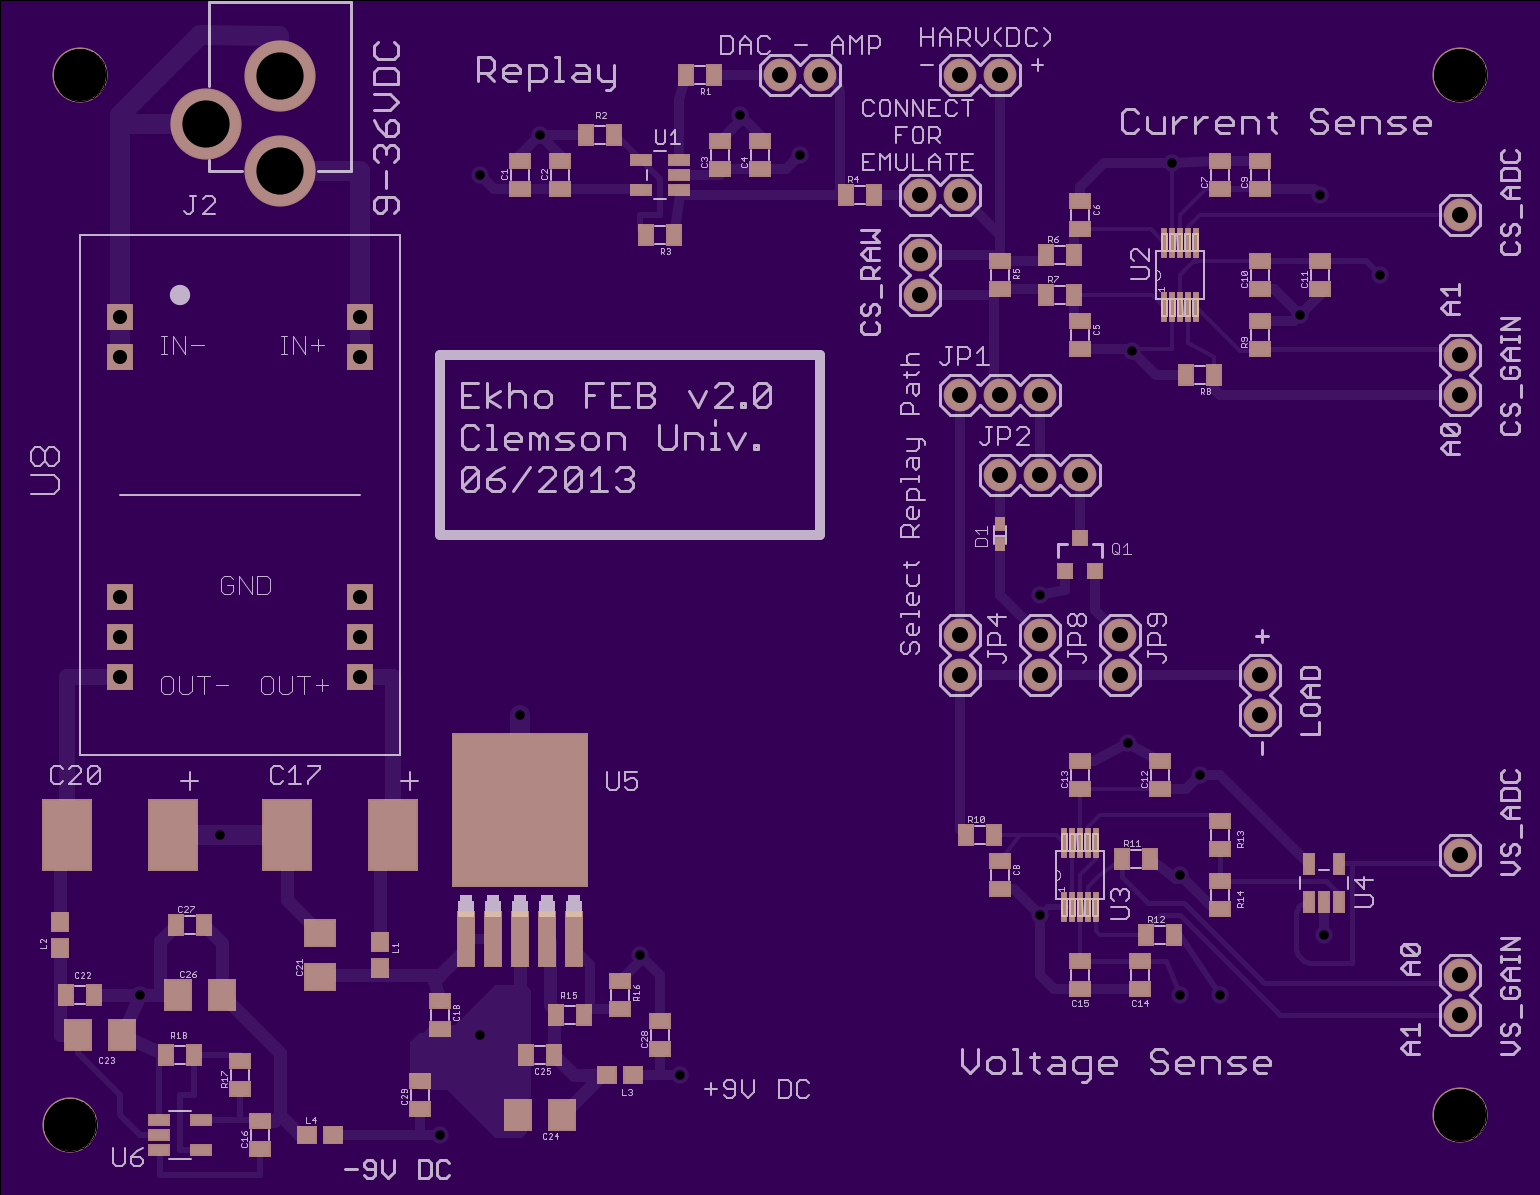
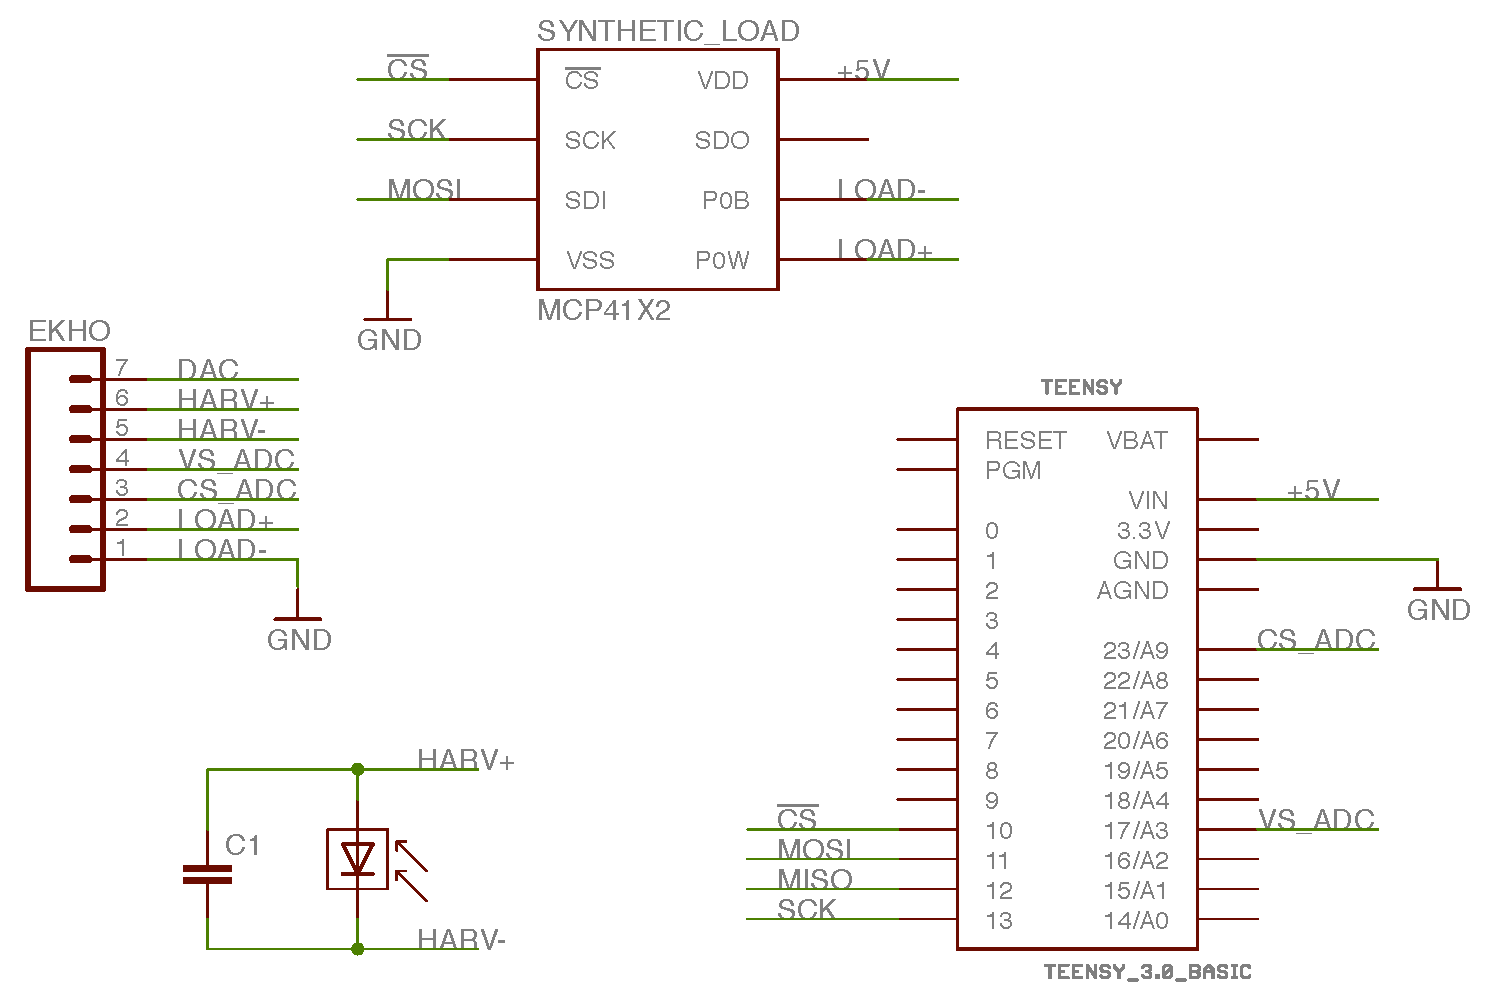
Connect the Teensy 3.1, the digital potentiometer / rheostat (synthetic load) and the Analog-front end as shown above.
-
Connect jumpers JP4 and the left side of JP1 for replay path.
-
Disconnect the jumper across JP14 (near the "CONNECT FOR EMULATE" silkscreen)
-
Set the gain on the Analog-front-end
-
Connect the harvester you want to record to Ekho (HARV(DC) pins).
-
Build the
surface_renderexecutable$ cd software/record $ make record -
Run the executable, supplying the port of the connected Teensy 3.1. The surface will be written to a file named
surface.rawin the same directory. The surface will be rendered as it is captured using OpenGL. Don't forget to excite the harvester so you can see the surface (for example, if recording a solar panel, shine a light on the panel).
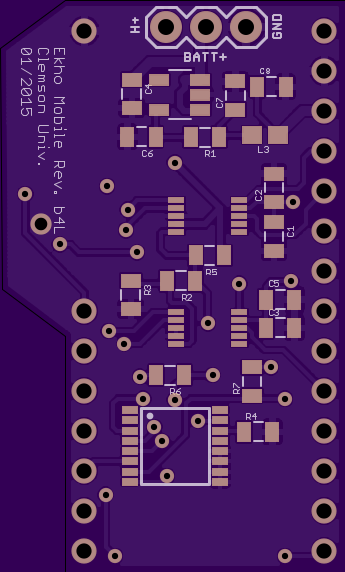
For the mobile version, the raw data can be taken from the micro SD card, or piped from the Teensy in the same way as the desktop version. The Ekho Mobile Front End board functions as a daughter board that sits on top (ot below) the Teensy.
Piping the pairs to the desktop via USB is shown here.
-
Flash the Teensy with the
firmware/record/EkhoRecordMobile_t3.inoprogram. -
Connect the harvester you want to record to the GND and H+ pins on the Ekho board (refer to the silkscreen). Ekho only supports DC harvester inputs.
-
Attach the Mobile Analog Front-End-Board to the Teensy.
-
Build the
surface_renderexecutable$ cd software/record $ make record -
Run the executable, supplying the port of the connected Teensy 3.1. The surface will be written to a file named
surface.rawin the same directory. The surface will be rendered as it is captured using OpenGL. Don't forget to excite the harvester so you can see the surface (for example, if recording a solar panel, shine a light on the panel).
 Emulating allows the user to realistically and repeatably test different software, and hardware configurations in an energy harvesting environment. For more information on how emulation works, and accuracy measures check out the paper.
-
Flash a Teensy 3.1 with the
firmware/emulate/EkhoEmulate_t3.inoimage using the Arduino application. -
Flash a seoncd Teensy 3.1 with the
firmware/emulate/EkhoDAQ_t3.inoimage using the Arduino application. -
Connect the jumper across JP14 (near the "CONNECT FOR EMULATE" silkscreen)
-
Connect jumpers JP4 and the left side of JP1 for replay path.
-
Set the gain on the Analog-front-end
-
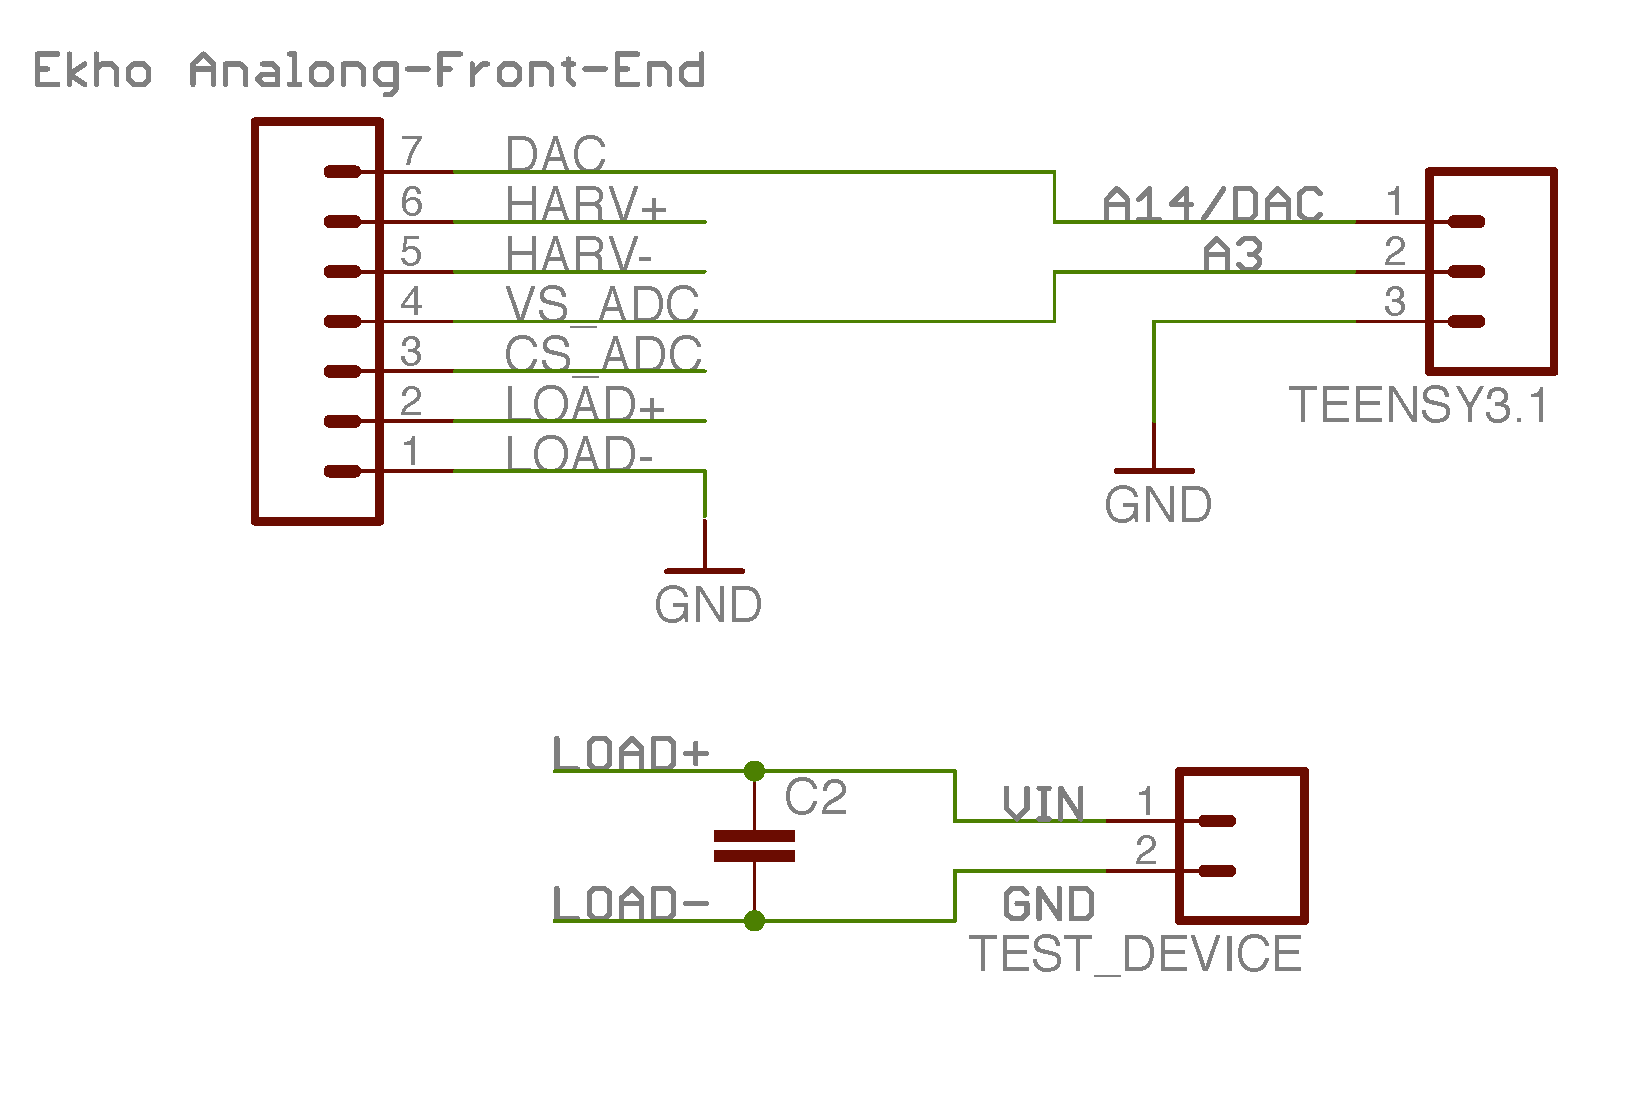
Connect both Teensy 3.1's, the device under test, and the Analog-front end as shown above.
-
Build the
emulate_renderexecutable$ cd software/emulate $ make emulate -
Run the executable, supplying both ports of the connected Teensy 3.1. The surface will be read from a file named
surface.rawin the same directory. The surface will be rendered with a trace showing the execution path across the IV-surface as it is captured using OpenGL.
Note that the OpenGL rendering is somewhat uneccessary with emulate, you can conduct emulate without the rendering and with only one Teensy 3.1 with slight modifications to the code. This simplifies the experimental setup. Post an issue here if you require more info on how to do this
We use the CRAPL License for all things Ekho. The basic idea is we are not responsible for the code "working" nor do we provide warranties. This is research quality code (which means lots of hacks). Everything including hardware is provided as-is.