Understanding usbmux and the iOS lockd
If you have ever been intrigued by how iTunes and Xcode communicate with devices and moreover how non Apple code like libimobiledevice is able to control them, here you have a hands on compilation of the knowledge about the matter with some personal research.
如果你曾经对iTunes和Xcode如何与设备通信以及非苹果代码(如libimobiledevice)如何控制它们感到好奇,那么在这里你将获得一份关于这个问题的实践知识汇编,其中包含了一些个人研究成果。
The usbmux is the first player in this matter, let’s see what the iphonewiki.com, say about it:
usbmux是这个问题中的第一位参与者,让我们来看看iphonewiki.com对此的说法:
During normal operations, iTunes communicates with the iPhone using something called “usbmux” — this is a system for multiplexing several “connections” over one USB pipe. Conceptually, it provides a TCP-like system — processes on the host machine open up connections to specific, numbered ports on the mobile device.
在正常操作中,iTunes使用一种称为“usbmux”的东西与iPhone进行通信。这是一种通过一个USB管道多路复用几个“连接”的系统。从概念上讲,它提供了类似于TCP的系统 - 主机上的进程打开到移动设备上特定编号端口的连接。
Apple has built an “usb multiplexer” for host applications to communicate with the iDevices. Obviously Apple has developed it for his own applications, not for the community. Apple provides usbmux in OSX and Windows to support iTunes. There is an open source project to replicate usbmux for Mac/Linux/Windows, it is called usbmuxd.
苹果为主机应用程序与iDevices通信构建了一个“usb多路复用器”。显然,苹果是为自己的应用程序开发它,而不是为社区开发。苹果在OSX和Windows中提供了usbmux以支持iTunes。有一个名为usbmuxd的开源项目来复制Mac/Linux/Windows上的usbmux。
iphonewiki.com provides information about the location of the original usbmux program in the Mac platform and how it is launched:
iphonewiki.com提供了关于Mac平台上原始usbmux程序的位置以及它如何启动的信息。
On the Mac, this is handled by /System/Library/PrivateFrameworks/MobileDevice.framework/Resources/usbmuxd, a daemon that is started by launchd (see /System/Library/LaunchDaemons/com.apple.usbmuxd.plist Catalina: /Library/Apple/System/Library/LaunchDaemons/com.apple.usbmuxd.plist)
We can confirm the usbmuxd and the daemon plist are still there in OS X 10.13.6 :
We can confirm the usbmuxd and the daemon plist are still there in OS X 10.13.6 :

The contents of the usbmux daemon plist are:
usbmux 守护进程 plist 的内容为:
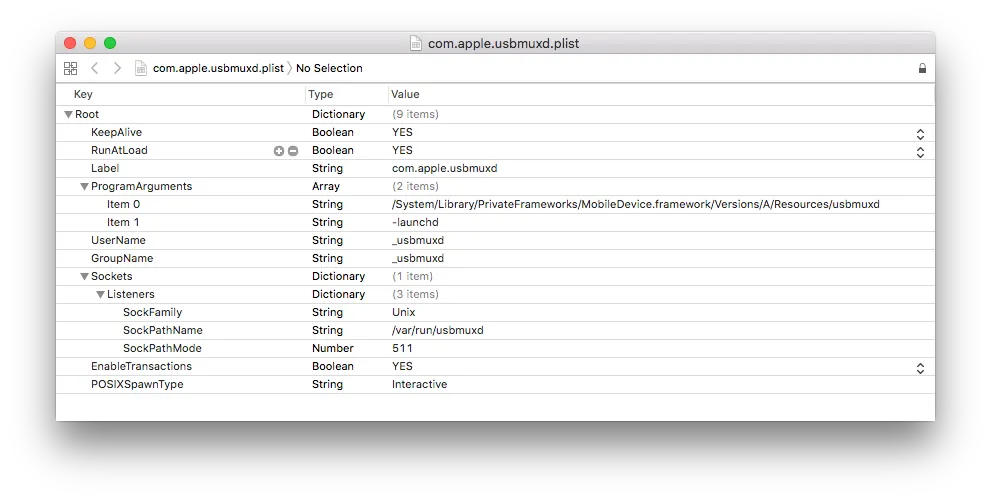
Notice the interesting information in the plist about Unix sockets. The usbmuxd daemon opens a Unix socket at /var/run/usbmuxd. More precisely, it is an Inter Process Communication file descriptor for processes to connect and communicate with the iPhone.
注意plist中关于Unix套接字的有趣信息。usbmuxd守护进程在/var/run/usbmuxd打开了一个Unix套接字。更准确地说,这是一个用于进程连接和与iPhone通信的进程间通信文件描述符。
The usbmuxd .. creates a listening UNIX Domain Socket at /var/run/usbmuxd. usbmuxd then watches for iPhone connections via USB; when it detects an iPhone running in normal mode (as opposed to [recovery mode][Recovery_Mode_]), it will connect to it and then start relaying requests that it receives via /var/run/usbmuxd — this is to say, usbmuxd is the only thing that actually speaks USB to the iPhone. This means that third-party applications which wish to talk to the iPhone must either do so through usbmuxd, or usbmuxd must be replaced.
usbmuxd会在/var/run/usbmuxd创建一个监听UNIX域套接字。然后,usbmuxd通过USB监视iPhone的连接;当它检测到运行在正常模式下的iPhone(而不是恢复模式),它将与其建立连接,然后开始转发通过/var/run/usbmuxd收到的请求 — 这意味着,usbmuxd是唯一能够与iPhone进行USB通信的组件。这意味着希望与iPhone通信的第三方应用程序必须要么通过usbmuxd进行通信,要么替换掉usbmuxd。
In other words, iTunes and Xcode talk to iDevices through the /var/run/usbmuxd socket. We can confirm that the socket is there:
换句话说,iTunes和Xcode通过/var/run/usbmuxd套接字与iDevices进行通信。我们可以确认该套接字存在:

So far we know that this socket exists and implements a TCP “like” protocol. Since its for Apple only to use, we can guess that they didn't have to be TCP compliant and probably they have done their “TCP like” way for higher efficiency.
迄今为止,我们知道这个套接字存在并实现了一个类似于TCP的协议。由于它只供苹果使用,我们可以猜测他们不必遵循TCP标准,并且可能采用了自己的“类似TCP”的方式以提高效率。
The dependencies of the usbmuxd executable are not many. There is one that looks like a fundamental part for the communication with devices, MobileDevice.framework. We will find out later on what does the framework provide.
usbmuxd可执行文件的依赖性并不多。其中一个看起来是与设备通信的基本部分,即MobileDevice.framework。我们稍后会了解该框架提供了什么功能。

There is an interesting modification you can apply to the usbmuxd.plist in order to get the Debug logs of usbmuxd in the console. Adding a simple DebugLevel key with value 7 will set enable the debug logs. This article explains how to do it.
你可以对usbmuxd.plist进行一个有趣的修改,以便在控制台中获取usbmuxd的调试日志。只需添加一个简单的DebugLevel键,并将其值设置为7即可启用调试日志。本文解释了如何操作。
Further diving into usbmux brings us to “libimobiledevice/usbmuxd”, which is pretty well explained in usbmuxd:
进一步深入研究usbmux,我们会发现“libimobiledevice/usbmuxd”,这在以下链接中有很好的解释:
libimobiledevice/usbmuxd is an open source project to simulate the OS X usbmux system on Mac, Linux and Windows. Except for Linux, the original Apple usbmux is available in Mac and Windows when installing iTunes/Xcode, therefore you may not need to use the open source project. However if you don’t want to install Apple’s iTunes on Windows you may use it.
libimobiledevice/usbmuxd 是一个开源项目,用于在 Mac、Linux 和 Windows 上模拟 OS X 的 usbmux 系统。除了 Linux 外,在安装 iTunes/Xcode 时,原始的 Apple usbmux 在 Mac 和 Windows 上都是可用的,因此您可能不需要使用这个开源项目。但是如果您不想在 Windows 上安装 Apple 的 iTunes,则可以使用它。
When usbmuxd is running (normally started, or stopped as a result of "udev" auto-insertion messages or by systemd) it provides a socket interface in "/var/run/usbmuxd" that is designed to be compatible with the socket interface that is provided on Mac OS X.
当usbmuxd正在运行时(通常是通过"udev"自动插入消息或由systemd停止),它会在"/var/run/usbmuxd"提供一个套接字接口,该接口旨在与Mac OS X上提供的套接字接口兼容。(usbmuxd 可能会以正常启动或者作为 "udev" 自动插入消息的结果而停止,也可能会被 systemd 停止。)
This usbmuxd open source exposes all you may want to know about the usbmux TCP “like” protocol. You can find there all about the ports, endpoints, layers, packet sizes, checksums, negotiations ...
这个开源的usbmuxd揭示了关于usbmux TCP“类似”的协议的所有你想知道的内容。你可以在那里找到有关端口、端点、层级、数据包大小、校验和以及协商等方面的全部信息...
We can confirm the information we got about the Unix socket /var/run/usbmuxd in the source file main.c. This is the code of the socket creation, with “chmod 0666”, meaning that all users can read and write:
我们可以确认关于源文件main.c中Unix套接字/var/run/usbmuxd的信息。这是套接字创建的代码,使用了“chmod 0666”,意味着所有用户都可以读取和写入。
static const char *socket_path = “/var/run/usbmuxd”;
static const char *lockfile = “/var/run/usbmuxd.pid";
..
if(unlink(socket_path) == -1 && errno != ENOENT) {  usbmuxd_log(LL_FATAL, "unlink(%s) failed: %s", socket_path, strerror(errno));  return -1; }
...
listenfd = socket(AF_UNIX, SOCK_STREAM, 0);
...
bzero(&bind_addr, sizeof(bind_addr));
bind_addr.sun_family = AF_UNIX;
strcpy(bind_addr.sun_path, socket_path);
if (bind(listenfd, (struct sockaddr*)&bind_addr, sizeof(bind_addr)) != 0) {  usbmuxd_log(LL_FATAL, "bind() failed: %s", strerror(errno));
return -1;
}
// Start listening if (listen(listenfd, 5) != 0) {  usbmuxd_log(LL_FATAL, "listen() failed: %s", strerror(errno));  return -1;
}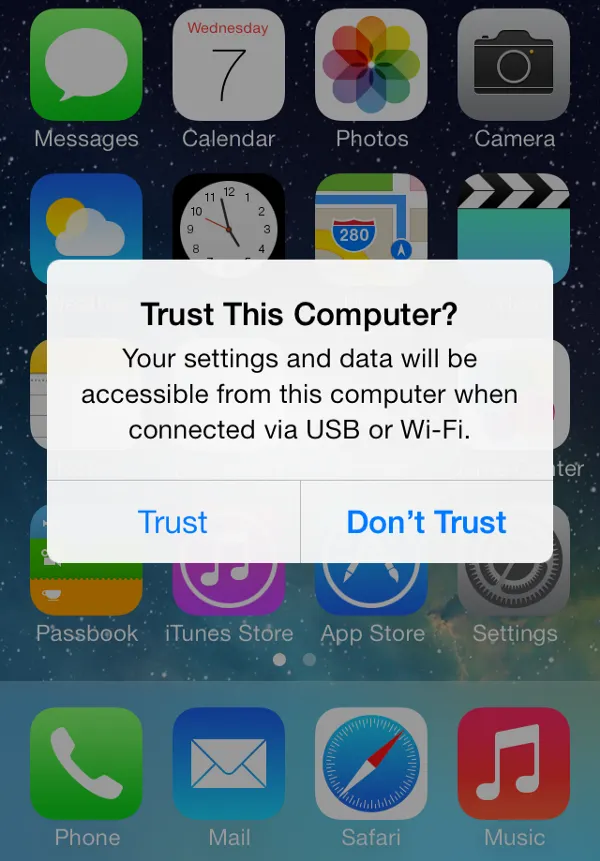
chmod(socket_path, 0666);Another important task of the usbmux is to detect device connections and perform pairing. The counterpart on the iOS side is the lockdown service, which we will cover later on. The pairing is not a transparent process, it requires users approval, this why we get the “Trust” dialog. It happens only once per Host and it didn’t exist until iOS7.
另一个usbmux的重要任务是检测设备连接并进行配对。iOS端的对应服务是锁定服务,我们稍后会介绍。配对过程不是透明的,需要用户批准,这就是为什么会出现“信任”对话框。每个主机只需发生一次,并且在iOS7之前不存在此功能。
According to my tests on Mac, the Trust dialog and the pairing doesn’t take place unless iTunes, Xcode or Photos are running. The usbmux daemon itself dos not launch the Trust process, it seems to manage to stablish a non fully trusted basic communication with the device to gather basic information. It is when an Application in the host wants to access the device that the Trust dialog and the pairing occurs. On Linux instead, the usbmuxd does force the Trust dialog. This means there is some difference between Apple’s and the open source project regarding when to perform the pairing.
根据我在Mac上的测试,除非运行iTunes、Xcode或Photos,否则信任对话框和配对不会发生。usbmux守护进程本身并不启动信任过程,似乎只能与设备建立一个非完全可信的基本通信以收集基本信息。当主机中的应用程序想要访问设备时,才会出现信任对话框和配对过程。而在Linux上,usbmuxd确实强制进行了Trust对话框。这意味着Apple和开源项目之间在何时执行配对方面存在一些差异。
During this process, sets of pairing records are exchanged between the iOS device and computer. Using pairing mechanism computer establishes a trusted relation with iPhone. The pairing records are kept in the folder /var/db/lockdown. You can see the pairing records by listing the directory:
在这个过程中,iOS设备和计算机之间交换了一组配对记录。使用配对机制,计算机与iPhone建立了一个可信任的关系。配对记录保存在文件夹/var/db/lockdown中。您可以通过列出该目录来查看配对记录:
$ sudo ls /var/db/lockdown
Deleting its contents will cause the Trust dialog to appear in the next connection.
删除其内容将导致下次连接时出现“信任”对话框。
The pairing record is a file named after the UDID of the iDevice and would look like this:
配对记录是以iDevice的UDID命名的文件,看起来像这样:
<?xml version=”1.0" encoding=”UTF-8"?><!DOCTYPE plist PUBLIC “-//Apple//DTD PLIST 1.0//EN” “http://www.apple.com/DTDs/PropertyList-1.0.dtd"><plist version=”1.0"><dict>
<key>DeviceCertificate</key>
<data>LS0tLS1CRUdJTiBDRVJUSUZJQ0FURS0tLS0tCk1JSUN1akNDQWFLZ0F3SUJBZ0lCQURB…</data>

This certificate is unique to each device.

<key>EscrowBag</key>
<data>hXUjlCIlve6v92….=</data>

The keybag of EscrowBag contains class keys used to decrypt the device.

<key>HostCertificate</key>
<data>LS0tLS1CRUdJTiBDRVJUSUZJQ0FURS0tLS0tCk1JSUN1akNDQWFLZ0F3SUJBZ0lCQURB…</data>

This certificate is for the host who's paired with iOS devices (usually, the same for all files that you've paired devices with, on your computer).

<key>HostID</key>
<string>5D9462DF-AB7D-486E-823F-B5C19BF3BF80</string>

This is a generated ID for the host.

<key>HostPrivateKey</key>
<data>LS0tLS1CRUdJTiBQUklWQVRFIEtFWS0tLS0tCk1JSUV2Z0lCQURBTkJna3Foa2lHOXcwQkFRRUZBQVND..</data>

This is the private key for your Mac (should be the same in all files on a given computer).

<key>RootCertificate</key>
<data>LS0tLS1CRUdJTiBDRVJUSUZJQ0FURS0tLS0tCk1JSUNyVENDQVpXZ0F3SUJBZ0lCQURB..</data>

This is the certificate used to generate keys (should be the same in all files on a given computer)

<key>RootPrivateKey</key>
<data>LS0tLS1CRUdJTiBQUklWQVRFIEtFWS0tLS0tCk1JSUV2UUlCQURBTkJna3Foa2lHOXcw..</data>

This is the private key of the computer that runs iTunes for that device.

<key>SystemBUID</key>
<string>B0911AB5–84F7–436F-936E-DEA460F6EA3A</string>

This refers to the ID of the computer that runs iTunes.

<key>WiFiMACAddress</key>
<string>e0:33:8e:b1:d7:d9</string>
</dict></plist>

This is the Mac address of the Wi-Fi interface of the device that is paired to the computer. If you do not have an active Wi-Fi interface, MAC is still used while pairing.
On the device side, the pairing records are kept in “/var/root/Library/ Lockdown/pair_records/”. Multiple pairing records are contained if the device is paired with multiple computers. The pairing record contains the SystemBUID, HostID, RootDertificate, DeviceCertificate and HostCertificate.
设备端,配对记录保存在“/var/root/Library/Lockdown/pair_records/”目录下。如果设备与多台计算机配对,则包含多个配对记录。配对记录包括SystemBUID、HostID、RootDertificate、DeviceCertificate和HostCertificate等信息。
With all that information in the device and in the host, the pairing process can find out if the device and the host have alreay been paired (trusted). This trusted relationship grants privileged access to download personal data, install applications, or perform other such tasks on an iOS device.
设备和主机中的所有信息,配对过程可以确定设备和主机是否已经进行了配对(信任)。这种信任关系授予特权访问权限,可以下载个人数据、安装应用程序或在iOS设备上执行其他任务。
On the device side we see another type of records next to the pairing records, the scrow_records, located in “/private/var/root/Library/Lockdown/escrow_records/”.
在设备端,除了配对记录之外,我们还可以看到另一种类型的记录,即存储在“/private/var/root/Library/Lockdown/escrow_records/”目录下的scrow_records。
Here we find an explanation for the escrow pairing https://resources.infosecinstitute.com/ios-forensics/#gref
在这里,我们找到了有关托管配对的解释: https://resources.infosecinstitute.com/ios-forensics/#gref
iTunes can back up and sync with the iPhone even in a locked state using Escrow keybag. It is a copy of class keys and system bag which is used for the encryption in IOS. Access to all classes of data on the device without entering the password can be achieved by keybag.
iTunes可以使用托管密钥包在锁定状态下备份和同步iPhone。它是用于iOS加密的类密钥和系统包的副本。通过密钥包,可以实现在设备上访问所有类别的数据而无需输入密码。
Newly generated key computed from the key 0x835 is protected with Escrow keybag and saved in escrow record on the phone. It is also plist file and located at /private/var/root/Library/Lockdown/escrow_records/
新生成的密钥,由0x835计算得出,并使用托管密钥包进行保护,并保存在手机上的托管记录中。它还是一个plist文件,位于/private/var/root/Library/Lockdown/escrow_records/位置。
These records are protected with UntilFirstUserAuthentication protection class. It further encrypts to user’s passcode. Hence device passcode needs to be entered while first time syncing the phone to iTunes.
这些记录受到UntilFirstUserAuthentication保护级别的保护。它进一步加密到用户的密码。因此,在首次将手机与iTunes同步时需要输入设备密码。
We learned that when a process on the host machine wants to talk to the iPhone, it opens up a connection to the Unix socket /var/run/usbmuxd. How about sniffing it ? We actually can using socat:
我们了解到,当主机上的进程想要与iPhone通信时,它会打开一个连接到Unix套接字/var/run/usbmuxd。那么如何进行嗅探呢?实际上,我们可以使用socat来实现:
$ sudo mv /var/run/usbmuxd /var/run/usbmux_real
$ sudo socat -t100 -x -v UNIX-LISTEN:/var/run/usbmuxd,mode=777,reuseaddr,fork UNIX-CONNECT:/var/run/usbmux_real

When you are done do not forget to:
$ sudo mv /var/run/usbmux_real /var/run/usbmuxd
Socat will print in the terminal the full communication.To dump the log to a file do the following:
Socat会在终端打印完整的通信内容。要将日志转储到文件中,请按照以下步骤操作:
$ sudo socat -t100 -x -v UNIX-LISTEN:/var/run/usbmuxd,mode=777,reuseaddr,fork UNIX-CONNECT:/var/run/usbmux_real > /tmp/usbmuxd.log 2>&1When a device is connected, the usbmuxd starts by sending a “Connect” request with an specific port number. The port always seems to be 32498 (which in correct endian is : 62078) :
当设备连接时,usbmuxd会发送一个带有特定端口号的“Connect”请求。该端口号似乎总是32498(正确的字节序为:62078):
<?xml version=”1 .0" encoding=”UTF-8"?>
<!DOCTYPE plist PUBLIC “-//Apple//DTD PLIST 1.0//EN” “http://www.apple.com/DTDs/PropertyList1.0.dtd”>
<plist version=”1.0">
<dict>
<key>ClientVersionString</key>
<string>usbmuxd-423.206.4</string>
<key>DeviceID</key>
<integer>4</integer>
<key>MessageType</key>
<string>Connect</string>
<key>PortNumber</key>
<integer>32498</integer> /* htonl 62078 */
<key>ProgName</key>
<string>usbmuxd</string>
</dict>
</plist>
The DeviceID is always an integer that usbmuxd has asigned to the device. During an earlier transaction, the usbmuxd has informed about the connected devices, their UDIDs and DeviceIDs. That value will be used later for this Connect command.
设备ID始终是usbmuxd分配给设备的整数。在之前的交互中,usbmuxd已经通知了连接的设备、它们的UDID和DeviceID。该值将在后续的连接命令中使用。
The response from the device would be a “Result 0” if the connection has been accepted:
如果连接被接受,设备的响应将是“Result 0”:
<plist version=”1.0">
<dict>
<key>MessageType</key>
<string>Result</string>
<key>Number</key>
<integer>0</integer>
</dict>
</plist>
A series of Request and Answers follow up :
一系列的请求和应答紧随其后:
REQ: QueryType
RESP: com.apple.mobile.lockdown
REQ: ReadBUID
RESP: The BUID
REQ: ReadPairRecord PairRecorID “a recordID”
RESP: PairRecordData with the Data (PairRecord={DeviceCertificate=xxxx,HostCertificate=xxxx,HostID=xxxx,RootCertificate=xxxx})
REQ: StartSessionfor Host ID
RESP: EnableSessionSSL with Session ID
REQ: Connect to Port Number 32498 /* htonl 62078 */
RESP: Result value 0 if OK
REQ: QueryType
RESP: com.apple.mobile.lockdown
REQ: GetValue ProductVersion
RESP: the iOS version number e.g. 11.4.1
REQ: Connect to Port Number
RESP: Result value 0 if OK
REQ: GetValue ProductName
RESP: “iPhone OS”
Notice that StartSession requires to stablish an SSL protocol.
请注意,StartSession 需要建立SSL协议。
We have learned that the communication is based on plist (xml) records and that it is encrypted, which makes the UNIX socket sniffing not valid for getting the information to reverse engineer the protocol.
我们已经了解到通信是基于plist(xml)记录并且进行了加密,这使得UNIX套接字嗅探无法获取逆向工程协议的信息。
This was an output for an already paired device, let’s see what would be the protocol when the device is not paired. As we said we can force the the host to forget the devices by removing its pairing record in /var/db/lockdown, this way:
这是一个已配对设备的输出结果,让我们看看在设备未配对时会出现什么样的协议。正如我们所说,我们可以通过删除 /var/db/lockdown 中的配对记录来强制主机忘记设备:
$ sudo rm /var/db/lockdown/udid-of-the-device.plistOnly when iTunes or Xcode is running, the connection process will get to the pairing request and the device will respond with a PairingDialogResponsePending, this is when the Trust dialog will appear in the screen:
只有在运行iTunes或Xcode时,连接过程才会进入配对请求,并且设备将以PairingDialogResponsePending的方式响应,这时Trust对话框将出现在屏幕上:
REQ: GetValue DevicePublicKey
RESP: The Public Key data

REQ: Pair with arguments:<PairingOptions ExtendedPairingErrors><DeviceCertificate data> <HostCertificate data><HostID id> <RootCertificate data><SystemBUID id>
RESP: Error PairingDialogResponsePending

The “Trust” Dialog shows on the device screen. Accept.

RESP: Command RelayNotification com.apple.mobile.lockdown.request_pair

REQ: Connect to Port 32498 /* 62078 */
RESP: Result value 0It is amusing, to say the least, that usbmuxd and charging are related. Stoping the usbmuxd deamon will cause that the connected iPhones will not get charged.
说实话,usbmuxd和充电之间的关系确实有趣。停止usbmuxd守护进程将导致连接的iPhone无法充电。
Apple must have decided that any USB connection which does not perform a approved connection and pairing with the device, it will not be accepted, not even the icomming electricity is welcome.
苹果可能已经决定,任何未经批准与设备进行连接和配对的USB连接都将被拒绝,即使传入的电力也不受欢迎。
You may experience it yourself. To stop the usbmuxd daemon on Mac:
你可以亲自体验一下。在Mac上停止usbmuxd守护进程:
$ sudo launchctl unload /System/Library/LaunchDaemons/com.apple.usbmuxd.plist

Catalina:
$ sudo launchctl unload /Library/Apple/System/Library/LaunchDaemons/com.apple.usbmuxd.plist
To start the usbmuxd back:
重新启动usbmuxd:
$ sudo launchctl load -w /System/Library/LaunchDaemons/com.apple.usbmuxd.plist

Catalina:
$ sudo launchctl load -w /Library/Apple/System/Library/LaunchDaemons/com.apple.usbmuxd.plistAfter this introduction to the fundamentals of usbmux, a programmer’s logic tells that there must be an API for Applications to communicate through the usbmux. Once again the iphonewiki.com gives information a about a library that seems to be the API we are looking for:
在对usbmux的基础知识进行介绍之后,程序员的逻辑告诉我们,必须有一个应用程序可以通过usbmux进行通信的API。再次查阅iphonewiki.com网站提供了关于一个看起来就是我们正在寻找的API库的信息。
MobileDevice Library is used by iTunes to transfer data between iPhone and computer over both USB and WiFi connections.
MobileDevice Library 是 iTunes 用来在 iPhone 和电脑之间通过 USB 和 WiFi 连接传输数据的工具。
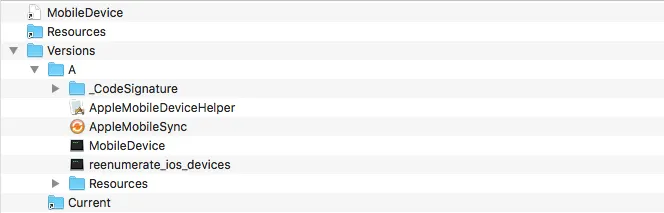
Having a look at the composition of MobileDevice we find that it is a framework composed of several binaries, with a main dylib and some utility executables. Some of those applications can actually be executed in the terminal, but we are going to focus in the MobileDevice dylib.
MobileDevice的组成结构包括几个二进制文件,其中有一个主要的动态库(dylib)和一些实用程序可执行文件。其中一些应用程序实际上可以在终端中执行,但我们将重点关注MobileDevice动态库。
We can find a reverse engeneered MobileDevice.h at [https://pewpewthespells.com/media/MobileDevice.h][] and does seem to contain the functions that iTunes would need to connect and communicate with an iDevice. Here some of the functions:
我们可以在https://pewpewthespells.com/media/MobileDevice.h找到一个逆向工程的 MobileDevice.h 文件,它似乎包含了iTunes连接和与iDevice 通信所需的函数。以下是其中一些函数:
mach_error_t AMDeviceConnect(struct am_device *device);

int AMDeviceIsPaired(struct am_device *device);

mach_error_t AMDeviceValidatePairing(struct am_device *device);

mach_error_t AMDeviceStartSession(struct am_device *device);

mach_error_t AMDeviceStartService(struct am_device *device, CFStringRef service_name, service_conn_t *handle, unsigned int *unknown);

mach_error_t AMDeviceStartHouseArrestService(struct am_device *device, CFStringRef identifier, void *unknown, service_conn_t *handle, unsigned int *what);

mach_error_t AMDeviceStopSession(struct am_device *device);
int socketForPort(struct am_restore_device *rdev, unsigned int portnum);
int sendCommandToDevice(struct am_recovery_device *rdev, CFStringRef cfs, int block);
int sendFileToDevice(struct am_recovery_device *rdev, CFStringRef filename);
There is actually an open source project that uses the undocumented API of MobileDevice.framework to build command lines tools to communicate with the devices, this project is called mobiledevice
实际上有一个开源项目使用了 MobileDevice.framework 的未记录API来构建命令行工具与设备进行通信,这个项目被称为 mobiledevice:
This project uses the MobileDevice.framework therefore is only Mac compatible. This open source counterpart and crossplarform sulution is libusbmuxd.
这个项目使用MobileDevice.framework,因此只能在Mac上运行。这个开源的替代方案和跨平台解决方案是libusbmuxd:
So far we have seen the two basic building blocks of the communciation with iDevices, the system usb multiplexer daemon (usbmuxd) that implements a TCP like protocol trhough the USB, and the API to build host applications that would operate the divices (libusbmuxd). We know as well that the protocol is based in xml messages.
到目前为止,我们已经看到了与iDevices通信的两个基本构建模块,即实现通过USB进行类似TCP协议的系统USB多路复用守护程序(usbmuxd)和构建操作设备的主机应用程序的API(libusbmuxd)。我们也知道该协议是基于XML消息。
At this point we could start writing applications that could communicate with the devices, given we’d know what messages to send.
在这一点上,我们可以开始编写能够与设备通信的应用程序,只要我们知道要发送哪些消息。
Now that we know what is on the host side, it is time to find out what is on the device side.
现在我们知道了主机端有什么,是时候找出设备端有什么了。
lockdownd is a the iOS daemon process in charge of providing iOS system information and access to services. It runs with root privilege.
lockdownd是iOS的守护进程,负责提供iOS系统信息和访问服务。它以root权限运行。
We can find the daemon declaration in /System/Library/LaunchDaemons. The plist is:
我们可以在 /System/Library/LaunchDaemons 中找到该守护进程的声明。plist文件如下:

And this is its content:
这是它的内容:

From that information we can deduce that it opens a TCP socket in localhost:62078, and an UNIX socket in /var/run/lockdown.sock. Those are the ports for clients processes to talk to the lockdown service. The binary is /usr/libexec/lockdown.
从这些信息中,我们可以推断出它在本地主机的62078端口打开了一个TCP套接字,并在/var/run/lockdown.sock上打开了一个UNIX套接字。这些是客户端进程与锁定服务进行通信的端口。该二进制文件位于/usr/libexec/lockdown。
Actually now we can understand why the Connect phase we saw earlier was connecting to port 62078. The Connect command requests to open a connection to lockdown port 62078 in a given DeviceID. Once the connection is granted we can continue communicating with the device.
实际上,现在我们可以理解为什么之前看到的Connect阶段要连接到端口62078。Connect命令请求在给定的DeviceID中打开与锁定端口62078的连接。一旦连接被授予,我们就可以继续与设备进行通信。
Looking in the plist, the UNIX socket seems to be created with privileges 511, which means only root will be able to write to it.
在 plist 文件中查看,UNIX 套接字似乎是以权限 511 创建的,这意味着只有 root 用户才能写入它。
We can confirm that the port 62078 is open:
我们可以确认端口 62078 是开放的:

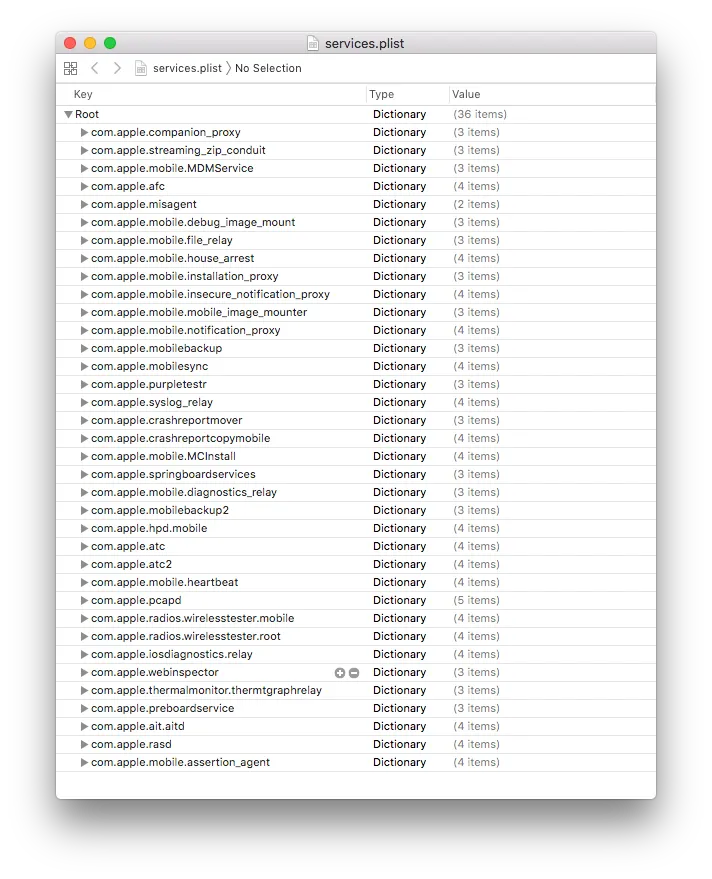
As mentioned, the lockdown service is a gateway to other iOS services. The list of services it offers is described in a /System/Library/Lockdown/Services.plist file. These are the services:
正如前面提到的,锁定服务是其他iOS服务的入口。它所提供的服务列表在 /System/Library/Lockdown/Services.plist 文件中进行描述。以下是这些服务:
There are other services added when the developer image is mounted:
当开发者镜像被挂载时,会添加其他服务。

The iOS services provided by the lockdown are those that applications like iTunes or Xcode need to perform their actions. Once the device pairing is performed, the programs request to the lockdown access to different services to communicate with them.
Lockdown提供的iOS服务是应用程序(如iTunes或Xcode)执行其操作所需的服务。一旦设备配对完成,程序会请求访问Lockdown以使用不同的服务进行通信。
Here some examples of services:
以下是一些示例:
com.apple.mobile.house_arrest
house_arrest is used by iTunes to transfer documents to and from an iOS device for apps that support this functionality. This is also used by Xcode to assist in the transfer of test data to a device while an app is in development.
house_arrest是iTunes用来在支持此功能的应用程序之间传输文档的。这也被Xcode用于在应用程序开发过程中将测试数据传输到设备上。

com.apple.mobile.installation_proxy
To install unistall apps on the device.

com.apple.debugserver
Launch iOS apps in debug mode.

com.apple.mobile.screenshotr
Service to request screenshots.

com.apple.mobilesync
Used by iTunes to transfer address book, Safari bookmarks, notes, and other information that the user has selected to sync with their desktop machine.

com.apple.afc
This service is often used to access the user’s camera reel, photo album, music, and other content stored in the/ var/mobile/Media folder on the device.
此服务经常用于访问用户设备中/var/mobile/Media文件夹中存储的相机胶卷、照片库、音乐和其他内容。

And others you can details in the great article:https://www.zdziarski.com/blog/wp-content/uploads/2014/08/Zdziarski-iOS-DI-2014.pdf
Let’s see an example of how Xcode requests a connection to the installation proxy service:
让我们看一个示例,了解Xcode如何请求连接到安装代理服务:
<?xml version=”1.0" encoding=”UTF-8"?>
<!DOCTYPE plist PUBLIC “-//Apple//DTD PLIST 1.0//EN” “http://www.apple.com/DTDs/PropertyList-1.0.dtd”>
<plist version=”1.0">
<dict>
<key>Label</key>
<string>xcodebuild</string>
<key>ProtocolVersion</key>
<string>2</string>
<key>Request</key>
<string>StartService</string>
<key>Service</key>
<string>com.apple.mobile.installation_proxy</string>
</dict>
</plist>
Bellow is the response from the lockdown service, the service has been started and the socket port it has opened is 50261 (=21956). Subsequent requests to the installation_proxy must be performed in that port.
以下是来自 lockdown 服务的响应,该服务已启动,并且它打开的套接字端口为50261(=21956)。对于安装代理的后续请求必须在该端口上执行。
<?xml version=”1.0" encoding=”UTF-8"?>
<!DOCTYPE plist PUBLIC “-//Apple//DTD PLIST 1.0//EN” “http ://www.apple.com/DTDs/PropertyList-1.0.dtd”>
<plist version=”1.0“>
<dict>
<key>Port</key>
<integer>50261</integer> /*21956*/
<key>Request</key>
<string>StartService</string>
<key>Service</key>
<string>com.apple.mobile.installation_proxy</string>
</dict>
</plist>
50261(=21956)is actually a TCP port that has been created in the iOS device. We can stablish a communication with that port from an external computer sending the Connect command we saw earlier, specifying the port and the device ID.
50261(=21956)实际上是在 iOS 设备中创建的一个TCP端口。我们可以从外部计算机发送之前看到的连接命令,指定端口和设备ID来与该端口建立通信。
If we see the “Connect” command as a generic tool to connect to any iOS port, it opens up some interesting possibilities.
如果我们将“Connect”命令视为一个通用工具,可以连接到任何iOS端口,那么就会有一些有趣的可能性。
In practice it is possible to create a socket server in a free port from an iOS App and to connect to it from the host machine sending the following command via the /var/run/usbmuxd Unix socket (File Descriptor):
实际上,可以在iOS应用程序中创建一个套接字服务器,并通过/var/run/usbmuxd Unix套接字(文件描述符)发送以下命令来从主机机器连接到它的空闲端口:
<?xml version=”1 .0" encoding=”UTF-8"?>
<!DOCTYPE plist PUBLIC “-//Apple//DTD PLIST 1.0//EN” “http://www.apple.com/DTDs/PropertyList1.0.dtd”>
<plist version=”1.0">
<dict>
<key>ClientVersionString</key>
<string>usbmuxd-423.206.4</string>
<key>DeviceID</key>
<integer>4</integer>
<key>MessageType</key>
<string>Connect</string>
<key>PortNumber</key>
<integer>My port</integer>  <--- The port number (with endian transform htonl)
<key>ProgName</key>
<string>usbmuxd</string>
</dict>
</plist>If you liked it, you can Star the Organismo-iOS-Driver Github repository and this article. :)
如果你喜欢的话,可以给Organismo-iOS-Driver Github仓库和这篇文章点个赞。 :)