Following the instructions below and using the latest release of this project you can create a simple Arduino-based adapter to use Xbox 360, Xbox One, PS3 and PS4 controllers with an original Xbox console.
This is an adaptation/fork of Ryzee119's excellent four-way wired/wireless controller adapter to allow the use of Xbox One and Xbox 360 controllers (wired and wireless) on an original Xbox console.
The objectives of this project were:
- A simple hardware build, using only off-the-shelf parts (at present, an Arduino Leonardo paired with a generic USB Host Shield).
- Simple soldering. A no solder version is possible if using the right choice of USB Host Shield.
- Reduced, simpler code to make playing around with it as straightforward as possible.
- Reduced functionality, reflecting the simpler code. Only wired controllers are supported and Steel Battalion emulation is not.
- Support for additional controllers (so far, PS3 & PS4 controller support has been added).
- To provide full, foolproof instructions to enable anyone who's broadly comfortable with an Arduino to make an adapter and anyone who is broadly comfortable with the command line and IDEs to edit and build the code. So this document is a key part of the project.
This started when I dusted off my old Xbox and wanted to make something to use newer controllers with it. There's plenty of previous work on this and as I develop this document I'll link to more and more of it, but even with some experience of AVR and PIC programming it was a bit of a slog working out how to do it. The two biggest barriers were the complexity of some of the projects out there and/or getting them to build using reliable, free/open-source tools.
A significant factor in basing this project on ogx360 rather than XBOXPadMicro/XInput (see below) was that it was possible to clone, edit, and build without too much fighting with tools/IDE(s). The ogx360 project was originally built in Atmel/Microchip Studio which is Windows only (I could have lived with this) but it kept causing my mouse pointer to stall every 60 seconds (I really couldn't) because it apparently fears some USB mice. This project started out with VSCode.
Even better, ogx360 has been transitioned to Platform IO and this project has followed suit. The old VSCode/CMake tools branch can be found at cmake_master and was used up to release 1.2.
Another important factor was starting with something which included the Xbox console's vendor-specific challenge/response values (see 'Alternatives & other projects to look at' below for more on this).
Release 1.3 differs from ogx360 as follows:
- Support for Xbox One and Xbox 360 wireless controllers has been removed.
- Support for multiple controllers has been removed. It supports a single controller connected via USB.
- Steel Battalion support has been removed, resulting in a smaller binary (and space for more controllers to be supported).
- PS3 controller support (via USB) has been added.
- PS4 controller support (via USB) has been added.
- Basic motion controls, using PS3/4 controllers is implemented.
- Motion controls can be enabled/disabled (PS + R2)
- Motion control sensitivity can be set (PS + R1) - crude, and definitely beta.
- The code supports an OLED screen displaying rumble/motion status.
- Replacement STL files for 3D printing a case have been added. For now, these assume use of an OLED screen. A non-OLED case to follow.
- The non-OLED release isn't properly tested. Consider beta for now.
These are broadly the priorities for now, not necessarily in order:
- Add instructions for building with an Arduino Pro Micro and mini USB Host Shield. This won't be a no-solder option but will be more compact. Thanks to Phantom8 for some really useful help with this already.
- Improving this document. The current build instructions rely on using VS Code (a command line only option will follow) and don't fully cover MacOS or cover Windows at all.
- Adding some scripts to make flashing the binary easier.
The OLED version currently uses 98% of the Leonardo's flash so it won't be possible to add further controllers without removing something else. Since removing the OLED only frees up about 9% of the flash, changes to the code will probably be limited to bug fixes and minor improvements, e.g. to the motion sensitivity options. I'm beginning to look at other microcontrollers to provide for significant additional functionality.
For now, these instructions cover using a 'full size' Arduino Leonardo and USB Host Shield. You could get it working with an Arduino Micro, Pro Micro (set to run on 5V at 16Mhz) with a little adaptation and I'll add instructions for this in due course. Using a Leonardo is the simplest way, however.
- An Arduino Leonardo/clone. Make sure it has the ICSP pin header (the separate, 6 pin header in the rear/centre). All those I could see on a quick skim of Amazon and eBay seemed to have one but I've seen references online to clones which do not.

- A standard size USB Host Shield (i.e. not one designed for a Pro Micro/Mini). Again, make sure this has the ICSP socket/header on the underside:

- If you'd prefer to avoid soldering altogether, also ensure your choice of shield comes with the power supply pads pre-soldered. Mine, made by ARCELI, did not but it's the work of minutes if you're comfortable with soldering iron. Amazon (in the UK, at least) has an unbranded alternative (for about twice the price!) with the pads pre-soldered. These are the three pads:

- A USB-A female to Xbox Controller male/plug adapter. These are a few £/$ on eBay and a better choice than hacking apart an Xbox peripheral
- A total of two micro USB cables. Most Leonardos come with one.
- One SSD1306-based 128x32 OLED screen. These are available cheaply on Amazon or eBay.
- Four wires (<10cm 4 way ribbon cable is ideal).
- (Optional) A four way (or equivalent, e.g. 4 x 1 way) dupont connector. Alternatively the wires can be soldered onto the OLED direct.
- (Optional) heatshrink.
- (Optional) Another Arduino (Uno/Leonardo/Micro/Pro Micro) and some male to female jumper wires to re-flash the bootloader onto the Leonardo if something goes wrong when using Avrdude. If you follow the instructions and - in particular - are very careful to (re-)produce the Avrdude command correctly, it won't. You could of course use a dedicated AVR hardware programmer for this if you have one.
- Check whether the pads need soldering on your USB Host Shield using the image above.
- If they're not, this is a decent tutorial on soldering jumper pads though there are several on YouTube which may be better if you're not confident with a soldering iron.
- Plug the USB Host Shield into the Leonardo.
- If you're not adding an OLED, you're done.
- Proper instructions to follow. In short, the wires need to be soldered to the underside of the Leonardo and then soldered/connected using a dupont connector to the OLED.
Notes:
- This section covers the process for Ubuntu/Debian and will be expanded with more detail and MacOS instructions soon. I'll get round to Windows eventually but for now the process is well explained in one of the ogx360 readmes.
- The flash script under /Firmware was written for my own convenience and may need adapting to your own setup - don't run it without checking! Use the method below.
We need to use Avrdude for this, rather than the Arduino IDE. Generally when you flash code onto an Arduino with the IDE it appears to a connected host (e.g. a PC) as a serial device, as this is a feature of the pre-flashed bootloader. Some Leonardos come with a version of the bootloader which makes it appear as a keyboard/mouse device and there are plenty of Leonardo-based projects which make use of this. In any case, neither of these is what we need and the Arduino IDE can't help us.
No special hardware (e.g. a programmer) is needed.
- Open two terminal windows/panes
- In one command prompt type
sudo apt-get update && sudo apt-get install avrdude - Get the latest version of the binary (sxbca.bin)
- In one terminal type in
dmesg -wH - Plug in the Leonardo via USB and you should see some dmesg output about it. If the Leonardo has the standard bootloader installed it will appear as a composite keyboard and mouse. If it has the alternative Caterina bootloader installed it will appear as an Arduino device. It doesn't matter which.
- Note the serial port the Arduino is connected to. In my case it's always /dev/ttyACM0
- In the second terminal window, navigate to where the sxbca.bin file is stored and - without pressing Enter - type in the following line, changing the name of the serial port if needed:
avrdude -p atmega32u4 -P /dev/ttyACM0 -c avr109 -U flash:w:sxbca.bin -C /etc/avrdude.conf'
- Press the reset button on the Leonardo and when you see the dmesg output register a new USB device hit 'Enter'. Avrdude will then flash the firmware. You should have eight seconds from pressing the reset button before the Arduino reverts to its normal state. When this happens, you'll see it again in dmesg. You can just press the reset button again if this happens.
- All done. Plug an Xbox One/360/PS3/PS4 controller into the USB Host Shield and the Leonardo into the Xbox console and everything should work.
Note - the correct command for MacOS is probably the following but this will be tested/confirmed soon.
avrdude -p atmega32u4 -P /dev/ttyACM0 -c avr109 -U flash:w:sxbca.bin -C /usr/local/Cellar/avrdude/6.3_1/etc/avrdude.conf'
- For the most part, just plug the device into the Xbox via the micro-USB port and the controller into the device via the USB-A port.
- Holding XBOX/PS+L2 enables rumble, unless you've compiled a version which doesn't support it by amending the relevant line in settings.h. You know if you've done this.
- If you're using rumble, plug the device into a wall PSU which supplies 7V-12V using the Leonardo's power socket. If you don't, then it will likely freeze when rumble takes place as the power draw is too high.
- If you remove external power while using the device with a PS controller, press the reset button. During my testing so far the PS controllers are clever enough not to start charging themselves if there is no external power (the voltage on USB VCC can drop below 4V with a PS controller connected). However, they don't always stop charging if external power is removed and this will stress the device.
- Holding PS+R2 enables/disables motion controls. Tip the controller forward to mimic right stick up, back to mimic right stick down. Roll the controller to mimic right stick right, roll left for right stick left. There are improvements to be made here but it works reasonably well.
- Holding PS+R1 sets the sensivity of the motion controls but the effect is, for the time being, subtle. What's happening is the device changes the angle of the controller (in any direction) which it considers to be equivalent to pressing the stick fully in the respective direction. High sensivity = 30deg, medium=45deg, low=60deg. It's not great and what I really need to do here is apply a curve to the input.
- Motion controls and the right stick can be used at the same time.
- With no feedback from the software this is never going to be like playing Splatoon, but I do intend to get it to the point where it's a sneaky way of lining up headshots in Halo.
If you want to get the Leonardo back to its stock state for whatever reason, just follow the same process as above but point Avrdude to the bootloader file which comes with the Arduino IDE. Where this is will depend on where the Arduino IDE is installed. Within the Arduino IDE folder on my (Ubuntu) system it was here:
XXXXX/arduino-1.8.12/hardware/arduino/avr/bootloaders/caterina/Leonardo-prod-firmware-2012-12-10.hex
My Arduino IDE folder contains an older version of the firmware (Leonardo-prod-firmware-2012-04-26.hex) - I'm not sure what the difference is. It also contains an alternative firmware - Caterina-Leonardo.hex - which when loaded on the Arduino makes it appear as an Arduino device rather than a keyboard/mouse.
This time, when you first plug the Arduino in it will appear in the dmesg output as a gamepad device. When you press the reset button it will appear again as an Arduino device.
Something 'going wrong' could mean:
- You time the flashing incorrectly, when the Leonardo is not in the right mode (achieved by pressing reset). However, I have done this accidentally and it's been fine. Several tutorials elsewhere warn about this however.
- You made a typo in the Avrdude command. E.g. Avrdude erases the flash before looking for the hex/bin file you point it towards. So if you make a typo in 'sxbca.bin' it will cheerfully erase your Arduino and leave it at that. It's hard to imagine anyone being daft enough to do this and then getting into a mild panic when they connect the device to the Xbox, it doesn't work, and they assume it's a consequence of refactoring code at 3am but it could happen...
In these and other cases you won't be able to flash the firmware properly with Avrdude (it either doesn't run, or does run but the device doesn't work). You also won't be able to load sketches with the Arduino IDE. You'll therefore need either another Arduino to use as an ISP (In System Programmer) or a hardware programmer. If you own a hardware programmer you probably don't need any help with this.
You can use either an Uno or any Arduino based on the atmega32u4 (Leonardo, Micro, Pro Micro - probably others). This page has a comprehensive explantion of how to do this. Although I refer below to soldering an ISP, you can make one perfecly well with jumper leads
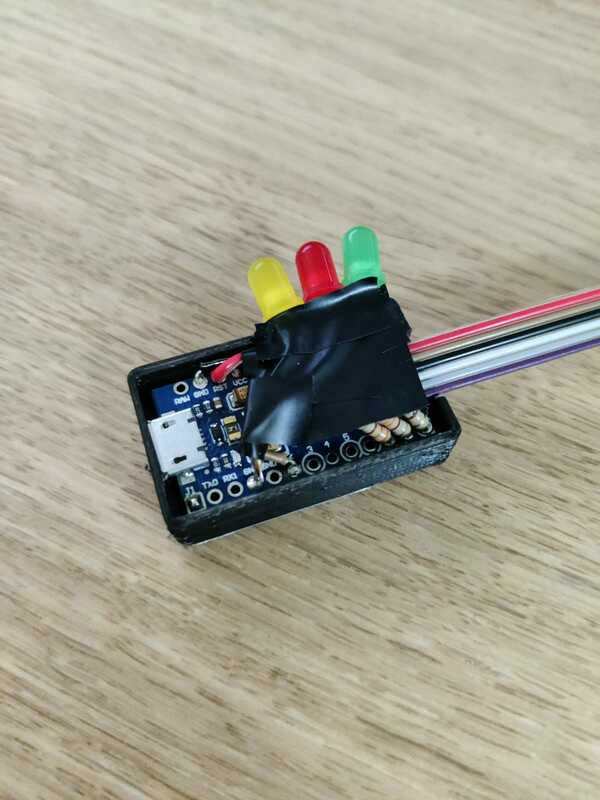
Recognising the likelihood that I'd screw up the flashing process at some point, before I started this project I soldered together a permanent ISP based on an Arduino Pro Micro clone, based on the instructions here (these actually cover doing it with a breadboard but the principles are the same).
The main takeaway from this tutorial is that when using a Pro Micro rather than an Uno you need to change the value of the RESET pin in the ISP sketch. Otherwise it's the pretty much the same. If you plan to play around with the code in this project or related ones (see below) making a permanent ISP is well worth doing. Using a Pro Micro and by soldering the LED resistors to the LED legs you can make something very compact:
- Ryzee119's ogx360 project, on which this is based.
- Uses up to four Arduino Pro Micros to provide up to four emulated original Xbox controllers, connected via a custom PCB to a MAX3421 USB Host Controller IC (the same IC used in Arduino USB Host Shields).
- Unfortunately, the MAX3421 is not (to the very best of my knowledge) available in a through-hole package making it tough work for a hobby project. Some people laugh in the face of surface mount soldering; I am not amongst them.
- Note: You can actually flash the ogx360 master binary to a Leonardo/Pro Micro following the instructions above and it just works with a wired controller. This doesn't seem to be documented in the otherwise comprehensive readmes. As this firmware has rumble enabled you may well find it hangs the device when rumble is activated for any length of time if you apply it to this hardware build rather than Ryzee119's.
- Another Ryzee199 project pretty much meets the aims of this one (simple, no soldering, other controller support) but relies on the Teensy 4.1. This works with the Arduino IDE, PlatformIO etc but is a more expensive option, reflecting the fact the board has an integral USB host, SD card, ethernet support etc. and a 32bit processor. But very straightforward.
- The XBOXPadMicro project allows for a customised controller to be built to work with a classic Xbox Console, using an Arduino's digital input pins.
- Doesn't include any USB host functionality, so you can't plug another controller into it. It has everything you need to build/adapt a custom controller, however. I plan to use this to get a TAC-2 working with PC/Xbox. Nobody needs more than one button, as the Amiga port of Street Fighter 2 demonstrated...
- It's written in C and would need some work to adapt it for use with the broader Arduino ecosystem, allowing it to be adapted for use with USB controllers.
- The Arduino XInput library has everything needed to build a project to make an Arduino appear as an Xinput controller (the protocol used by the Xbox, successor consoles and Windows) except the vendor-specific HID challenge/response code needed to work with an actual Xbox console. So it will work with Windows/Linux/Mac but not the console itself.
- This project and both of Ryzee119's use the Arduino USB Host Shield Library to handle communication between the device and the Xbox One/360 controller. The speed with which you can pick up an Arduino, a shield and have a PS4/Xbox One/360/etc. controller talking to Linux/Windows/Mac via serial is really impressive. It's well supported and has support for a wide range of USB controllers, including great example sketches.
This covers MacOS/Linux (Ubuntu). Some of it holds for Windows (VSCode, Platform IO) but the instructions for installing and using Avrdude differ. More to follow.
- From a command prompt run:
sudo apt-get install avrdude git
- From a command prompt run:
xcode-select --install
brew tap osx-cross/avr
brew install avrdude
- Download and install Visual Studio Code here: https://code.visualstudio.com/download
- Open VS Code, click on the 'extensions' icon on the left hand side and install 'Platform IO. Open and close VS Code to finalise install.
- Clone this project to an appropriate location with 'git clone https://github.com/jimnarey/SimpleXboxControllerAdapter'
- Access the Platform IO home tab by clicking the (very small) Platform IO icon on the bottom bar of the VS Code window.
- Select 'Open Project' and point the folder selection window at the cloned repo.
- Click the tick icon in the bottom bar of the VS Code window.
- Clicking the arrow button, to upload the code, doesn't work without a bit of further config. I need to do a bit of digging into this but for now use Avrdude, which is how the original CMake version of this project was flashed and is more robust.
When adding PS3 controller support I used the Leonardo's second UART/Serial port ('Serial1' in the Arduino library) for debugging. This can be accessed on pins 20 and 21. You'll need an inexpensive USB to serial module to connect it to a PC/Mac. You can then open the Arduino IDE, point it to the correct serial port (in my case /dev/ttyUSB0) and start the Serial Monitor. On Ubuntu (at least) using 'screen' is more convenient - install with sudo apt-get install screen.
The lines for initialising Serial1 are in main.cpp and commented out in most commits. Assuming you uncomment these and don't change the baud from 9600, you'd then start screen with the following, amending the name of the serial port if necessary:
screen /dev/ttyUSB0 9600
There is almost no space left on the ATmega32u4's flash with the current build so it may be necessary to remove support for one or more controllers in order to add in support for others.
Adding PS3 and PS4 controller support involved the following:
- Adding an #include for the PS3USB/PS4USB library
- Instantiating the PS3USB/PS4USB class using the same format as the existing Xbox controller classes (pass it a pointer to the 'USBHost' object)
- Adding a check for whether a PS3/PS4 controller is connected to controllerConnected()
- Reproducing the calls to the two Xbox controller classes in getButtonPress() and getAnalogHat()
- When only some buttons worked, using the output from Serial1 (via the USB to serial module) to see what was coming back from the controller by adding temporary code to the main loop, e.g.
if (PS3Wired.PS3Connected) {
    Serial1.println(PS3Wired.getButtonPress(R2));
}
- Adding lines like this for one button at a time makes it much easier to make sense of the serial output
- Making necessary changes to the values returned from the controller. For example, the Xbox expects a value from each axis on each analog stick between -32768 and 32767 - so a signed 16bit int. The PS3 and PS4 controller each provides an unsigned 8bit int instead: 0 - 255. The lines of code which deal with this are commented. The face buttons also needed remapping to their physical counterparts on the Xbox controller.
Thanks to Ryzee119 for helping resolve some (to me) incomprehensible linker errors when trying to import the PS4 library for the first time.
I have since tested importing and instantiating the classes for Bluetooth, Wii controllers and general HID controllers so making use of these should be possible without any additional dependencies being used. However, all of these together with the current functionality resulted in a 43K binary, so they can't all be used together.