![]()
Loops is a JupyterLab extension to support iterative and exploratory data analysis in computational notebooks.
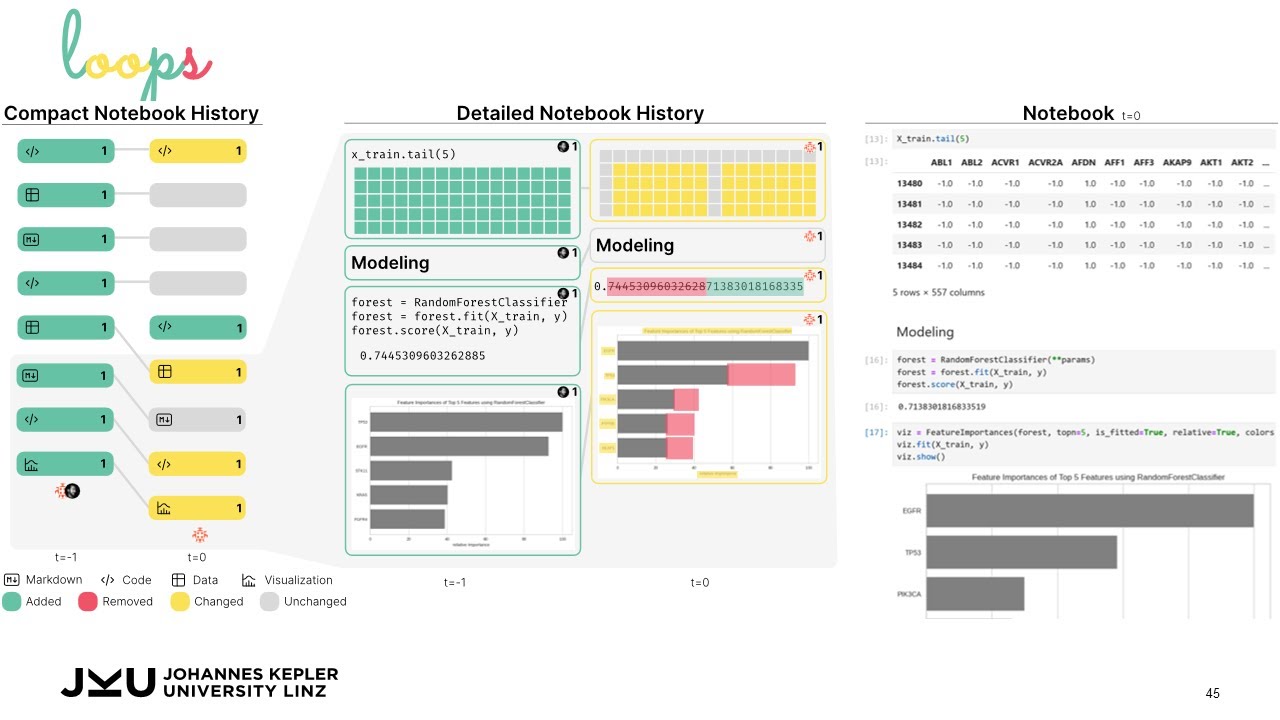
Loops automatically tracks the notebook's history and visualizes it next to the notebook. Loops shows the evolution of the notebook over time and highlights differences between versions to reveal the impact of changes made within a notebook. Loops visualizes differences in code, markdown, tables, visualizations, and images. For a quick overview of loops, see our preview video on YouTube:
Try loops yourself on Binder with two example notebooks for which the analysis process has been recorded. Loops is part of JuypterLab's sidebar and can be opened from there.
- Use Case 1: Concert Data Analaysis
- Use Case 2: What-If Analysis on Cancer Patient Data
The Use Case data and notebooks are also available on OSF to try loops in a local environment (see Usage).
To learn more about loops, read our paper.
Abstract:
Exploratory data science is an iterative process of obtaining, cleaning, profiling, analyzing, and interpreting data. This cyclical way of working creates challenges within the linear structure of computational notebooks, leading to issues with code quality, recall, and reproducibility. To remedy this, we present Loops, a set of visual support techniques for iterative and exploratory data analysis in computational notebooks. Loops leverages provenance information to visualize the impact of changes made within a notebook. In visualizations of the notebook provenance, we trace the evolution of the notebook over time and highlight differences between versions. Loops visualizes the provenance of code, markdown, tables, visualizations, and images and their respective differences. Analysts can explore these differences in detail in a separate view. Loops not only improves the reproducibility of notebooks but also supports analysts in their data science work by showing the effects of changes and facilitating comparison of multiple versions. We demonstrate our approach's utility and potential impact in two use cases and feedback from notebook users from various backgrounds.
Requires JupyterLab >= 4.0.0.
You can install loops with JupyterLab's extension manager:

Or from the command line using pip:
pip install loops-diffYour comments and feedback are welcome. Write an email to klaus.eckelt@jku.at and let us know what you think!
If you have discovered an issue or have a feature suggestion, feel free to create an issue on GitHub.
Klaus Eckelt, Kiran Gadhave, Alexander Lex, Marc Streit.
Loops: Leveraging Provenance and Visualization to Support Exploratory Data Analysis in Notebooks.
OSF Preprint, doi:10.31219/osf.io/79eyn, 2024.
@article{2024_loops,
    title = {Loops: Leveraging Provenance and Visualization to Support Exploratory Data Analysis in Notebooks},
    author = {Klaus Eckelt and Kiran Gadhave and Alexander Lex and Marc Streit},
    journal = {OSF Preprint},
    doi = {10.31219/osf.io/79eyn},
    url = {https://doi.org/10.31219/osf.io/79eyn},
    year = {2024}
}
There are two ways to set up loops for development:
- with VS Code devContainers (recommended), which sets up Jupyter and the dependencies in a container.
- with a local setup, the default way for JupyterLab extension. Works with every code editor.
- VS Code
- Dev Containers extension for VS Code
- Docker
See the official Dev Containers Tutorial for more detailed instructions and alternatives.
A devcontainer.json file is provided that uses the official scipy-notebook container for development (includes JupyterLab, numpy, pandas, matplotlib, seaborn, altair, scikit-learn, and more).
With the above requirements fullfilled, you will see the following popup when opening this project in VS Code:

Alternatively, you can also reopen the project in a devcontainer via the command prompt:

By reopening in the container, you will get an environment with Jupyter Lab and the packages from the docker image and it will also install all dependencies of the extension as well as the extension itself. Therefore, this process will take a while when doing it for the first time. You can watch the set up process by opening the log in the terminal. When the extension is installed, the terminal should look similar to this:

All you need to do, is running jlpm watch in the VS Code terminal afterwards so that the extension gets updated when you make code changes.
The terminal can also be used to add further python packages.
Note: You will need NodeJS to build the extension package.
Tested with Node 18 and Python 3.9
You also may want to create a virtual environment, i.e.
python -m venv env
source env/bin/activate

# Install Jupyterlab and any other python packages you want to use
python -m pip install "jupyterlab>=4.0.0"
The jlpm command is JupyterLab's pinned version of
yarn that is installed with JupyterLab. You may use
yarn or npm in lieu of jlpm below.
# Clone the repo to your local environment
# Change directory to the loops directory
# Install package in development mode
python -m pip install -e "."
# Link your development version of the extension with JupyterLab
python -m jupyter labextension develop . --overwrite
# Rebuild extension Typescript source after making changes
jlpm build
You can watch the source directory and run JupyterLab at the same time in different terminals to watch for changes in the extension's source and automatically rebuild the extension.
# Watch the source directory in one terminal, automatically rebuilding when needed
jlpm watch
# Run JupyterLab in another terminal
python -m jupyter lab
With the watch command running, every saved change will immediately be built locally and available in your running JupyterLab. Refresh JupyterLab to load the change in your browser (you may need to wait several seconds for the extension to be rebuilt).
By default, the jlpm build command generates the source maps for this extension to make it easier to debug using the browser dev tools. To also generate source maps for the JupyterLab core extensions, you can run the following command:
python -m jupyter lab build --minimize=FalseThis extension is using Jest for JavaScript code testing.
To execute them, execute:
jlpm
jlpm testThis extension uses Playwright for the integration tests (aka user level tests). More precisely, the JupyterLab helper Galata is used to handle testing the extension in JupyterLab.
More information are provided within the ui-tests README.
See RELEASE