Ruby Tutorial
For links to translations of this tutorial (Traditional Chinese, Spanish, French) see the Home page.
The code and assets for this example and others can be found in the gosu-examples Ruby gem. Simply gem install gosu-examples and then run gosu-examples.
Every Gosu application starts with a subclass of Gosu::Window. A minimal window class looks like this:
require 'gosu'

class Tutorial < Gosu::Window
  def initialize
    super 640, 480
    self.caption = "Tutorial Game"
  end

  def update
    # ...
  end

  def draw
    # ...
  end
end

Tutorial.new.show
The constructor initializes the Gosu::Window base class to create a 640x480 pixels large window. It also sets the caption of the window, which is displayed in its title bar. You can create a fullscreen window by passing :fullscreen => true after the width and height.
update() and draw() are overrides of methods defined by Gosu::Window. update() is called 60 times per second by default, and should contain the main game logic, such as moving objects around, or testing for collisions.
draw() is usually called 60 times per second, but may be skipped for performance reasons. It should contain code to redraw the whole scene, but no game logic.
Then follows the main program. We create a window and call its show() method, which does not return until the window has been closed by the user or by calling close(). This is the main loop of the game.
A diagram of the main loop is shown on the Window Main Loop page.
require 'gosu'

class Tutorial < Gosu::Window
  def initialize
    super 640, 480
    self.caption = "Tutorial Game"

    @background_image = Gosu::Image.new("media/space.png", :tileable => true)
  end

  def update
  end

  def draw
    @background_image.draw(0, 0, 0)
  end
end

Tutorial.new.show
(At this point, please download space.png and ensure that it can be found at media/space.png.)
Gosu::Image#initialize takes two arguments, a filename and an (optional) options hash. Here we set :tileable to true, see Basic Concepts for an explanation. Basically, you should use :tileable => true for map tiles and background images.
As mentioned in the last section, the window's draw() member function is the place to draw everything, so we override it and draw our background image.
The image is drawn at (0, 0) - the third argument is the Z position; see Basic Concepts for an explanation of Z ordering in Gosu.
Here comes a simple player class:
class Player
  def initialize
    @image = Gosu::Image.new("media/starfighter.bmp")
    @x = @y = @vel_x = @vel_y = @angle = 0.0
    @score = 0
  end

  def warp(x, y)
    @x, @y = x, y
  end

  def turn_left
    @angle -= 4.5
  end

  def turn_right
    @angle += 4.5
  end

  def accelerate
    @vel_x += Gosu.offset_x(@angle, 0.5)
    @vel_y += Gosu.offset_y(@angle, 0.5)
  end

  def move
    @x += @vel_x
    @y += @vel_y
    @x %= 640
    @y %= 480

    @vel_x *= 0.95
    @vel_y *= 0.95
  end

  def draw
    @image.draw_rot(@x, @y, 1, @angle)
  end
end
(Please download starfighter.bmp and ensure that it can be found at media/starfighter.bmp.)
To explain:
-
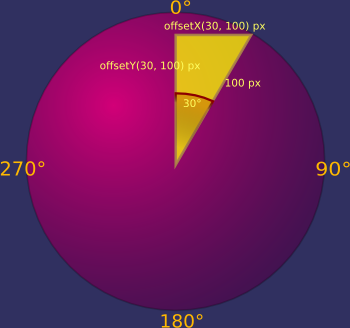
Player#acceleratemakes use of theoffset_x/offset_yfunctions, which are similar to the mathematical sin/cos functions. If something moved 100 pixels per frame at an angle of 30°, it would move byoffset_x(30, 100)(=50) pixels horizontally, and byoffset_y(30, 100)(=-86.6) pixels vertically each frame. - When loading BMP images files, Gosu replaces
#ff00ff(fuchsia/magenta/magic pink) with transparent pixels. - Note that
draw_rotputs the center of the image at (x, y) - not the upper left corner asImage#drawdoes. See the RDoc for the full list of arguments todrawanddraw_rot. - The player is drawn at z=1, i.e. over the background which is drawn with z=0. We'll replace these magic numbers with something better later.
class Tutorial < Gosu::Window
  def initialize
    super 640, 480
    self.caption = "Tutorial Game"

    @background_image = Gosu::Image.new("media/space.png", :tileable => true)

    @player = Player.new
    @player.warp(320, 240)
  end

  def update
    if Gosu.button_down? Gosu::KB_LEFT or Gosu::button_down? Gosu::GP_LEFT
      @player.turn_left
    end
    if Gosu.button_down? Gosu::KB_RIGHT or Gosu::button_down? Gosu::GP_RIGHT
      @player.turn_right
    end
    if Gosu.button_down? Gosu::KB_UP or Gosu::button_down? Gosu::GP_BUTTON_0
      @player.accelerate
    end
    @player.move
  end

  def draw
    @player.draw
    @background_image.draw(0, 0, 0)
  end

  def button_down(id)
    if id == Gosu::KB_ESCAPE
      close
    else
      super
    end
  end
end

Tutorial.new.show
Here we have introduced keyboard and gamepad input.
Similar to update() and draw(), Gosu::Window provides two member functions button_down(id) and button_up(id) which can be overridden. The default implementation of Gosu::Window#button_down lets the user toggle between fullscreen and windowed mode with alt+enter (Windows, Linux) or cmd+F (macOS). Because we want to keep this default behaviour, we call super if the user has not pressed anything that interests us.
In our implementation of button_down, we close the window when the user presses Esc. The list of button constants can be found in the RDoc.
These two callbacks for pressed and released buttons are suitable for one-time events such as using an item. But they are not useful for actions that happen while a button is pressed — for example, moving the player. This is where the Window#update method comes into play, which calls player.move(), which in turn uses Gosu.button_down?(id). This method will return true as long as a button is being held by the player.
If you run the code in this section, you should be able to fly around.
First, we are going to get replace the magic numbers for Z positions with the following constants:
module ZOrder
  BACKGROUND, STARS, PLAYER, UI = *0..3
end
What is an animation? A sequence of images - so we'll use Ruby's built in Array to store them. In a real game, we might want to write a proper Animation class, but the array is good enough for now.
Let's introduce collectible stars, which are the central object of this section. Stars appear out of nowhere at a random position on the screen, and show a rotation animation until collected by the player. The definition of the Star class is simple because it has no logic of its own:
class Star
  attr_reader :x, :y

  def initialize(animation)
    @animation = animation
    @color = Gosu::Color::BLACK.dup
    @color.red = rand(256 - 40) + 40
    @color.green = rand(256 - 40) + 40
    @color.blue = rand(256 - 40) + 40
    @x = rand * 640
    @y = rand * 480
  end

  def draw
    img = @animation[Gosu.milliseconds / 100 % @animation.size]
    img.draw(@x - img.width / 2.0, @y - img.height / 2.0,
        ZOrder::STARS, 1, 1, @color, :add)
  end
end
Since we do not want to load the full animation every time we create a Star, we will pass an existing Animation into its constructor.
To show a different frame of the stars' animation every 100 milliseconds, the time returned by Gosu.milliseconds is divided by 100 and then modulo-ed down to the number of frames. The selected image is then drawn additively, centred at the star's position, and modulated by a random colour that we generated in the constructor.
Now let's add code to the Player class to collect stars:
class Player
  ...
  def score
    @score
  end

  def collect_stars(stars)
    stars.reject! { |star| Gosu.distance(@x, @y, star.x, star.y) < 35 }
  end
end
Now let's extend Window to load the animation, spawn new stars, have the player collect them and draw the remaining ones:
...
class Tutorial < Gosu::Window
  def initialize
    super 640, 480
    self.caption = "Tutorial Game"

    @background_image = Gosu::Image.new("media/space.png", :tileable => true)

    @player = Player.new
    @player.warp(320, 240)

    @star_anim = Gosu::Image.load_tiles("media/star.png", 25, 25)
    @stars = Array.new
  end

  def update
    ...
    @player.move
    @player.collect_stars(@stars)

    if rand(100) < 4 and @stars.size < 25
      @stars.push(Star.new(@star_anim))
    end
  end

  def draw
    @background_image.draw(0, 0, ZOrder::BACKGROUND)
    @player.draw
    @stars.each { |star| star.draw }
  end
  ...
(Please download star.png and ensure that it can be found at media/star.png.)
Done! You can now collect stars.
Finally, we want to draw the current score using a bitmap font, and play a "beep" sound every time the player collects a star. The Window will handle the text part, loading a font that is 20 pixels high:
class Tutorial < Gosu::Window
  def initialize
    ...
    @font = Gosu::Font.new(20)
  end

  ...

  def draw
    @background_image.draw(0, 0, ZOrder::BACKGROUND)
    @player.draw
    @stars.each { |star| star.draw }
    @font.draw_text("Score: #{@player.score}", 10, 10, ZOrder::UI, 1.0, 1.0, Gosu::Color::YELLOW)
  end
end
The Player class will be responsible for keeping track of the score, loading a sound and playing it.
class Player
  attr_reader :score

  def initialize
    @image = Gosu::Image.new("media/starfighter.bmp")
    @beep = Gosu::Sample.new("media/beep.wav")
    @x = @y = @vel_x = @vel_y = @angle = 0.0
    @score = 0
  end

  ...

  def collect_stars(stars)
    stars.reject! do |star|
      if Gosu.distance(@x, @y, star.x, star.y) < 35
        @score += 10
        @beep.play
        true
      else
        false
      end
    end
  end
end
(Please download beep.wav and ensure that it can be found at media/beep.wav.)
See the RDoc for more powerful ways of playing back sounds.
That's it! Everything else is up to your imagination. If you want to see examples of other types of games being written in Ruby/Gosu, take a look at the great projects on the Gosu Showcase board.


- Getting Started
- Tutorials
- In-Depth Documentation
- Deployment
-
Gosu Boards
- Gosu Exchange - Questions? Ask them here.
- Gosu Showcase - Show off your projects.
- Extending Gosu - Libraries that play nicely with Gosu.