![]()
This integration allows you to optimize the use of your solar energy. It controls the switching on and off of your equipment, the activation of which is deferred over time depending on production and current electricity consumption.

- What is Solar Optimizer?
- How does it work?
- How do we install it?
- The configuration
- Available entities
- In addition
- Contributions are welcome!
News
- release 1.3.0:
- added the parameter
duration_stop_minwhich allows to specify a minimal duration of deactivation to distinguish it from the minimal delay of activationduration_min. If not specified, this parameter takes the value ofduration_min.- restores the state of the
enableswitches when the integration starts.- starts a calculation immediately after starting Home Assistant
- release 1.0: first operational version. Control of equipment based on switches, power control (Tesla) and configuration via configuration.yaml.
This integration will allow you to maximize the use of your solar production. You delegate to it the control of your equipment whose activation can be deferred over time (water heater, swimming pool pump, electric vehicle charge, dishwasher, washing machine, etc.) and it takes care of launching them when the power produced is sufficient.
It constantly tries to minimize the import and export of energy by starting, stopping and modifying the power allocated to equipment.
2 types of equipment are managed:
- equipment controlled by a switch (a service in general) which has a fixed and pre-determined power consumption,
- equipment whose power consumption is adjustable (Tesla, Robotdyn). By adjusting the power allocated to this equipment, Solar Optimizer aligns consumption as closely as possible with production.
The ideal is to have at least one piece of equipment whose power is adjustable in the list of equipment managed by Solar Optimizer.
The operation is as follows:
- at regular intervals (configurable), the algorithm simulates modifications to the states of the equipment (on / off / allocated power) and calculates a cost for this configuration. Overall the cost is the
a * imported_power + b * exported_power. The coefficients a and b are calculated according to the cost of electricity at the time of calculation, - the algorithm keeps the best configuration (the one with a minimum cost) and looks for other solutions, until a minimum is reached.
- the best configuration is then applied.
The algorithm used is a simulated annealing type algorithm, a description of which you will find here: https://fr.wikipedia.org/wiki/Recuit_simul%C3%A9
To avoid the effects of flickering from one cycle to another, a minimum activation delay can be configured by equipment: duration_min. For example: a water heater must be activated for at least one hour for the ignition to be useful, charging an electric car must last at least two hours, ...
Similarly, a minimum stop duration can be specified in the duration_stop_min parameter.
Each configured device is associated with a switch-type entity that authorizes the algorithm to use the device. If I want to force the heating of the hot water tank, I put its switch to off. The algorithm will therefore not look at it, the water heater switches back to manual, not managed by Solar Optimizer.
In addition, it is possible to define a usability rule for equipment. For example, if the car is charged at more than 90%, the algorithm considers that the equipment which controls the charging of the car must be switched off. This rule is defined in the form of a configurable template which is True if the equipment is usable.
These 2 rules allow the algorithm to control only what is really useful at a time t. These rules are re-evaluated at each cycle.
- Install HACS. This way you get updates automatically.
- Add this Github repo as a custom repo in HACS settings.
- Find and install "Solar Optimizer" in HACS and click "Install".
- Restart Home Assistant.
- Then you can add the Solar Optimizer integration in the integration page. You can only install one Solar Optimizer integration.
Manual installation is possible. It is not recommended and therefore it will not be described here.
When adding the Solar Optimizer integration, the following settings page opens:
You must specify:
- the sensor which gives the instantaneous net consumption of the dwelling (it must be negative if production exceeds consumption). This figure is indicated in Watt,
- the sensor which gives the instantaneous photovoltaic production in Watt too,
- a sensor or input_number which gives the cost of the imported kwh,
- a sensor or input_number which gives the price of the exported kwh (depends on your contract),
- a sensor or input_number which gives the applicable tax on the exorted kwh (depends on your contract)
These 5 pieces of information are necessary for the algorithm to work, so they are all mandatory. The fact that they are sensors or input_number allows to have values that are re-evaluated at each cycle. Consequently, switching to off-peak hours can modify the calculation and therefore the states of the equipment since the import becomes less expensive. So everything is dynamic and recalculated at each cycle.
Controllable devices are defined in the configuration.yaml file as follows:
-
add the following line in your configuration.yaml:
solar_optimizer: !include solar_optimizer.yaml -
and create a file at the same level as the configuration.yaml with the following information:
algorithm:
   initial_temp: 1000
   min_temp: 0.1
   cooling_factor: 0.95
   max_iteration_number: 1000
devices:
   - name: "<equipment name>"
     entity_id: "switch.xxxxx"
     power_max: <max power consumed>
     check_usable_template: "{{ <the template which is True if the equipment is usable> }}"
     duration_min: <the minimum activation duration in minutes>
     duration_stop_min: <minimum stop duration in minutes>
     action_mode: "service_call"
     activation_service: "<service name>"
     deactivation_service: "<service name>"
Note: parameters under algorithm should not be touched unless you know exactly what you are doing.
Under devices you must declare all the equipment that will be controlled by Solar Optimizer as follows:
| attribute | valid for | meaning | example | comment |
|---|---|---|---|---|
name |
all | The name of the equipment | "VMC basement" | - |
entity_id |
all | the entity id of the equipment to order | "switch.vmc_basement" | - |
power_max |
all | the maximum power consumed by the equipment | 250 | - |
check_usable_template |
all | A template that is True if the equipment can be used by Solar Optimizer | "{{ is_state('cover.porte_garage_garage', 'closed') }}" | In the example, Sonar Optimizer will not try to control the "VMC basement" if the garage door is open |
duration_min |
all | The minimum duration in minutes of activation | 60 | The basement VMC will always turn on for at least one hour |
duration_stop_min |
all | The minimum duration in minutes of deactivation. Is duration_min if not specified |
15 | The basement VMC will always turn off for at least 15 min |
action_mode |
all | the mode of action for turning the equipment on or off. Can be "service_call" or "event" (*) | "service_call" | "service_call" indicates that the equipment is switched on and off via a service call. See below. "event" indicates that an event is sent when the state should change. See (*) |
activation_service |
only if action_mode="service_call" | the service to be called to activate the equipment in the form "domain/service" | "switch/turn_on" | activation will trigger the "switch/turn_on" service on the entity "entity_id" |
deactivation_service |
only if action_mode="service_call" | the service to call to deactivate the equipment in the form "domain/service" | "switch/turn_off" | deactivation will trigger the "switch/turn_off" service on the entity "entity_id" |
For variable power equipment, the following attributes must be valued:
| attribute | valid for | meaning | example | comment |
|---|---|---|---|---|
power_entity_id |
variable power equipment | the entity_id of the entity managing the power | number.tesla_charging_amps |
The power change will be done by calling the change_power_service service on this entity |
power_min |
variable power equipment | The minimum power in watts of the equipment | 100 | When the power setpoint falls below this value, the equipment will be switched off by calling the deactivation_service |
power_step |
variable power equipment | The power step | 10 | - |
change_power_service |
variable power equipment | Service called to change power | "number/set_value" |
- |
convert_power_divide_factor |
variable power equipment | The divisor applied to convert power to value | 50 | In the example, the "number/set_value" service will be called with the power setpoint / 50 on the entity entity_id. For a Tesla on a three-phase electrical installation this parameter should be set to 660 (220 x 3), to convert power to amperes. For mono-phase installation, set it to 220. |
Complete and commented example of the device part:
devices:
   - name: "Reservoir pump"
     # The switch that controls the tank pump
     entity_id: "switch.tank_pump_socket"
     # the power of this pump
     power_max: 170
     # Always usable
     # check_usable_template: "{{ True }}"
     # 15 min minimum activation
     duration_min: 15
     # 5 min deactivation minimum
     duration_stop_min: 5
     # On enable/disable via a service call
     action_mode: "service_call"
     # The service enabling the switch
     activation_service: "switch/turn_on"
     # The service to deactivate the switch
     deactivation_service: "switch/turn_off"

   - name: "Tesla Recharge"
     entity_id: "switch.cloucloute_charger"
     # The minimum load power is 660 W (i.e. 1 Amp because convert_power_divide_factor=660 too)
     power_min: 660
     # The minimum load power is 3960 W (i.e. 5 Amp (= 3960/600) )
     power_max: 3960
     # the step of 660 or 1 Amp after division by convert_power_divide_factor
     power_step: 660
     # Usable if the charging mode is "Solar" and the car is plugged into the charger and it is charged at less than 90% (so it stops by itself at 90%)
     check_usable_template: "{{ is_state('input_select.charge_mode', 'Solar') and is_state('binary_sensor.tesla_wall_connector_vehicle_connected', 'on') and is_state('binary_sensor.tesla_charger', 'on') and states('sensor.tesla_battery ') | float(100) < states('number.cloucloute_charge_limit') | float(90) }}"
     # 1 hour minimum charge
     duration_min: 60
     # 15 min minimum stop charge
     duration_stop_min: 15
     # The entity that drives the load amperage
     power_entity_id: "number.tesla_charging_amps"
     # 5 min minimum between 2 power changes
     duration_power_min: 5
     # activation is done by a service call
     action_mode: "service_call"
     activation_service: "switch/turn_on"
     deactivation_service: "switch/turn_off"
     # the power change is done by a service call
     change_power_service: "number/set_value"
     # the factor used to convert the set power into Amps (number.tesla_charging_amps takes Amps)
     convert_power_divide_factor: 660
...
Any change in the configuration requires a stop / restart of the integration (or of Home Assistant) to be taken into account.
The integration, once properly configured, creates a device that contains several entities:
- a sensor named "total_power" which is the total of all the powers of the equipment controlled by Solar Optimizer,
- a sensor named "best_objective" which is the value of the cost function (see how the algorithm works),
- a switch per equipment named
switch.enable_solar_optimizer_<name>declared in the configuration.yaml. If the switch is "Off", the algorithm will not consider this equipment for the calculation. This allows you to manually remove equipment from the list without having to modify the list. This switch contains additional attributes which make it possible to follow the internal state of the equipment seen by the algorithm.
In addition, the following Lovelace code is used to control each declared device:
# To put at the beginning of the front-end page
decluttering_templates:
  managed_device_power:
    default: null
    card:
      type: custom:expander-card
      expanded: false
      title-card-button-overlay: true
      title-card:
        type: custom:mushroom-template-card
        primary: "{{ state_attr('[[device]]', 'friendly_name') }}"
        secondary: "[[secondary_infos]]"
        icon: "[[icon]]"
        badge_icon: >-
          {% if is_state_attr('[[device]]','is_enabled', True) %}mdi:check{%
          else %}mdi:cancel{% endif %}
        badge_color: >-
          {% if is_state_attr('[[device]]', 'is_usable', True) and
          is_state_attr('[[device]]', 'is_enabled', True) %}green {% elif
          is_state_attr('[[device]]', 'is_enabled', False) %}red {% elif
          is_state_attr('[[device]]','is_waiting', True) %}orange {% elif
          is_state_attr('[[device]]', 'is_usable', False) or
          state_attr('[[device]]', 'is_usable') is none %}#A0B0FF{% else
          %}blue{% endif %}
        entity: "[[device]]"
        icon_color: >-
          {% if is_state('[[device]]', 'on')%}orange{% else %}lightgray{% endif
          %}
        tap_action:
          action: toggle
        hold_action:
          action: more-info
        double_tap_action:
          action: none
      cards:
        - type: custom:mushroom-chips-card
          chips:
            - type: entity
              entity: "[[enable_entity]]"
              double_tap_action:
                action: more-info
              tap_action:
                action: toggle
              hold_action:
                action: more-info
              icon_color: green
              content_info: name
        - type: markdown
          content: >-
            **Prochaine dispo** : {{ ((as_timestamp(state_attr('[[device]]',
            'next_date_available')) - as_timestamp(now())) / 60) | int }}
            min<br> **Prochaine dispo puissance**: {{
            ((as_timestamp(state_attr('[[device]]',
            'next_date_available_power')) - as_timestamp(now())) / 60) | int }}
            min<br> **Utilisable** : {{ state_attr('[[device]]', 'is_usable')
            }}<br> **Est en attente**  : {{ state_attr('[[device]]',
            'is_waiting') }}<br> **Puissance requise** : {{
            state_attr('[[device]]', 'requested_power') }} W<br> **Puissance
            courante** : {{ state_attr('[[device]]', 'current_power') }} W
          title: Infos
  managed_device:
    default: null
    card:
      type: custom:expander-card
      expanded: false
      title-card-button-overlay: true
      title-card:
        type: custom:mushroom-template-card
        primary: "{{ state_attr('[[device]]', 'friendly_name') }}"
        secondary: >-
          [[secondary_infos]] (max. {{ state_attr('[[device]]', 'power_max') }}
          W)
        icon: "[[icon]]"
        badge_icon: >-
          {% if is_state_attr('[[device]]','is_enabled', True) %}mdi:check{%
          else %}mdi:cancel{% endif %}
        badge_color: >-
          {% if is_state_attr('[[device]]', 'is_usable', True) and
          is_state_attr('[[device]]', 'is_enabled', True) %}green {% elif
          is_state_attr('[[device]]', 'is_enabled', False) %}red {% elif
          is_state_attr('[[device]]','is_waiting', True) %}orange {% elif
          is_state_attr('[[device]]', 'is_usable', False) or
          state_attr('[[device]]', 'is_usable') is none %}#A0B0FF{% else
          %}blue{% endif %}
        entity: "[[device]]"
        icon_color: >-
          {% if is_state('[[device]]', 'on')%}orange{% else %}lightgray{% endif
          %}
        tap_action:
          action: toggle
        hold_action:
          action: more-info
        double_tap_action:
          action: none
      cards:
        - type: custom:mushroom-chips-card
          chips:
            - type: entity
              entity: "[[enable_entity]]"
              double_tap_action:
                action: more-info
              tap_action:
                action: toggle
              hold_action:
                action: more-info
              icon_color: green
              content_info: name
        - type: markdown
          content: >-
            **Prochaine dispo** : {{ ((as_timestamp(state_attr('[[device]]',
            'next_date_available')) - as_timestamp(now())) / 60) | int }}
            min<br> **Utilisable** : {{ state_attr('[[device]]', 'is_usable')
            }}<br> **Est en attente**  : {{ state_attr('[[device]]',
            'is_waiting') }}<br> **Puissance requise** : {{
            state_attr('[[device]]', 'requested_power') }} W<br> **Puissance
            courante** : {{ state_attr('[[device]]', 'current_power') }} W
  enable_template:
    default: null
    card:
      type: custom:mushroom-chips-card
      chips:
        - type: entity
          entity: '[[enable_entity]]'
          double_tap_action:
            action: more-info
          tap_action:
            action: toggle
          hold_action:
            action: more-info
          icon_color: green
          content_info: none
then use as follows:
          - type: vertical-stack
            cards:
              - type: custom:decluttering-card
                template: managed_device_power
                variables:
                  - device: switch.solar_optimizer_recharge_tesla
                  - secondary_infos: >-
                      {{ states('sensor.total_puissance_instantanee_twc_w') }} W
                      ({{ states('number.tesla_charging_amps')}} A)
                  - icon: mdi:ev-station
                  - enable_entity: switch.enable_solar_optimizer_recharge_tesla
              - type: custom:decluttering-card
                template: managed_device
                variables:
                  - device: switch.solar_optimizer_prise_recharge_voiture_garage
                  - secondary_infos: '{{ states(''sensor.prise_garage_voiture_power'') }} W'
                  - icon: mdi:power-socket-fr
                  - enable_entity: >-
                      switch.enable_solar_optimizer_prise_recharge_voiture_garage
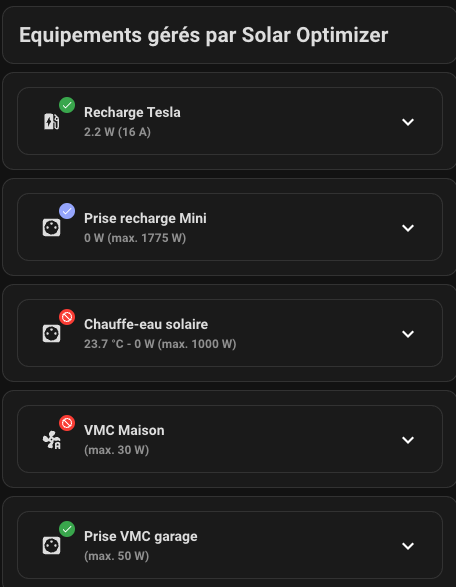
You will then get a component to interact with the equipment that looks like this:
If you would like to contribute, please read the contribution guidelines