LetsRobot.tv is a site for interacts with other using telepresence robots. User create their own robots and add them to the site. https://letsrobot.tv
Copy this into the terminal, and follow the instructions. This script has been tested on a Raspberry Pi 3, with a fresh flash of "2017-04-10-raspbian-jessie-lite".
sudo wget https://raw.githubusercontent.com/runmyrobot/runmyrobot/master/scripts/install.sh -O /tmp/install.sh && bash /tmp/install.sh
After end installtion, all the files needed should be installed and ready for use, but you still might need to change some arguments in your "/home/pi/start_robot" file, to make it suit your robot.
To edit your start_robot file, put this into the terminal.
sudo nano /home/pi/start_robot
The RasPi will need the following things install so it can talk to your motor and talk to the internet.
(1) Install motor HAT software:
(2) Install python serial, gnutls, python-dev, espeak, and python-smbus:
apt-get install python-serial python-dev libgnutls28-dev espeak python-smbus python-pip git
(3) Install socket.io client for python:
pip install socketIO-client
(4) Install alsa-lib
cd /usr/local/src
wget ftp://ftp.alsa-project.org/pub/lib/alsa-lib-1.0.25.tar.bz2
tar xjf alsa-lib-1.0.25.tar.bz2
cd /usr/local/src/alsa-lib-1.0.25
./configure --host=arm-unknown-linux-gnueabi
make -j4
sudo make install
(5) Install x264
cd /usr/local/src
git clone git://git.videolan.org/x264
cd x264
./configure --host=arm-unknown-linux-gnueabi --enable-static --disable-opencl
make -j4
sudo make install
(6) Install FFmpeg
cd /usr/local/src
git clone https://github.com/FFmpeg/FFmpeg.git
cd FFmpeg
./configure --arch=armel --target-os=linux --enable-gpl --enable-libx264 --enable-nonfree --enable-gnutls --extra-libs=-ldl
make -j4
sudo make install
Start by cloning the runmyrobot repository
cd ~
git clone https://github.com/runmyrobot/runmyrobot
cd runmyrobot
Go to new robot page to create a robot. If you already have one, got to manage robots. There you'll find your Robot ID and Camera ID.
These two scripts need to be running in the background to bring your robot to life: controller.py, send_video.py. Here are instructions about how to start them.
Copy the 'start_robot' Script from runmyrobot/Scripts to the pi home folder
cp ~/runmyrobot/scripts/start_robot ~/
Edit the script so you can adjust some settings for controller.py and send_video.py:
nano ~/start_robot
Edit the YOURROBOTID to your robot ID.
Edit the YOURCAMERAID to your camera ID.
You are getting both IDs when you are creating a new bot on the website.
The second parameter on send_video.py 0 is assuming you have one camera plugged into your Pi and you are using it, which is usually the case.
There are more parameter possible for controller.py:
robot_id
Your Robot ID. Required
--env prod | dev
Environment for example dev or prod | default='prod'
--type motor_hat | serial | l298n | motozero
What type of motor controller should be used | default='motor_hat'
--serial-device /dev/ttyACM0
Serial device | default='/dev/ttyACM0'
--male
Use TTS with a male voice
--female
Use TTS with a female voice
--voice-number 1
What voice should be used | default=1
--led max7219
What LEDs should be used (if any) | default=none
--ledrotate 180
Rotates the LED matrix | default=none
Example start_robot:
cd /home/pi/runmyrobot
nohup scripts/repeat_start python controller.py YOURROBOTID --type motor_hat --male --voice-number 1 --led max7219 --ledrotate 180 &> /dev/null &
nohup scripts/repeat_start python send_video.py YOURCAMERAID 0 &> /dev/null &
crontab -e
insert following line and save:
@reboot /bin/bash /home/pi/start_robot
That's it!
We use ffmpeg to stream audio and socket.io to send control messages.
The is a community project. Making your own bot? Adding your own control stuff? Cool! We'd like to hear from you.
Adafruit Motor Hat
Serial Port based commands
GoPiGo
L298N
MotoZero
Missing something?, you can add it, open source!
For GoPiGo3, you will need to install the gopigo3 python module (which is different than older versions). It will need to be installed with the installation script from Dexter. Also, PYTHONPATH needs to be set to "/home/pi/Dexter/GoPiGo3/Software/Python"
Refer to this: https://github.com/DexterInd/GoPiGo3
sudo git clone http://www.github.com/DexterInd/GoPiGo3.git /home/pi/Dexter/GoPiGo3
sudo bash /home/pi/Dexter/GoPiGo3/Install/install.sh
sudo reboot
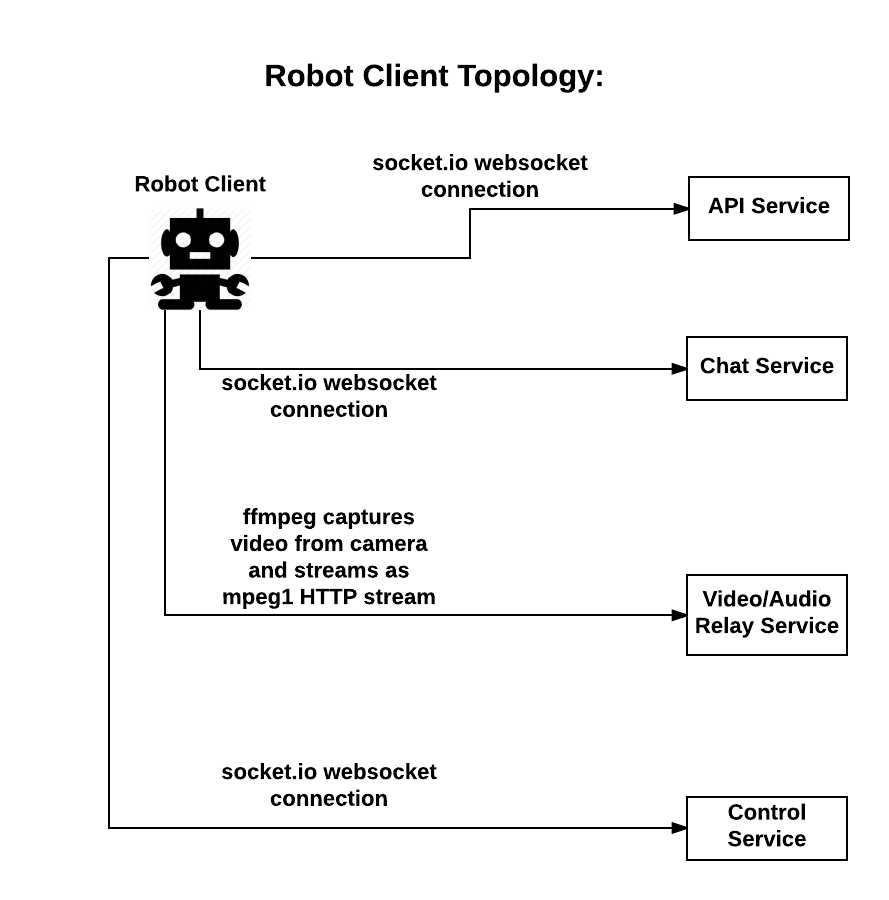
The robot client connects via websockets to the API service to retrieve configuration information, to the chat to receive chat messages, the video/audio relays to send its camera and microphone capture, and to the control service to receive user commands.
Control server via socket.io Application server via socket.io and HTTP Chat server via socket.io Sends video stream via websockets Sends audio stream via websockets Capturing Audio and Video Relays commands to robot hardware Text to Speech Supports remote login for diagnostics and updates Configuration updates from the web client (partially implemented) The robot client connects to four external services: API Service, Chat Service, Video/Audio Service, and the Control Service. Provides information about which host and port to connect to for the chat service, video/audio service, and control service Relays chat messages sent from the web clients to the robot The robot client streams ffmpeg output to the video/audio service Relays control messages sent from the web clients to the robot