A hands on guide to writting idomatic Ember.
##Contributions
This training guide and app was build and designed by Daniel Chappell and Kevin Boucher. Both this guide and the source code for the app are open source and completely free.
Please open an issue or submit a pull request for clarification or correction. Nothing is perfect with out help from the community, Thanks!
In this training we will build an app that has user creation, authentiation, other CRUD functionality, and all the validation you would expect from a robust user experience. We will be focusing most on Core architecture concepts in the eco system and applying them to build our app.
The primary motivation of this training is to demostrate the correct ember idoms for many non trival (however common) application concerns. It is expected that you have throughly read the Ember Guide at least the sections covering these topics as we will not dedicate time to introduce syntax:
- Ember Object Model
- Routing
- Templates
- Components
- Controllers
- Models
Our app will utilize ember-cli which has the following depedencies:
- Phantom JS
- Node.js (with NPM) >= .10
- bower
Please also download:
Some of the principles that drive the ember philosophy:
-
There is a set of concerns that must be be addressed in every non-trivial web app no matter how different the business domain.
-
There should be an extensible pattern or construct that can address each of these recurring concerns.
-
ember is the collection of these constructs and patterns.
-
ember subscribes to convention > configuration. Is opinionated.
-
Involving the diverse open source community in designing new solutions to be part of ember is the best way to ensure only robust features are added to the framework.
-
The web derives it's power from the ability to bookmark and share URLs. Application state should be completely reproducable from a given URL. Don't Break the Web!
-
Hamsters are really cute.
Here are some benefits ember receives from being opinionated:
- ember apps should all look very similar.
- Opinionated software is easier to read and debug.
- Developers are able to switch between ember projects somewhat seamlessly.
- Documentation is more focused, making it more effective.
- Allows framework to be more robust.

But what does it mean to be opinonated?
In ember there is an idiomatic(recommended) way to do most things.
It means that ember is full of recommendations, not just options, on how you should write your ember code.
** Being opinionated also allows ember to refine it's architecture patterns with the larger community.**
I have listed some of the benefits of opinionated code bases, but there are drawbacks as well.
Developers new to ember, often mix ember constructs incorrectly with paradigms they have used in the past (random jquery snippets or other imperative code outside the ember system). They have a hard time finding out what their errors mean, and are frustrated to realize they must refactor their code to the ember-way™
This is why ember is said to have a somewhat steep learning curve.
When framework constructs are being used outside of the recommended way (what is generally covered by the integration tests) unexpected bugs can arise that are hard to track down and lack documentation or stack overflow posts (because others are not doing it that way)!
The patterns ember uses have been around a while and are probably not new to the experienced developer.
ember at it's core is a MVC framework, with sprinklings of reactive programming and other functional concepts.
MVC stands for Model View Controller which are names we give to the 3 constructs (usually coded as classes or modules) where we put our application code.
More specifically each route of the application will have its own Model, View, and Controller and the code you write for that route will be split between these three modules.
In computer science, separation of concerns (SoC) is a design principle for separating a computer program into distinct sections, such that each section addresses a separate concern. A concern is a set of information that affects the code of a computer program. --Wikipedia
The purpose of this is to have good seperation of concerns in the application for each route, and the code for each route is also seperate from code for the other routes of your app.
When I say 'route' I mean an area of the applcation, generally you can think of it as a specific page. There is also an Ember.Route construct which we will cover later in this lesson.
ember does not stray too far from conventional MVC representation, but it can look different if you have not seen these patterns used on the client side.
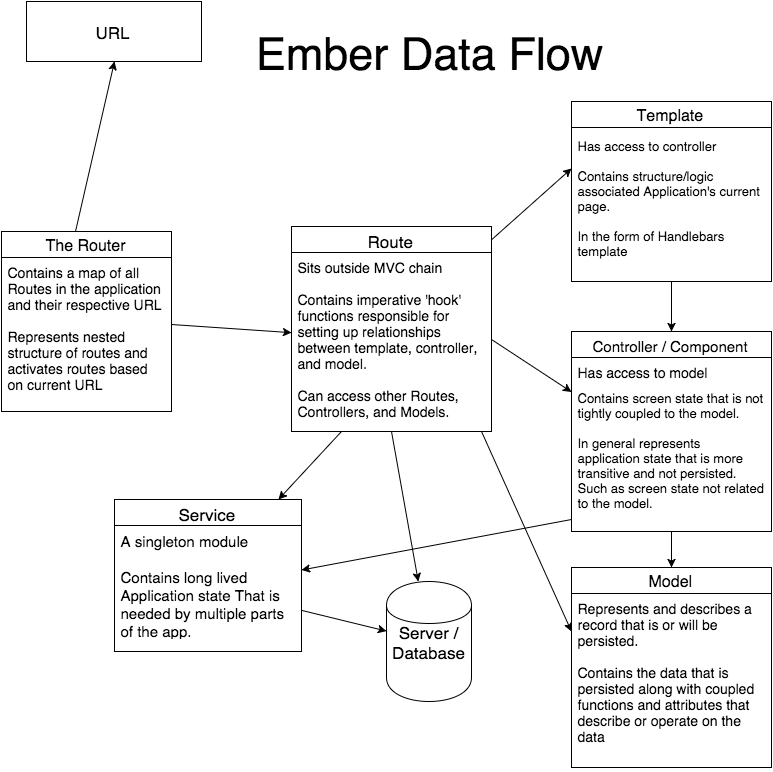
Below is a representation of ember's flavor of MVC. Most notably, the view concept in ember is represented by the handlebars template, which is mostly structure (HTML) with minimal logic. The template acesses the controller to fill its dynamic sections.
The controller construct in ember can either be an Ember.Controller or Ember.Component. Both contain state/logic that should not be coupled with the model, but is important to the current route.
A good example would be managing screen state such as filtering, sorting, or toggling options on a form. These two concepts (Controllers and Components) while different in multiple ways, are similar enough that in an upcoming ember release Ember.Component will completely replace Ember.Controller.
However this has not happened yet and both concepts are important to current ember applications and I will cover each one in depth as we build our app.

This diagram gives most of the neccessary information, however a few things I would like to point out:
-
One of the main ideas behind the MVC design is resuability. The model should be a completely self contained unit that does not rely on any other module when executing it's methods. The model should be able to work with any View/Controller combo that would want to use the data that this model represents.
-
Also the pattern goes further than just determining what code belongs in which module. It also dictates the direction of observation, or data flow, of the app. The view (template) must access the model through the controller. Furthermore the model can only be accessed and cannot access anything itself (which is key to its reusabliltiy).
Welome! We are going to build an ember app that uses many of the core concepts of ember.
First clone this repo it has the CSS and package.json/bower.json you will start out with.
$ git clone https://github.com/josephchappell/ember-training.gitIf you haven't yet globally install ember-cli. Like this:
$ npm install -g ember-cliNow lets navigate to the ember-training repository. If you list the files you should see a package.json and a bower.json. The package.json lists dependencies and versions that are controlled by NPM package manager. The bower.json file does the same but for dependencies that are controlled by bower.
These are the two package managers an ember app will use. When you clone down a repo you do not yet have the dependencies as they are not generally tracked by git. To download all the dependencies from npm and bower:
$ npm install
$ bower installOur app is a touch/click driven cacluator. It has advanced features such as not allowing you to press the wrong button, a generated printout of your entered operations (like old register tape), and the ability to save your registers. You will also be able to go back and review your old register where you can potentially delete them potentially delete them! Obviously since we are saving our calcuations to a database we have to have discrete user sessions so only see our own regisers. Did I mention also more validation than you can shake a stick at?
The API for these operations is provided as we will just be focusing on the ember code base.
Namespace https://ember-calc.herokuapp.com/api/v1
/checkAuth GET (Checks cookie returns 200 or 401)
/login POST (200 + cookie or 401) { username: String, password: String }
/logout POST No request body
/users POST { username: String, password: String }
/registers GET /registers POST /registers/:id GET /registers/:id DELETE
All of the required CSS is already included in the app. (Credit Kevin Boucher) The HTML to go along with it will be provided in each section as we expand on our app. Even though all that work is done for us, It is still good to get a mental picture of our end product.
First the user must be able to login and logout. This will also be the first page a user lands on when not yet authenticated:

They must also be able to Sign up:

Pretty easy so far. Signing up successfully should automatically sign them in. Also authenticated pages will have a logout button as you will see momentarily.
The Main Calculator View:

This will be the main page of our app where we use the calculator and experience the magic that is digital register tape. On the right side of the screen we see a 'saved registers header' Here is where all our saved regisers will be displayed in a list for individual viewing.
Ok I think that is enough for now The rest of the features I will show as we get to them.
The best place for us to start is the calculator itself. All the actual non trival thinking will take place here. I have done the thinking for you and will be providing the implementation so we can focus on where the code snippets should go.
Again I want to reiterate the focus of this training is how to put different types of code together correctly in ember, It is very possible you are able to create a better or more clever solution than me for the calculator logic its self!.
Ok lets start..
The main authenticated page in our app will be the one that shows the calculator. To me it made since to make this the /calculator route. However you could have named it /johnlockeisalive or something else even less semantic. We must first create this route in the file system before we can start writing code to make it work.
Ember-CLI (in the terminal/command-line) will be your tool for creating your files in the proper place. Here is the command (Also make sure you are inside your project director):
$ ember generate route calculatorYou should see something like this:

As we see above adding a route also adds a template file of the same name, along with a ready to go test file (Yay!).
Along with the newly created files, Ember also changed your app/router.js file, which is The Ember Router not to be confused with an Ember.Route.
Here is what yours and any other new ember-cli project's router.js should look like:
import Ember from 'ember';
import config from './config/environment';

var Router = Ember.Router.extend({
  location: config.locationType
});

Router.map(function() {
});

export default Router;
After the route generation command was run it now has one line added.
import Ember from 'ember';
import config from './config/environment';

var Router = Ember.Router.extend({
  location: config.locationType
});

Router.map(function() {
    this.route('calculator');
});

export default Router;this.route('calculator')decares the calulator route for use in app, and will load the corresponding calculator route (Ember.Route) when it is visited which by default will be /calculator.
you can also change the default path of a route like this (but please don't at this point):
this.route('calculator', {path: '/johnlockeisalive'})Now generate a controller for our calculator route
$ ember generate controller calculatorThe controller in ember is very much like a component and should be thought of as the top level component for a given route. One of major differences between controllers and components, is that controllers are singleton which have one instance used throught the app session, where components are more reusable and a new component instance is created each place they are used.
A controller therefore is the context for template the route will load (in our case the calculator template). the controller should contain all logic too specific to go into the model. The best example of this is properties and functions that control screen state. Which is exactly what drives our calculator!
It is important to note that every route(navigatable area) in ember will have
- An Ember.Route
- An Ember.Controller
But you do not have to define either of these files unless you need them. If they are not defined in your codebase, ember will create the default route or controller on the fly. Which is one of the first benefits of ember. ** Idomatic Ember solutions require less code**.
In our case we need to add much calculator specfic logic to the controller, so we have generated one.
Navigate to your calculator.hbs file and lets fill it with some boilerplate html that is our calculator structure.
Ok I know there is alot there, but it is just buttons and wrapper divs! We are using Materialize CSS which you might have seen in the bower.json file. All the classes extra classes are part of materialize. We could work hard to build something ugly, but how would we feel once done? Exactly.
You should be seeing something that looks like this:

You probably noticed this is just plain HTML there is no handlebars or ember functionality in this template yet. That is because we don't have any Ember logic written yet! Lets go do that now, Our routes template takes it's values directly from controller of the same name so lets go there now.
Generate files start as just empty exports, but these exports extend the correct parent class. Your starting calculator controller should look like this:
import Ember from 'ember';

export default Ember.Controller.extend({
});
Lets use the concepts you learned in Ember Guides - Object Model to start filling in our logic.
We know we will need a display property which will hold the current value of the screen, and we also probably need a property to hold whatever the current total is:
import Ember from 'ember';

export default Ember.Controller.extend({
  display: '',
  runningTotal: ''
});In Ember 'actions' are used to handle user input in a safe way with out having to manually add observers, actions can be defined on the controller, route, or any component. Lets add some actions will fire when our calculator buttons are pressed.
import Ember from 'ember';

export default Ember.Controller.extend({
  display: '',
  runningTotal: '',
  actions: {
    inputNum(num) {
      //implement
    },
    inputOperator(fnName) {
      //implement
    }
  }
});
It seems like a good idea to have one actions for all number inputs and another that handles operations. You could also handle all the input with one action, or handle each button with a different action. One action seemed too complicated, and was becoming a parsing algorithm, and with an action for each button there is alot of duplicated code that can be easily avoided, However you could do it a variety of ways.
Our calculator has 8 functions. *5 are infix style functions that take two operands
-
- Addition
-
- Subtraction
- x Multiplication
- / Division
- x^y x to the power of y
and 3 unary functions which will operate on the current total:
- ! factorial
- sin calculates the sine of a number
- cos calculates the cosine of a number
We need a way to handle both functions that operate on one value and also functions that operate on two. Also we need a way to accept number or decimal input and know whether to add it to the left or the right operator. I'm jumping ahead a bit but, Here is what I came up with:
import Ember from 'ember';

export default Ember.Controller.extend({
  display: '',
  runningTotal: '0',
  operand: '',
  loadedFn: null,
  actions: {
    inputNum(num) {
      let runningTotal = this.get('runningTotal');
      let operand = this.get('operand');
      let loadedFn = this.get('loadedFn');

      if (operand && operand !== '0' && loadedFn) {
          this.set('operand', this.get('operand').concat(num));
         } else if(loadedFn) {
            this.set('operand', num);
         } else if (runningTotal === '0') {
            this.set('runningTotal', num);
         } else {
            this.set('runningTotal', this.get('runningTotal').concat(num));
         }
    },
    inputOperator(fnName) {
      let {loadedFn,
          operand,
          runningTotal} = this.getProperties(['loadedFn', 'operand', 'runningTotal']);

            if (loadedFn) {
                runningTotal = loadedFn(+operand);
                this.setProperties({runningTotal,
                                    loadedFn: null,
                                    fnName: null,
                                    operand: ''
                                   });
            }

            this.send(fnName, +runningTotal);
    }
  }
});
There is alot to explain here:
-
I decided to used curried functions (not written yet) for the math operations. The infix functions will store a preloaded function that takes the final arugment in the 'loadeFn' property.
-
'runningTotal' will be a string (for concatentation purposes) then converted to an number to be used as the left operand or single operand depending on the function.
-
The 'operand' property default as an empty string but is built (by concatentation) to be the second operand for infix functions.
-
I know to add the a number character to the runningTotal (first operand) if there is not currently a loadedFn (a pending infix operation) otherwise I should be adding the number to the 'operand' (second operand).
-
When a new operation is input and there is already a loadedFn run the loadedFn with the current operand property.
-
Take the updated runningTotal and send it as the argument to the specific action for a given operation. (not written yet)
Ok, this will eventually make sense... lets add the actions helpers to our template file and send each action the proper argument:
I removed all the extra divs from the example just find each button and update it accordingly. The action helper takes the action name as a string and then how many ever arguments our function takes. I am passing the numbers and function names as strings.
If you reference the functions in the javascript example above I am concatentating each number digit to build input together like '234' would be '2' '3' '4'. I know that as long as there is not an infix function loaded, any number pressed should be concatentated onto the runningTotal.
Ember suggests that we organize our our utility files into the app/utils/ directory. Ember doesn't need the utility files in a certain place, since they are not looked up by the resolver, this is just a helpful convention, so all ember apps can look the same. In fact there is a a built in ember-cli generator for utility files. Lets go ahead a make our calculator function utility file.
$ ember generate util calc-funcsok now nagivate to app/utils/calc-funcs.js and paste in these functions, you should erase what is already there:
/**
Curried versions of simple math operations
 **/

export function add(num1) {
    return (num2) => num1 + num2;
}

export function subtract(num1) {
    return (num2) => num1 - num2;
}

export function multiply(num1) {
    return (num2) => num1 * num2;
}

export function divide(num1) {
    return (num2) => num1 / num2;
}

export function factorial(num, acc = 1) {
    if (num <= 1) {
        return acc;
    }
    return factorial(num - 1, num * acc);
}

export function toPower(num1) {
    return (num2) => Math.pow(num1, num2);
}
If you need to brush up on ES6 module syntax, here is a good link for that ES6 Modules
You should now import these functions into your calculator controller. Like this:
import * as Calc from '../utils/calc-funcs';This brings all exported functions from the calc-funcs file in under the Calc namespace. We now access the factorial function as Calc.factorial(num). You can also import them individually, but I will have other functions with similar names so I found it best to import them namespaced.
Notice the functions above for the infix operators are curried and when they are exectuted with 'runningTotal' they will return what will be stored in the 'loadedFn' property. Lets do that part now.
import Ember from 'ember';
import * as Calc from '../utils/calc-funcs';

export default Ember.Controller.extend({
  display: '',
  runningTotal: '0',
  operand: '',
  loadedFn: null,
  fnName: null,
  currentTotalFreeze: false,
  _updateAndPrintRunningTotal(newRunningTotal) {
        this.setProperties({runningTotal: newRunningTotal,
                            currentTotalFrozen: true,
                            });
  },
  actions: {
    add(runningTotal) {
        this.setProperties({loadedFn: Calc.add(runningTotal),
                            fnName: 'add'});
    },
    subtract(runningTotal) {
       this.setProperties({loadedFn: Calc.subtract(runningTotal),
                           fnName: 'subtract'});
    },
    multiply(runningTotal) {
      this.setProperties({loadedFn: Calc.multiply(runningTotal),
                          fnName: 'multiply'});
    },
    divide(runningTotal) {
      this.setProperties({loadedFn: Calc.divide(runningTotal),
                          fnName: 'divide'});
    },
    powerOf(runningTotal) {
      this.setProperties({loadedFn: Calc.powerOf(runningTotal),
                          fnName: 'powerOf'});
    },
    factorial(runningTotal) {
      this._updateAndPrintRunningTotal(Calc.factorial(runningTotal));
    },
    sin(runningTotal) {
      this._updateAndPrintRunningTotal(Math.sin(runningTotal));
    },
    cos(runningTotal) {
      this._updateAndPrintRunningTotal(Math.cos(runningTotal));
    },
    equal(runningTotal) {
      this._updateAndPrintRunningTotal(runningTotal);
    },
    inputNum(num) {
      let runningTotal = this.get('runningTotal');
      let operand = this.get('operand');
      let loadedFn = this.get('loadedFn');

      if (operand && operand !== '0' && loadedFn) {
          this.set('operand', this.get('operand').concat(num));
         } else if(loadedFn) {
            this.set('operand', num);
         } else if (runningTotal === '0') {
            this.set('runningTotal', num);
         } else {
            this.set('runningTotal', this.get('runningTotal').concat(num));
         }
    },
    inputOperator(fnName) {
      let {loadedFn,
          operand,
          runningTotal} = this.getProperties(['loadedFn', 'operand', 'runningTotal']);

            if (loadedFn) {
                runningTotal = loadedFn(+operand);
                this.setProperties({runningTotal,
                                    loadedFn: null,
                                    fnName: null,
                                    operand: ''
                                   });
            }
            this.set('currentTotalFreeze', false);
            this.send(fnName, +runningTotal);
    }
  }
});
A specfic action for each operator has been added. Now our previous line in inputOperator makes sense:
this.send(fnName, +runningTotal);We do the specific general logic needed for any operator in the inputOperator action and then call the operator specific action, by the operator name that is passed, where we do the logic specific to that operator. Here is where we will make the nessary distinction between infix fuctions and unary operations. This highlights a strength of the ember action invocation syntax. Functions are called with a string name, enabling more easy meta-programming.
There is a new property 'currentTotalFrozen' that is false by default. This property serves one purpose: Preventing numbers from being entered. After an operation that totals without adding a new funtion, So equals or any unary function(which auto total like equals). If one of these functions are input, you must either clear your total to start over or carry the total forward by selected another operator. This prevents you from adding a number as another to the end of currentTotal (which would not be intended).
I have also added another function (a regular method, not action) _updateAndPrintRunningTotal. This is the function that is called by unary functions to immediately update the running total and (eventually we will print to the register).
The infix functions how ever delay their calculation and updates until either:
- The total is requested with =
- Another operator is input, and the current loadedFn has not been evaluated. (In this state we will have our runningTotal our loadedFn and our complete operand, so it is a good time to calculate.)
You might have also notice for every infix function that gets set into 'loadedFn' I am saving the string name of that type of function in a property 'fnName'. Right now there isn't a reason to do that. But I have a plan for it and will return to explain this part in a later section, for now lets let it hang out.
We only have one button left to handle the clear button! Lets add an actions for it:
Add this to your actions hash in the controller:
clearDisplay() {
  this.setProperties({
    runningTotal: '0',
    loadedFn: null,
    fnName: null,
    operand: '',
    currentTotalFrozen: false
  });
}
For now clearDisplay is going to be pretty simple and just reset all our state properties that drive the calculator. Lets add our actio helper to the clear button in the template:
Sweet!
Oh yeah, I guess we should do something with that display property we declared as null right at the start. Find you code that looks like this in calculator.hbs
And replace the comment. It should look like this:
However in all our calculations we haven't ever set display and it is still null, which obviously won't work. That's ok! Turns out there is a better option here than mutative state. If you take out your pocket calculator (aka your phone) you will probably see that either the left operand is displaying or the right operand is displaying, depending if we have loaded an infix function or not (really it depends on if you have started building the second operand).
Ok so in our app we will only show either the runningTotal or the second number('operand') The operand will only ever be present if we are in an infix function and at least one number has been pressed to build the 'operand' property. So that is perfect. This is an opportunity for a pure calculation. AKA Computed Property. Replace the display: null on our controller with this code:
display: Ember.computed('runningTotal', 'operand', function() {
    return this.get('operand') || this.get('runningTotal');
})
Computed properties are pure functions that return a calculation that is based on their dependent keys which you can think of as the arguments for the function. Computed properties are very efficient as they are able to cache their values, and only clear the cache when one of their dependent keys change in some way.
There are also built in computed properties, that add alot of functionality in a single line, we are about to use some of those now.
We need a way to know if we are current inputing the second number for addition or division. You know we don't have great memories, and we aren't showing the operator symbol in the display, Why? Because the apple calculator didn't! Anyway lets write some computed properties and template code to have the current function button highlighted:
isAdding: Ember.computed.equal('fnName', 'add'),
isSubtracting: Ember.computed.equal('fnName', 'subtract'),
isDividing: Ember.computed.equal('fnName', 'divide'),
isMultiplying: Ember.computed.equal('fnName', 'multiply'),
isPowerOfing: Ember.computed.equal('fnName', 'powerOf'),
Now our fnName is coming in handy. We now have some easy to use declaritive properties that will automatically update true/false when fnName changes.
Now which ever function is currently active (based on fnName) will have the 'active' class which has visual indication to the user. Man this is really comming together. We should take this visual indication thing a step further and prevent the user from pushing buttons that will break our app. For example two infix functions in a row, or a function and then equals, or equals and then a number..ah crap. There are lots of bugs with out validation!
lets create more computed properties to know what state our app is in.
Here are the computed properties that will tell us whether a number can currently be input, add these to your controller:
cannotInputNumber: Ember.computed.readOnly('currentTotalFrozen'),
canInputNumber: Ember.computed.not('cannotInputNumber')
We can pretty much enter a number at any time unless we have totaled out and need to clear, which we can know based on the currentTotalFrozen property. If that property is true, we cannot input a number. I also have the inverse computed property for conveience. which is the ember.computed.not of its opposite property.
Lets do the same for operators:
hasLoadedFunction: Ember.computed.bool('loadedFn'),
cannotInputOperator: Ember.computed('hasLoadedFunction', 'operand', function() {
    return this.get('hasLoadedFunction') && !this.get('operand');
}),
canInputOperator: Ember.computed.not('cannotInputNumber'),
cannotInputEqualOperator: Ember.computed.or('cannotInputOperator', 'currentTotalFrozen')
Here we have a ember.computed.bool which converts the 'loadedFn' to a booleans (functions always evaluate to true), we use this to know if we can input an operator. The only time we cannot input an operator is if we have a loadedFn but we do not yet have an operand (second number). The code above in cannotInputOperator watches both hasLoadedFunction and operand to determine when this is true.
Additionally with the equal operator we cannot use it, if a total has already been calculated which is indicated by the 'currentTotalFrozen' property. Here we use an ember.computed.or to return true if either condition/property is true. These logical computed properties are very helpful Ember provides a number of them:
- Ember.computed.and('prop1', 'prop2', 'prop3',...)
- Ember.computed.or('prop1', 'prop2', 'prop3',...)
- Ember.computed.bool('prop1')
- Ember.computed.not('prop1')
- You can use Ember.readOnly('prop1') if prop1 is already a boolean.
Lets update the template to disable the buttons when their operation is not allowed:
Ok now the computed properties will autmatically controller the disabled attribute on our html buttons. We are winning!
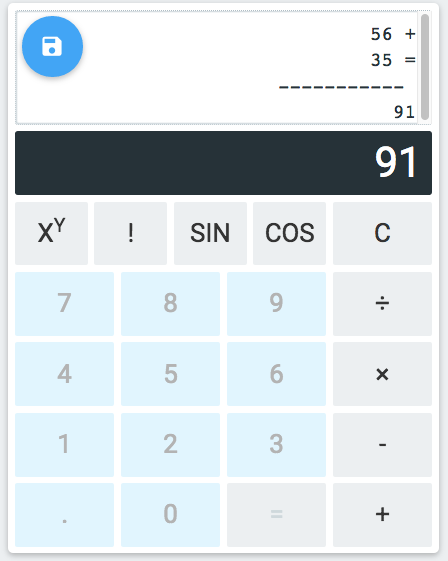
So far I have been ignoring the register part of the calculator that prints a ledger/register as we go. Most all of the code to add this functionality will be added to methods we have already written, lets get it working so we can move on. No great ember lessons here, just select places we all the set the registerTape property with a new concatenation to add the next line.
First declare the property:
registerTape: ''now update this method:
_updateAndPrintRunningTotal(newRunningTotal) {
    this.setProperties({runningTotal: newRunningTotal,
        currentTotalFrozen: true,
        registerTape: this.get('registerTape').concat(`\n----------- \n${newRunningTotal}  \n`)
    });
}
and this method:
inputOperator(fnName) {
    let {loadedFn,
        operand,
        runningTotal,
    registerTape} = this.getProperties(['loadedFn', 'operand', 'runningTotal', 'registerTape']);
    //Only the first register line will use runningTotal
    //If fn is = after a unary operator don't print a value;
    let registerPrintValue = operand || fnName !== 'equal' && runningTotal || '';

    if (loadedFn) {
    runningTotal = loadedFn(+operand);

    this.setProperties({runningTotal,
        loadedFn: null,
        fnName: null,
        operand: ''
        });
    }

    this.setProperties({registerTape: registerTape.concat(`\n${registerPrintValue} ${this._getOperatorSymbol(fnName)}`),
    currentTotalFrozen: false
    });

    this.send(fnName, +runningTotal);
    }
These are the two methods where we print to the register. The first method for 'equals' and other unary operators, and the second method prints something every time. Don't forget to add the registerPrintValue assignment expression in the inputOperator method!
We should have a way to clear the register and start fresh. Its not exactly what normal calculators do but I decided that the clear button should clear the current total and loaded functions, while maintaining the register history (what we are already doing). However if the runningTotal is clear (equal to '0' we can assume we have already cleared once) the clear button will then reset the register.
Lets make the change to the clearDisplay action:
clearDisplay() {
    if (this.get('runningTotal') === '0') {
        this.set('registerTape', '');
    } else {
        this.set('registerTape', this.get('registerTape').concat('\n\nCLEAR\n'));
    }
    this.setProperties({
        runningTotal: '0',
        loadedFn: null,
        fnName: null,
        operand: '',
        currentTotalFrozen: false
    });
}
The function above does what I just describe with one other bit of functionality (it adds 'CLEAR' to the register) if only clearing the total. We should also update the clear button to display an appropriate label for what action it will do, clear total or clear register. Again this is another calculation and a computed property is a perfect choice.
clearCurrent: Ember.computed('runningTotal', function() {
    return this.get('runningTotal') !== '0'  ? "C" : "CR";
})We now have a string property (registerTape) on our controller that represents our register with all the line breaks. But there is more logic that we need to display it correctly, and it makes sense to isolate that logic because it only has to do with showing the register.
This is our first use case for creating a component. A component as you have read in the ember guides. Is very similar to a controller, but isolated and nestable. A component should be self sufficent piece of the UI with an interface in which it receives data from the controller or a parent component.
lets generate our component back in the shell:
$ ember generate component register-tapeEmber should have generated a js file, a template file, and a test file.
Components are different currently in a number of ways. Currently components (thier tempalates) when rendered are wrapped in an outer element, ember uses this to manage the component. By default this element is a div but it can be configured to be whatever tag type you would like with the 'tagName' property. You can also pass in classes or attributes to decorate the element.
export default Ember.Component({
tagName: 'button',
classNames: ['foo', 'bar']
});
A component also has some hooks related to rendering, that are not available on the route or the controller, which is a big advantage of using a component.
This isn't a gap in the framework persay, Ember has a deprecated concept Ember.View which has this functionality for use with controllers. But we are transition to use components more and soon you will actually route a component.
The component hooks are:
didInsertElement: Fires when the root component element has been rendered into the DOM.
willInsertElement: Fires right before the element is inserted into the DOM but after the element is created. (available at this.get('element') )
willDestroyElement: Fired when component is being removed from the DOM. This is where you want to do manual tear down of observers if you use that sort of thing..
The most notable reason to use these hooks is for writing external library code. That's right, so far ember has covered everything; but there are times includeing once coming up in our app where you have to modify the DOM explicitly, or use an external library like D3.js, The didInsertElement hook is one of the best places for that logic since it is fired at a safe point in the ember run loop (more on the run loop later).
Go to your register-tape.js file and plug in this code.
import Ember from 'ember';

export default Ember.Component.extend({
    classNames:['register-tape white'],
    register: null,

    registerDisplay: Ember.computed('register', function() {
        var register = this.get('register') || '';
        return register.trim().replace(/(\n)+/g, '<br />');
    }),

    _scrollRegister: Ember.observer('register', function() {
        Ember.run.schedule('afterRender',this, function() {
            let elem$ = this.$(this.element);
            elem$.scrollTop(elem$.prop('scrollHeight'));
        });
    }),

    didInsertElement() {
        this._scrollRegister();
    }
});
When defining a component we declare the properties that will be passed in on instantiation (either with null values or other defaults). In this case we will pass register from the controller to be formatted and displayed.
We had some difficulty getting the register to display correctly with the line breaks, along with the other fancy stuff we are asking it to do like over flow and auto scroll. So we made a computed property to replace all the line breaks with '<br>' tags. I'll except a pull request for a better solution on this one, but for now it can server as another computed property example where we take data and transform it as it changes, with some calculation. registerDisplay in the code example above does this.
Now lets write our template markup:
Here we are using triple brackets instead of the normal two, that is because we are inserting html the br tags and we dont' want this sanitized. This is not a very secure solution as someone could get html inject into the app this way, perhaps with out the user knowing, however I have already confessed to this part not being the best. Moving along.
There were some other functions in our component we defined above, the first example in this app of having to use an Ember.observer. There are a couple of best practices I encourage when using Ember.observers. First use them as little as possible, most observation is a result of user interaction and can be handled in a safer, more obviously way, with actions. Secondly I recomend when you do need to use them, make them as obvious as possible in your code. The are very different from computed properties, but their sytnax is very similar. I really wish they looked a bit more different as I see this trip alot of developers up.
I put an _ in front of my observers, to help me notice them and they are always private anyway so that works out. You can also call the property associated with an ember observer to fire the function, as we are doing here in the didInsertElement hook. I have not seen this documented in the guides but it seems like intentional behavior to me, and I judge it save to use!
The reason we need to call the observer function manually in the didInsertElement hook is observers are not fired when values are changed on intialization. For example when we create the component and pass a register to our register property changing it from null to something. That will not fire the observer (which we need it to fire) But changes all other changes after initialization will fire. Thanks observer!
The didInsertElement hook helps us get around this by firing the function at the point in the runloop when we know it is safe to assume register is initially set and has just been rendered.
Inside the observer function I have wrapped my jquery code in a Ember.run.schedule I am not going to go into too much detail on the run loop, because 1. it is a something that 90% of the time just works and you don't need to mess with it. and 2. I can recommend some better reading on it, than I could write up within the scope of this article.
For full mastery of the Ember runloop checkout:
To explain what I am doing here, with Ember.run.schedule('afterRender', func) I am saying schedule this function to run in the next runloop iteration after the render jobs. Which ensures that the bindings have synced and changes have been rendered in the DOM which is what I want since I am using jQuery to manipulate the DOM.
By the way this function is autoscrolling the register-tape div that is overflowing with register data. That way we are always seeing the bottom of the data and can scroll up to see out of view register data.
Lets now use our component in the calculator.hbs file:
Replace:
With:
All the boiler plate that makes up our calculator buttons has been bugging me. I think we can make it a bit cleaner and get rid of some of the redundancy by turning it into a button component. This isn't the most dramatic refactoring you can get with a component, but when you see that things all have the same tag name and the same classes and have the same sort of behavior that is a good indication you can clean things up a bit. However this is an example and I'm not encouraging you to prematurely optimze your whole app, only when when the benefits surface should you start to engineer more intricate solutions.
Generate your component:
$ ember generate component calc-buttonHere is the component code:
import Ember from 'ember';

export default Ember.Component.extend({
    isDisabled: false,
    tagName: 'button',
    classNames: ['btn-flat', 'waves-effect', 'waves-light'],
    classNameBindings: ['isDisabled:disabled'],
    attributeBindings: ['isDisabled:disabled'],
    click() {
        this.get('buttonAction')();
    }
});In addition to actions you can also define functions on components that have the name of a browser event like I did above with click. The benefit of this is by passing the action step (you could otherwise write {{action on="click"}} and write it as an action". When defining browser event functions they should be placed outside the actions hash. Browser actions have the normal DOM behavior of bubbling until they are handled. If you wish to continue to bubble either an action or a browser event you can return true. Since actions and event functions are essentially call backs that only mutate code, and have no return value, we can effectivey use the return value as bubbling control flow.
In the example above you see we have customized the tagName to wrap the compoent as a button, and also use the classNames property to get rid of those boilerplate classes we were having to type everytime. slassNameBindings and attributeBindings work the same way. The code above reads if isDisabled is true add the disabled class and add the disabled attribute.
Components auto generate a template file that looks like this:
This works for our use case. Components can be invoked with a hash syntax (like handlebar if helpers) and will take a block (of HTML). The passed HTML will be inserted into the {{yield}} helper.
Lets update our calculator.hbs to use our new component replacing the existing buttons:
Earlier I mentioned that a key difference in components is that they are have a completely isolated scope. Specifically this means that anything the component uses or interacts with must be explicitly passed into the component, normally on initialization. This includes actions, which outside of components bubble to the route, and then up the nested route structure until they are handled. In components however if an action is invoked it must be handled on the route. There is an explicit way to invoke an action that is passed in to a component.
In our example above we could have done:
import Ember from 'ember';

export default Ember.Component.extend({
    isDisabled: false,
    buttonType: null,
    tagName: 'button',
    classNames: ['btn-flat', 'waves-effect', 'waves-light'],
    classNameBindings: ['isDisabled:disabled'],
    attributeBindings: ['isDisabled:disabled'],
    click() {
        this.sendAction('buttonAction', this.get('buttonType'));
    }
});
This is the old way to do actions, it requires you to pass in the action as a string under a property name that will be passed to the sendAction method. This method is the only way to trigger actions outside a component on ember versions before 1.13
Note before we were using send to call actions which will bubble when not inside a component. The send method also checks the current object first for the function before trying the parent context. sendAction on the other hand goes straight to the parent component or controller, and is used to send an actions outside the current component."
The major benefit to makign components work this way is you are required to utilize an interface for invoking methods outside a component, this allows us to avoid relying on bubbling which would often make a component less reusable.
There is a new better sytanx which we used above, in the actual code I had you write in our app. In that example we pass our action to a property name, but instead of it being a string we use the action subexpression (action 'args..') which actually resolves to a the action(function) itself.
Then on the component when you wish to invoke the function you just access it as a normal property (via get) and invoke it like a function. One great benefit to this syntax presents itself with multiple nested components. You still have to pass the function down each level to the inner component when it executes the function at the lowest level, it is an enclosed function with the original top level context.
If you were doing this with the older sendAction way, you would need to invoke a sendAction at each level bubbling up the invocation all the way to the top controller.
Finally one thing that is less convienent about the new syntax you should be aware of. The (action 'blah) subexpression only looks at the current context for a given action to enclose. That means you cannot rely on bubbling when using the new syntax. However we get to do awesome things like we did in calc-button where we use (action 'inputNum' '3') to partially apply 3 at the outer level, and can just execute the function with the arguments already loaded. This makes our component interface poentially much more flexable.
Ember does not specify what your model should be or what means you use to fetch your model. Ember has first class support for an additional libary called Ember-Data which is the defacto standard for models and communicating with the server in most modern ember apps.
Ember-Data is a client side ORM that allows you to setup relationships between your object and model them close to the database schema, it also handles all the XHR requests automatically.
Ember-Data definitely kicks ember up another notch on the opinonated framework/magical code happening scale, but it is not required and is only as of 2015 reaching maturity and semantic version stabelization.
It is common with older ember apps to just use jquery or XMLHttpRequest and convert the JSON to be your model wrapping it in an Ember.Object. Later in this training we will be building an application to solidify the Ember concepts discussed, for simplicity sake we will be using Ember.Data.
While ember does not require you to return an Ember.Object as your model,and in some cases it might not be necessary, in general a model that is simply a javascript object literal (POJO) will not allow your model much felxibillity and will limit its robustness. Returning an Ember.Object as your model allows you to take full advantage of the ember system of observation, and enables you to write computed properties that can describe your model attributes.
To setup Ember-Data with our app we have to extend the the RESTAdapter to include our host and namespace. Ember-Data will figure out the rest of the URL based on REST conventions, if you aren't following those conventions you will have to select a different adaptor, or write your own.
Generate an application adaptor with ember-cli:
$ ember generate adapter applicationnow add the host and namespace property to your app/adaptors/application.js:
import DS from 'ember-data';

export default DS.RESTAdapter.extend({
    host: 'https://ember-calc.herokuapp.com',
    namespace: 'api/v1'
});Since we are using ember-data there is some fancy stuff given to us, everything we are doing with models can also apply if you are just using an Ember.Object as your model.
lets generate our register model:
$ ember generate model registerFill in our three properties that we persist for each register:
import DS from 'ember-data';

export default DS.Model.extend({
    register: DS.attr(),
    label: DS.attr(),
    date: DS.attr()
});
To rehash the MVC section of this training our models can contain two kinds of code.
- properties that will be sent to the server for persistence. Ember-Data has these designated with DS.attr()
- Methods and Computed Properties that describe the main properties. These computations must be self contained with in the model, and apply to anywhere the model is used.
Our register model is simple too simple, we only have database properties.
Lets skip ahead and do our other model the user model:
import DS from 'ember-data';
import Ember from 'ember';

export default DS.Model.extend({
    username: DS.attr(),
    password: DS.attr(),
    isUsernameValid: function() {
        return this.get('username') && this.get('username').length > 4;
    }.property('username'),
    isPasswordValid: function() {
        return this.get('password') && this.get('password').length > 4;
    }.property('password'),
    isValid: Ember.computed.and('isUsernameValid', 'isPasswordValid'),
    isNotValid: Ember.computed.not('isValid')
});
This is a much better example validation like this and also formatting (not seen here) are two good kinds of functionality that can decorate a model.
Again anything that is not completely inline with the model's resuability belongs on the controller or somewhere else.
Defining these models in this way allows us to create save and destroy them with ember data methods that called from the store.
We will use this user model later in the training when we do our authentication and session management code.
New feature time! Lets add a new route where we will review our register on a separate page of the app. Here will will have the option to save our register as well go back to a clear calculator or pick back up where we left off.
Here is what the end result will be:
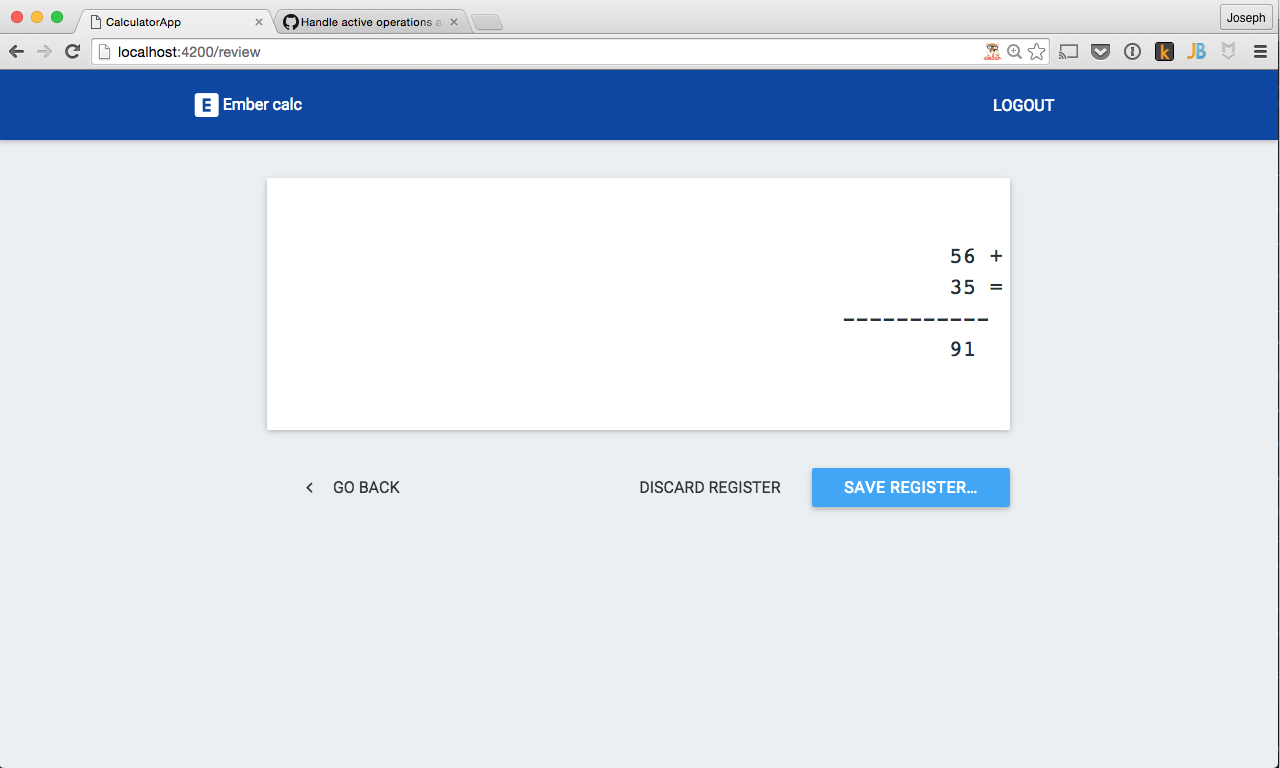
Beautiful I know.
Lets do what is needed to make our new route:
$ ember generate route reviewEarlier in the MVC section I described the model in ember as something that is persisted or sent to the server, it normally 'models' a record in the database. In our calculator route we have not yet defined a model, which makes sense as our calculator is all UI and nothing is saved between states, but here is where we save it. So our register that was a controller property for calculator should be our model in the new review route.
Leets add the model function to our route:
export default AuthenticatedRoute.extend({
    model() {
        return this.store.createRecord('register', {
            register: this.controllerFor('calculator').get('registerTape')
        });
    }
    });
Routes have access to all controllers through the controllerFor method. Here we are using it get registerTape from the calculator controller, and use it to populate our model. If you are wondering why wrote the model hook this way and did not pass in the model. That is a great question and I will cover that in depth here shortly. When we go over dynamic vs static routes.
For now lets add our markup for this route's template:
Above we are accessing the register through them model by asking the controller for 'model.register'. This is because the model is stored on the controller in the model property as a means of facilitating the MVC data flow.
So far so good, we have a model being created by the route and the template has styles and markup and it requested the register from the model for rendering. Lets add the actions for our 'go back' and 'discard register'.
export default AuthenticatedRoute.extend({
    model() {
        return this.store.createRecord('register', {
            register: this.controllerFor('calculator').get('registerTape');
        });
    },
    actions: {
        discardRegister() {
            this.transitionTo('calculator');
        }
    }
});
For the goBack action I want to go back to the last history item in Window.history. This is a very generic function that can be used any where we are in the app. For that reason I am going to put it in the application route which is the top level route that all unhandled actions bubble up to.
Even though Ember has been using your application route it has been creating it at runtime and we don't currently have an application route.
Lets get one:
$ ember generate route applicationNow add the action:
import Ember from 'ember';

export default Ember.Route.extend({
    actions: {
        goBack() {
            window.history.back();
        }
    }
});
We have the functionality in place from our screen shot lets see more to continue developing our feature.
Here is the result of hitting the save button on the review template:
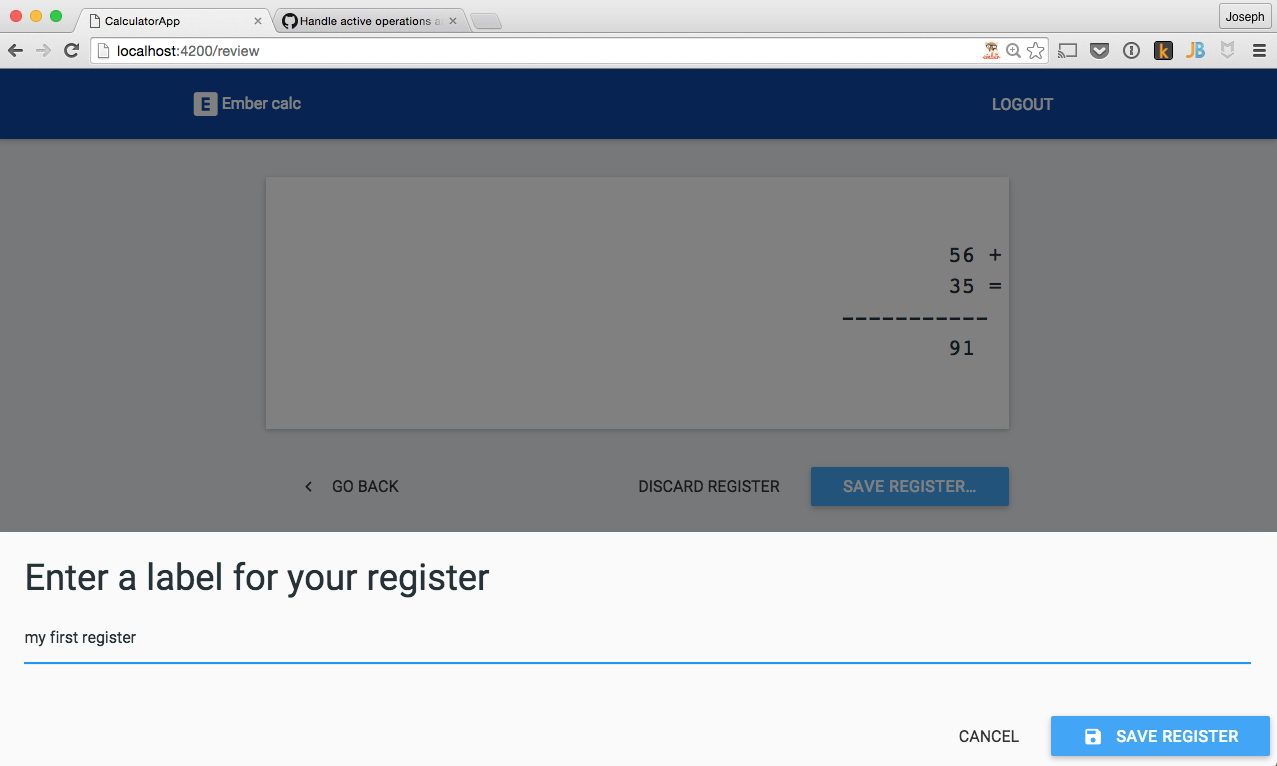
Here we have a modal come up from the bottom of the page requesting we label our register before it can be saved. On the modal we are able to cancel or continue saving, Also you can't see from this screenshot but we should only enable our button once a label is present in the field.
If cancelled we will simply clear the modal.
We are going to add a link on the calculator route to transition us to the review route. Lets add it in the register window itself but only when there is a register to save. Basically we will hide the button when it is not an option to save. Here is the screen shot:
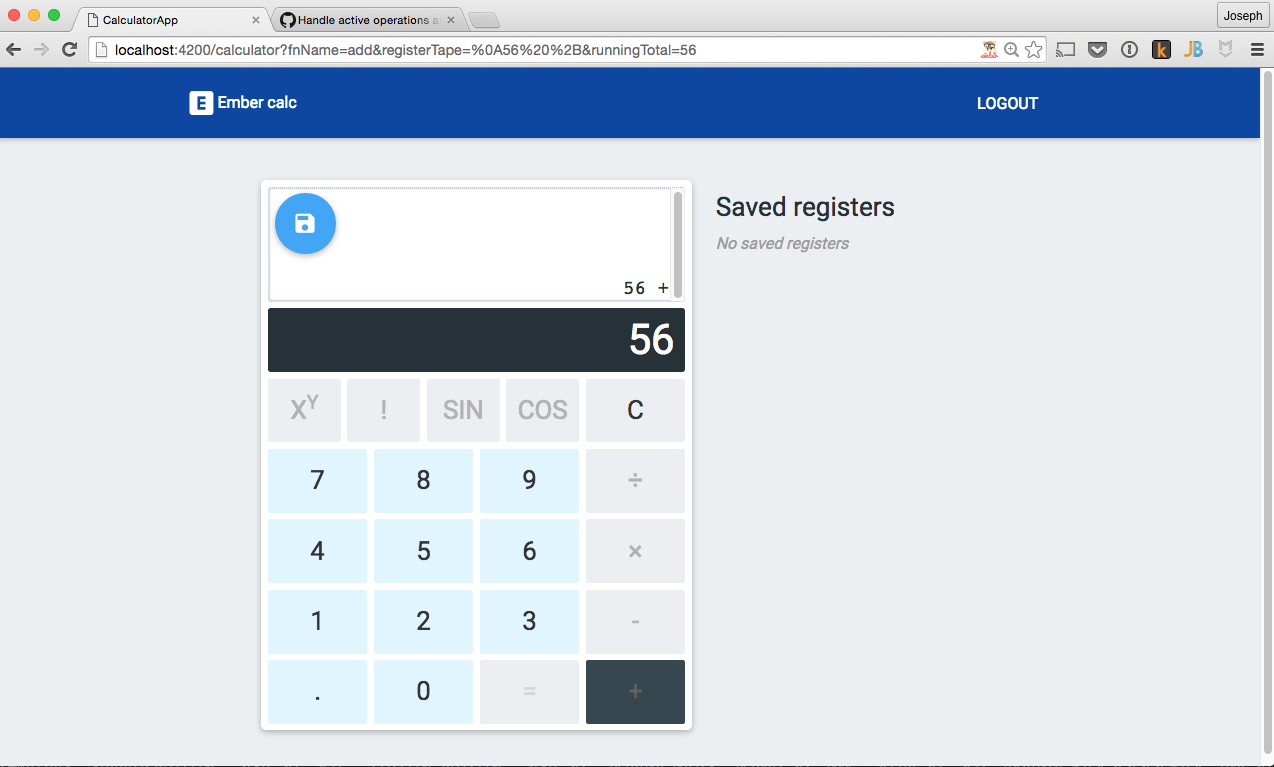
First lets add our link to the register-tape component:
Notice we used a link-to handlebar helper this works exactly the same as the transitionTo method that is written in the route objects. It is wrapped in a "if helper" so it only shows when we have a register.
Lets create the hasRegister property in the component so this works properly:
hasRegister: Ember.computed.notEmpty('register'),We have our link working now, you should be able to try it out by going to your calculator and clicking the button to transition to review. We even wrote the code that grabs the register off the controller and makes it your model.
Ok now on the the save modal functionality:
$ ember generate component save-register-modalThe component template:
The component js file:
import Ember from 'ember';

export default Ember.Component.extend({
    classNames: ['modal bottom-sheet'],
    content: null,
    elementId: 'saveRegisterModal',
    hasLabel: Ember.computed.notEmpty('content.label'),

    didInsertElement() {
        var context = this;

        this.$().openModal({
            ready() {
                context.$('#saveRegisterModal input:first-of-type').focus();
            },
            complete() {
                context.sendAction('clearSaveModal');
            }
        });
    },

    actions: {
        saveRegister(register) {
            this.$().closeModal();
            this.sendAction('saveRegister', register);
        },
        clearSaveModal() {
            this.$().closeModal();
            this.sendAction('clearSaveModal');
        }
    }
});
Ok so this is our modal, we needed it to be a component to have access to the didInsertElement hook, which was neccesary for the jquery operation we are doing. Which is an animation, you will see; it is beautiful!
We also have our actions that save the register, and clear the modal, both of these actions perform the closeModal jquery animation.
Finally the hasLabel computed property is the basis for our validation and prevention of the save button being pressed with out a label.
Next we need to generate a single template (with out a route or component):
$ ember generate template save-registerWe are going to use this template to render our new component into an outlet. This is required for now because only templates are routable (not components). Will be remedied in 2.4
now lets fill our empty save-register.hbs with our one line component invocation:
One other thing to note here I am using the old action bubbling syntax for my component, where I pass in the action name as a string. The reason I am doing this instead of the new syntax is the actions clearSaveModal and SaveRegister are on the route, and we have not needed to define a controller, ember instead is generating a generic controller at runtime.
I don't want to create the controller file and have to pass these down through the controller. So I am using the bubbling. Remember the (action "name") helper only finds functions that match its name on the current context so in this case the undefined controller. This is more just personal preference on my part and not something I would consider a best practice.
For now we have both of these action mechanisms, as we get closer to 3.0 it will be obvious how to refactor our action handling for the future of ember.
now we can create the clearSaveModal and saveRegister functions along with another action that shows the save modal. These are defined back on the review route.
actions: {
        saveRegister(model) {
            model.set('date', Date()); //just want string not object
            let savingPromise = model.save();
            savingPromise.then(() => {
                this.transitionTo('calculator');
            });
        },
        showSaveModal() {
            this.render('save-register',{
                into: 'application',
                outlet: 'modal',
                controller: this.get('controller')
            });
        },
        clearSaveModal() {
            this.disconnectOutlet('modal');
        },
        discardRegister() {
            this.transitionTo('calculator');
        }
}
You can call this.render anywhere on a route, but it is most often called in it's appropriate route hook, renderTemplate.
In the showSaveModal action we are rendering the save register template (which contains our component) into the modal outlet.
Which we should probably define:
Navigate to your application template we didn't create it but it always exists automatically.
right now it is:
make it:
Now we can render into the specific modal outlet while out main page remains rendered into the default (unamed) outlet in application.hbs.
So showSaveModal is rendering the modal which inits the component which animates into the screen (because of the code we put in didInsertElement).
clearModal which is tied to the modal cancel button. calls one simple function disconnectOutlet, this route method takes the name of a named outlet and removes what is rendered inside it.
Finally we have the saveRegister action, that actually saves the register after a label is passed by the user. In this function we are setting a date on the model, then saving the model, which returns a promise, we chain a then on to transfer back to calculator when we know we have saved.
Ok I feel like we are doing a lot right now, but it is good. As we go use concepts in the app I have already covered, I will move faster. We now have the modal functionalty complete and a direct way to get from calculator to review and from review back to calculator.
There is are a few bugs that we need to handle before we leave review route.
-
When we create a model with ember-data it is remembered at least locally even if not saved. This will create a problem for us if we don't destroy it when leaving the route. However we only want to destroy it if it has not been saved. ember-data gives us away to do this with the isNew property.
-
Since it is a dynamic route our modelhook runs every time. What if we navigate straight to this route '/review' with out building a calcualtor first, an example would be if the user bookmarks the URL. If this happens we won't have a register to find on our calculator controller, since it won't have existed yet. There is really no way arounds this as the review route is route that relies on temparary data that it will possibly save. We can't make it a dynamic route (that would be even worse) since there is nothing to lookup based on URL params. We just need to handle this the best we can which is if there is no register to show we should redirect back to calculator before we even attempt to create the model.
Here are the two route hooks we will use to fix these edge cases:
    beforeModel() {
        if (!this.controllerFor('calculator').get('registerTape')) {
            this.transitionTo('calculator');
        }
    },
    model() {
        return this.store.createRecord('register', {
            register: this.controllerFor('calculator').get('registerTape')
        });
    },
    deactivate() {
        let model = this.modelFor('review');

        if (model.get('isNew')) {
            model.deleteRecord();
        }
    }
The beforeModel hook is the best place to redirect from a route if you need to for some reason (like this), as it is the very first cook fired when a route is entered.
The deactivate hook is fired when the route is exiting. If the model has not been marked as saved we will delete it, a bit counter intuitive I know.
So we finished our review route but it isn't going to be able to save, because those are authenticated only APIs.
I guess we have to switch gears and develop the ability to login and out.
- A user should be able to login, and then transitioned to the calculator route.
- A user should stay logged in after closing tab/browser (handled by serverside cookies).
- A user should be able to logout, and be redirected to the login screen.
- A user can be created and then auto-loggedin and transitioned to calculator.
- A user should recieve notification of serverside errors when logging in or creating a user.
- An unauthenticated user should be redirected to login when atempting to visit an authenticated route.
Here is a concept you might not have read about in the Ember Guides although here is the page. Services in ember use mostly concepts we have already covered along with a few new concepts.
Services extend Ember.Object and are singleton instances that are created lazily and looked up when needed. All of this is also true of controllers. In fact before services existed we used to use controllers to fill their purpose.
What purpose is that?
Services are modules that hold state relating to an application concern and/or provide API functionalty for that concern. However the main distinction is the services functionality is required by multiple parts of the app.
Services live for the life of your application and should be used to share state that effects and can be manipulated by multiple routes/controllers/components.
A service can also be used to fetch data that is outside of your normal model system, specifically if that model system is ember data which has strict requirements for how requests are formatted.
A pretty diagram showing the complete Ember System.
-
login/logout APIs are not RESTful
-
Many places in the app want to know if we are authenticated.
-
Authentication is separate and does not belong on one particular route or controller.
Services unlike most things can be easily injected into another Ember.Prototype. A Service can be injected into anything including a plain Ember.Object, or Ember.Component which are otherwise isolated.
Here is the syntax for injecting a service onto another Ember.Prototype:
Ember.Route.extend({
session: Ember.inject.service()
})
It is important that the declared property name be the same as the service name so it can be successfully lookedup.
lets generate our session:
$ ember generate service sessionHere is the code for our services/session.js
import Ember from 'ember';

export default Ember.Service.extend({
    isAuthenticated: false,
    apiBase: "https://ember-calc.herokuapp.com/api/v1",
    attemptedTranstion: null,

    login(username, password) {
        return new Ember.RSVP.Promise((resolve, reject) => {
            let url = `${this.get('apiBase')}/login`;
            let success = () => {
                this.set('isAuthenticated', true);
                resolve();
            };
            let error = (jqXHR, status, err) => reject(err);

            Ember.$.ajax({
                method: "POST",
                data: {"username": username, "password": password},
                url,
                success,
                error
            });
        });
    },

    checkAuth() {
        return new Ember.RSVP.Promise((resolve, reject) => {
            let url = `${this.get('apiBase')}/checkAuth`;
            let success = () => {
                this.set('isAuthenticated', true);
                resolve();
            };
            let error = () => reject();

            // if marked as authenticated don't bother checking server
            if (this.get('isAuthenticated')) {
                resolve();
                return;
            }

            Ember.$.ajax({
                method: "GET",
                url,
                success,
                error
            });
        });
    },

    logout() {
        return new Ember.RSVP.Promise((resolve, reject) => {
            let url = `${this.get('apiBase')}/logout`;
            let success = () => {
                this.set('isAuthenticated', false);
                resolve();
            };

            let error = (jqXHR, status, err) => reject(err);

            Ember.$.ajax({
                method: "POST",
                url,
                success,
                error,
                xhrFields: {
                    withCredentials: true
                },
                crossDomain: true
            });
        });
    }
});
Ok! lots of code, but all concepts you know so I will just talk through what is happening.
- We are keeping up with authentication status with a property isAuthenticated.
- We are storing the apiBase (as we need it here and are outside of ember-data where we used it before).
- We have a property attemptedTransition that will potentially hold an ember transition object.
- login/logout methods that return promises which set isAuthenticated accordingly.
- checkAuth method which checks authenticated by checking the isAuthenticated flag, and if false making a server call to check if our session cookie is valid.
Lets generate our login route:
$ ember generate route loginAnd here is some login route code:
import Ember from 'ember';

export default Ember.Route.extend({
    session: Ember.inject.service(),
    model() {
        return Ember.Object.create({
            username: null,
            password: null
        });
    }
});

Ember data doesn't work in for this use case since logging in is outside normal CRUD operations. However a regular Ember.Object works perfectly as a model, all we need is a username and password.

Also we are injecting our session service into our login route, we will use it momentarily.


login.hbs markup:

```handlebars
<div class="row section">
    <div class="col s12 m10 offset-m1 white z-depth-1">
        <form>
            <div class="container">
                <h1>Sign in</h1>
                <div class="row">
                    <div class="col s12">
                        {{#link-to 'user.new'}}Not a user Yet? Sign up!{{/link-to}}
                    </div>
                    <div class="col s12">
                        <div class="row">
                            <div class="col s12">
                                {{#if model.errorMessage}}
                                    <h6 class="error-message">{{model.errorMessage}}</h6>
                                {{/if}}
                            </div>
                            <div class="input-field col s12">
                                {{input id="username" type="text" value=model.username}}
                                <label for="username">Username</label>
                            </div>
                            <div class="input-field col s12">
                                {{input id="password" type="password" value=model.password}}
                                <label for="password">Password</label>
                            </div>
                        </div>
                        <button class="waves-effect waves-light btn" type="submit">Sign in!</button>
                    </div>
                </div>
            </div>
        </form>
    </div>
</div>
Oh html, why must you look like that? Anyways alot of this is just wrappers for materialize css.
A couple notable things here, We are writing a link-to helper to transition to the user.new route for those not already signed up. We will need to make that route in a minute.
We also have an error message that is trying to render {{model.errorMessage}} however we haven't defined that on our model. We can actually set things on our model at runtime. We will set the error message if there is one, and then it will show up.
Finally it is worth mentioning, though it was covered in the ember guides, that input helpers are really awesome we can pass them any htm5 input type and the property passed to value will always hold the current input value.
Lets add an action for logging in:
actions: {
    login(username, password) {
        this.get('session').login(username, password).then(() => {
            this.transitionTo('calculator');
        }, () => {
            this.get('controller').set('model.errorMessage', 'Incorrect combination of username and password');
        });
    }
}
Our login action will call the login method on our session service, on success will transition us to calculator otherwise it sets errorMessage on the model like previously discussed. In a real world app having more robust error messaging would be desirable.
All the routes in our app other than login and user.new will require authentication.
So far (other than login) we have only defined:
- calculator
- review
We should create a Mixin which allows us to extend the contructor prototype in a specific way grouping logic that can be reused by mixing it in to other classes.
When defining Ember.Mixins you use the create method not the extend method.
Lets create our authenticated route:
$ ember generate mixin authenticatedimport Ember from 'ember';
export default Ember.Mixin.create({
session: Ember.inject.service(),
beforeModel(transition) {
return this.get('session').checkAuth().catch(() => {
transition.abort();
this.set('session.attemptedTransition');
this.transitionTo('login');
});
}
});The strategy here is simple. we use our injected session service to checkAuth in the beforeModel (the best place to do an early redirect).
The beforeModel has a transition argument that can be arborted and stored, to be retried later. which is what we are doing here, in the catch of the promise (meaning checkAuth returned a negative response). We store the transition in the session.attemptedTransition property we just defined and transition to login.
If the checkAuth is successful we just continue entering the route normally.
lets update our other routes by adding our authentiated mixin:
calculator route:
import Ember from 'ember';
import Authenticated from '../mixins/authenticated';

export default Ember.Route.extend(Authenticated, {
    model() {
        return this.store.findAll('register');
    },
    actions: {
        goToViewRegister(register) {
            this.transitionTo('view-receipt', register);
        }
    }
});
review route:
import Ember from 'ember';
import Authenticated from '../mixins/authenticated';

export default Ember.Route.extend(Authenticated, {
    beforeModel(...args) {
        this._super(...args);
        if (!this.controllerFor('calculator').get('registerTape')) {
            this.transitionTo('calculator');
        }
    },
    model() {
        return this.store.createRecord('register', {
            register: this.controllerFor('calculator').get('registerTape')
        });
    },
    deactivate() {
        let model = this.modelFor('review');

        if (model.get('isNew')) {
            model.deleteRecord();
        }
    },
    actions: {
        saveRegister(model) {
            model.set('date', Date()); //just want string not object
            let savingPromise = model.save();
            this.controller.set('savePromise', savingPromise);
            savingPromise.then(() => {
                this.transitionTo('calculator');
            });
        },
        showSaveModal() {
            this.render('save-register',{
                into: 'application',
                outlet: 'modal',
                controller: this.get('controller')
            });
        },
        clearSaveModal() {
            this.disconnectOutlet('modal');
        },
        discardRegister() {
            this.transitionTo('calculator');
        }
    }
});
Adding a mixin is the same as over writing a method on the prototype. The fact that our Mixin uses beforeModel to detect authentication and redirect, must now be considered when implementing the beforeModel on any authenticated route, like we do in review route.
To fix this call the super method with this._super(..args) to ensure the parent behavior is maintained. In our case the breaking of our authenticated paradigm.