Arduinoflake is an awesome winter decoration that will light up every dark night. It is no ordinary decoration. This frozen looking beauty is Arduino compatible and can be programmed to do whatever you want to! It features a capacitive touch button which let you interact with it. Last but not least it is open-source.
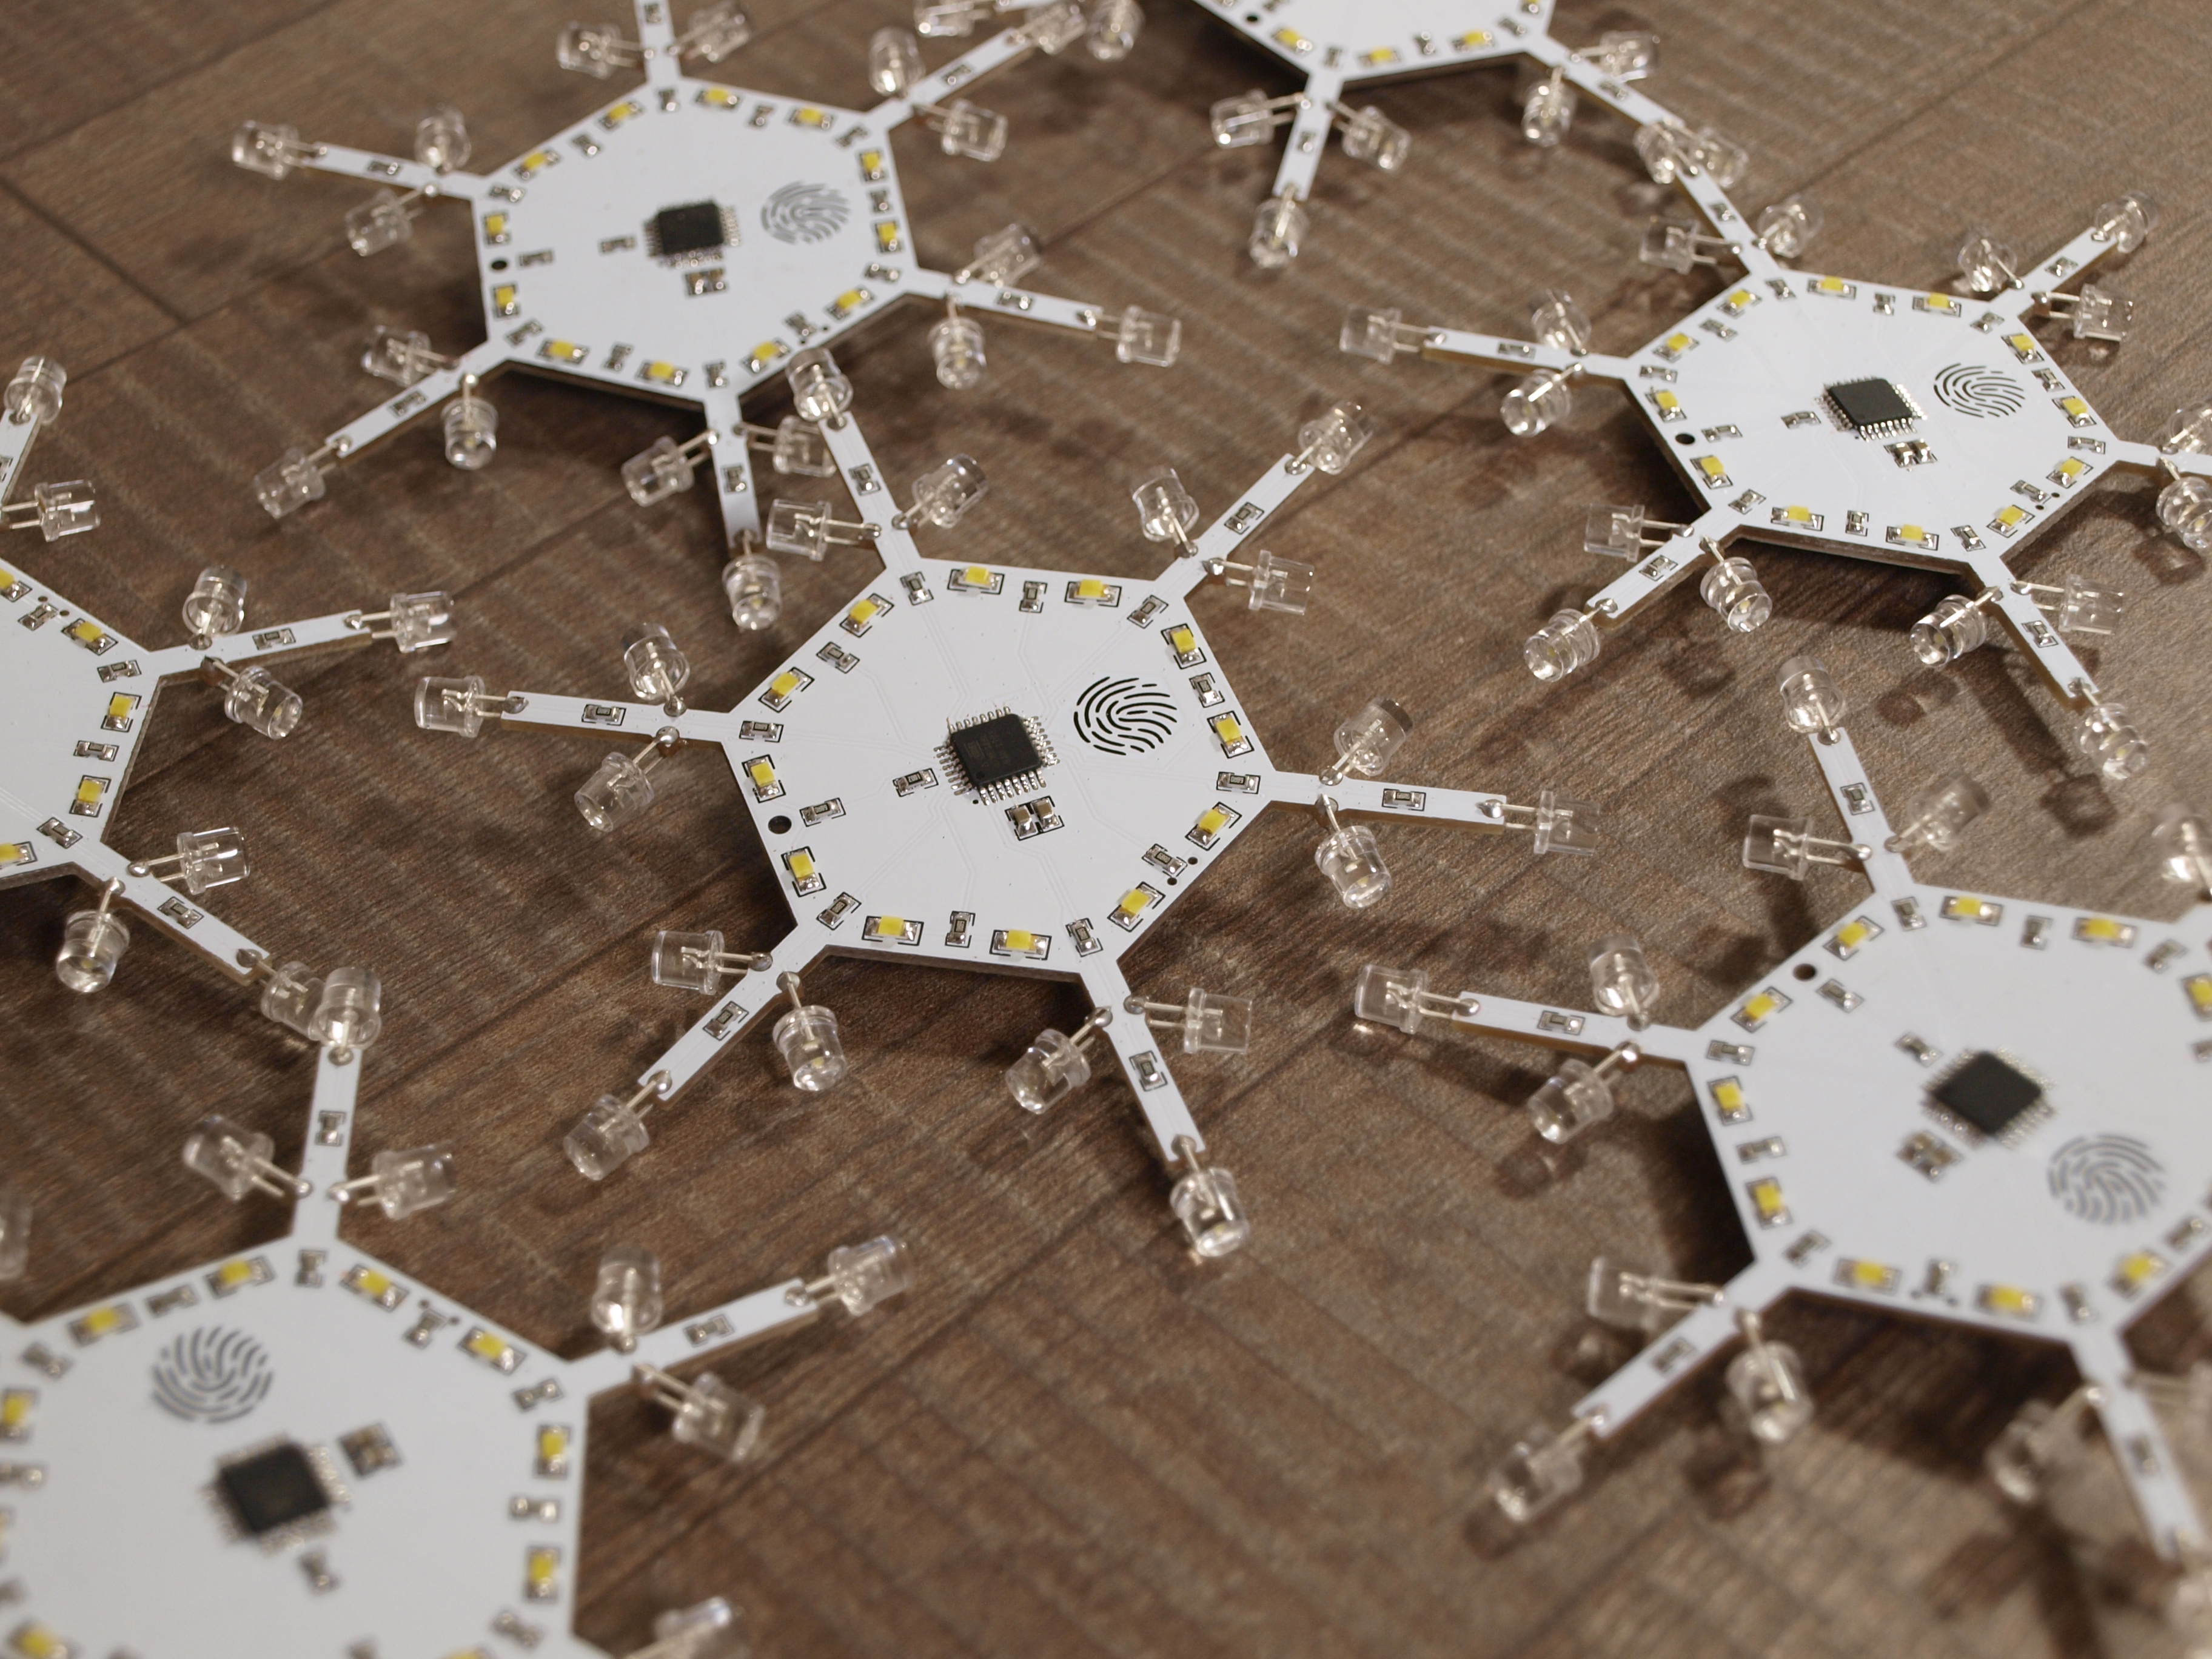
- 30 LEDs grouped into 18 independent segments
- touch button for interactions
- ATmega8 Arduino compatible microprocessor
- micro USB interface for programming (CH340 USB-to-UART)
- AVR ISP interface for bootloader flashing
- runs up to 12 hours on a single CR2032 battery
The easiest way how to get your own snowflake is to order a DIY kit on my Tindie Store. Kit contains professionally manufactured PCBs by PCBway and all compatible components needed to assemble a fully functional Arduinoflake.
The second option is to manufacture the PCB and get all necessary parts yourself. Arduinoflake is Open-Source. Schematic and Gerber files are included in this repository. Don't forget to share your creation with me, I would love to see that!
- rev1 - no dedicated touch IC
- rev2 - public version without USB (2018)
- rev3 - private beta with USB
- rev4 - public version with USB (2019)
- ATmega8A TQF32
- TTP223 SOT23
- CH340E MSOP-10
- 18x bright white flat-top crystal clear LEDs
- 12x bright white 1206 SMD LEDs
- 18x 68Ω resistors
- 5x 100nF capacitors
- 50pF capacitor
- 10kΩ resistor
- 2x 1kΩ resistors
- micro USB connector
- CR2032 battery holder
- MSK-12C02 power switch
Arduinoflake consists of 30 white LEDs grouped into 18 segments. Each group is connected to one of the ATmega8 output pins and can be programmatically controlled. The touch button is handled by standalone TTP223 integrated circuit and is connected to PD3 input pin with interrupt support.
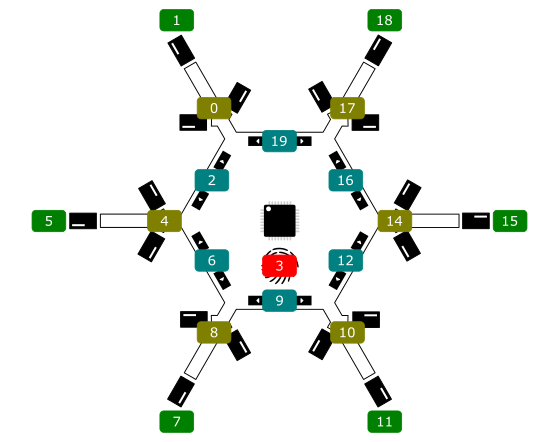
Arduinoflake LED groups to ATmega8 digital pins mapping
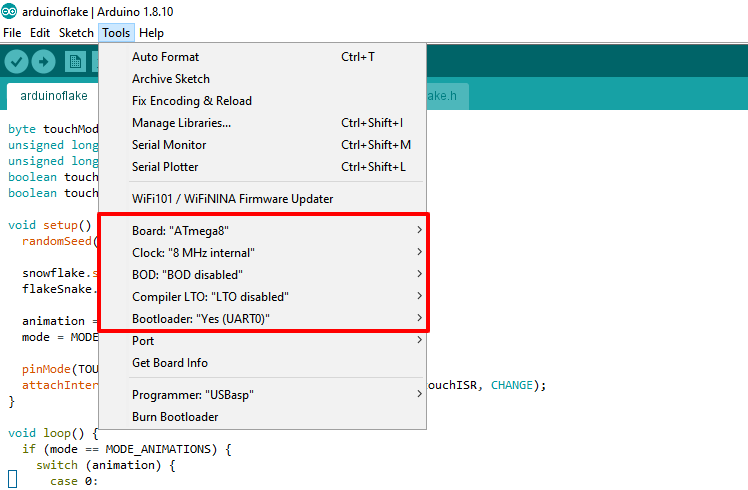
Arduinoflake can be programmed using the Arduino IDE. However, the Atmega8 chip is not supported by default and you need to add the support first and configure it.
- Install MCUdude/MiniCore device library
- Open Tools > Boards and select ATmega8
- Select Tools > Clock > 8 MHz internal
- Select Tools > BOD > Disabled
- Select Tools > Compiler LTO > LTO disabled
- Select Tools > Bootloader > Yes (UART0)
If you purchased the kit from me, your chip already has a bootloader flashed and can be connected and programmed via USB - skip this part. If you started with a blank microprocessor you need special hardware to upload bootloader to the chip to be able to communicate via USB. If there is a problem with USB programming, it's also wise to try to flash the bootloader again.
USBasp is a cheap $1 board that allows you to connect any ATmega chip with your computer via USB. Including Arduinoflake. It translates USB commands into AVR ISP commands that can program the processor.
There is an ISP interface in the left corner on the back of Arduinoflake. You can either use pogo pins if you have those or solder 6-pin header directly to the board to easily connect your ISP cable. Arduinoflake is both 3.3V and 5V tolerant.
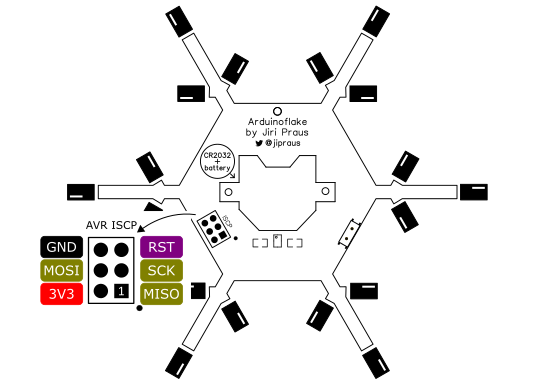
AVR ISP programming interface
You can turn common Arduino UNO or any other Arduino board into programming hardware. its a bit messy, but does not require special hardware. Read how to turn your Arduino UNO into a programmer. The rest is same as with USBasp.
Do you have your programmer set? Go now to Arduino IDE and with above settings run Tools > Burn Bootloader
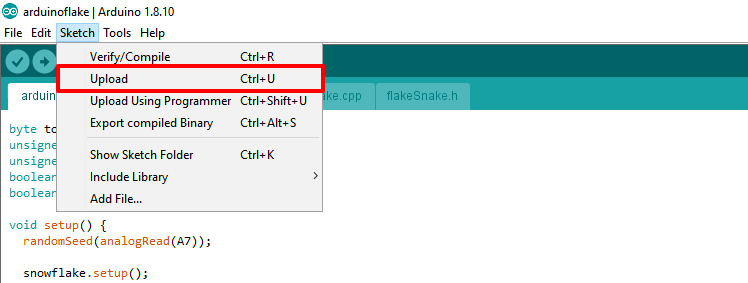
Checkout this repository and open arduinoflake.ino project file. Connect your Arduinoflake to your computer via micro USB cable. Make sure you are using smart USB cable, some of the cables are power only and thus cannot transfer data at all. Select the port of your Arduinoflake, it should be the one that just appears. You might need to install a CH340 driver.
Run Sketch > Upload. You should get a sweet 'avrdude done. Thank you.' message at the end of the console. Now you can make your own personalized Arduinoflake.
Getting started with the Arduinoflake library Arduinoflake comes with handy canvas.cpp class which creates an abstraction over the Arduinoflake hardware. You will use it to paint your Arduinoflake with lights.
- LEDs are addressed with index (0-18)
- setup single LED
- setup range of LEDs
- power management
- software PWM for each LED (to be done)
- touch button abstraction (to be done)
CANVAS(byte numLedsAtOnce);
- numLedsAtOnce - power saving factor, number between 1-18, high number high power consumption but also brighther LEDs
void setup()
Need to be called in project's setup() function to setup hardware.
void render()
Need to be called every 1ms in project's loop() function to be able toproperly control LEDs.
void set(byte index, byte value);
Set brightness value to LED on index. Use LED_ON or LED_OFF constant for value.
void setByRange(byte fromIndex, byte toIndex, byte value);
Set brightness value to LEDs on indeces <fromIndex, toIndex). Use LED_ON or LED_OFF constant for value.
void clear();
Turn off all LEDs.
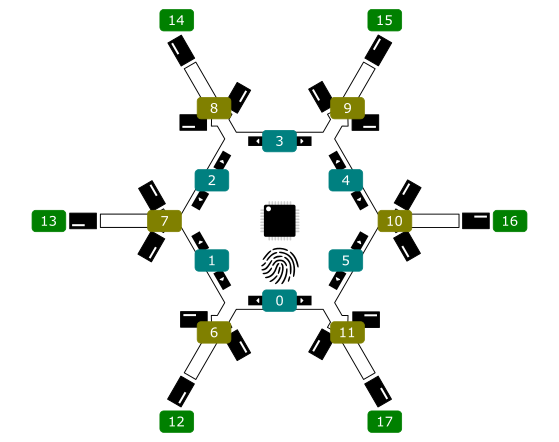
Arduinoflake LED groups indexes used in library
- Add touch button abstraction to hardware class
- Add support for PWM
- Add more animations