SampleInstaller
In this short tutorial we will demonstrate the main ideas behind RGUILS by automating the Sikuli installer GUI.
The goal here is to create an object-oriented API to access the installer GUI, rather than just automating fixed UI interaction sequences. With the API it becomes very easy to automate any sequence of actions in a simple and robust way. Here's an example:
from sampleinstaller import Installer

installer = Installer(INSTALLER_EXE_PATH)

installer.run()                            # launch installer with welcome page
installer.next()                           # go to "Configure Shortcuts"
installer.configure_quick_launch_shortcut(False)
installer.next()                           # go to "Select Installation Folder"
installer.next()                           # go to "Ready to Install"
installer.install()                        # start installation
installer.wait_until_finished()
installer.finish()                         # close installer
All images in this tutorial were taken on a Windows XP system, but the principles outlined here are mostly system independent. You should have some familiarity with Sikuli (you may want to read the Sikuli overview first). The article about robust GUI automation is recommended for further reading.
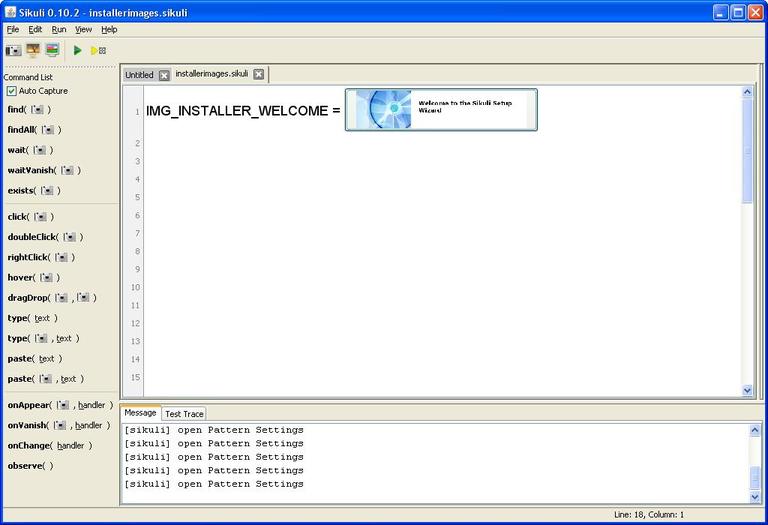
We shall start by collecting images of the installer buttons and other GUI elements that we want to interact with through Sikuli. For this, we shall use the Sikuli IDE and create a project in which we merely assign the images to constants, so we can later import them using the SikuliImport module. In this tutorial we choose the name of the Sikuli project to be installerimages.
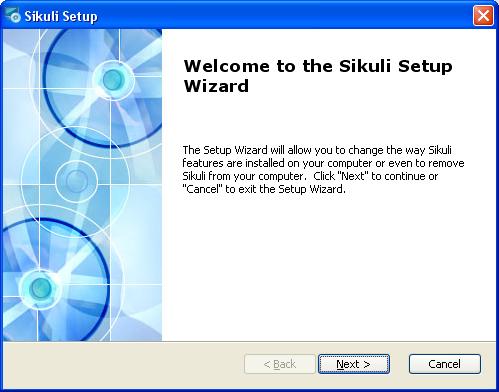
In order for RGUILS to determine the location of the installer window on the screen, we need an anchor image, i.e. a portion of the installer window that is unique to the installer window.
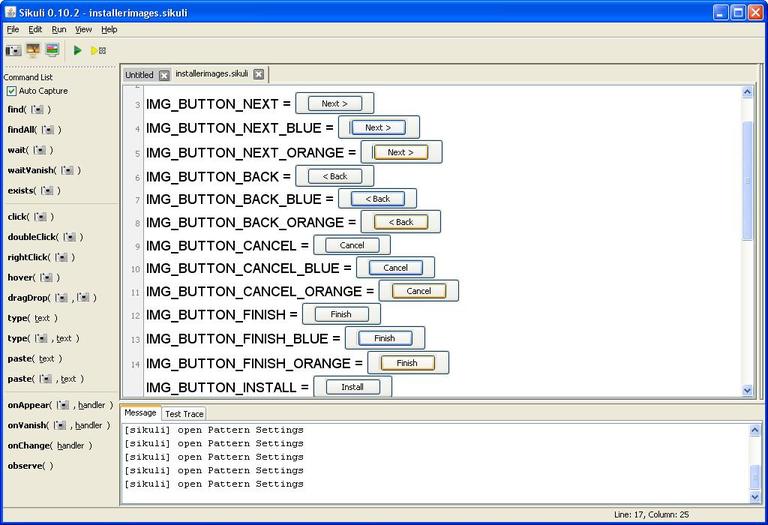
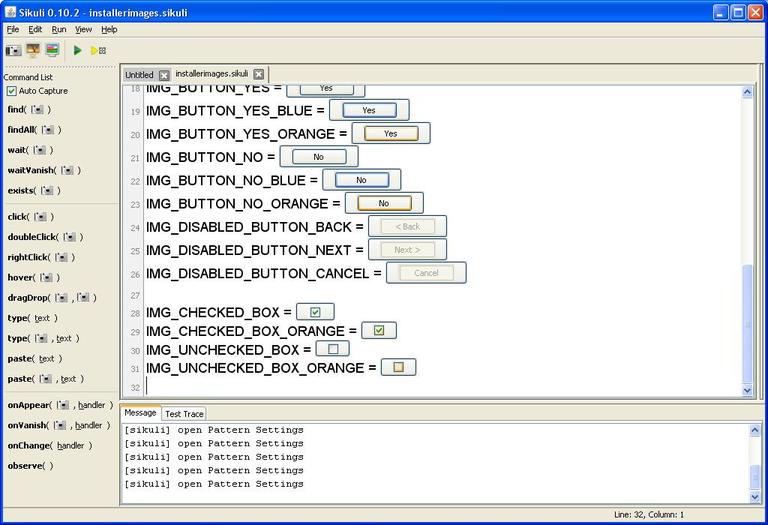
Next, we capture images of all the buttons that exist in the installer window. There are five buttons in the installer window (for this tutorial we use only buttons that are used for installing Sikuli and ignore buttons for removing or changing an installation): Back, Next, Cancel, Install and Finish. In addition, the confirmation popup window contains two buttons, Yes and No.
Each button has three different styles: no focus (thin black border), focus (thick blue border) and mouse over (thick orange border). (If the focus is put on a button using the Tab key, there is an additional inner dotted border, but we ignore this here.) In addition, some buttons (Back, Next, Cancel) may be disabled (light gray border and text), depending on the current page and actions performed by the installer.
We collect images of each button in all possible states. To capture a button in different states, we capture it multiple times using the Sikuli IDE and change its state everytime:
- To move the focus on a button, click on it but drag the mouse pointer off the button while holding the mouse key pressed, then release the mouse key. (Another option is to use the Tab key, but this adds the dotted inner border.)
- To remove the focus from a button, move it to another button using the Tab key or by clicking on it and dragging the mouse key off it. If there is no other button that can get the focus, bring another window to the front but don't let it cover the button.
- To change the border color to orange, hover the mouse pointer over the button. In order to capture the button with the orange border, you must first click the camera icon in the Sikuli IDE, and in the two seconds before the Sikuli IDE captures your screen hover the mouse pointer over the button. Don't worry, the mouse pointer is not captured.
Finally, the Configure Shortcuts page contains checkboxes to select where shortcuts to the Sikuli IDE should be created by the installer, so we take images of them as well:
Note the naming scheme. The constants IMG_BUTTON_NAME*, IMG_DISABLED_BUTTON_NAME*, IMG_CHECKED_BOX* and IMG_UNCHECKED_BOX* are used by the Images module to create dictionaries with images that can be used to create instances of Buttons and Checkboxes.
The SikuliImport and Images modules make it easy to import images from a Sikuli project into our own sample installer module. All we have to do is create a settings.py file and place it in the sikuliimport directory:
"""settings.py
   put this file in the sikuliimport directory
"""

import os.path
from userlib import USERLIBDIR

# full path of the Sikuli project folder
INSTALLER_IMAGES_DIR = os.path.join(USERLIBDIR, 'installerimages.sikuli')

# full directory paths of sikuli projects that should be imported
SIKULI_PROJECT_DIRS = [INSTALLER_IMAGES_DIR]
Now we can import the images as constants from the sikuliimport.projects module:
from sikuliimport.projects import IMG_INSTALLER_WELCOMEFurthermore, the Images module provides dictionaries with buttons, checkboxes and radio buttons by parsing the names of the image constants. These dictionaries are suitable to create objects using the Buttons and Checkboxes modules:
from seagull.images import IMG_BUTTONS

# IMG_BUTTONS['next'] = list of all Next button imagesCreate a new module file sampleinstaller.py with a class Installer. We pass the path to the installer executable to the constructor. To launch the installer, we call Sikuli's openApp method.
"""sampleinstaller.py"""

import os.path
from sikuli.Sikuli import openApp

class Installer:
    """Class to automate the Sikuli installer."""

    def __init__(self, installer_exe_path):
        if not os.path.exists(installer_exe_path):
            raise Exception('No such file: %s' % installer_exe_path)
        self.path = installer_exe_path

    def run(self):
        """Runs the installer."""
openApp(self.path)The first step to interact with the installer window through Sikuli is to determine its size and location on the screen. Since the window size is fixed, we can simply measure it (for example, using the selectRegion function in the Sikuli IDE) and define two constants, WINDOW_WIDTH and WINDOW_HEIGHT.
The location of the installer window on the screen may not be known a priori. The AnchoredRegion class (see Util) and its subclass AnchoredWindow (see Window) provide a convenient way to determine the location of a region on the screen by providing an anchor image, i.e. an image that occurs at a fixed offset to the top-left corner of the region.
We import the anchor image from our installerimages Sikuli project and define two constants with the offset of the image in the installer window. Then we make the Installer class a subclass of AnchoredWindow and pass the anchor image, the window size and the anchor image offset to the AnchoredWindow __init__ method. When the installer is launched, we call the anchor method, which waits for the anchor image to appear and then sets the window coordinates accordingly.
import os.path
from sikuli.Sikuli import openApp
from seagull.window import AnchoredWindow
from sikuliimport.projects import IMG_INSTALLER_WELCOME

WELCOME_WINDOW_TIMEOUT = 30
ANCHOR_IMAGE_OFFSET_X = 3
ANCHOR_IMAGE_OFFSET_Y = 30
WINDOW_WIDTH = 499
WINDOW_HEIGHT = 392

class Installer(AnchoredWindow):
    """Class to automate an installer."""

    def __init__(self, installer_exe_path):
        if not os.path.exists(installer_exe_path):
            raise Exception('No such file: %s' % installer_exe_path)
        self.path = installer_exe_path
        AnchoredWindow.__init__(self, IMG_INSTALLER_WELCOME,
                ANCHOR_IMAGE_OFFSET_X, ANCHOR_IMAGE_OFFSET_Y,
                WINDOW_WIDTH, WINDOW_HEIGHT,
                name = 'installer', title = 'Setup')

    def run(self):
        """Runs the installer."""
        openApp(self.path)
self.anchor(WELCOME_WINDOW_TIMEOUT)To automate the installer buttons, we use the Buttons class. This class takes a dictionary object, where the keys are button names and each value is a list of different images of the same button, and locates all the buttons that exist in a specified region. The Images module creates those dictionary objects automatically from the button images in our installerimages Sikuli project. The Buttons class also determines if a button is disabled, if images of disabled buttons are provided.
We restrict the button region to the lower area of the installer window. This speeds up searching for button images by Sikuli considerably and makes it a lot more robust. After all buttons on the installer welcome page have been identified by the find_buttons method, we wait until the Next button is enabled. This usually takes a few seconds while the installer is loading resources.
import os.path
from sikuli.Sikuli import openApp
from sikuli.Region import Region
from seagull.window import AnchoredWindow
from seagull.buttons import Buttons
from sikuliimport.projects import IMG_INSTALLER_WELCOME
from seagull.images import IMG_BUTTONS, IMG_BUTTONS_DISABLED

WELCOME_WINDOW_TIMEOUT = 30
ANCHOR_IMAGE_OFFSET_X = 3
ANCHOR_IMAGE_OFFSET_Y = 30
WINDOW_WIDTH = 499
WINDOW_HEIGHT = 392
BUTTON_REGION_HEIGHT = 48
NEXT_BUTTON_ENABLED_TIMEOUT = 20

class Installer(AnchoredWindow):
    """Class to automate an installer."""

    def __init__(self, installer_exe_path):
        if not os.path.exists(installer_exe_path):
            raise Exception('No such file: %s' % installer_exe_path)
        self.path = installer_exe_path
        AnchoredWindow.__init__(self, IMG_INSTALLER_WELCOME,
                ANCHOR_IMAGE_OFFSET_X, ANCHOR_IMAGE_OFFSET_Y,
                WINDOW_WIDTH, WINDOW_HEIGHT,
                name = 'installer', title = 'Setup')

    def run(self):
        """Runs the installer."""
        openApp(self.path)
        self.anchor(WELCOME_WINDOW_TIMEOUT)
        self.button_region = Region(self.getX(),
                self.getY() + self.getH() - BUTTON_REGION_HEIGHT,
                self.getW(), BUTTON_REGION_HEIGHT)
        self.buttons = Buttons(IMG_BUTTONS,
                IMG_BUTTONS_DISABLED, region = self.button_region)
        self.buttons.find_buttons()
        self.buttons.waitUntilButtonIsEnabled('next', NEXT_BUTTON_ENABLED_TIMEOUT)
Note the 'next' argument to waitUntilButtonIsEnabled: This is the key in the IMG_BUTTONS dictionary for the Next button images, and it is derived by the Images module from the IMG_BUTTON_NEXT* constant names in our Sikuli project file.
Also, note that even though the Yes and No buttons are not used in the installer main window, for simplicity we use all button images for the main window buttons.
To navigate between the different installer pages, we define a number of methods that use the Next, Back, Finish and Cancel buttons. Add the following import to the top of the file:
from time import sleepThe add the following methods to the Installer class:
    def next(self):
        """Clicks the Next button."""
        self.buttons.click('next')
        sleep(1)

    def back(self):
        """Clicks the Back button."""
        self.buttons.click('back')
        sleep(1)

    def install(self):
        """Clicks the Install button."""
        self.buttons.click('install')
        sleep(1)

    def finish(self):
        """Clicks the Finish button."""
        self.buttons.click('finish')
        sleep(1)

    def cancel(self):
        """Clicks the Cancel button."""
        self.buttons.click('cancel')
        sleep(1)
After clicking a button, we sleep for one second to allow the installer to react.
Instead of letting Sikuli click on the buttons, we can also use keyboard shortcuts, which may be faster and more robust. Add the following imports at the beginning of the file:
from sikuli.Sikuli import openApp, SCREEN
from sikuli.Key import Key, KEY_ALT
Then add the keyboard based navigation methods:
    def next_key(self):
        """Presses the Next button using the keyboard."""
        self.setFocus()
        SCREEN.type('n', KEY_ALT)
        sleep(1)

    def back_key(self):
        """Presses the Back button using the keyboard."""
        self.setFocus()
        SCREEN.type('b', KEY_ALT)
        sleep(1)

    def install_key(self):
        """Presses the Install button using the keyboard."""
        self.setFocus()
        SCREEN.type('i', KEY_ALT)
        sleep(1)

    def finish_key(self):
        """Presses the Finish button using the keyboard."""
        self.setFocus()
        SCREEN.type('f', KEY_ALT)
        sleep(1)

    def cancel_key(self):
        """Presses the Cancel button using the keyboard."""
        self.setFocus()
        SCREEN.type(Key.ESC)
        sleep(1)
Key-press events are generated in Sikuli by calling the type method on a region (the sikuli.Sikuli module also defines a type function, but we avoid this because if overrides the python built-in type function). Here, we call type on the SCREEN object.
To ensure that the key-press events reach the installer window, and not some other application window, we call setFocus (see Window), which gives the installer window focus by clicking on the window title bar (note that Installer is an indirect subclass of Window). Giving the window focus explicitly is very useful when an Installer instance is created in a Jython command prompt and the navigation methods are called from there, because at the time we hit Enter the focus is on the Jython command window and not on the installer window.
By default the Sikuli installer adds shortcuts to the Sikuli IDE on the user's desktop, in the Windows start menu, and in the quick launch toolbar. These can be disabled by unchecking one or more of the checkboxes on the Configure Shortcuts page.
To automate the checkboxes, we use the VerticalCheckboxList class (see Checkboxes). It accepts a dictionary with checkbox images (as provided by the Images module) and identifies all checkboxes in a given region, and what their state (i.e. checked or unchecked) is. Add the following imports to the beginning of the file:
from seagull.checkboxes import VerticalCheckboxList
from seagull.images import IMG_BUTTONS, IMG_BUTTONS_DISABLED, IMG_CHECKBOXES
Then change the run method as shown, and add the methods to configure the application shortcuts:
    def run(self):
        """Runs the installer."""
        openApp(self.path)
        self.anchor(WELCOME_WINDOW_TIMEOUT)
        self.button_region = Region(self.getX(),
                self.getY() + self.getH() - BUTTON_REGION_HEIGHT,
                self.getW(), BUTTON_REGION_HEIGHT)
        self.buttons = Buttons(IMG_BUTTONS,
                IMG_BUTTONS_DISABLED, region = self.button_region)
        self.buttons.find_buttons()
        self.buttons.waitUntilButtonIsEnabled('next', NEXT_BUTTON_ENABLED_TIMEOUT)
        self.shortcut_checkboxes = None

    def _configure_shortcut(self, shortcut, add_shortcut):
        if self.shortcut_checkboxes is None:
            self.shortcut_checkboxes = VerticalCheckboxList(IMG_CHECKBOXES,
                    region = self)
            self.shortcut_checkboxes.find_elements()
        if bool(add_shortcut) != self.shortcut_checkboxes.is_checked(shortcut):
            if bool(add_shortcut):
                self.shortcut_checkboxes.check(shortcut)
            else:
                self.shortcut_checkboxes.uncheck(shortcut)
            sleep(1)

    def configure_desktop_shortcut(self, add_shortcut = True):
        """Checks the checkbox for the Desktop shortcut.
           If add_shortcut is False, unchecks the checkbox.
        """
        self._configure_shortcut(0, add_shortcut)

    def configure_start_menu_shortcut(self, add_shortcut = True):
        """Checks the checkbox for the Start Menu shortcut.
           If add_shortcut is False, unchecks the checkbox.
        """
        self._configure_shortcut(1, add_shortcut)

    def configure_quick_launch_shortcut(self, add_shortcut = True):
        """Checks the checkbox for the Quick Launch shortcut.
           If add_shortcut is False, unchecks the checkbox.
        """
        self._configure_shortcut(2, add_shortcut)
Once the checkbox list instance has been created and the checkboxes identified (by calling find_elements), a checkbox can be checked and unchecked simply by calling the check and uncheck methods with the checkbox index.
Note that the checkbox list instance is only created when it is needed, and it is created only once everytime the installer is run. The checkbox list instance is aware of the current state of the checkboxes.
When the Install button is pressed, the installer begins installing Sikuli. Depending on system resources, the installation process can take several seconds up to a few minutes. When the installation is complete, the buttons in the installer window change and the Finish button appears.
We can check whether installation has finished by observing the installer window and checking for the presence of the Finish button. Note that the automation script (or the Jython runtime for that matter) is running in its own separate process, independently of the Sikuli installer, so it can observe the installer while the installation process is running.
Add the following import to the beginning of the file:
from seagull.util import WaitThen add the following methods to the Installer class:
    def is_finished(self):
        """Returns True if the installer has finished installing.
           More precisely, returns True if the Finish button exists in the
           installer window.
        """
        self.buttonlist.find_buttons()
        return self.buttonlist.exists_button('finish')

    def wait_until_finished(self, timeout = INSTALL_TIME_MAX_SECONDS):
        """Waits until the installation is finished.
           Checks every 3 seconds if the Finish button exists.
           Raises TimeoutExceeded if the installer is not finished after the
           specified timeout.
        """
        waiting = Wait(timeout, interval = 3,
                exception_message = 'installer not finished after %f seconds' %
                timeout)
        while not self.is_finished():
            waiting.wait()
The is_finished method updates the buttons object in the Installer instance and checks whether the Finish button was found. The wait_until_finished method calls is_finished repeatedly, sleeping in between, until the Finish button is found or the maximum wait time is exceeded. In the latter case TimeoutExceeded is raised (see Wait in Util).
You may have noticed that when you call the cancel method, there is nothing that handles the confirmation window that pops up when the Cancel button is pressed. We shall add a method confirm_cancel that clicks the Yes button (or the No button if requested) in the popup window. To do so, we use a separate button list object with only the images of those two buttons, and restrict it to the region of the popup window. The popup window always appears in the center of the installer window. We define two constants with the popup window dimensions:
CONFIRM_WINDOW_WIDTH = 349
CONFIRM_WINDOW_HEIGHT = 143
Next, we add some code to the run method that calculates the location of the popup window region and defines the buttons:
    def run(self):
        """Runs the installer."""
        openApp(self.path)
        self.anchor(WELCOME_WINDOW_TIMEOUT)
        self.button_region = Region(self.getX(),
                self.getY() + self.getH() - BUTTON_REGION_HEIGHT,
                self.getW(), BUTTON_REGION_HEIGHT)
        self.buttons = Buttons(IMG_BUTTONS,
                IMG_BUTTONS_DISABLED, region = self.button_region)
        self.buttons.find_buttons()
        self.confirm_window_region = Region(
                self.getX() + (self.getW() - CONFIRM_WINDOW_WIDTH) / 2,
                self.getY() + (self.getH() - CONFIRM_WINDOW_HEIGHT) / 2,
                CONFIRM_WINDOW_WIDTH, CONFIRM_WINDOW_HEIGHT)
        self.confirm_buttons = Buttons({ 'yes' : IMG_BUTTONS['yes'],
                'no' : IMG_BUTTONS['no'] }, region = self.confirm_window_region)
        self.buttons.waitUntilButtonIsEnabled('next', NEXT_BUTTON_ENABLED_TIMEOUT)
        self.shortcut_checkboxes = None
Now we can add the confirm_cancel method which finds the buttons in the popup window region and clicks the specified button ('yes' or 'no'). We modify the cancel method so that it clicks the Yes button after hitting Cancel.
    def confirm_cancel(self, button):
        """Clicks the specified button in the confirmation window."""
        self.confirm_buttons.find_buttons()
        self.confirm_buttons.click(button)
        sleep(1)

     def cancel(self):
         """Clicks the Cancel button and the Yes button in the confirmation popup."""
         self.buttons.click('cancel')
         sleep(1)
         self.confirm_cancel('yes')
We can also modify the keyboard based cancel method to use the keyboard shortcut for the Yes button:
     def cancel_key(self):
         """Presses the Cancel button and the Yes button in the confirmation popup
            using the keyboard.
         """
         self.setFocus()
         SCREEN.type(Key.ESC)
         sleep(1)
         SCREEN.type('y')
sleep(1)To close the installer window, you click Cancel, confirm and click Finish. You can also click on the Close button in the window title bar, which has the same effect of hitting Cancel when the Cancel button is enabled, and Finish when the Finish button is enabled.
Since our Installer class is a subclass of Window (by virtue of AnchoredWindow), it has a close method that clicks on the Close button in the window title bar. In order to shut down the installer without installing, it has to be called twice:
installer = Installer(INSTALLER_EXE_PATH)
installer.run()

# shut down
installer.close()
installer.confirm_cancel('yes')
installer.close()This tutorial has shown how to develop an object-oriented API to access and control the GUI of a software installer like the Sikuli installer. The API allows us to perform any sequence of actions on the installer with only a few lines of code. Since the API is so simple, we can even use it to control the installer from the command line (from a Jython command prompt) interactively.
We have not covered all of the functionality offered by the installer. We focused on installing but did not touch on removing or altering an installation (also we skipped the installation path configuration). Most of these are straightforward to add.
You may have wondered how it is possible to do an automated installation of Sikuli using Sikuli (or Sikuli Script, to be more precise) if Sikuli is not (yet) installed on your machine. For this example, simply install Sikuli manually, then copy the whole installation folder to a new folder, and uninstall Sikuli. You can run Sikuli out of the copied folder, even if it is not officially installed on your computer. Also see the installation instructions in GettingStarted.