| Info | Value |
|---|---|
| Created by | Keith Vassallo |
| Acknowledgements | @peterforgacs |
| Related Reading | Original Guide |
Check out a video version of this guide at: VIDEO COMING SOON
Aims and Prerequisites
Create a Machine Image
Create an AWS Role
Create an AMI
Run an Instance
Optional: Enable ENA
Optional: Install Nvidia Drivers
This quick guide shows how you can install Windows 10 on an AWS EC2 instance.
You will need:
- An AWS account (Duh!).
- A Windows 10 licence key. You must have a Pro or Enterprise licence. Windows 10 Home will not work. Also, you must use a 64-bit version of Windows.
- Virtualbox, or some other virtualisation software.
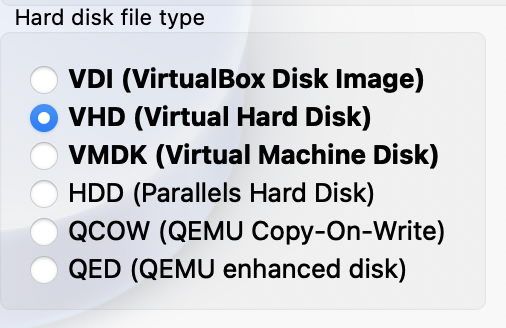
- Use VirtualBox or some other virtualisation software to create a new virtual machine. Make sure the disk image is at least 20GiB in size and that you choose a vhd format for the disk.
-
Install Windows on the VM. I would recommend you create a local user and not to login with your Microsoft account. Also, now would be a good time to run Windows Update and install any available updates.
-
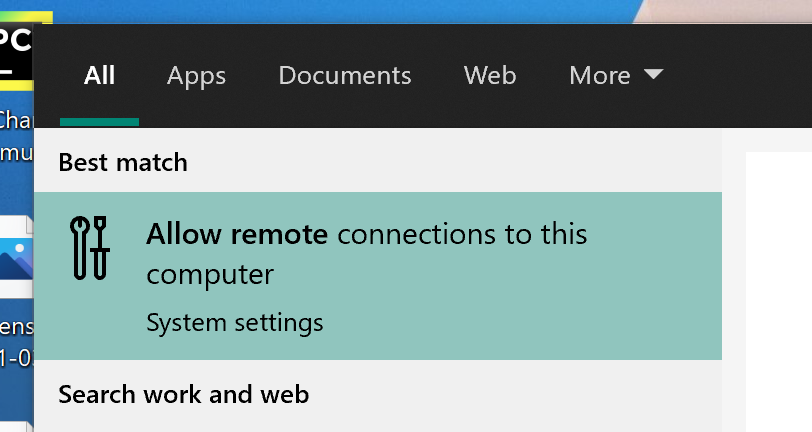
Once the updates are installed, click go to Start > Allow remote connections to this computer. From here, click Show settings next to Change settings to allow remote connections to this computer.
- Select the Allow remote connections to this computer item, and disable the Network Level Authentication checkbox right under it.

-
Install EC2Launch v2 on the VM.
-
If you want, you can set a password for the Administrator user to make things easier down the line, although this is not strictly required.
-
Restart and exit the VM.
The following steps should be done on your host system, i.e. not the VM.
-
Install the AWS CLI tools on your system. You can download them for Windows, macOS or Linux.
-
Type the following in a Terminal on macOS/Linux, or Terminal/PowerShell/Command Prompt on Windows:
aws configure-
You will be asked for an access key and secret access key. You can create keys from here. You can also specify a default region - it's a good idea to set this to the region you wan to run your EC2 instance in (if you do that, you can omit the --region option from the commands below).
-
Create an S3 bucket. Remember bucket names must be unique:
aws s3 mb s3://BUCKET_NAME_HERE --region eu-central-1- Go to the directory where you saved your VHD file, and upload it to S3:
cd /path/to/vhd/location
aws s3 cp FILENAME_HERE.vhd s3://BUCKET_NAME_HERE --region eu-central-1- Grab the file trust-policy.json and place it in the same folder. Now we'll create a role called vmimport and apply this policy to it:
aws iam create-role --role-name vmimport --assume-role-policy-document file://trust-policy.json- Grab the file role-policy.json. Replace BUCKET_NAME_HERE with the name of your bucket - there are two replacements to be made. We'll add this policy to the role:
aws iam put-role-policy --role-name vmimport --policy-name vmimport --policy-document file://role-policy.json-
Grab the file containers.json. Replace BUCKET_NAME_HERE and FILENAME_HERE with the name of your S3 bucket and VHD filename respectively.
-
Create the AMI
aws ec2 import-image --description "Windows 10" --disk-containers file://containers.json --role-name vmimport --region eu-central-1- The above will take a while. You can use the following command to check for progress (it will show a progress indicator and eventually switch to completed).
aws ec2 describe-import-image-tasks --region eu-central-1-
From the AWS console, go to Services > EC2 and then go to AMIs.
-
Select your image, and click Actions > Launch. You should be able to choose a variety of instance types, but some instance types will not be available due to them requiring Elastic Network Adapter (ENA) support. If you need that (such as to use a g4 instance for gaming, we'll be setting that up below).
-
If you didn't set a password for the Administrator user, you'll need to modify the .rdp file. Simply open it in a text editor, and change the last line username from Administrator to whatever username you used.

-
Configure your instance as desired.
-
Once the instance is created, go to Instances, choose the instance and click Connect. From there, download the RDP file and you're good to go.
If you want to run a latest-generation instance, you need to enable ENA (Elastic Network Adapter). To do this, we'll need to enable it on our running instance from the previous step and create a new AMI. The following steps should be done in the running Windows 10 EC2 instance.
- Install AWS Tools for Windows PowerShell. Go to Start > Windows PowerShell (right-click and choose Run As Administrator). Now type:
Install-Module -Name AWSPowerShell.NetCore- Enable running unsigned scripts by typing the following in PowerShell:
Set-ExecutionPolicy -ExecutionPolicy Unrestricted- Create a profile called default containing your access key:
Set-AWSCredential -AccessKey YOUR_ACCESS_KEY_HERE -SecretKey YOUR_SECRET_KEY_HERE -StoreAs default-
Download the ENA driver from here and install it by running the install.ps1 file.
-
Shutdown the instance.
We'll now enable ENA support on the instance. The following steps should be done on your local computer, not the instance.
- Run the following command, replacing INSTANCE_ID_HERE with the ID of your instance (you can get that from the AWS console under Instances and selecting your instance).
aws ec2 describe-instances --instance-ids INSTANCE_ID_HERE --query "Reservations[].Instances[].EnaSupport"- That should return either [] or nothing at all, because ENA is not enabled. So, to enable it run:
aws ec2 modify-instance-attribute --instance-id INSTANCE_ID_HERE --ena-support-
Run the command from step 6 again. This time it should display [ true ].
-
From the AWS console, start the instance again, and connect to it using RDP as we did previously, then shutdown the instance again.
-
Create an AMI from the instance by selecting it, and going to Actions > Image and templates > Create Image. When the image has been created, you can terminate the instance (Instance state > Terminate instance).
-
You can now use this new image to launch new instances, and you should be able to use the new instance types such as g4.
If you want to use the instance for gaming or content creation, you may want to install the Nvidia drivers. Note that for most modern graphics instances you'll need ENA support which is described in the previous section. The following actions should be carried out on a Windows 10 EC2 instance of the g4dn variety. If you're using another instance type, check this out instead.
- Download the AWS Nvidia drivers by pasting the following command in Windows PowerShell:
$Bucket = "nvidia-gaming"
$KeyPrefix = "windows/latest"
$LocalPath = "$home\Desktop\NVIDIA"
$Objects = Get-S3Object -BucketName $Bucket -KeyPrefix $KeyPrefix -Region us-east-1
foreach ($Object in $Objects) {
    $LocalFileName = $Object.Key
    if ($LocalFileName -ne '' -and $Object.Size -ne 0) {
        $LocalFilePath = Join-Path $LocalPath $LocalFileName
        Copy-S3Object -BucketName $Bucket -Key $Object.Key -LocalFile $LocalFilePath -Region us-east-1
    }
}-
This will create a folder NVIDIA on your desktop. Navigate to this folder and install the driver version you want.
-
Add a registry entry using PowerShell:
New-ItemProperty -Path "HKLM:\SOFTWARE\NVIDIA Corporation\Global" -Name "vGamingMarketplace" -PropertyType "DWord" -Value "2"- Download the certification file. Again, from PowerShell:
Invoke-WebRequest -Uri "https://nvidia-gaming.s3.amazonaws.com/GridSwCert-Archive/GridSwCertWindows_2021_10_2.cert" -OutFile "$Env:PUBLIC\Documents\GridSwCert.txt"- Restart the instance and connect to it again. To verify the driver is installed, run the following command in Terminal/PowerShell/Command Prompt:
"C:\Program Files\NVIDIA Corporation\NVSMI\nvidia-smi.exe" -qThis should display some stuff, including:
GRID Licensed Product
    Product Name              : GRID vGaming
    License Status            : Licensed
- Shutdown the instance. Create an AMI from the instance by selecting it in the AWS console, and going to Actions > Image and templates > Create Image. When the image has been created, you can terminate the instance (Instance state > Terminate instance).