
![]()
This tool simplifies the process of installing and managing Xperience by Kentico instances by providing step-by-step wizards with default options provided.
Run the following command from a command prompt such as Powershell:
dotnet tool install Xperience.Xman -gRun the following command from a command prompt such as Powershell:
dotnet tool update xperience.xman -gThis tool can be run from anywhere, as long as the directory contains the configuration file. If there is no configuration file, a new one will be created when you run the tool. When you install a new instance, a new profile is created in the configuration file, allowing you to manage multiple installations without changing directory.
The xman.json file contains information about the tool, your default options, and profiles. This file will be automatically created if it doesn't exist when you run a command like xman p.
{
  "Version": "3.1.0.0",
  "Profiles": [
    {
      "ProjectName": "28dev",
      "WorkingDirectory": "C:\\inetpub\\wwwroot\\28dev"
    }
  ],
  "CurrentProfile": "28dev",
  "DefaultInstallOptions": {
    "Version": null, // Version cannot have a default value
    "Template": "kentico-xperience-sample-mvc",
    "ProjectName": "myproject",
    "InstallRootPath": "C:\\inetpub\\wwwroot",
    "UseCloud": false,
    "DatabaseName": "xperience",
    "ServerName": "my-server",
    "AdminPassword": "mypassword"
  },
  "CDRootPath": "C:\\inetpub\\wwwroot\\ContinuousDeployment"
}
You can edit this file to change the DefaultInstallOptions used when installing new Xperience by Kentico projects, and the location of the Continuous Deployment files.
The following commands can be executed using the xman tool name:
?,helpi,installu,updatem,macrosb,buildg,generates,settingsci <store> <restore>cd <store> <restore> <config>p,profile <add> <delete> <switch>
Certain commands such as update are executed against the installation indicated by the current profile. The profile command shows you the current profile, and allows you to switch profiles. If you only have one profile, that is automatically selected.
To switch profiles, run the profile command from the directory containing the configuration file:
xman profile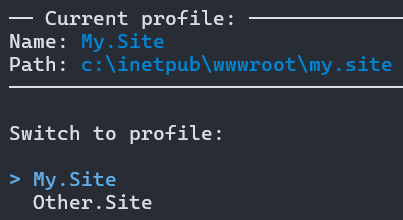
You can add or delete profiles using the corresponding commands. This can be useful to register Xperience by Kentico installations that weren't installed using the tool.
xman p add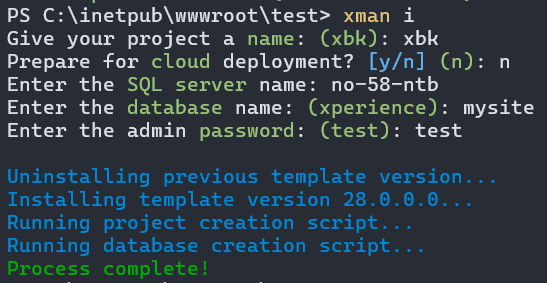
xman p deleteWhen installing a new project, a new folder will be created in the InstallRootPath of the configuration file, or in a custom directory that you specify in the installation wizard. After installation, a new profile is created for the instance.
-
Run the
installcommand from the directory containing the configuration file which will begin the installation wizard:xman install
-
(optional) Select a profile with the
profilecommand -
Run the
updatecommand from the directory containing the configuration file, which will begin the update wizard:xman update
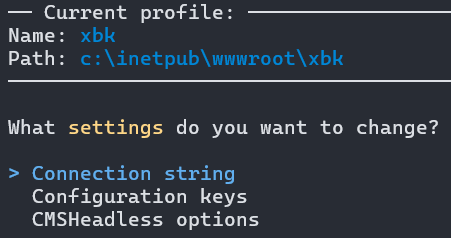
This tool can assist with changing the CMSConnectionString, supported configuration keys, and the headless API.
-
(optional) Select a profile with the
profilecommand -
Run the
settingscommand from the directory containing the configuration file, which will begin the settings wizard:xman settings
See our documentation for more information about macro signatures and the available options.
-
(optional) Select a profile with the
profilecommand -
Run the
macroscommand from the directory containing the configuration file, which will begin the macro wizard:xman macros
-
(optional) Select a profile with the
profilecommand -
Run the
buildcommand from the directory containing the configuration file to build the current profile's instance:xman build
See our documentation for more information about code file generation.
-
(optional) Select a profile with the
profilecommand -
Run the
generatecommand from the directory containing the configuration file which will begin the generation wizard:xman generate
You can use the ci command to serialize the database or restore the CI repository to the database. Your project must have been built at least once to run CI commands.
-
(optional) Select a profile with the
profilecommand -
Run the desired command from the directory containing the configuration file to begin the CI process:
xman ci storexman ci restore
This tool can help you manage a local Continuous Deployment environment. For example, if you are self-hosting your website and you have DEV and PROD Xperience by Kentico instances, the tool simplifies the process of migrating database changes from lower environments to production.
You can customize the location of the CD files by changing the CDRootPath property in the configuration file:
{
    "CDRootPath": "C:\\XperienceCDFiles"
}
Your project's CD configuration file is automatically created when you run the cd command and can be manually edited to fine-tune the CD process. You can also run the config command to edit the configuration file using a wizard. For example, you may want to change the RestoreMode before restoring CD data to the database.
-
Select a profile with the
profilecommand. This determines which configuration file is modified -
Run the
configcommand from the directory containing the configuration file, which will begin the configuration wizard:xman cd config
When you are finished development and wish to serialize the CD data to the filesystem, use the store command:
-
Select a profile with the
profilecommand. This determines which project's database is serialized -
Run the
storecommand from the directory containing the configuration file:xman p # switch to DEV profile xman cd store # serialize DEV database
To migrate the changes from development to production, run the restore command:
-
Select a profile with the
profilecommand. This determines which project's database is updated -
Run the
restorecommand from the directory containing the configuration file. The tool will display a list of profiles to choose as the source for the restore process (in this example, the DEV profile):xman p # switch to PROD profile xman cd restore # restore DEV CD files to PROD database