Modifying and flashing of devices is at your own risk. I'm not responsible for bricked or damaged devices. I strongly recommend a backup of original firmware before installing any other software.
The thermostat is working independent from the Wifi-Module. That means, functionality of the thermostat itself will not and can't be changed. This firmware replaces only the communication part of the thermostat, which is handled by the ESP module. The firmware will partially work with other devices too. The Tuya devices has a serial communication standard (MCU commands) which is only different in parameters. Unknown commands will be forwarded to the MQTT server.
There are 2 options to flash the firmware on device:
- Flashing device manually: Unplug and open the device, wire 4 cables and connect it to a programmer for ESP8266
- Use tuya-convert for flashing. Not tested from my side, tested and committed by another user
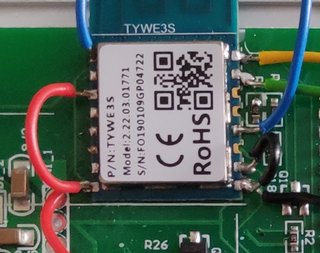
Compatible devices looks inside like this. On the right you can see the ESP8266 module (TYWE3S)

There are many ways to get the physical connection to ESP module. I soldered the connections on the device for flashing. Maybe there is a more elegant way to do that. It's quite the same, if you try to flash any other Sonoff devices to Tasmota. So get the inspiration for flashing there: https://github.com/arendst/Sonoff-Tasmota/wiki
Following connections were working for me (refer to ESP-12E pinout):
- Red: ESP-VCC and ESP-EN connected to Programmer-VCC (3.3V)
- Black: ESP-GND and ESP-GPIO15 connected to Programmer-GND
- Green: ESP-RX connected to Programmer-TX
- Yellow: ESP-TX connected to Programmer-RX
- Blue right: ESP-GPIO0, must be connected with GND during power up
- Blue left: ESP-Reset, connect to GND to restart the ESP
Flasing will fail, if the thermostat is still powered during this operation.
Don't skip this. In case of malfunction you need the original firmware. Tasmota has also a great tutorial for the right esptool commands: https://github.com/arendst/Sonoff-Tasmota/wiki/Esptool. So the backup command is:
esptool.py -p <yourCOMport> -b 460800 read_flash 0x00000 0x100000 originalFirmware1M.bin
for example:
esptool.py -p /dev/ttyUSB0 -b 460800 read_flash 0x00000 0x100000 originalFirmware1M.bin
Get the ESP in programming mode first. Erase flash:
esptool.py -p /dev/ttyUSB0 erase_flash
After erasing the flash, get the ESP in programming mode again. Write firmware (1MB)
esptool.py -p /dev/ttyUSB0 write_flash -fs 1MB 0x0 WThermostat_x.xx.bin
This method does not require any kind of soldering or disassembly of the device.
Some users were able to flash Beca Thermostats (BHT-002 and BHT-6000 also) with tuya-convert.
Follow the steps here to upload the firmware to your thermostat.
You should download the binary from here and place it in the /files/ folder before starting the flash procedure.