Getting Started with XChange for Noobies
This document will help you get up and running with your own development environment for working with XChange using Eclipse.
Because everyone uses different computers and operating systems, it's impossible to provide step by step instructions for installing every tool on every system, but this guide should get you close no matter what system you are on.
Java is the language XChange is written in. There are plenty of other sources you can find for more information about Java. I recommend to Java beginners the book Head First Java, 2nd Edition. Even though it's old, it's still a great intro and all the code in the book will work with the latest Java versions. There are thousands of Java tutorials out there.
You need to install Java on your computer if it is not already there.
Eclipse is an IDE (integrated developer environment). While you could (and some people prefer to) edit all your source files in a basic text editor, compile and run you programs from the command line, Eclipse attempts to make the process easier. Other features of an IDE include refactoring tools, debuggers, classpath management, and specialized file type editors, and the number of extra plugins is enormous. Another popular alternative Java IDE is IntelliJ.
You need to install Eclipse on your computer.
Maven manages dependencies and compiles your code. Most software projects utilize 3rd-party dependencies. In Java, these dependencies are in the form of compiled jars. Without Maven, you'd need to manually hunt down jars on the Internet and manually add then to your project and project's classpath. Using Maven, you simply define with dependencies your project has in a file called pom.xml placed at the root of the project. Maven then fetches the necessary jars and adds then to your project. Additionally, Maven will build your project for you with simple commands such as mvn package, which creates a jar out of your project if desired.
m2e is a Eclipse plugin that integrates Maven into Eclipse.
You need to install the m2e plugin into Eclipse. m2e has its own embedded maven installation, so you won't have to install maven yourself separately. In Eclipse, go to Help --> 'Eclipse Marketplace...' and search for 'Maven'. Click on 'Install' for the m2eclipse plugin title 'Maven Integration for Eclipse (Luna) 1.5.0'.
SourceTree is a git client. There is plenty of documentation out there on git and all of it's capabilities, but for the sake of this introduction, we will concentrate on the basics. SourceTree is a nice GUI-based git client that is cross-platform and is updated frequently.
You need to install SourceTree (or some git client) on your computer. It installs git for you as well, so you won't have to install git yourself separately.
Cloning If you are a repo owner or committer (direct write access) or you are only interesting in reading the project's code, you should clone a repo. When you clone a repo, you're creating an exact copy of a remote repo on your local computer. Using a git client, you can commit your edits/updates to your local clone, and then push the commits to the remote repo.
Forking If you are a contributor (no write access) and you plan on contributing changes back to the repo, you should fork a repo. When you fork a repo, you are creating an exact copy of the remote repo on GitHub. That repo is now yours, and separate for the original repo. You then need to clone your forked repo to create an exact copy of a remote repo on your local computer. To contribute code back to the original repo, you first need to push commits to your fork and then submit a pull request via the GitHub website.
You need to clone XChange's source code to your local computer if you plan on browsing the source code, fixing bugs or contributing in any way. You do not need to clone XChange's source code to your local computer if you are going to create your own app built on top of XChange.
One of the first things you may want to do is import XChange into Eclipse and run some of the examples. If you can successfully do that, you know everything is set up correctly and you can even start changing source code in XChange itself for bug fixing or feature additions.
-
Open Eclipse
-
File --> Import, Maven --> Existing Maven Projects. Choose XChange's source code on local computer and click through the import wizard.
Eclipse will now import the entire XChange project, which is now pretty big and it will take a while. m2e will need some time to download all of XChange's dependencies. You shouldn't see any errors (little red X's) if it imported successfully. You can always try right-clicking on the
xchange-parentfolder and choosing Maven --> Update Project.XChange is a "multi-module" Maven project. In
xchange-parent, you will findpom.xmland it references all the child modules, which all have their ownpom.xml. -
Dig down into
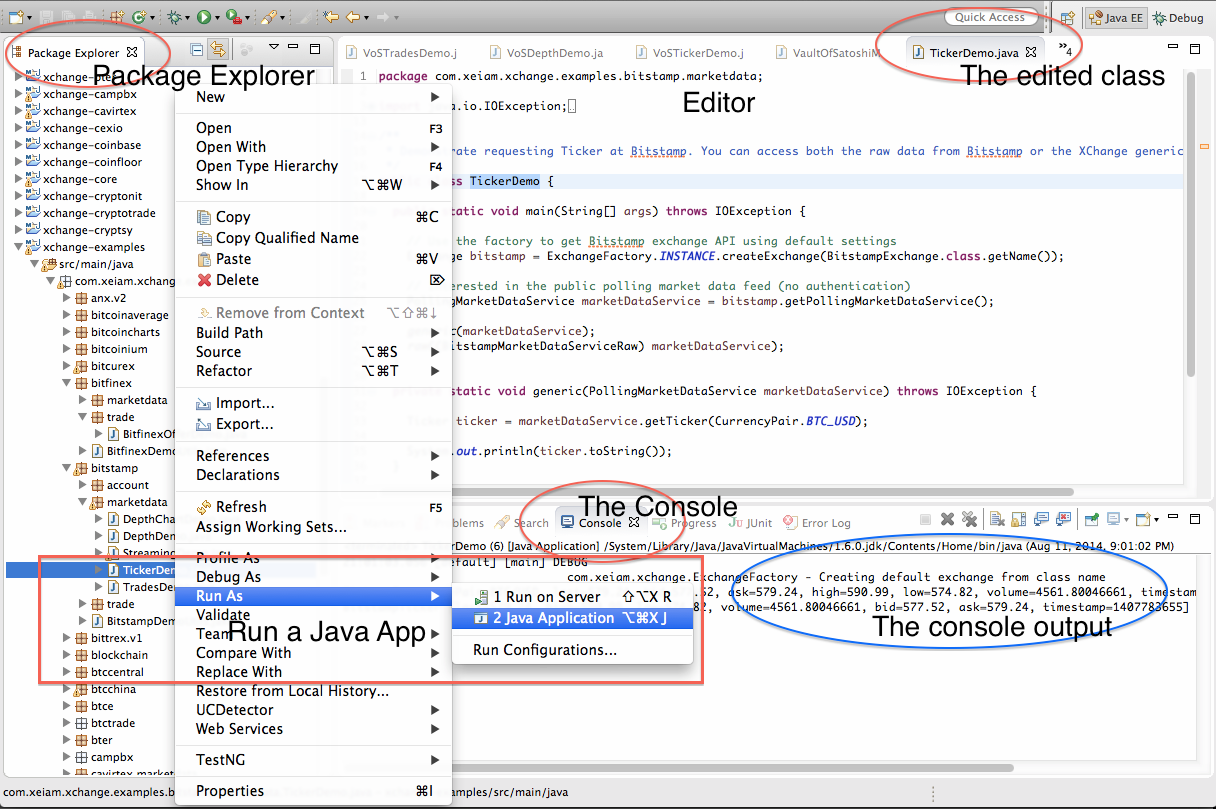
xchange-examples-->org.knowm.xchange.examples.bitstamp.marketdata.TickerDemo.java. -
Run
org.knowm.xchange.examples.bitstamp.marketdata.TickerDemo.javaby right-clicking on it in the tree view and choosing Run As --> Java Application
Below is an annotated screenshot of the Eclipse IDE showing the above described elements.
- Open Eclipse
- File --> New --> Project… -> Maven Project
- Check "create simple project". You could use default location or uncheck checkbox and select new location.
- Write something to groupId and artifactId usch as
org.knowm.xchangeandxchange-parent. Optionally fill Name & Description fields. Click finish. - Open pom.xml file. Add following code below within
<dependencies>:
<dependency>
  <groupId>org.knowm.xchange</groupId>
  <artifactId>xchange-bitstamp</artifactId>
  <version>2.0.0</version>
</dependency>
Now you can write code in your own custom Java classes that depend on the above dependencies. If you want to write code against the BTCChina code in XChange, you need to add a dependency for the xchange-btcchina dependency. Once you save your changes, m2e will download the jar from Maven Central, add it to your project and add it to the classpath automatically.
BTW, you probably want to use the SNAPSHOT dependencies, which are the cutting edge development versions, which are built automatically for every push to the main XChange repo. They are hosted on Sonatype's snapshots repository. Just look at XChange's root pom.xml file to see what the current snapshot version is. Your dependency will then look like this instead:
<dependency>
  <groupId>org.knowm.xchange</groupId>
  <artifactId>xchange-bitstamp</artifactId>
  <version>2.1.0-SNAPSHOT</version>
</dependency>
Additional dependencies may be necessary. For example, you may need to add sf4j-simple as a dependency since this is used when logging output to the console. In that case, the most current version of this logger at the time of writing can be added as follows:
<dependency>
  <groupId>org.slf4j</groupId>
  <artifactId>slf4j-simple</artifactId>
  <version>1.7.25</version>
</dependency>
Visit https://mvnrepository.com/artifact/org.slf4j/slf4j-simple for the current version of the component.
Note: You can easily search for dependencies from Eclipse as well by editing your project's pom.xml file and navigating to the 'Dependencies' tab. The search option allows you to easily add dependencies on XChange components.
Note: to add the Sonatype repository, you'll need to add a <repositories> tag in your pom.xml file, like so:
<repositories>
    <repository>
        <id>sonatype-oss-snapshot</id>
        <name>sonatype-oss-snapshot</name>
        <url>https://oss.sonatype.org/content/repositories/snapshots</url>
    </repository>
</repositories>- Save
pom.xml - Optional if Eclipse is being stubborn: Right-click on project and choose Maven -> Update Project… and select "Force Update" before you hit OK.
- Now create your first app. The easiest thing to do is copy an existing example class from the
xchange-examplesmodule in XChange. Each class has a main method and demonstrates some feature of XChange. Just copy a.javafile into thesrc/main/javafolder. For example,org.knowm.xchange.examples.bitstamp.marketdata.TickerDemo.javaas described above. - Run in within Eclipse by right-clicking on it in the tree view and choosing Run As --> Java Application. Look for output in the console within Eclipse.
You should take the time to read up on how a Maven project is structured and why. Most importantly, all Maven projects follow the following structure:
src/main/javasrc/main/resourcessrc/test/javasrc/test/resources
The resources folders are for non-Java class files such as *.properties files of other config files. Also, inside of the java folders you should use Java packages to create hierarchy and organization. They are actually just folders but in Java, they are referred to as packages and within Eclipse, you can add new packages.
If you've never coded in Java and used tools such as Eclipse and Maven, you have a steep learning curve ahead of you. If you stick to it long enough though, it will all eventually be incredibly easy and it will all make sense.