Experience address:https://demo.netless.link/
- A web developer who is engaged in the development of online education software, online meetings, and remote collaboration software, and wants to quickly implant an interactive whiteboard in a short time.
- Have a certain TypeScript, React coding or reading foundation.
- If you want to develop components for the second time, you need to install lerna to start.
The whole process is componentized. If you are not picky about the component's UI, you can just use the code in the whiteboard folder in the project. If you want to change the style of the component, you can customize the component under the premise of understanding the role of lerna and reading DEV_README.md.
It is not safe for all Tokens in the demo to be hard-coded on the front end. It is recommended to have a server to call after the production environment.
Simply starting a project means to directly apply the component code style in the project, and only write the "glue" code by yourself.
-
Register a Netless account
-
Get AppIdentifier
Console -> Application management -> Click copy
-
Get SDK Token
Console -> Application management -> Configuration -> Click copy
-
Complete the configuration, fill in the configuration file
.env.examplefile name is changed to.envAPPIDENTIFIER=283/VGixxxxxx2HJg // Whiteboard APPIDENTIFIER SDKTOKEN=NETLESSSDK_YWs9eDRxxxxxxxxxxxxxxxxxxxxxxxxxxxxxxxxxxxxxxxRkNTIyYjMwMmIyZGRj // Whiteboard SDKTOKEN
-
Safety Precautions
After going online, this Token It is recommended to maintain it in the backend
The process of synchronizing rich media such as videos and pictures on the whiteboard does not directly transmit these large-volume data through long connections, but uploads it to Alibaba Cloud's cloud storage and synchronizes the url address returned by the cloud storage. Under the premise that the developer understands that what is synchronized is the address, he should be able to figure out the basic elements required for the configuration of OSS during debugging:
-
For local debugging, we did not configure the proxy at the packaging layer, so cross-domain access should be enabled.
-
Shared reading is allowed, and can be changed to support various anti-theft links after going online.
-
You can upload by yourself (Needless to say, see the OSS documentation)
-
Debug configuration reference https://developer.netless.link/docs/faq/oss-config/
-
Complete the configuration, fill in the configuration file
.env.examplefile name is changed to.envAK=LTAI4xxxxxxxxxxuDmu SK=ycdfrOxxxxxxxxxxxxxxxxxxWqsy OSSREGION=oss-cn-hangzhou BUCKET=bxxxxxxxgs FOLDER=testxxxxx PREFIX=https://bxxxxxxxgs.oss-cn-hangzhou.aliyuncs.com/
-
If you don't want to configure cloud storage, please comment out the following code and run it directly. But you cannot use the core functions such as uploading pictures, audio and video, PPT, etc.
 <ToolBox room={room} customerComponent={
        [
            <OssUploadButton oss={ossConfigObj}
                 room={room}
                 whiteboardRef={whiteboardLayerDownRef}/>,
            <PluginCenter oss={ossConfigObj}
                  room={room}/>
        ]
}/>

// changed to
<ToolBox room={room}/>
-
Safety Precautions
After going online, this Config It is recommended to maintain it in the backend
# Access to the whiteboard folder
cd whiteboard
# Load dependencies
yarn
# Startup project
yarn dev
# Packaged project
yarn buildWe assume that the developers who need secondary development are deep players and need to be familiar with some front-end engineering and component-related tools.
- yarn or npm
- lerna (There is a simple way to run it below, please search and learn by yourself for detailed usage)
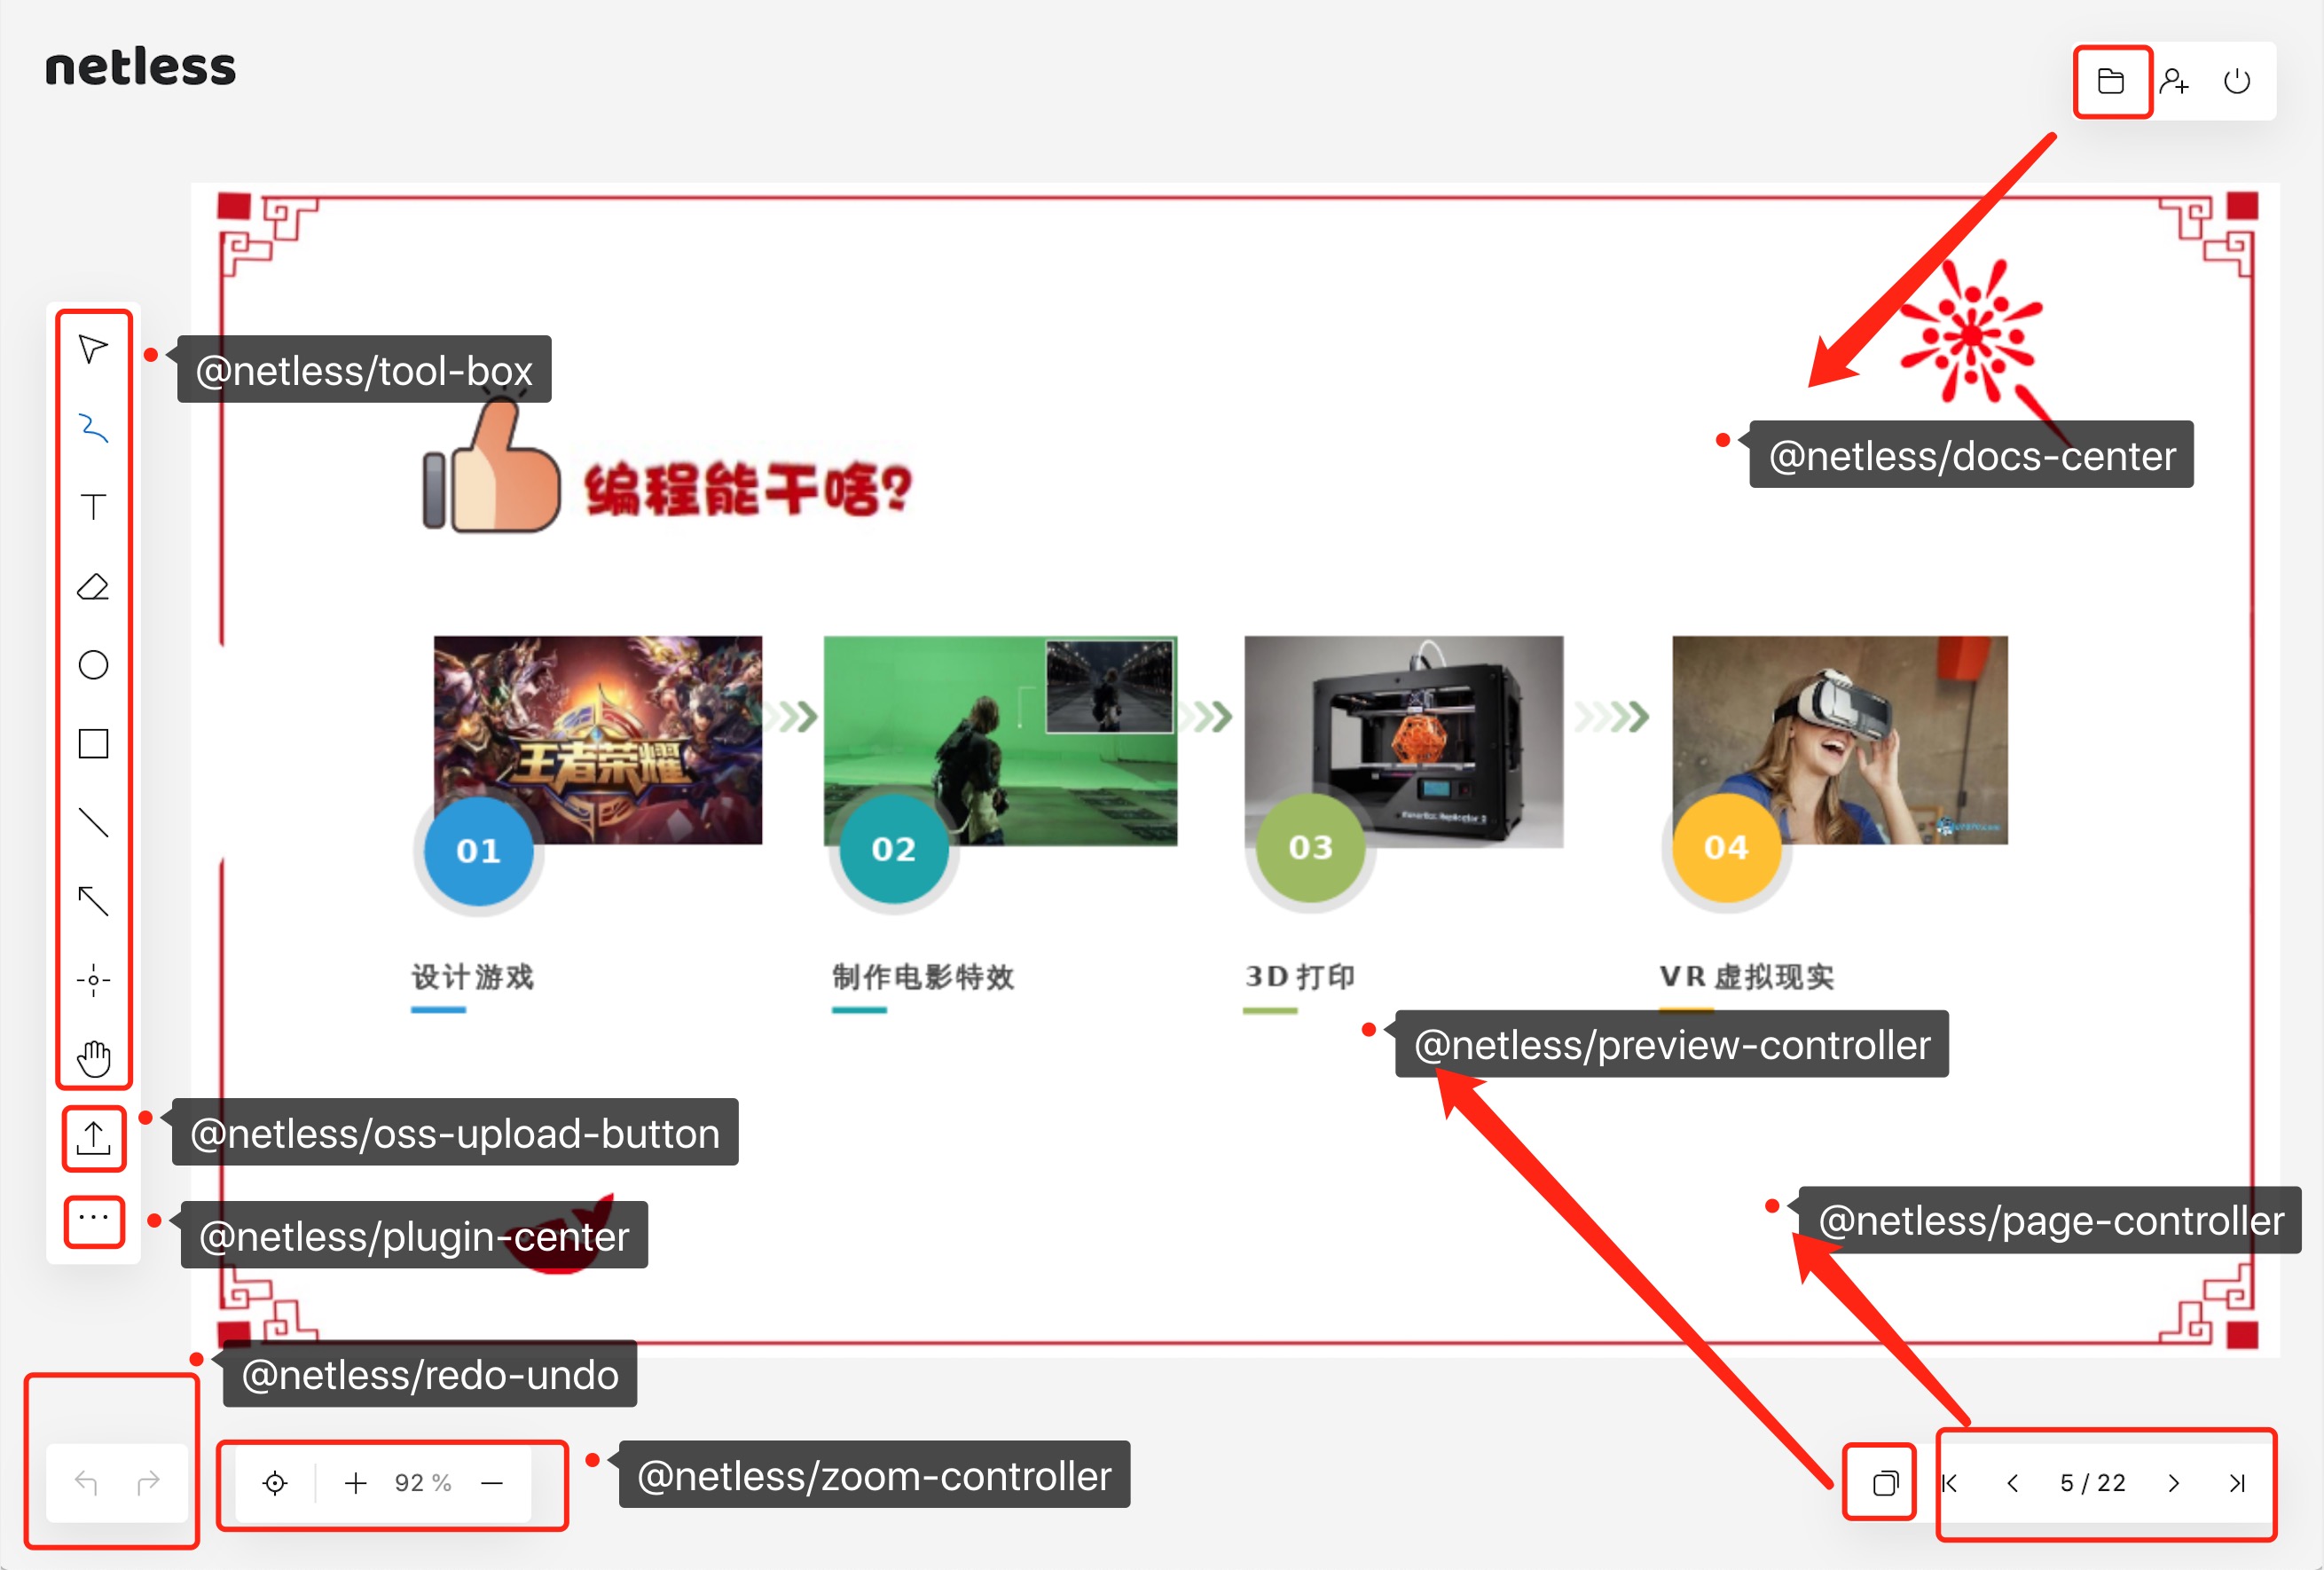
The advantage of using lerna management is: the common functions of the componentized whiteboard are convenient to use, maintain and manage. The following briefly lists the core components, and introduces their functions and styles.
-
@netless/tool-box- Toolbar: control the switching of teaching aids of the whiteboard and the management of the color and thickness of the teaching aids
-
@netless/redo-undo- Undo redo
-
@netless/page-controller- Pagination control: display the total number of pages, the current page, the previous page, the next page, the first page, and the last page.
-
@netless/zoom-controller- Zoom in and out control: zoom in, zoom out, current percentage, return to initial size and position
-
@netless/preview-controller-
Multi-page preview control: preview page content, insert blank page, delete page
-
Preview the details page
-
-
@netless/cursor-tool- Cursor tool: support cursor position display, cursor teaching aid status, cursor operator name display
-
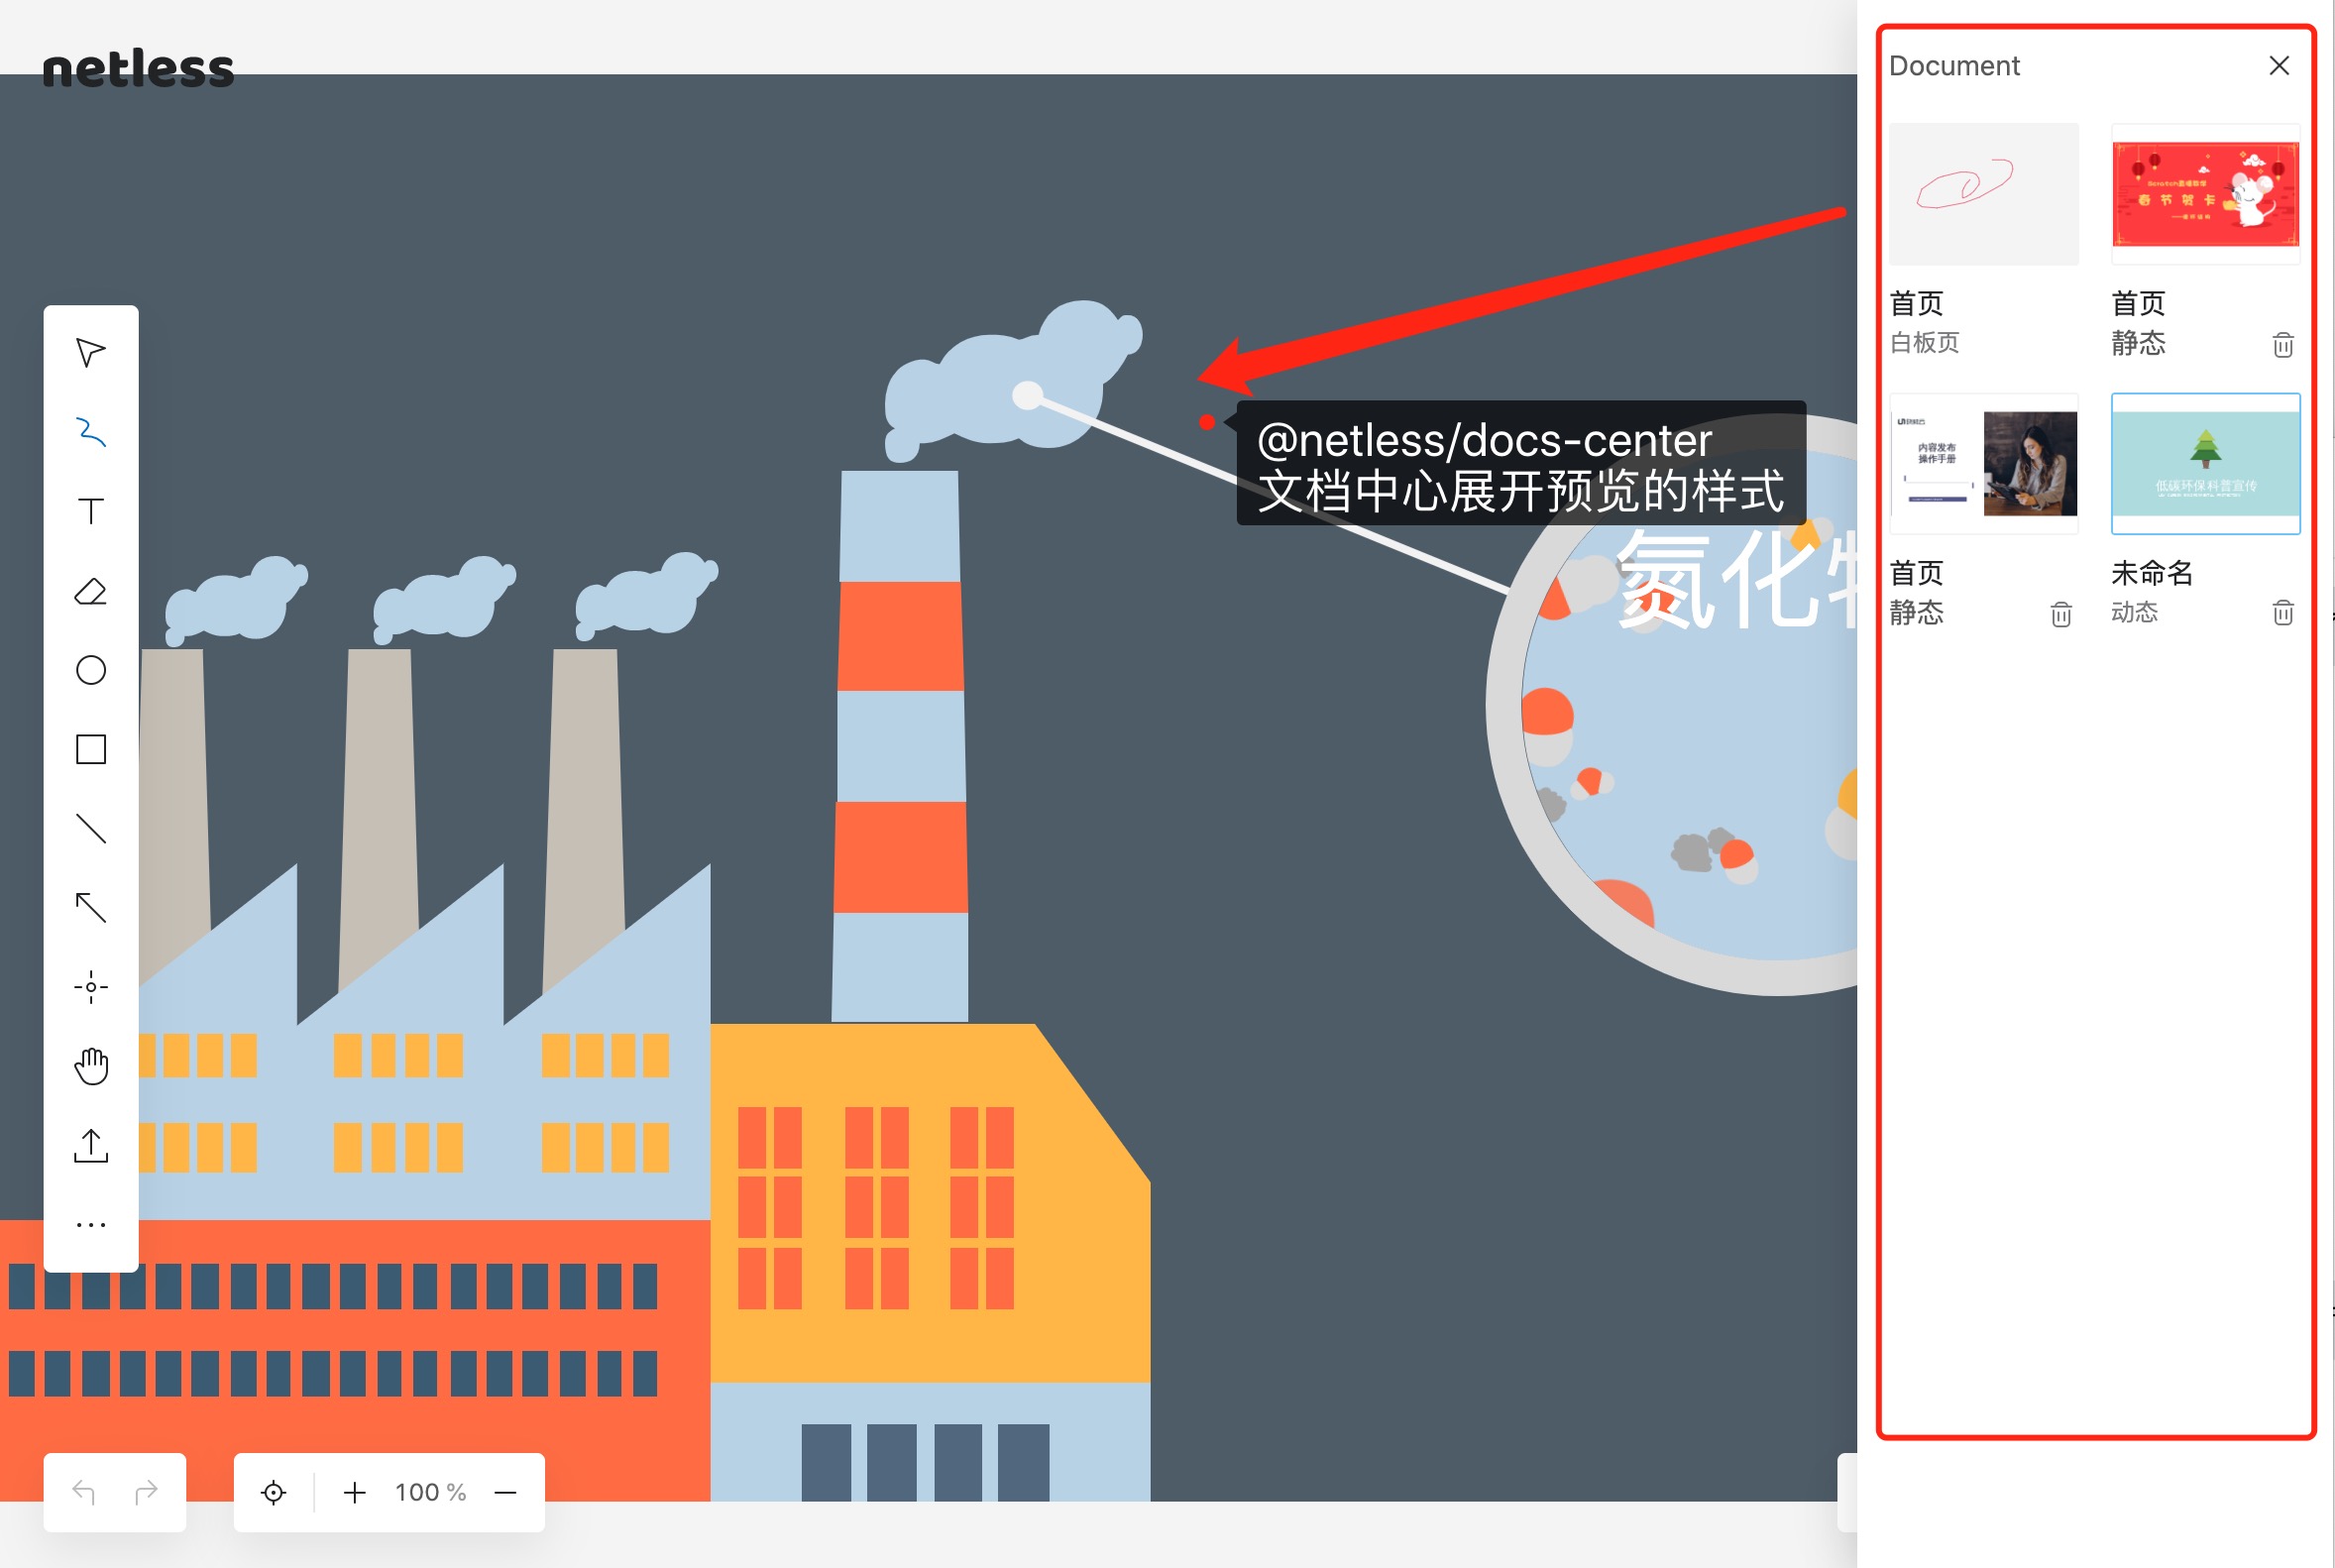
@netless/docs-center-
Document Center: Manage the courseware materials uploaded in the whiteboard room, such as: PPT, PDF, WORD, PPTX
-
Document Center Preview
-
-
@netless/oss-upload-button- Upload management button: upload pictures, courseware
-
@netless/white-video-plugin- Video plug-in: Support uploading video, which is used for injection during initialization.
-
@netless/white-audio-plugin- Audio plug-in: Support audio plug-in, used to inject during initialization.
-
@netless/plugin-center- Plug-in whiteboard plug-in management center: manage the display of plug-ins, used to upload videos using api.

@netless/fetch-middleware- Network request middleware: has the function of setting request timeout error report
@netless/loading-bar- Progress bar: upload to oss for display
@netless/menu-box- Sidebar component with animation: used in document center and preview management
# STEP 1
yarn
# STEP 2
lerna bootstrap
# STEP 3
# The following two dependencies depend on other libraries in the package, and build other libraries first, then build these two libraries
lerna run --ignore @netless/docs-center --ignore @netless/preview-controller build:lib
lerna run --scope @netless/docs-center --scope @netless/preview-controller build:lib
lerna run --scope whiteboard build# Install global lerna
yarn global add lerna
# or npm install
npm install lerna -g
# Separate yarn
yarn
# lerna Ready to work
lerna bootstrap
# Start hot update of all scripts
lerna run --parallel dev
# Yarn build command to build all libraries
lerna run build
# Run only the yarn dev script of toolbox
lerna run --scope `lib-name` dev
# lerna run --parallel --scope @netless/toolbox --scope whiteboard dev
# Run run dev scripts except tool-box
lerna run --ignore @netless/tool-box dev
# build all libraries
lerna run --parallel build:lib