Skip to content
New issue

Have a question about this project? Sign up for a free GitHub account to open an issue and contact its maintainers and the community.

By clicking “Sign up for GitHub”, you agree to our terms of service and privacy statement. We’ll occasionally send you account related emails.

Already on GitHub? Sign in to your account

Latest TFT_eSPI library and dimmable backlight #15

Open
bradmck opened this issue Mar 11, 2023 · 61 comments
Open

Latest TFT_eSPI library and dimmable backlight #15

bradmck opened this issue Mar 11, 2023 · 61 comments

Comments

@bradmck
Copy link
Contributor

bradmck commented Mar 11, 2023

This isn't a bug, I just wanted to share some info. I was able to get this working using the latest TFT_eSPI library - using the older custom_component method vs. the newer external_components method for now. I was also able to setup the backlight pin with ledc so it's dimmable. These were very simple changes to just a couple of header files in the TFT_eSPI library:

In User_Setup_Select.h comment out this line:

#include <User_Setup.h>

And uncomment this line:

//#include <User_Setups/Setup206_LilyGo_T_Display_S3.h>

In User_Setups/Setup206_LilyGo_T_Display_S3.h comment out these two lines:

#define TFT_BL 38  
#define TFT_BACKLIGHT_ON HIGH

Then in your ESPHome yaml file use this for the light - get rid of the GPIO switch and replace with this:

output:
  - platform: ledc
    pin: GPIO38
    id: gpio38
    frequency: 10000

light:
  - platform: monochromatic
    output: gpio38
    name: "Backlight"
@bradmck
Copy link
Contributor Author

bradmck commented Mar 12, 2023

I actually made some more progress on this and seem to have it working where I don't need to modify anything at all in the stock TFT_eSPI library. I'm using the latest version (2.5.23) from Bodmer's GitHub without any modifications . You can specify everything needed in build_flags like this:

esphome:
  platformio_options:
    build_flags: 
      - -DUSER_SETUP_LOADED=1 -DST7789_DRIVER=1 -DINIT_SEQUENCE_3=1 -DCGRAM_OFFSET=1 -DTFT_RGB_ORDER=TFT_RGB -DTFT_INVERSION_ON=1 -DTFT_PARALLEL_8_BIT=1 -DTFT_WIDTH=170 -DTFT_HEIGHT=320 -DTFT_DC=7 -DTFT_RST=5 -DTFT_WR=8 -DTFT_RD=9 -DTFT_D0=39 -DTFT_D1=40 -DTFT_D2=41 -DTFT_D3=42 -DTFT_D4=45 -DTFT_D5=46 -DTFT_D6=47 -DTFT_D7=48 -DLOAD_GLCD=1 -DLOAD_FONT2=1 -DLOAD_FONT4=1 -DLOAD_FONT6=1 -DLOAD_FONT7=1 -DLOAD_FONT8=1 -DLOAD_GFXFF=1 -DSMOOTH_FONT=1

@patfelst
Copy link

patfelst commented Mar 13, 2023

Well done @bradmck I see value in using the latest TFT_eSPI to gain the latest optimisations and features, when I get my current projects finish, I will try this out.

In your last post above, i.e. no modifications, how are you using the build flags to select Setup206_LilyGo_T_Display_S3.h?

Can you please post a complete / short ESPHome yaml file with sprite usage - it would be appreciated.

@patfelst
Copy link

PS never mind my question about the build flags, I can see the build flags set all the options in this file
https://github.com/Bodmer/TFT_eSPI/blob/master/User_Setups/Setup206_LilyGo_T_Display_S3.h

But I'd still appreciate a complete ESPHome yaml file - thanks again.

@bradmck
Copy link
Contributor Author

bradmck commented Mar 13, 2023

Thanks @patfelst. Yes, I want to stick with the stock, and latest version of TFT_eSPI. I thought I'd be able to tell it to load the Setup206 file through build flags but wasn't able to figure that out (at least yet) so just defined everything that was in the file, except for the backlight pins. Now I'm trying to figure out if I can make this work using the external_component method. I'm still using the older custom_component method. Here's a full copy of my yaml, but this is from earlier code so isn't using Sprites - but that should just be a matter of using the newer code:

esphome:
  name: s3-bradmck
  includes:
    - tdisplays3-bradmck/tft_espi_display.h
    - tdisplays3-bradmck/Free_Fonts.h

  libraries:
    - SPI
    - FS
    - SPIFFS
    - TFT_eSPI
  platformio_options:
    build_flags: 
      - -DUSER_SETUP_LOADED=1 -DST7789_DRIVER=1 -DINIT_SEQUENCE_3=1 -DCGRAM_OFFSET=1 -DTFT_RGB_ORDER=TFT_RGB -DTFT_INVERSION_ON=1 -DTFT_PARALLEL_8_BIT=1 -DTFT_WIDTH=170 -DTFT_HEIGHT=320 -DTFT_DC=7 -DTFT_RST=5 -DTFT_WR=8 -DTFT_RD=9 -DTFT_D0=39 -DTFT_D1=40 -DTFT_D2=41 -DTFT_D3=42 -DTFT_D4=45 -DTFT_D5=46 -DTFT_D6=47 -DTFT_D7=48 -DLOAD_GLCD=1 -DLOAD_FONT2=1 -DLOAD_FONT4=1 -DLOAD_FONT6=1 -DLOAD_FONT7=1 -DLOAD_FONT8=1 -DLOAD_GFXFF=1 -DSMOOTH_FONT=1

esp32:
  board: esp32-s3-devkitc-1
  variant: esp32s3
  framework:
    type: arduino
    #version: 2.0.3
    #platform_version: 5.0.0

# Enable logging
logger:

# Enable Home Assistant API
api:

ota:
  password: "6ada29f6f41ce1685d29d406efd25fa4"

wifi:
  ssid: !secret wifi_ssid
  password: !secret wifi_password
  # Enable fallback hotspot (captive portal) in case wifi connection fails
  ap:
    ssid: "S3 Fallback Hotspot"
    password: "zQ9tuPKIfFMu"

web_server:

time:
  - platform: homeassistant
    id: ha_time
    timezone: "America/New_York"

interval:
  - interval: 1s
    then:
    - lambda: |-
        setup_t SetupInfo;
        displayControllerComponent->tft.getSetup(SetupInfo);
        ESP_LOGD("custom", "TFT Width: %d", SetupInfo.tft_width);
        // displayControllerComponent->clear();
        displayControllerComponent->drawBar();
        displayControllerComponent->drawString(id(ha_time).now().strftime("%Y-%m-%d %H:%M:%S:%S"));


# switch:
#   - platform: gpio
#     pin: GPIO38
#     name: "Backlight"
#     id: backlight
#     internal: false
#     restore_mode: RESTORE_DEFAULT_ON

output:
  - platform: ledc
    pin: GPIO38
    id: gpio38
    frequency: 10000

light:
  - platform: monochromatic
    output: gpio38
    name: "Backlight"
    restore_mode: RESTORE_DEFAULT_ON

custom_component:
    lambda: |-
        App.register_component(displayControllerComponent);
        return {displayControllerComponent};
    id: displayComponent

@patfelst
Copy link

Excellent thanks for that. Are you on the ESPHome discord? I reckon user @ssieb would be able to help with the external component. Anyway when I get around to trying this, I'll see if I can get it to include Setup206.h.

@bradmck
Copy link
Contributor Author

bradmck commented Mar 15, 2023

I've been playing around with the newer method of using the external component and was able to start using functions from TFT_eSPI within lambdas. I had to make one small change to the component so far: in components/tdisplays3/t_display_s3.h I commented out the "private:" line above the TFT_eSPI and TFT_eSprite lines so those are now public. Then I can call functions from TFT_eSPI with something like:
id(disp).spr.fillRectHGradient(20, 50, 270, 70, TFT_MAGENTA, TFT_BLUE);

Of course I can also create new sprites and push them onto the existing spr object. For me this is kind of the best of both worlds... The simplicity of the Display component but with the ability to do more complex graphics/drawing than ESPHome provides natively. At this point I haven't been able to get it to use the latest TFT_eSPI library - it always wants to use 2.4.71.

One catch in case anyone is interested in trying this is that you can't do the rotation on the Display component, so comment that out. You need to use the function from TFT_eSPI under on_boot:

 on_boot: 
    - priority: 600
      then:
        - lambda: |-
            id(disp).tft.setRotation(3);

And just for reference here's my "display:" section from the yaml file. Aside from the on_boot piece my yaml is a copy of the example.yaml. This draws the same date/time string as the example, but down low on the screen. Then I draw another date/time string at the top using TFT_eSPI functions. In the middle of the screen is a Horizontal Gradient from TFT_eSPI.

display:
  - platform: tdisplays3
    id: disp
    update_interval: 1s
    #rotation: 270
    lambda: |-
      id(disp).spr.fillSprite(TFT_WHITE);

      TFT_eSprite spr2 = TFT_eSprite(&id(disp).spr);
      spr2.createSprite(id(disp).tft.width(), 30);
      spr2.fillSprite(TFT_BLACK);
      spr2.setTextColor(TFT_BLUE, TFT_BLACK);
      spr2.setTextDatum(TC_DATUM);
      spr2.drawString(id(ha_time).now().strftime("%Y-%m-%d %H:%M:%S").c_str(), spr2.width() / 2, 0, 4);
      spr2.pushToSprite(&id(disp).spr, 0, 0, TFT_BLACK);

      id(disp).spr.fillRectHGradient(20, 50, 270, 70, TFT_MAGENTA, TFT_BLUE);

      it.printf(20, 130, id(roboto), Color(255, 0, 0), id(ha_time).now().strftime("%Y-%m-%d %H:%M:%S").c_str());

@bradmck
Copy link
Contributor Author

bradmck commented Mar 18, 2023

One last post and I'll stop spamming this repository

I've spent a bit more time on this and have a working version that uses the external_components method while using the latest TFT_eSPI library. I made a small change to the component to expose the tft and spr object so they were public. I'm able to draw using both the built in ESPHome functions as well as functions from TFT_eSPI on the same screen, which I think is kinda cool. I'll point out that it seems to me this component could maybe be made generic to support any display - allowing TFT_eSPI and native ESPHome functions on any display.

In case anyone wants to try it here's a full YAML which uses my repository:

esphome:
  name: tdisplay-poc
  friendly_name: tdisplay-poc

  on_boot: 
    - priority: 600
      then:
        - lambda: |-
            id(disp).tft.setRotation(3);
            setup_t tftSetup;
            id(disp).tft.getSetup(tftSetup);            
            id(TFT_eSPI_Version).publish_state(tftSetup.version.c_str());

  libraries: 
    - SPI
    - FS
    - SPIFFS
    - TFT_eSPI

  platformio_options:
    upload_speed: 921600
    build_flags:
      # The folowing defines will configure the TFT display driver, size and pins
      - "-D USER_SETUP_LOADED=1"
      - "-D ST7789_DRIVER=1"
      - "-D INIT_SEQUENCE_3=1"
      - "-D CGRAM_OFFSET=1"
      - "-D TFT_RGB_ORDER=TFT_RGB"
      - "-D TFT_INVERSION_ON=1"
      - "-D TFT_PARALLEL_8_BIT=1"
      - "-D TFT_WIDTH=170"
      - "-D TFT_HEIGHT=320"
      - "-D TFT_CS=6"
      - "-D TFT_DC=7"
      - "-D TFT_RST=5"
      - "-D TFT_WR=8"
      - "-D TFT_RD=-1"
      - "-D TFT_D0=39"
      - "-D TFT_D1=40"
      - "-D TFT_D2=41"
      - "-D TFT_D3=42"
      - "-D TFT_D4=45"
      - "-D TFT_D5=46"
      - "-D TFT_D6=47"
      - "-D TFT_D7=48"
      - "-D LOAD_GLCD=1"
      - "-D LOAD_FONT2=1"
      - "-D LOAD_FONT4=1"
      - "-D LOAD_FONT6=1"
      - "-D LOAD_FONT7=1"
      - "-D LOAD_FONT8=1"
      - "-D LOAD_GFXFF=1"
      - "-D SMOOTH_FONT=1"
      - "-D TFT_MISO=13"
      - "-D TFT_MOSI=11"
      - "-D TFT_SCLK=12"
      - "-D SPI_FREQUENCY=5000000"
      - "-D SPI_READ_FREQUENCY=2000000"
      - "-D SPI_TOUCH_FREQUENCY=2500000"


external_components:
  - source:
      type: git
      url: https://github.com/bradmck/lilygo-tdisplays3-esphome.git
      ref: main
    components: [tdisplays3]

esp32:
  board: esp32-s3-devkitc-1
  variant: esp32s3
  framework:
    type: arduino

# Enable logging
logger:

# Enable Home Assistant API
api:
  reboot_timeout: 0s

ota:
  password: "6ada29f6f41ce1685d29d406efd25fa4"

wifi:
  ssid: !secret wifi_ssid
  password: !secret wifi_password
  # Enable fallback hotspot (captive portal) in case wifi connection fails
  ap:
    ssid: "tdisplay-poc Fallback Hotspot"
    password: "zQ9tuPKIfFMu"

web_server:

time:
  - platform: homeassistant
    id: ha_time

output:
  - platform: ledc
    pin: GPIO38
    id: gpio38
    frequency: 2000

light:
  - platform: monochromatic
    output: gpio38
    name: "Backlight"
    restore_mode: RESTORE_DEFAULT_ON

text_sensor:
  - platform: template
    name: "TFT_eSPI Version"
    id: TFT_eSPI_Version

font:
  - file: "gfonts://Roboto"
    id: roboto
    size: 30

display:
  - platform: tdisplays3
    id: disp
    update_interval: 1s
    #rotation: 270    # Don't set the rotation here, use the TFT_eSPI function (check if there's a way to use a build option for this)
    lambda: |-
      // Set a white background - this draws to the sprite the main component uses
      id(disp).spr.fillSprite(TFT_WHITE);

      // Draw the gauge
      int rssi=random(-100, -60);
      int gaugeangle = map(rssi, -150, -40, 30, 330);
      TFT_eSprite sprArc = TFT_eSprite(&id(disp).spr);
      sprArc.createSprite(140, 140);
      sprArc.fillSmoothCircle(sprArc.width() / 2, sprArc.height() / 2, sprArc.width() / 2, TFT_LIGHTGREY, TFT_BLACK);
      sprArc.drawSmoothArc(sprArc.width() / 2, sprArc.width() / 2, sprArc.height() / 2, 50, 30, 330, TFT_DARKGREY, TFT_DARKGREY);
      sprArc.drawSmoothArc(sprArc.width() / 2, sprArc.width() / 2, sprArc.height() / 2, 50, 30, gaugeangle, TFT_GREEN, TFT_LIGHTGREY);

      // Draw the gauge value lable in the center
      TFT_eSprite sprArcValue = TFT_eSprite(&id(disp).spr);
      sprArcValue.createSprite(140, 140);
      sprArcValue.setTextDatum(MC_DATUM);
      sprArcValue.setTextColor(TFT_BLUE, TFT_BLACK);
      sprArcValue.drawNumber(rssi, sprArc.height() / 2, sprArc.height() / 2, 6);

      // Push the gauge and label to the background sprite
      sprArc.pushToSprite(&id(disp).spr, (id(disp).spr.width() / 2) - (sprArc.width() / 2) , 5, TFT_BLACK);
      sprArcValue.pushToSprite(&id(disp).spr, (id(disp).spr.width() / 2) - (sprArc.width() / 2) , 5, TFT_BLACK);

      // Original clock using traditinal ESPHome ESPHome Display functions
      it.printf(20, 140, id(roboto), Color(255, 0, 0), id(ha_time).now().strftime("%Y-%m-%d %H:%M:%S").c_str());

@patfelst
Copy link

Not spam at all @bradmck, I appreciate the good work here. Still have not had a chance to try, but will in the next couple of weeks.

That's a nicer way to define the build flags, would enable commenting each line if somebody wanted to. Also good to see your other comments to help understand things.

@guillempages
Copy link
Collaborator

@bradmck glad to see that you made it work with the external_component method.

If you sync with the latest commit in landonr's repo, and slightly adapt the "components/tdisplays3/display.py" file, you would even be able to remove the whole "libraries: ..." section from your example.yaml file.

It would be great if you could find a way of moving all those "platformio defines" into the python file as well; to avoid the need of putting them manually on every yaml file using the component. I (briefly) tried that, but did not succeed.

@bradmck
Copy link
Contributor Author

bradmck commented Mar 18, 2023

There was a problem with the previous YAML - something specific to the build_options. I did didn't realize when I posted the above that as soon as I reset the ESP the display wouldn't initialize correctly. I'd have to load a different sketch first. This version actually works reliably. This one is much longer but adds multiple pages and incorporates the buttons to switch pages. Some pages are just ESPHome drawing functions and some use ESPHome and TFT_eSPI functions.

esphome:
  name: tdisplay-displaypages
  friendly_name: tdisplay-displaypages

  on_boot: 
    - priority: 600
      then:
        - lambda: |-
            id(disp).tft.init();
            id(disp).tft.setRotation(3);
            setup_t tftSetup;
            id(disp).tft.getSetup(tftSetup);            
            id(TFT_eSPI_Version).publish_state(tftSetup.version.c_str());
        - script.execute: DisplayStartupPage

  libraries: 
    - SPI
    - FS
    - SPIFFS
    - TFT_eSPI

  platformio_options:
    upload_speed: 921600
    build_flags:
      # The folowing defines will configure the TFT display driver, size and pins
      - -DUSER_SETUP_LOADED=1 
      - -DST7789_DRIVER=1 
      - -DINIT_SEQUENCE_3=1 
      - -DCGRAM_OFFSET
      - -DTFT_RGB_ORDER=TFT_RGB 
      - -DTFT_INVERSION_ON=1 
      - -DTFT_PARALLEL_8_BIT=1 
      - -DTFT_WIDTH=170 
      - -DTFT_HEIGHT=320 
      - -DTFT_DC=7 
      - -DTFT_RST=5 
      - -DTFT_WR=8 
      - -DTFT_RD=9 
      - -DTFT_D0=39 
      - -DTFT_D1=40 
      - -DTFT_D2=41 
      - -DTFT_D3=42 
      - -DTFT_D4=45 
      - -DTFT_D5=46 
      - -DTFT_D6=47 
      - -DTFT_D7=48 
      - -DLOAD_GLCD=1
      - -DLOAD_FONT2=1 
      - -DLOAD_FONT4=1 
      - -DLOAD_FONT6=1 
      - -DLOAD_FONT7=1 
      - -DLOAD_FONT8=1 
      - -DLOAD_GFXFF=1 
      - -DSMOOTH_FONT=1
      # If you don't care about control of the backlight you can uncomment the two lines below
      # - -DTFT_BL=38
      # - -DTFT_BACKLIGHT_ON=HIGH


external_components:
  - source:
      type: git
      url: https://github.com/bradmck/lilygo-tdisplays3-esphome.git
      ref: main
    components: [tdisplays3]

esp32:
  board: esp32-s3-devkitc-1
  variant: esp32s3
  framework:
    type: arduino

# Enable logging
logger:

# Enable Home Assistant API
api:
  reboot_timeout: 0s

ota:
  password: "6ada29f6f41ce1685d29d406efd25fa4"

wifi:
  ssid: !secret wifi_ssid
  password: !secret wifi_password
  use_address: 192.168.86.180
  # Enable fallback hotspot (captive portal) in case wifi connection fails
  ap:
    ssid: "tdisplay-poc Fallback Hotspot"
    password: "zQ9tuPKIfFMu"

web_server:

time:
  - platform: homeassistant
    id: ha_time

output:
  - platform: ledc
    pin: GPIO38
    id: gpio38
    frequency: 2000

light:
  - platform: monochromatic
    output: gpio38
    name: "Backlight"
    restore_mode: RESTORE_DEFAULT_ON

text_sensor:
  - platform: template
    name: "TFT_eSPI Version"
    id: TFT_eSPI_Version

binary_sensor:
  # GPIO0 will restart the script that is switching pages
  - platform: gpio
    pin:
      number: GPIO0
      inverted: true
      mode:
        input: true
        pullup: true
    name: "Page Scrolling"
    id: tdisplay_pagescrolling
    on_press:
      - script.execute: DisplayPages

  # GPIO14 will kill the script that is switching pages and will manually go to the next page
  - platform: gpio
    pin:
      number: GPIO14
      inverted: true
      mode:
        input: true
    name: "Next Page"
    id: tdisplay_pagenext
    filters:
    - delayed_on: 10ms
    on_press: 
      - lambda:  |-
          if (id(disp).get_active_page() == id(page1)) {
            ESP_LOGD("custom", "Switch to Page 2");
            id(DisplayPages).stop();
            id(disp).show_page(id(page2));
          } 
          else if (id(disp).get_active_page() == id(page2)) {
            ESP_LOGD("custom", "Switch to Page 3");
            id(DisplayPages).stop();
            id(disp).show_page(id(page3));
          } 
          else if (id(disp).get_active_page() == id(page3)) {
            ESP_LOGD("custom", "Switch to Page 4");
            id(DisplayPages).stop();
            id(disp).show_page(id(page4));
          } 
          else if (id(disp).get_active_page() == id(page4)) {
            ESP_LOGD("custom", "Switch to Page 1");
            id(DisplayPages).stop();
            id(disp).show_page(id(page1));
          } 
          else {
            // Might not need this but here for future
          }

font:
  - file: "gfonts://Roboto"
    id: roboto
    size: 30

script:
  - id: DisplayStartupPage
    mode: restart
    then:
      - display.page.show: pageStartup
      - delay: 5s
      - wait_until:
          wifi.connected:
      - script.execute: DisplayPages

  - id: DisplayPages
    mode: restart
    then:
      - display.page.show: page1
      - delay: 5s
      - display.page.show: page2
      - delay: 5s
      - display.page.show: page3
      - delay: 5s
      - display.page.show: page4
      - delay: 5s
      - script.execute: DisplayPages

display:
  - platform: tdisplays3
    id: disp
    update_interval: 1s
    #rotation: 270    # Don't set the rotation here, use the TFT_eSPI function (check if there's a way to use a build option for this)
    pages:
      - id: page1
        lambda: |-
          // Since I filled the component's sprite object I need to fill it on each page to clear the screen
          // Set a white background - this draws to the sprite the main component uses
          id(disp).spr.fillSprite(TFT_WHITE);

          int rssicolor;
          // Draw the gauge
          int rssi=random(-100, -60);
          if (rssi < -100) {
            rssicolor=TFT_RED;
          }
          else if (rssi < -90) {
            rssicolor=TFT_ORANGE;
          }
          else if (rssi < -80) {
            rssicolor=TFT_YELLOW;
          }
          else {
            rssicolor=TFT_GREEN;
          }

          int gaugeangle = map(rssi, -150, -40, 30, 330);
          TFT_eSprite sprArc = TFT_eSprite(&id(disp).spr);
          sprArc.createSprite(140, 140);
          sprArc.fillSprite(TFT_PINK);
          sprArc.fillSmoothCircle(sprArc.width() / 2, sprArc.height() / 2, sprArc.width() / 2, TFT_BLACK, TFT_BLACK);
          sprArc.drawSmoothArc(sprArc.width() / 2, sprArc.width() / 2, sprArc.height() / 2, 50, 30, 330, TFT_DARKGREY, TFT_DARKGREY);
          sprArc.drawSmoothArc(sprArc.width() / 2, sprArc.width() / 2, sprArc.height() / 2, 50, 30, gaugeangle, rssicolor, TFT_LIGHTGREY);

          // Draw the gauge value label in the center - this sprite is the same size as the gauge itself to allow for easy text centering
          TFT_eSprite sprArcValue = TFT_eSprite(&id(disp).spr);
          sprArcValue.createSprite(140, 140);
          sprArcValue.setTextDatum(MC_DATUM);
          // Fill the text sprite with Pink, and use Pink for text background.  This will get filtered out late
          sprArcValue.fillSprite(TFT_PINK);
          sprArcValue.setTextColor(TFT_WHITE, TFT_PINK);
          sprArcValue.drawNumber(rssi, sprArc.height() / 2, sprArc.height() / 2, 6);

          // Push the gauge to the background sprite and filter out the Black background
          sprArc.pushToSprite(&id(disp).spr, (id(disp).spr.width() / 2) - (sprArc.width() / 2) , 5, TFT_PINK);  //, TFT_BLACK);
          // Push the label to the background sprite and filter out the Pink background
          sprArcValue.pushToSprite(&id(disp).spr, (id(disp).spr.width() / 2) - (sprArc.width() / 2) , 5, TFT_PINK);

          // Original clock using traditinal ESPHome ESPHome Display functions
          it.printf(20, 140, id(roboto), Color(255, 0, 0), id(ha_time).now().strftime("%Y-%m-%d %H:%M:%S").c_str());

      - id: page2
        lambda: |-
          // This page uses only ESPHome drawing functions
          // Since I filled the component's sprite object I need to fill it on each page to clear the screen
          id(disp).spr.fillSprite(TFT_BLACK);
          it.print(0, 10, id(roboto), "This is page 2!");
          it.printf(20, 70, id(roboto), Color(255, 0, 0), id(ha_time).now().strftime("%Y-%m-%d %H:%M:%S").c_str());

      - id: page3
        lambda: |-
          // This page uses only ESPHome drawing functions
          // Since I filled the component's sprite object I need to fill it on each page to clear the screen
          id(disp).spr.fillSprite(TFT_BLACK);
          auto red = Color(255, 0, 0);
          auto green = Color(0, 255, 0);
          auto blue = Color(0, 0, 255);
          auto white = Color(255, 255, 255);
          it.rectangle(20, 50, 30, 30, white);
          it.rectangle(25, 55, 30, 30, red);
          it.rectangle(30, 60, 30, 30, green);
          it.rectangle(35, 65, 30, 30, blue);
          it.filled_circle(it.get_width() / 2, it.get_height() / 2, it.get_height() / 4, red);

      - id: page4
        lambda: |-
          // This page uses a mix of ESPHome functions and functions from TFT_eSPI
          // Since I filled the component's sprite object I need to fill it on each page to clear the screen
          id(disp).spr.fillSprite(TFT_BLACK);
          id(disp).spr.fillRectHGradient(0, 0, it.get_width(), it.get_height(), TFT_MAGENTA, TFT_BLUE);
          it.print(0, 50, id(roboto), "Page with");
          it.print(0, 80, id(roboto), "gradient background");

      - id: pageStartup
        lambda: |-
          id(disp).spr.fillSprite(TFT_BLACK);
          it.print(0, 10, id(roboto), "Connecting...");

@bradmck
Copy link
Contributor Author

bradmck commented Mar 18, 2023

@guillempages - didn't notice your reply before. I can actually remove the libraries: section and it works fine - not sure why I still had that section. I don't have any idea how to add those build options to the python file, but will see if I can figure it out. My repository is very close to landonr's. I just deleted and re-forked yesterday.

@patfelst
Copy link

patfelst commented Mar 19, 2023

Hi I just tried your tdisplay-poc.yaml and the backlight works from HA front end (on / off and brightness level), and I can see the TFT_eSPI text sensor (version) but the display is black. The only thing I changed was remove OTA password and added an API encryption key, plus changed the font from Roboto to Arial.

I see your comment above about there being an initialise problem, so I'll try the above. To run a minimal setup like your example tdisplay-poc.yaml, what exactly did you change to get it working?

@landonr
Copy link
Owner

landonr commented Mar 19, 2023

just tried this and it works great!

  • backlight with adjustable brightness works!
  • graph with dial shows

can we make a PR and i'll update the example? then I can update the external component to call all of the tft specific methods for drawing shapes, etc in here. That way we can use all the default display methods
https://esphome.io/api/classesphome_1_1display_1_1_display_buffer.html

@landonr
Copy link
Owner

landonr commented Mar 19, 2023

image

@patfelst
Copy link

me too, I got the above code working - thanks!

@bradmck
Copy link
Contributor Author

bradmck commented Mar 19, 2023

Cool, glad it's working for you guys. @patfelst - I'll update the tdisplay-poc.yaml file in my repo. I'll also add this longer one with multiple pages as reference. @landonr I have no problem submitting a PR - but want to just a touch of cleanup. I'm also looking into trying to get the defines into the Python file as @guillempages suggested. If I can figure that out I'd also like to make it so you can override them in YAML if desired. If you can define your own headers you should technically be able to work with any display that works with TFT_eSPI. I realize that's out of scope for the goal here though. I myself think it's neat you can mix/match drawing functions.

@landonr
Copy link
Owner

landonr commented Mar 19, 2023

If you feel like submitting a pr early, I'm happy to help out with the yaml stuff. I've been working on a component here https://github.com/landonr/homeThing/blob/84ad6d75c2b6836ba7b7bb429e27d414994f2ce9/components/homeThing/__init__.py

😄

@bradmck
Copy link
Contributor Author

bradmck commented Mar 19, 2023

@landonr - I deleted my repo and did a fresh fork from yours so I could start over just making the necessary changes without any playing around. My repo is working perfect for me. I added updated samples, which of course point to my repo for now. I can open a PR if you don't mind the tft and spr objects being exposed publicly? I want to test a bit more but seems to be working fine for me so far. Also, I briefly checked out your homeThing posted above and looks really cool!

@guillempages - I've tried to move all of the defines out of the YAML but can't make it work. I found how to use cg.add_define in Python, and can see they get added to defines.h in the generated source, but it's like they get read after the TFT_eSPI library initializes during compile. I can see it's using the default driver and Serial instead of Parallel. (That's why I pull those values and push them into sensors - I can see them on the webpage to verify) I next tried adding them as defines in t_display_s3.h in the components folder but same issues. I asked on Discord but haven't gotten any pointers yet, though I did not try @ tagging ssieb. I did test moving them to secrets and that works fine. I'll keep trying.

@bradmck
Copy link
Contributor Author

bradmck commented Mar 19, 2023

@guillempages - I have a branch of my fork that doesn't require the build flags in YAML. I added a config option you can use under the display: component called user_build_flags . If the config option is provided and true then the yaml needs to have build_flags for the display or the library defaults will be used. If omitted or false then the T-Display-S3 flags that were in my yaml before are used. There's a sample yaml in this branch called tdisplays3-nobuildflagsneeded. The default build flags were moved into display.y. Implementation could be better but it works at this point.
(landonr and I chatted on Discord)

https://github.com/bradmck/lilygo-tdisplays3-esphome/tree/MoveTFTDefines

@guillempages
Copy link
Collaborator

@bradmck very nice. The "add_build_flag" calls on the cg were probably what I was missing when I tried that.
I've seen your PR still doesn't have that yet; would be nice to put this in, so that the minimal examples.yaml that I pushed would still work.

@bradmck
Copy link
Contributor Author

bradmck commented Mar 21, 2023

I slowed down and did a reset - I have my repo setup as a fresh fork from @landonr's, but I removed the tdisplays3 folder in the root, which includes the patched TFT_eSPI library. All build flags for the display are in the display.py file. @guillempages - I'd be curious if I broke the touchscreen in the process? I don't have one to test with.

@guillempages
Copy link
Collaborator

@bradmck I've tried to use your version of the repository. The good news is, touch is still working. The bad news is, the screen stays completely black for me :-( (backlight is working with the switch; haven't tried the dimming)

(I'm just using my own configuration, and changed the repo where I'm picking the component from; otherwise the yaml file stayed the same as was working with landonr's repo)

@bradmck
Copy link
Contributor Author

bradmck commented Mar 21, 2023

@guillempages - well, crap. I thought I had tested enough where I was pretty confident this would work for you/others. Thank you for testing. I'll try to see what I missed. Sorry it didn't work this time. (I'm a little puzzled since mine works just fine - but will do some more testing)

EDIT: Well I'm a bit puzzled - I can't make mine fail. I have unplugged and reset several times. Re-uploaded several times. I even went all the way back to the factory firmware that came on my device, then used the ESPHome web tools to prepare for first use. Then I adopted it and pasted in the contents of the example.yaml file (which I think came from you?), saved and uploaded. (The only thing I add is a use_address: line to make flashing easier since I've been uploading a lot of configs to this thing and the name is always changing, but the address is always the same.)

Could you be sure to clean build files? I have been bit by that more than once. I swear there was even a time I was banging my head against the wall and could figure out why something wasn't working - finally deleted the whole folder for that device under config/.esphome/build and son of a &*&^, that was the problem. (I feel silly asking that since you seem more advanced than I - no offense intended). The only way the display should be empty/black is if the right driver isn't being loaded for TFT_eSPI, but I have those hard-coded in the display.py file and that seems to work fine for me. If it still doesn't work I'd be curious if adding the build_flags to your YAML changes anything? (they are posted up above)

@patfelst
Copy link

patfelst commented Mar 21, 2023

I just tried example.yaml and its working for me. EDIT: I did this by creating a new ESPHome device, so threre were no old build files to clean.

Then I tried accessing id(disp).spr but it doesn't appear to be accessible any more. Are you still working on this @bradmck?

/config/esphome/test-t-display-s3-v2.yaml: In lambda function:
/config/esphome/test-t-display-s3-v2.yaml:91:47: error: 'TFT_eSprite esphome::tdisplays3::TDisplayS3::spr' is private within this context
       TFT_eSprite sprArc = TFT_eSprite(&id(disp).spr);
                                               ^~~
In file included from src/esphome.h:59,
                 from src/main.cpp:3:
src/esphome/components/tdisplays3/t_display_s3.h:63:39: note: declared private here
     TFT_eSprite spr = TFT_eSprite(&tft);

@bradmck
Copy link
Contributor Author

bradmck commented Mar 21, 2023

Thanks @patfelst - that's good to hear. I am still working on exposing the TFT and SPR objects, but as an option that defaults to false. I decided to start over to clean my code up. (I'm an amateur) So this is step 1, remove the need for the custom TFT_eSPI library and move the build_flags I had been doing in YAML into the component (thanks @guillempages ). To really expose the TFT and SPR objects I needed to do a better job on the rotation piece, which I _think _ I have figured out (sample size 1). That's another branch I'm working on.

@clowrey
Copy link

clowrey commented Mar 28, 2023

Cool, glad it's working for you guys. @patfelst - I'll update the tdisplay-poc.yaml file in my repo. I'll also add this longer one with multiple pages as reference. @landonr I have no problem submitting a PR - but want to just a touch of cleanup. I'm also looking into trying to get the defines into the Python file as @guillempages suggested. If I can figure that out I'd also like to make it so you can override them in YAML if desired. If you can define your own headers you should technically be able to work with any display that works with TFT_eSPI. I realize that's out of scope for the goal here though. I myself think it's neat you can mix/match drawing functions.

Being able to have any display that works on TFT_eSPI available for ESPHOME would be amazing!!! hope that's what this is turning into or maybe branch off your own Repo for it.. That is exactly what I hoped to find over a year ago when I started looking into better display libraries for ESPhome.

It looks like the repository that your previous example YAML files in here was replaced with the newer simpler version for the Tdisplay-S3 with less exposed? Is there still a copy of your older version using all the local YAML pin defines? I would like to try this method with other displays like these:
TN 800*480 ESP32 S3 7.0inch_ESP32-8048S070
IPS 800*480 ESP32 S3 5.0inch_ESP32-8048S050
TN 480*270 ESP32 S3 4.3inch_ESP32-4827S043

Edit - I looked into this further and it seems that TFT_eSPI does not support the 16bit parallel data bus required by these displays and does not intend to in the future so I was wrong to think that implementing the entire library would allow me to use them directly.. I will look at other options like integrating the Arduino_GFX library that already supports these displays in a similar way to how you integrated the TFT_eSPI library..

Edit - I think the LVGL graphics library would probably be best just because it is much more popular and also supports these displays..

@clowrey
Copy link

clowrey commented Mar 28, 2023

I just tried your example here https://github.com/bradmck/lilygo-tdisplays3-esphome/blob/main/example.yaml and it worked for me! I did have to use the web flasher per your instructions for the initial flash - it would not flash correctly using the "Plug into the computer running ESPHome Dashboard" option I usually use for initial flashing with the device plugged into my ESPHome host computer - but maybe something related to the proxmox USB passthrough setup who knows..

@patfelst
Copy link

Being able to have any display that works on TFT_eSPI available for ESPHOME would be amazing!!! hope that's what this is turning into or maybe branch off your own Repo for it.. That is exactly what I hoped to find over a year ago when I started looking into better display libraries for ESPhome.

I will second this. It would be really useful. If anyone is going to spend time doing that, are you aware of LovyanGFX? I use it for my Arduino (non-Esphome) projects. It has mostly the same API as TFT_eSPI, more features, compatible with M5Stack products and in benchmarks is faster than TFT_eSPI. The developer is very responsive to issues and bugs and is actively maintaining the repo. Check it out.
https://github.com/lovyan03/LovyanGFX

@clowrey
Copy link

clowrey commented Mar 29, 2023

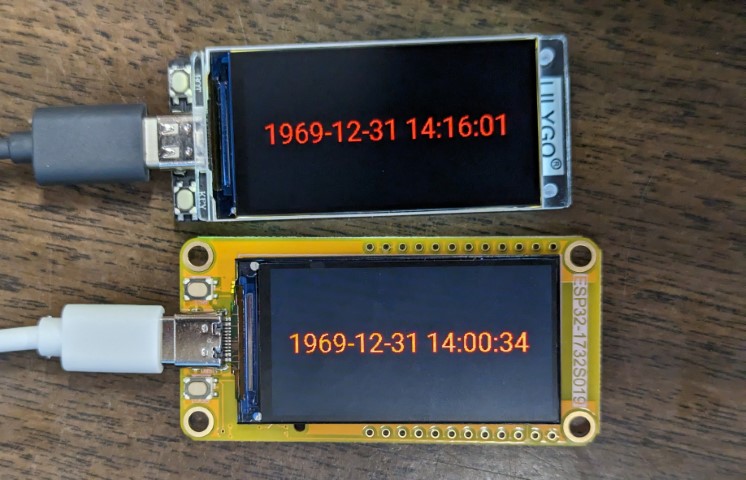
I just forked your repo and successfully altered the init stuff to work with this display the esp32-1732s019 which has the same LCD but it uses the SPI interface and is about half the price.. The contrast looks worse on this image but that is just because the max backlight is allot brighter on the esp32-1732s019 version, with the backlight dimmed they look the same. Thanks for all the work on this everyone!

@bradmck
Copy link
Contributor Author

bradmck commented Mar 30, 2023

Cool, thanks for the feedback @clowrey! A quick note on the Driver listed in the log.... 30601 when converted to hex is 7789, so that tells you it's the ST7789 driver. I just didn't get around to converting this yet. I should have mentioned that in my post above.

@patfelst
Copy link

patfelst commented Mar 31, 2023

@bradmck yes working for me too. BTW I have the non-touch version.
I made a local copy to display driver in hex too :)

[11:36:19][C][tdisplays3:031]: TDisplayS3:
[11:36:19][C][tdisplays3:034]:   TFT_eSPI Library Version: 2.5.23
[11:36:19][C][tdisplays3:035]:   TFT Width: 170
[11:36:19][C][tdisplays3:036]:   TFT Height: 320
[11:36:19][C][tdisplays3:039]:   TFT_eSPI Driver: 7789
[11:36:19][C][tdisplays3:044]:   TFT_eSPI Interface: 8-bit Parallel

by modifying this line:

ESP_LOGCONFIG(TAG, "  TFT_eSPI Driver: %x", iTFTDriver);

I noticed you have this branch, is that ready for people to try out?
https://github.com/bradmck/lilygo-tdisplays3-esphome/tree/OptionToExposeTFTObjects

thanks again for your work on this.

@bradmck
Copy link
Contributor Author

bradmck commented Mar 31, 2023

@patfelst --- thanks for testing and glad it's working. And thanks for the tip on the code change. I'll incorporate that. You're certainly welcome to try that other branch but it's definitely not fully baked. I have a local copy that is a little bit better, but I'm struggling getting rotation in sync just using the rotation: setting on the display. One of the issues I've run into (and I'm not an expert at this) but I can't override the set_rotation or whatever the function is called. I am still trying to work on this though.

@patfelst
Copy link

patfelst commented Mar 31, 2023

OK thanks, I'll give the other branch a try. Sorry but I've not attempted coding a ESPHome component before, so can't help you with the rotation issue. But I did notice in the TFT_eSPI drivers folder, he has a couple of different versions of ST7789 drivers. Go to this folder and scroll down to the bottom
https://github.com/Bodmer/TFT_eSPI/tree/master/TFT_Drivers
image

It might be worth trying the second version of rotation?

@patfelst
Copy link

You're certainly welcome to try that other branch but it's definitely not fully baked.

I got it working with your long sprite yaml code example above (but without the multiple page stuff, just the simulated RSSI part at the top). I just had to set expose_tft_objects: true:

display:
  - platform: tdisplays3
    id: disp
    update_interval: 1s
    rotation: 270
    expose_tft_objects: true
    lambda: |-

If / when you get back to exposing the tft and sprite objects, you might want to look in to implementing the automatic clearing of the display at the start of the display lambda as described here. I see in your comments above you are doing it manually via id(disp).spr.fillSprite(TFT_BLACK);. I noticed this as the time of day is overwriting itself and gets garbled. Anyway not a big deal, and thanks again.

@guillempages
Copy link
Collaborator

@bradmck Sorry, it took a bit longer to test that.
I've copied your configuration (changing the keys and wifi values as needed, of course), and it still doesn't work for me :-(
The relevant configuration logs are:

[23:22:10][C][switch.gpio:075]: GPIO Switch 'Backlight'
[23:22:10][C][switch.gpio:098]:   Restore Mode: restore defaults to ON
[23:22:10][C][switch.gpio:031]:   Pin: GPIO38
[23:22:10][C][homeassistant.time:010]: Home Assistant Time:
[23:22:10][C][homeassistant.time:011]:   Timezone: 'CET-1CEST,M3.5.0,M10.5.0/3'
[23:22:10][C][tdisplays3:031]: TDisplayS3:
[23:22:10][C][tdisplays3:034]:   TFT_eSPI Library Version: 2.5.23
[23:22:10][C][tdisplays3:035]:   TFT Width: 170
[23:22:10][C][tdisplays3:036]:   TFT Height: 320
[23:22:10][C][tdisplays3:039]:   TFT_eSPI Driver: 30601
[23:22:10][C][tdisplays3:044]:   TFT_eSPI Interface: 8-bit Parallel

@bradmck
Copy link
Contributor Author

bradmck commented Apr 3, 2023

Thank you @guillempages for testing that. That output is exactly what I'd expect. I'm still puzzled why this isn't working and it seems it must be related to touch vs. non-touch. Out of curiosity, did the test you ran above have touch functionality added to the config? (I'm guessing no since you said you used my config, but making sure). I may just have to buy one of these with touch to do some tinkering with.

I will say I just noticed something on LilyGo's Github page (https://github.com/Xinyuan-LilyGO/T-Display-S3).... The two pinout diagrams have a slight difference besides the touch chip. On the second diagram it shows pin 15 for LCD_POWER_ON. I did a quick test on my config by just adding another GPIO switch for that pin but it doesn't make any difference on my board.

@patfelst
Copy link

patfelst commented Apr 4, 2023

I just deleted my previous post as it was mostly wrong :(
GPIO15 is on both the touch and non-touch (it's just at the top of the pinout picture for the non-touch version).

GPIO15 is labelled PWR_EN on the schematic and controls the LED backlight via a transistor and P-FET only when running on battery power, i.e. USB power (VBUS) is not present. So @bradmck you're correct, when running on USB power, the state of GPIO15 will not do anything due to the diode OR of VBUS and PWR_EN.

When the P-FET is ON, it applies 3.3V from the regulator to the four LED backlight controller chip U4 (AW9364). It's labelled "V3V" after being switched by the P-FET. Once this V3V voltage is present, GPIO38 can be used to control the 4x backlight LEDs on/off or PWM brightness control.

In summary, GPIO15 is a battery saving measure - if you're running on LiPo battery you have to set GPIO15 high to enable the LCD backlight. If you don't drive it high, the backlight will be off.
image

@hapklaar
Copy link

hapklaar commented Apr 4, 2023

GPIO15 is labelled PWR_EN on the schematic and controls the LED backlight via a transistor and P-FET only when running on battery power, i.e. USB power (VBUS) is not present. So @bradmck you're correct, when running on USB power, the state of GPIO15 will not do anything due to the diode OR of VBUS and PWR_EN.

When the P-FET is ON, it applies 3.3V from the regulator to the four LED backlight controller chip U4 (AW9364). It's labelled "V3V" after being switched by the P-FET. Once this V3V voltage is present, GPIO38 can be used to control the 4x backlight LEDs on/off or PWM brightness control.

In summary, GPIO15 is a battery saving measure - if you're running on LiPo battery you have to set GPIO15 high to enable the LCD backlight. If you don't drive it high, the backlight will be off.

That is very interesting and probably the cause for what I described here #20

I could probably use a button on the module to switch it on when on battery?

@hapklaar
Copy link

hapklaar commented Apr 4, 2023

Wonderful, adding this to code fixed my issue. Thanks @patfelst

switch:
  - platform: gpio
    pin: GPIO15
    name: "Backlight"
    id: backlight
    internal: true
    restore_mode: ALWAYS_ON   

@guillempages
Copy link
Collaborator

Thank you @guillempages for testing that. That output is exactly what I'd expect. I'm still puzzled why this isn't working and it seems it must be related to touch vs. non-touch. Out of curiosity, did the test you ran above have touch functionality added to the config? (I'm guessing no since you said you used my config, but making sure). I may just have to buy one of these with touch to do some tinkering with.

Yes, I've copied your configuration and there is no touch component there.

I will say I just noticed something on LilyGo's Github page (https://github.com/Xinyuan-LilyGO/T-Display-S3).... The two pinout diagrams have a slight difference besides the touch chip. On the second diagram it shows pin 15 for LCD_POWER_ON. I did a quick test on my config by just adding another GPIO switch for that pin but it doesn't make any difference on my board.

The backlight was working as expected; it's just that it doesn't draw anything on the screen.

@patfelst
Copy link

patfelst commented Apr 4, 2023

Wonderful, adding this to code fixed my issue. Thanks @patfelst

Glad to hear it @hapklaar, sorry I didn't think of this when you posted issue #20

@bradmck
Copy link
Contributor Author

bradmck commented Apr 4, 2023

Thanks @guillempages. @landonr and I ran into someone on Discord (@bok over there) that has the touch version and my code works for him. What I found interesting (and can't explain) is that he first reported it didn't work. Then came back saying it did after he restarted Home Assistant and restarted the S3. He's hopefully going to post a compiled bin you can try. The touch version is like $36 on Amazon right now so I haven't ordered one yet. (It was like $24 just a month ago.)

@clowrey
Copy link

clowrey commented Apr 15, 2023

@bradmck - Do you have an off hand idea of how hard it would be to accomplish this sort of integration you and @landonr have here but with https://github.com/lovyan03/LovyanGFX instead? I may attempt some hacking in that direction but just wondered if you already have an idea of how hard/easy it would be? And the possible steps involved? If you do feel so inclined to go down that route I would happily pay to have Aliexpress send you one of these 5" 800x480 IPS touch displays for free to tinker with ;) If interested PM me your address.. They are already supported in Lovyn Graphics library, they are still working out a few refresh rate issues but it works.. I don't care too much about refresh anyway as I just want static display of numbers and lines etc... Thanks!

@patfelst
Copy link

patfelst commented Apr 15, 2023

@bradmck - Do you have an off hand idea of how hard it would be to accomplish this sort of integration you and @landonr have here but with https://github.com/lovyan03/LovyanGFX instead? I may attempt some hacking in that direction but just wondered if you already have an idea of how hard/easy it would be? And the possible steps involved? If you do feel so inclined to go down that route I would happily pay to have Aliexpress send you one of these 5" 800x480 IPS touch displays for free to tinker with ;) If interested PM me your address.. They are already supported in Lovyn Graphics library, they are still working out a few refresh rate issues but it works.. I don't care too much about refresh anyway as I just want static display of numbers and lines etc... Thanks!

Yes I would like to know too as I prefer LovanGFX for the reasons I stated above. Thanks all! I fact what I've really wanted for a few years now is to get ESPHome working with the M5Stack Core2 (which LovyanGFX supports). I'd be willing to post a Core2 to anyone willing to do some development.

@bradmck
Copy link
Contributor Author

bradmck commented Apr 15, 2023

@clowrey and @patfelst -- let me take a look. I quickly looked at that library when @patfelst first posted it and honestly the comments being in a foreign language scared me a bit. I do have a very basic Arduino sketch working with this library on my T-Display-S3. Dumb question, but I'm assuming both of you would want the native functionality of this library available in lambdas similar to how I've been testing exposing the TFT and SPR objects here?

@patfelst
Copy link

patfelst commented Apr 15, 2023

EDIT: Sorry, most of the LovyanGFX examples are commented in Japanese, I was thinking of his other library M5Unified where the comments are in English. BTW M5Unified is a single library for all of the M5Stack products, it actually uses LovyanGFX under the hood.

In any case you can use google translate by pasting in the github pages (e.g. Fonts example)

Lovyan is very responsive to issues (he also uses Google translate to converse but you wouldn’t know it).

And yes exactly the same as you’ve done here. I’d even settle for not exposing the sprites and TFT object. Thanks for considering.

@clowrey
Copy link

clowrey commented Apr 15, 2023

@bradmck For me all I care about is having the ability to use print statements + simple lines in the lambda.

Other stuff could slowly be added later I'm sure..
Maybe you could make a short writeup summary of how this current repository here accomplishes what it does with eSPI? And how the Lovayn library would be different/similar? I know the code is there but I'm still not entirely sure how it works. And it might be nice for others to have that summary in the readme anyway.

Here is an example layout I've been using on smaller displays. I'm using HA + ESPhome for data logging, monitoring, load balancing, mostly alternative energy in off grid situations.

PXL_20230328_184845528
PXL_20230105_001906595 MP
PXL_20220814_002115625 MP
That is a 0-1000A DC shunt monitor I designed a custom PCB for using a ttgo T-Display - and now I just like the simplicity of ESPhome for dashboards at sites that are more stable than trying to have a tablet display the whole home assistant dashboard. And am hoping to use the 5" display as a wall display for general end users to view their system status. I have the YAMLs shared here https://github.com/clowrey/ESPhome-YAML

@landonr
Copy link
Owner

landonr commented Apr 17, 2023

can we make a new issue for support LovyanGFX? I have a M5stack Fire and StickC Plus I can try getting this working with

@patfelst
Copy link

under this repo? I mean this repo is for the Lilygo T-Display-S3. But I'm happy to create a new issue if its ok in this repo.

Also if its specifically for M5Stack products, it would be better to base it on the M5Unified library - which as I mentioned above uses LovyanGFX, but also has all the libraries for the chips the M5Stack products use, like the touch controller, AXP192 I2C power controller (which on some products is used to control the LCD backlight) etc.

@clowrey
Copy link

clowrey commented Apr 17, 2023

can we make a new issue for support LovyanGFX? I have a M5stack Fire and StickC Plus I can try getting this working with

The m5 stickC plus displays are also supported by library's already in ESPhome too and by this eSPI library if you just the text and stuff. I have an example here using one https://github.com/clowrey/ESPhome-YAML/blob/main/m5stick-cplus-heatpump.yaml

@bradmck
Copy link
Contributor Author

bradmck commented Apr 21, 2023

Just letting you guys know I am still looking at the LovyanGFX library - I just haven't gotten it working yet.

@landonr
Copy link
Owner

landonr commented Apr 26, 2023

under this repo? I mean this repo is for the Lilygo T-Display-S3. But I'm happy to create a new issue if its ok in this repo.

Also if its specifically for M5Stack products, it would be better to base it on the M5Unified library - which as I mentioned above uses LovyanGFX, but also has all the libraries for the chips the M5Stack products use, like the touch controller, AXP192 I2C power controller (which on some products is used to control the LCD backlight) etc.

yeah i think that is probably the move.

  • make a new repo for m5unified for esphome
  • keep looking at loylangfx, and make a new repo for that @bradmck

@patfelst
Copy link

patfelst commented Apr 26, 2023

Yes I agree two different integrations (i.e. two repos) would need to be created because LovyanGFX will span many products and vendors, whereas M5Unified specifically targets M5 Stack products. They are different use cases.

Not sure if you meant for me to create either or both repos, but I don't think I have the coding skills (or time to learn at least) to mange either of these, but I will follow with interest and help test etc. Appreciate you guys working on this!

@landonr
Copy link
Owner

landonr commented Apr 27, 2023

I can get around to it when i have time and i'll report back. I have both devices

@landonr
Copy link
Owner

landonr commented Jul 3, 2023

I thought about it a bit and I don't think including LovyanGFX makes sense for esphome. I made a component for one m5stack device here it wasn't that bad https://github.com/landonr/esphome-components/tree/main/components/MiniEncoderC

For AXP192 i've been using this component https://gitlab.com/geiseri/esphome_extras/-/tree/main/components/axp192

@genebean
Copy link

genebean commented Jan 2, 2024

FWIW, I just found this and got my setup working with this:

esphome:
  name: ${name}
  friendly_name: ${friendly_name}

esp32:
  board: lilygo-t-display-s3
  variant: esp32s3
  framework:
    type: arduino
    version: 2.0.14
    platform_version: 6.1.0

external_components:
  - source: github://landonr/lilygo-tdisplays3-esphome
    components: [tdisplays3]

Of note, there is a board definition for this now at https://docs.platformio.org/en/latest/boards/espressif32/lilygo-t-display-s3.html

@clowrey
Copy link

clowrey commented Mar 12, 2024

We are getting 16 bit parallel displays in main ESPhome!! esphome/esphome#5872

Sign up for free to join this conversation on GitHub. Already have an account? Sign in to comment
Labels
None yet
Projects
None yet
Development

No branches or pull requests

7 participants