During this course, you will work on various assignments as you learn to code. Starting in Phase 1, all assignments will be interactive pieces of curriculum that require a submission of work. For each assignment, you will need to complete some work on your local machine, then submit it to Canvas. If the assignment includes tests, you will need to pass all tests before Canvas will register the assignment as Complete.
You'll first see an assignment's instructions here, in Canvas. However, the work you'll be doing will be on your local machine. In order to work on an assignment, you'll need to get it 'forked' and 'cloned' to your computer.
When you've finished your work, you will need to use Flatiron School's submission
tool, the learn-co gem, to submit your work on Canvas.
In this lesson, we'll walk through the full process. In fact, this lesson is the first Canvas assignment you'll be completing on your own!
Your task for this lesson is to go through the process of downloading, completing, and submitting your completed assignment. The following steps walk through the process of getting an assignment onto your computer from Canvas. Follow along using this current assignment.
Note: In order to work on and submit assignments, you will need to connect your GitHub account to your Flatiron School Portal Account account. For more information on this, check out this readme.
Through this course, you will be downloading many assignments, so it is important to take a moment now to think about how you'll organize this work on your computer. You are welcome to do what you like, but we recommend setting up a directory where you can keep all of your work for this course.
- Go to your terminal and navigate to your home directory by typing
cd ~ - Create a
Developmentfolder by typingmkdir Development(if you're a Mac user, this folder already exists) - Navigate into this folder with
cd Development - In here, create a
codefolder withmkdir code - Navigate into this folder with
cd code
You'll be going through multiple phases in this course, so it may also be
helpful to go one step further and create folders for phases 1 through 5 within
code.
Having a specific place for your work will make it easier to find if you ever need to look back at an earlier project. It'll also keep the rest of your computer's folders clear of random code.
The process we'll go through in this lesson will create sub-folders
automatically. Whenever you are starting a new assignment, navigate back to your
main code folder (cd ~/Development/code) to ensure these sub-folders don't
get created within each other.
On the assignment's page in Canvas, you'll see three buttons in the upper right corner of the assignment's text. The first is a Fork button. When this button is present, it means this assignment requires work on your local machine.

Forking is a process where an exact copy is made of a collection of code and files. Clicking the Fork button copies our original version of an assignment over to your personal GitHub account, then redirects you to that new copy. Forking will allow you to write your own code solution without interfering with the original copy.
If clicking the Fork button does not bring you to GitHub, check to make sure that you have connected your GitHub account to Flatiron School.
Note: In GitHub, there is a Fork button, as well. However, this button will not communicate with Flatiron School - we won't know you've forked the assignment, and your assignment won't submit successfully in Canvas.
Once an assignment fork has been created, you'll need to download it to your
local machine. To do this on your personal GitHub fork, first click the Code
button. A pop-up will appear that says Clone with HTTPS. You'll see a URL
provided starting with https://....

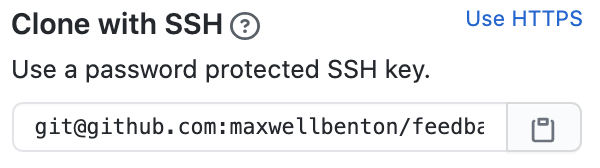
Before doing anything else, make sure to switch from HTTPS to SSH by
clicking the Use SSH link. When clicked, the pop-up will change to display
Clone with SSH. Instead of a URL, you'll see what sort of looks like an
email, starting with git@github.com:.
Aside: Why SSH? If you followed the setup instructions, you have added your personal SSH key to GitHub. GitHub will store your personal copies of all the work you do in this course. Because you've added your SSH key, GitHub will know who you are when you send work from your local machine to GitHub to be stored. HTTPS may not work for all assignments and will require you to sign-in from your terminal.
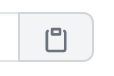
From here, click the clipboard icon.
Now, open to your terminal and navigate to where you'd like to download the
assignment (e.g. cd ~/Development/code).
Once you've navigated to where you'd like to store assignments, type
git clone then paste in the copied text from GitHub. It should look something
like this:
git clone git@github.com:<your-user-name>/welcome-completing-assignments.gitPress enter, and you should see a flurry of terminal activity. Once the terminal gives you control to type again, a new folder with the GitHub name of the assignment will be present. Change directory into this folder to access the assignment files.
cd welcome-completing-assignmentsNow, if you've set up VS Code, type code . to open up a text editor window
with access to all of the assignment's files. The instructions are now also
available on your local machine in README.md.
Most assignments will have tests that check your work and provide immediate feedback in the terminal. We'll walk through some examples in upcoming lessons.
This assignment has a single test: check to see if you've correctly cloned this assignment to your local machine. If you've followed the steps above, you've completed everything you need to do to pass the test, all that is left to do is run it.
To run an assignment's tests, make sure you're still in the assignment's folder on your local machine, then type the following:
learn testThis command will again cause a flurry of activity in your terminal. You may see some warnings in the mix of output, but that is normal. After a few moments, you should see the test results printed out. For this assignment, they should look like this:
This assignment
    ✓ has been correctly cloned to your local environment


  1 passing (5ms)
Congratulations! You've passed the test.
Note: If you did not receive a passing test, or if your terminal produced some sort of error, walk through the steps in this lesson again and make sure you've followed each one. If you're still receiving errors, we recommend going back through the local environment setup instructions again to ensure everything is set up properly.
When all tests are passing, you can head back to the assignment on Canvas. Refresh the assignment page and you should see that Canvas now registers the assignment as Complete, and you will be ready to move on to the next lesson.
Each assignment will be different and will include instructions on what is
required to complete it. Some labs will have many tests. You can run
learn test as many times as you'd like while working to solve these labs. You
will submit your work to Canvas each time you do, but the assignment will be
marked Incomplete until all tests are passing.
Every time you run learn test, all the changes you've made locally will be
stored on your GitHub fork of the repo. If you head back to your repo after
running learn test, you should see a message that a new branch, fis-wip, has
been created. This branch contains the work you've done so far.
For most assignments, you will go through the process we just walked through. In our curriculum, these assignments are often referred to as labs - coding lessons that include tests. There are a few other types of assignments, though, that require slightly different submission steps:
- Code-alongs: These also require code, but will guide you through what
needs to be written. There are no tests to pass, but you will still need to go
through forking, cloning, and running
learn test. - Portfolio Projects: For these assignments, you'll be building fully functional applications. Some guidelines and requirements will be provided, but it will be up to you to design and create your own app. These will eventually become the projects you showcase to potential employers!
- Blog Submissions: Blogs are a required part of our Software Engineering courses. They help to develop your online presence and are a great way to reinforce the concepts you learn. You'll write your blog posts on a different platform, but submit links to them in Canvas.
For project and blog assignments, you will not use the forking and cloning process. For projects, you'll likely be building from scratch rather than forking and cloning existing content. For blogs, you'll be writing your blog posts on some other platform online.
In both cases, you'll need to manually submit a link to your work on Canvas. While viewing the assignment, you should see a Submit Assignment button in the upper-right section of the page.

Clicking this button will bring you to the bottom of the page where you can submit a URL link to your work.

Upon submission you should see confetti appear, indicating that your submission has been accepted.
Note: It is possible to submit lab and code-along assignments this way. However, the assignment will only be marked as submitted, not complete.
You've completed your first assignment! You now know how to work on and submit assignments:
- Click the Fork button on the Canvas assignment
- Once the assignment is forked, clone it down to your local machine
- Complete any required work, then run
learn test - If all tests pass, the assignment will be submitted to Canvas and marked as Complete
- Your work will also be pushed to GitHub and will be available on the
fis-wipbranch
Equipped with this knowledge, you are now ready to tackle greater challenges!