Traffic Light Image Classification
Udacity Self-Driving Car Nanodegree
Capstone Project. System Integration
The perception subsystem dynamically classifies the color of traffic lights in front of the vehicle. In the given simulator and test site environment, the car faces a single traffic light or a set of 3 traffic lights in the same state (green, yellow, red). We assume it is not possible to have multiple traffic lights in the different states at the same time.
We have considered different approaches to solve the traffic light classification task:
- classification of the entire image using CNN;
- object (traffic light in state) detection;
- object (traffic light) detection and classification using separate model.
Considering the fact that traffic lights are always in the same state, and focusing on the creation of a lightweight and fast model, we've chosen the direction of classifying the entire image for the simulator mode of operation. This approach uses a Convolutional Neural Network, which takes a whole image from the front camera as an input and predicts the traffic light state (we've decided to use Red / None prediction classes) as an output. We used the transfer learning technique on the MobileNet architecture with the Tensorflow Image Retraining Example (tutorial: https://goo.gl/HgmiVo, code: https://goo.gl/KdVcMi).
There are multiple datasets, available for model training:
- images from the Udacity Simulator (images as well as the ground truth from the frontal camera are available as a ROS topic);
https://drive.google.com/open?id=0Bw5abyXVejvMci03bFRueWVXX1U - rosbag, captured on the Udacity's test site;
https://drive.google.com/file/d/0B2_h37bMVw3iYkdJTlRSUlJIamM/view - Bosch Small Traffic Lights Dataset.
We've trained our model on a mixture of the datasets above.
On the image pre-processing step we've applied multiple visual transformations:
- random cropping of the image;
- rotation on the random angle (+/- 5 degrees);
- random flipping of the up to 20% images;
- random color jittering;
- applying shadows (reference: https://goo.gl/VzoxcY).
In order to balance the dataset, some images (manually chosen) were augmented.
"Simple transfer learning with MobileNet model" example from TensorFlow was used to re-train our model.
We started with a MobileNet model pre-trained on the ImageNet images, and trained a new set of fully-connected layers with dropout, which can recognize our traffic light classes of images. The model works with the image dimensions 224x224x3. The top fc layer receives as input a 1001-dimension feature vector for each image.
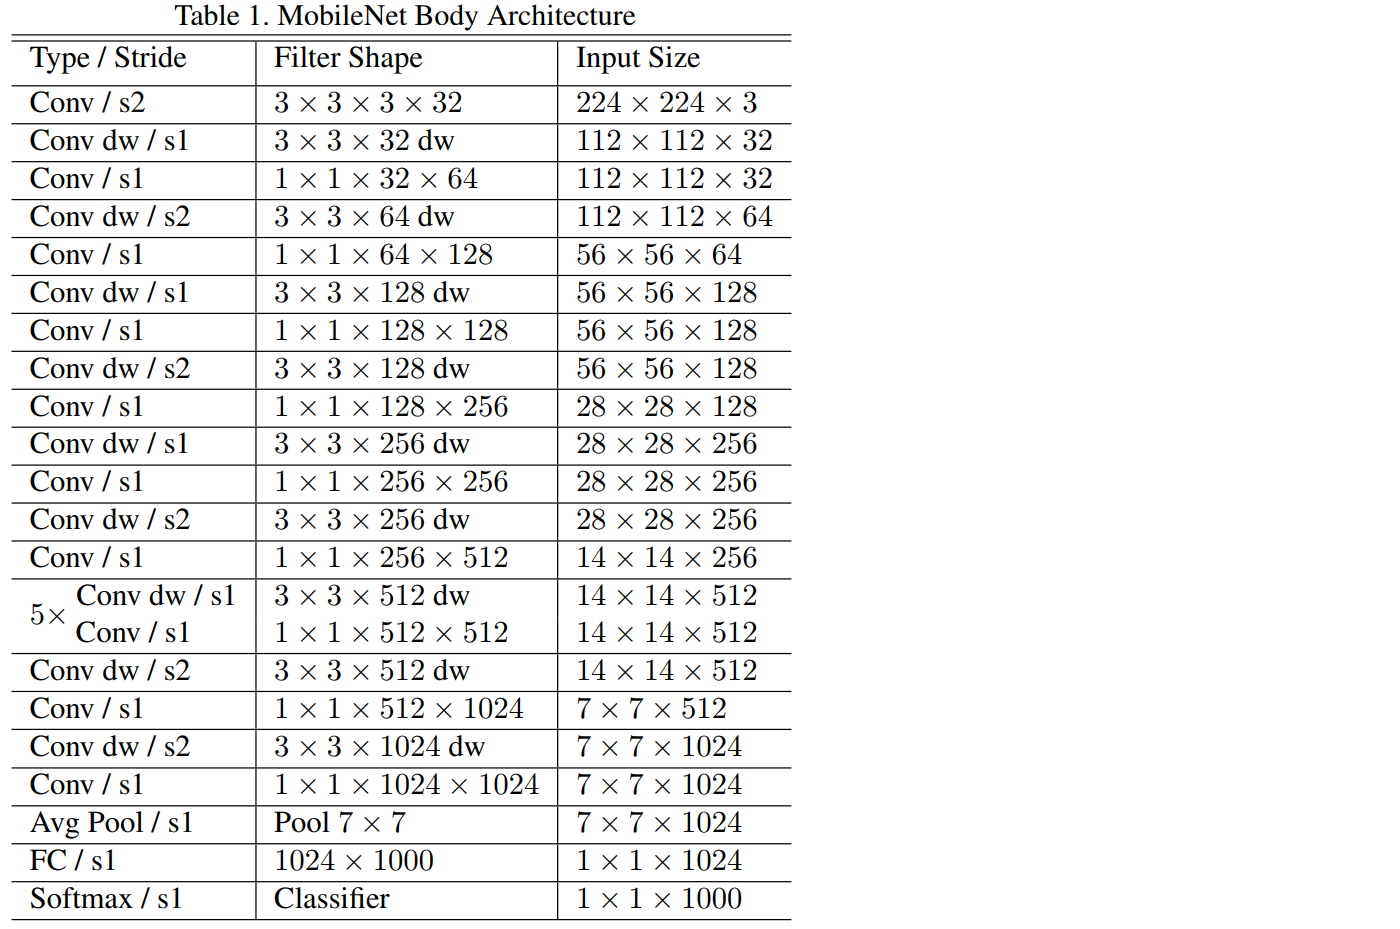
MobileNets are neural networks constructed for the purpose of running efficiently (high FPS, low memory footprint) on mobile and embedded devices. MobileNets achieve this with 3 techniques:
- Perform a depthwise convolution followed by a 1x1 convolution rather than a standard convolution. The 1x1 convolution is called a pointwise convolution if it's following a depthwise convolution. The combination of a depthwise convolution followed by a pointwise convolution is sometimes called a separable depthwise convolution.
- Use a "width multiplier" - reduces the size of the input/output channels, set to a value between 0 and 1.
- Use a "resolution multiplier" - reduces the size of the original input, set to a value between 0 and 1.
These 3 techiniques reduce the size of cummulative parameters and therefore the computation required. Of course, generally models with more paramters achieve a higher accuracy. MobileNets are no silver bullet, while they perform very well larger models will outperform them. MobileNets are designed for mobile devices, NOT cloud GPUs. The reason we're using them in this lab is automotive hardware is closer to mobile or embedded devices than beefy cloud GPUs.[1]
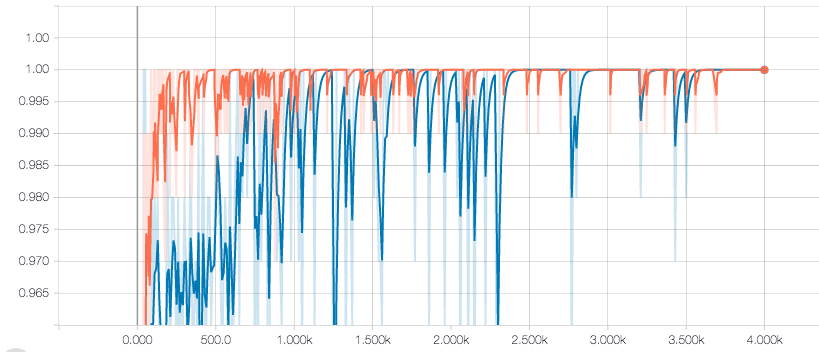
Accuracy on the simulator data:
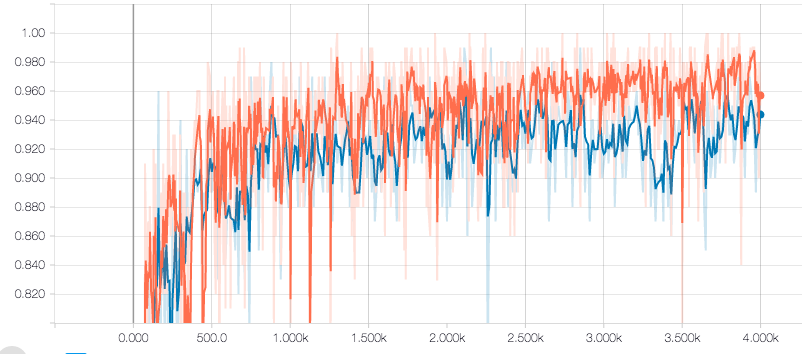
Accuracy on the Udacity's test track data:
nohup python src/retrain.py \
--image_dir data/udacity_data \
--summaries_dir model/summaries_udacity \
--flip_left_right 5 \
--random_crop 5 \
--random_scale 5 \
--random_brightness 5 \
--architecture 'mobilenet_1.0_224'> model/train.log 2>&1 &
nohup tensorboard --logdir model/summaries_udacity > model/tensorboard.log 2>&1 &
For the test-site mode of the traffic-light detection node, we employ the "SSD: Single Shot MultiBox Detection" framework to locate a bounding box around a traffic light. We found the off-the-shelf pre-trained ssd_mobilenet_v1_coco version did not perform well under certain lighting conditions, such as bright sunshine. To mitigate, we applied transfer learning using the Tensorflow Object Detection API to fine-tune the model. The training dataset includes camera images from training, reference, and review rosbags. Also, we measured a 9X improvement in inference performance as a result of the fine-tuning.
The V channel of a high-confidence cropped image (converted to HSV color space) is passed to an OpenCV-based simple classifier. The geometric locations where the lights are expected are compared for brightness. The highest mean value in three square regions of interest in the overall rectangle returned by the detector wins. This method proves to be quite robust against image drift (when bounding boxes are less than accurate).
The following image correctly classifies as "red", despite the shift.
Initially, the entire camera image is searched for traffic light patterns. Once a traffic light is found, we create a 300x300 cropping around that position. This improves location finding and confidence ranking in subsequent frames. If a pattern is not found, the system reverts to searching the entire image.
- Udacity Object Detection Lab
- https://becominghuman.ai/traffic-light-detection-tensorflow-api-c75fdbadac62