Page selector not working for supergroup web-cli #55
Assignees

Comments
|
Hi Ruth I've put some time aside tomorrow to take a look |
|
Thanks!
Ruth Stento
User Experience Lead
Lightbend
512-696-1448
<http://lightbend.com>
…On Wed, May 27, 2020 at 1:28 PM Richard Summerhayes < ***@***.***> wrote:
Hi Ruth
I've put some time aside tomorrow to take a look
—
You are receiving this because you authored the thread.
Reply to this email directly, view it on GitHub
<#55 (comment)>,
or unsubscribe
<https://github.com/notifications/unsubscribe-auth/AFOUG6YQOCQQJLMX7CABZXTRTVLUFANCNFSM4NMME4LA>
.
|
|
Fixed by #56 |
Sign up for free
to join this conversation on GitHub.
Already have an account?
Sign in to comment
A few weeks ago when I added the supergroup for Cloudstate for web-cli tabs, it worked. Today it doesn't and I can't figure out why. I've attached the source from a page where I've defined and used them. The tabs appear OK, but there is no selector at the top. When I inspect, the supergroup switch css element is there, but empty:
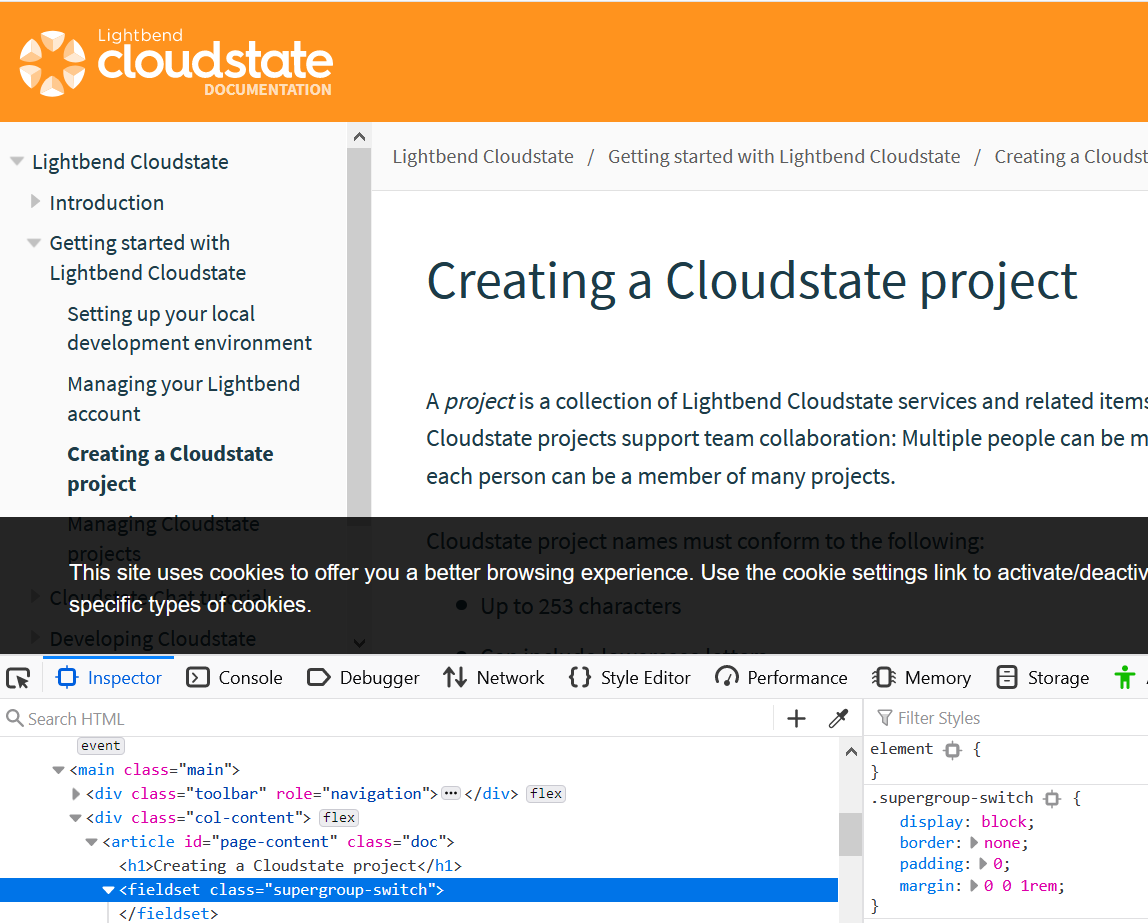
@rasummer, if you could help me figure this out, it would be great. I also realized that it would be better if the group were named supergroup-browser-cli, with tabs named "Browser" and "CLI" because it seems more user friendly to refer to the app in the browser than as a "web UI".
Source from the prev page:
= Creating a Cloudstate project
:toc:
:toc-title: ON THIS PAGE
:toclevels: 2
:page-supergroup-web-cli: Interface
include::ROOT:partial$include.adoc[]
A project is a collection of Lightbend Cloudstate services and related items that comprise your application. Cloudstate projects support team collaboration: Multiple people can be members of a single project, and each person can be a member of many projects.
Cloudstate project names must conform to the following:
To create a project:
[.tabset]
Web::
+
. Sign into your Cloudstate account.
. Click new project.
. Enter a Project name following the constraints described above.
. Enter a user-friendly name in the Project description field.
. Click submit.
Your project should appear in the My projects list. A Cloudstate admin will need to activate the project before you can use it.
CLI::
+
. Log into your Cloudstate account:
+
csctl auth login
The web UI launches in a browser.
+
. Enter your credentials.
+
An authorization page displays.
+
. Click Authorize
+
. Create a project by substituting your project name and placing a descriptive name in quotes:
+
csctl project new “friendly name”
At this point, your project is empty, and you are the only person who is a member of it.
== Project status
Along with the project name and description, you will see a project status. This status may begin as
PENDINGuntil the project has been approved by a Lightbend Cloudstate administrator, at which point it will show asACTIVE, and you can continue using the project to deploy services.If your project does not move to
ACTIVEstatus in a short time, please email us at mailto:support@lightbend.com[support@lightbend.com] and let us know the project name.NOTE: You can also use the command line,
csctl project list, to see a list of all projects you have access to (or have created). See xref:manage-project-adoc[Managing projects] for more information.== What's next
Next, you will use the command line to xref:auth-kubectl.adoc[authenticate kubectl to your project].
The text was updated successfully, but these errors were encountered: