This repo contains AWS FreeRTOS IoT python client sample code (colab example) and AWS IoT FreeRTOS sample code for TI CC32xx wifi board.
CMPE-AWSIoT.ipynb is the AWS IoT python sdk example based on colab.
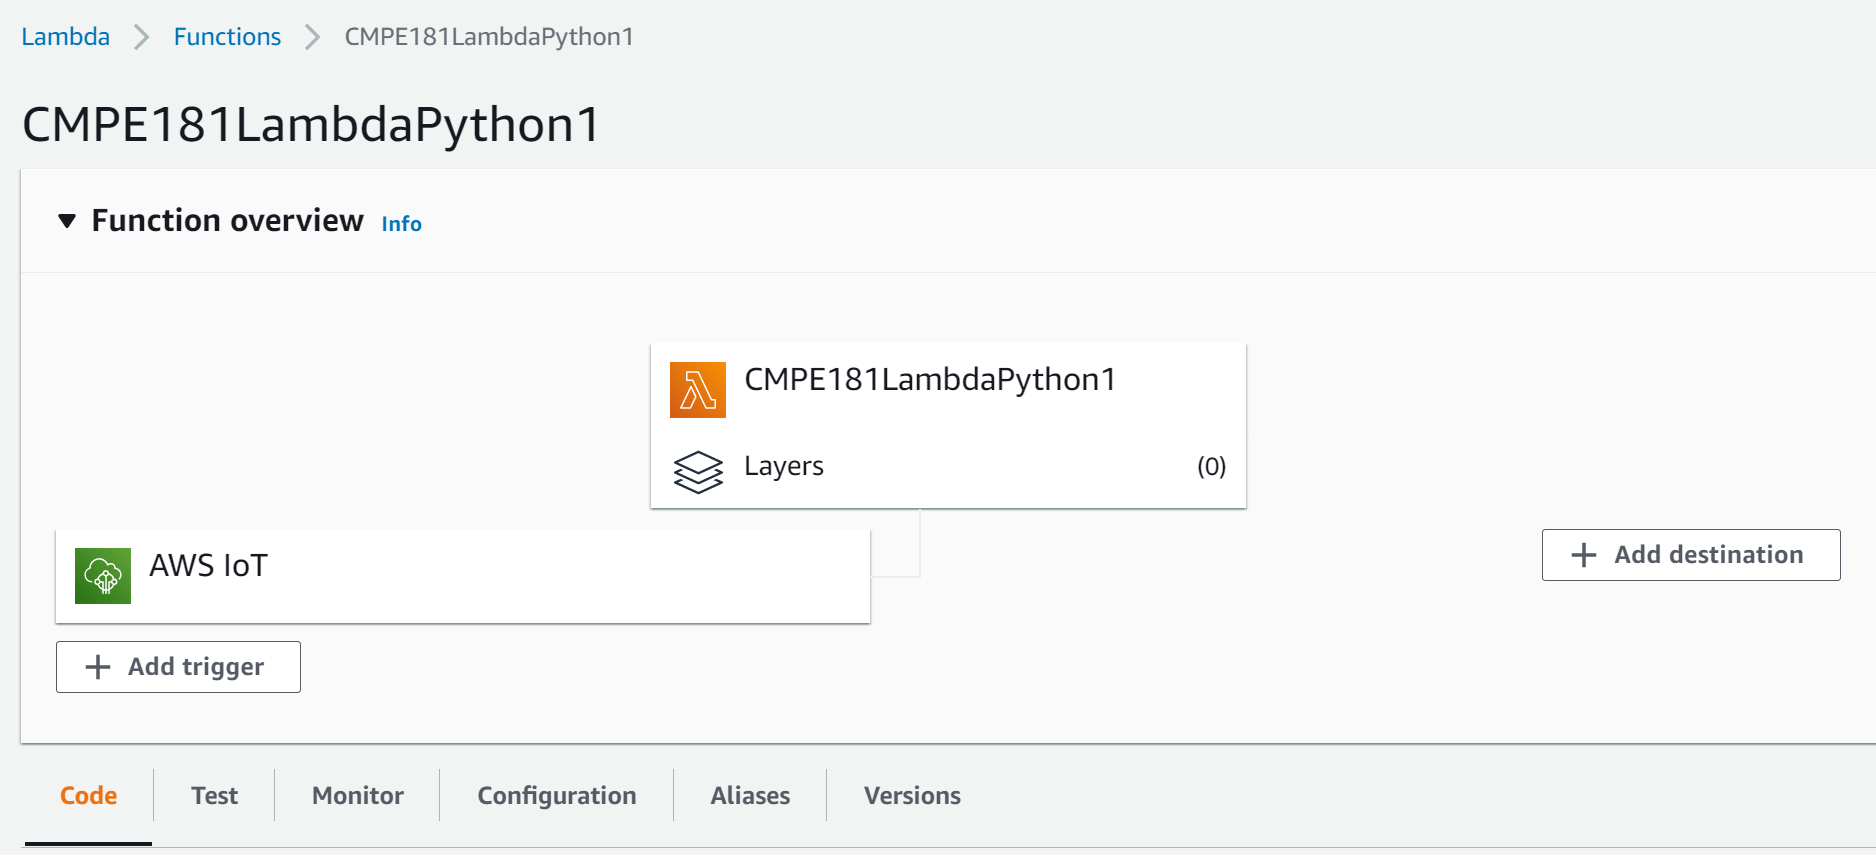
IoTLambda.py is the python code that deployed to AWS lambda that can be triggered by AWS IoT message.
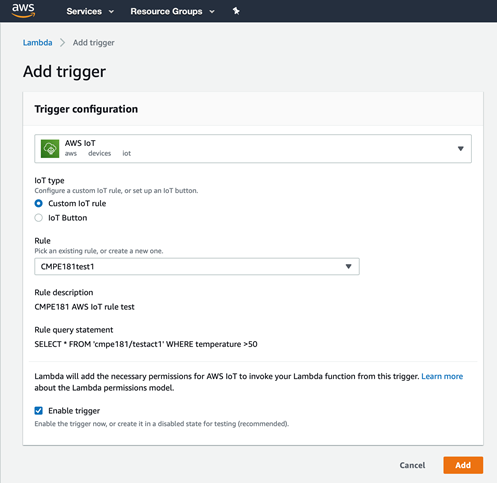
You can add the AWS IoT Core as the trigger
This lambda function inserts IoT data into dynamodb, update the item in the dynamodb by converting Fahrenheit to Celsius, Send to SNS notification, and publish data back to the IoT device.
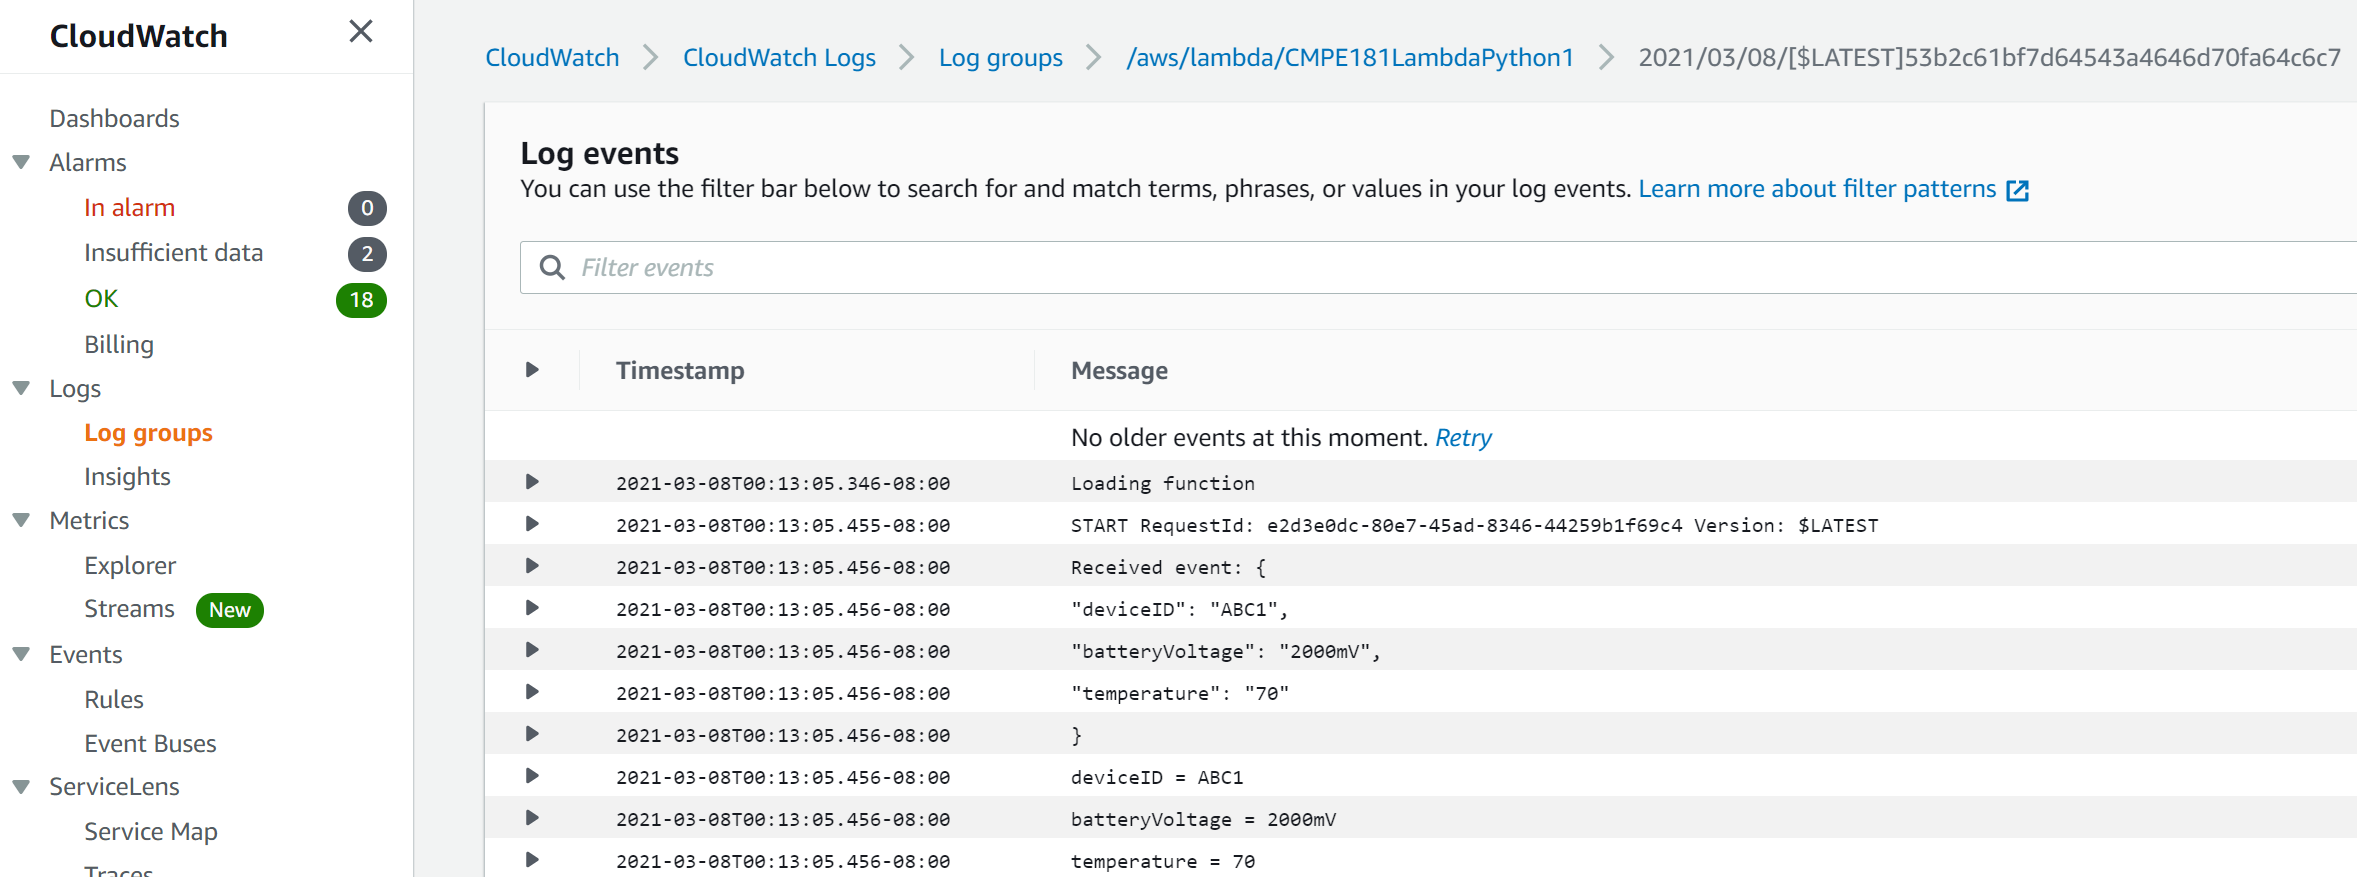
You can send a json data to test this lambda function, for example, the json data is
{
  "deviceID": "abcdd2",
  "batteryVoltage": "2000mV",
  "temperature": "70"
}
To trigger the Lambda function via IoT devices, you need to add this Lambda action in IoT Rules

When you send the data in the AWS IoT side, you can see the log of the Lambda function
Amazon API Gateway is an AWS service for creating, publishing, maintaining, monitoring, and securing REST, HTTP, and WebSocket APIs at any scale. The APIs created with Amazon API Gateway expose HTTPS endpoints only. API Gateway doesn't support unencrypted (HTTP) endpoints.
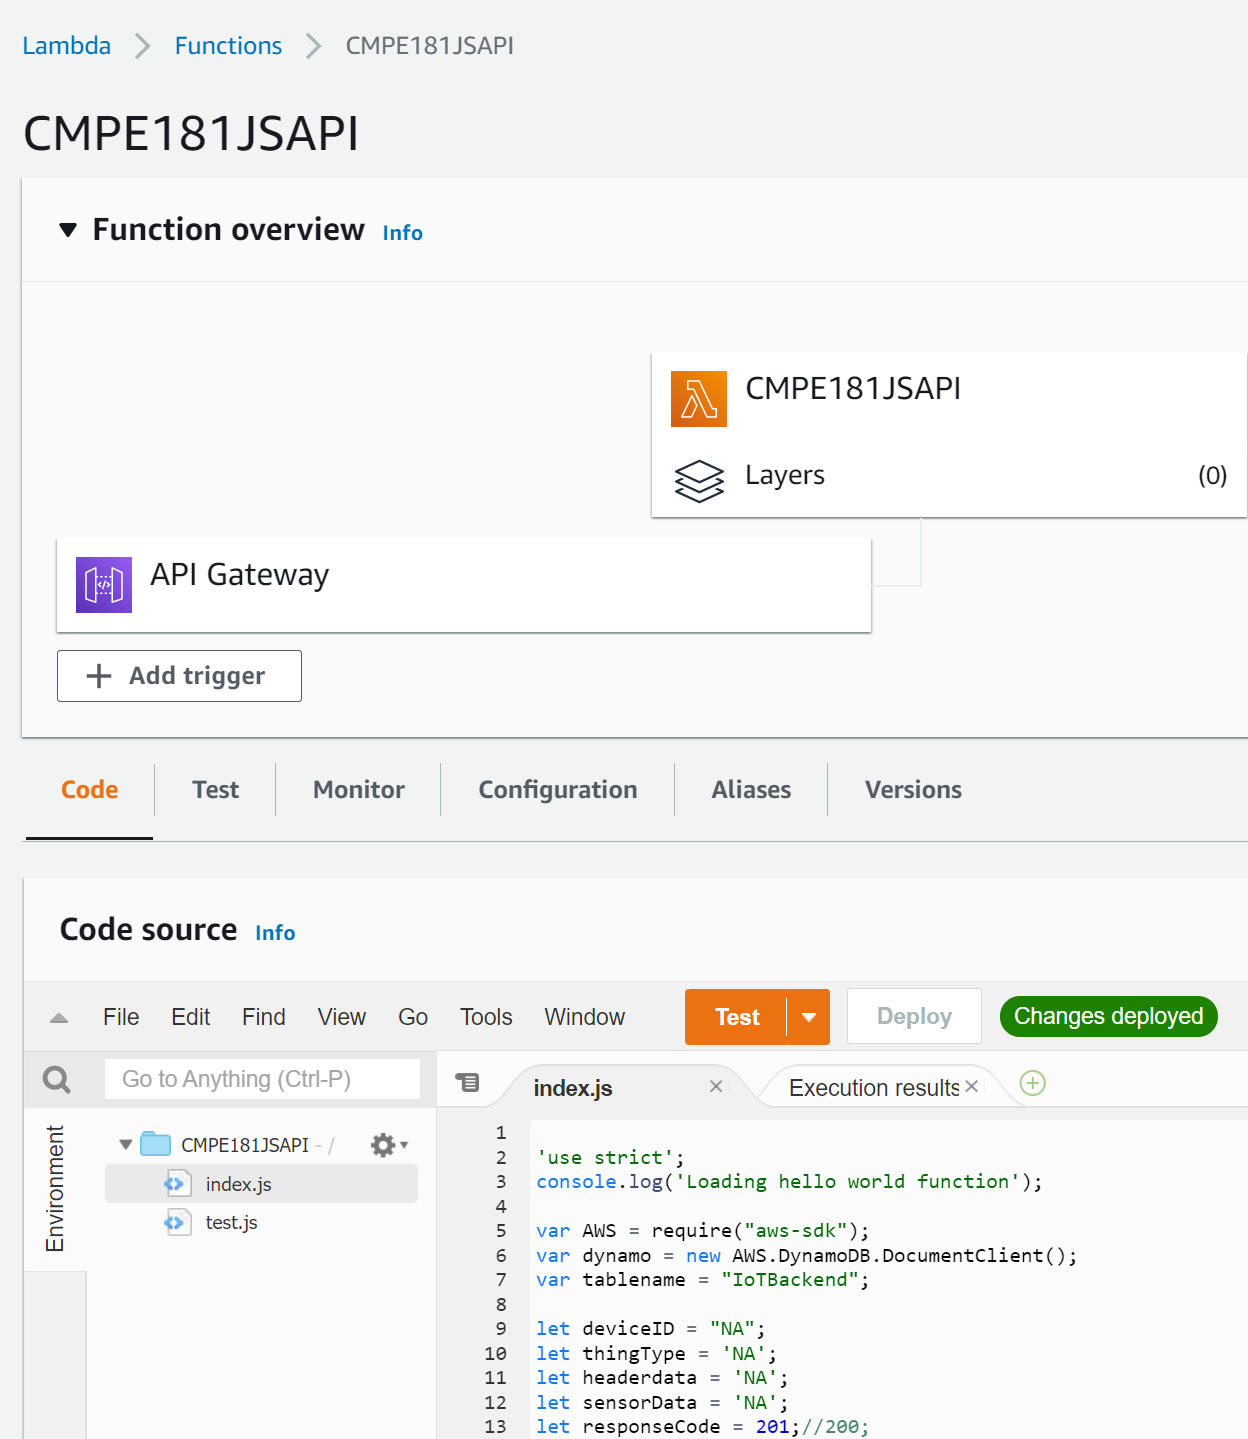
You can create a REST API with Lambda integrations in Amazon API Gateway. In a Lambda integration, the HTTP method request from the client is mapped to a backend Lambda function invocation. In a Lambda proxy integration, the entire client request is sent to the backend Lambda function as is, except that the order of the request parameters isn't preserved. In a Lambda non-proxy integration (also called a "custom integration"), you configure the way the parameters, headers, and body of the client's request are translated into the format that your backend Lambda function requires.
CMPE181JSAPI.js is the lambda function that can be trigger by API Gateway
You can test the lambda function via Test event data
{
  "httpMethod": "POST",
  "isBase64Encoded": false,
  "headers": {
    "content-type": "application/json",
    "headerdata": "testheader"
  },
  "thingType": "test",
  "queryStringParameters": {
    "deviceID": "httpdevice1010",
    "thingType": "web"
  },
  "body": "{ \"sensorData\" : { \"temperature\" : \"60\", \"batteryVoltage\" : \"2000mV\" }}"
}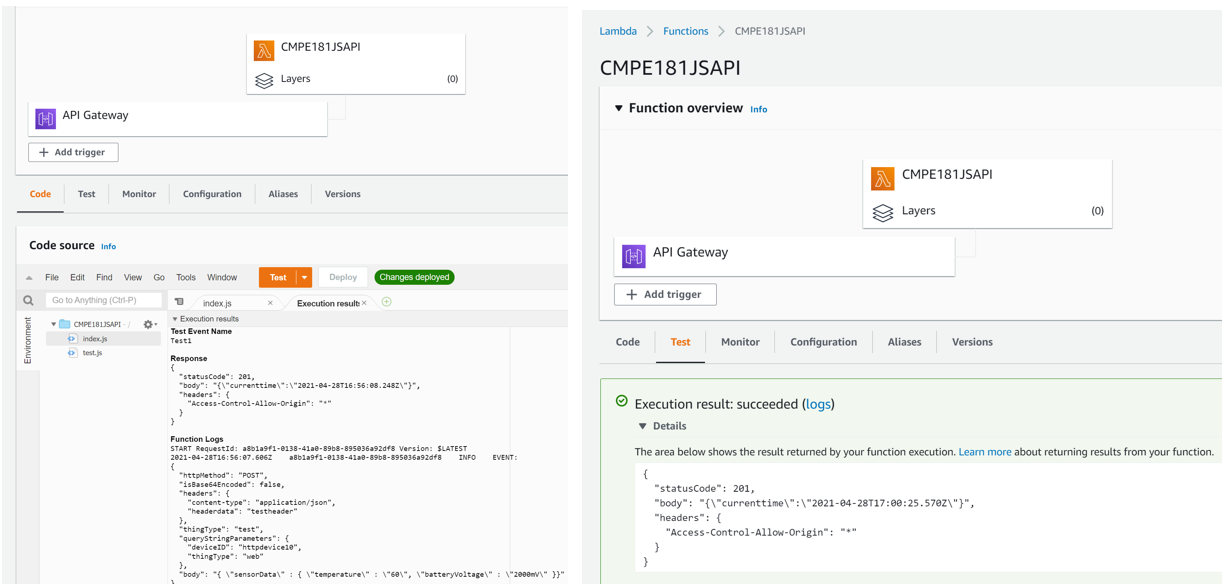
After the test, you can see the data has been saved in the DynamoDB

-
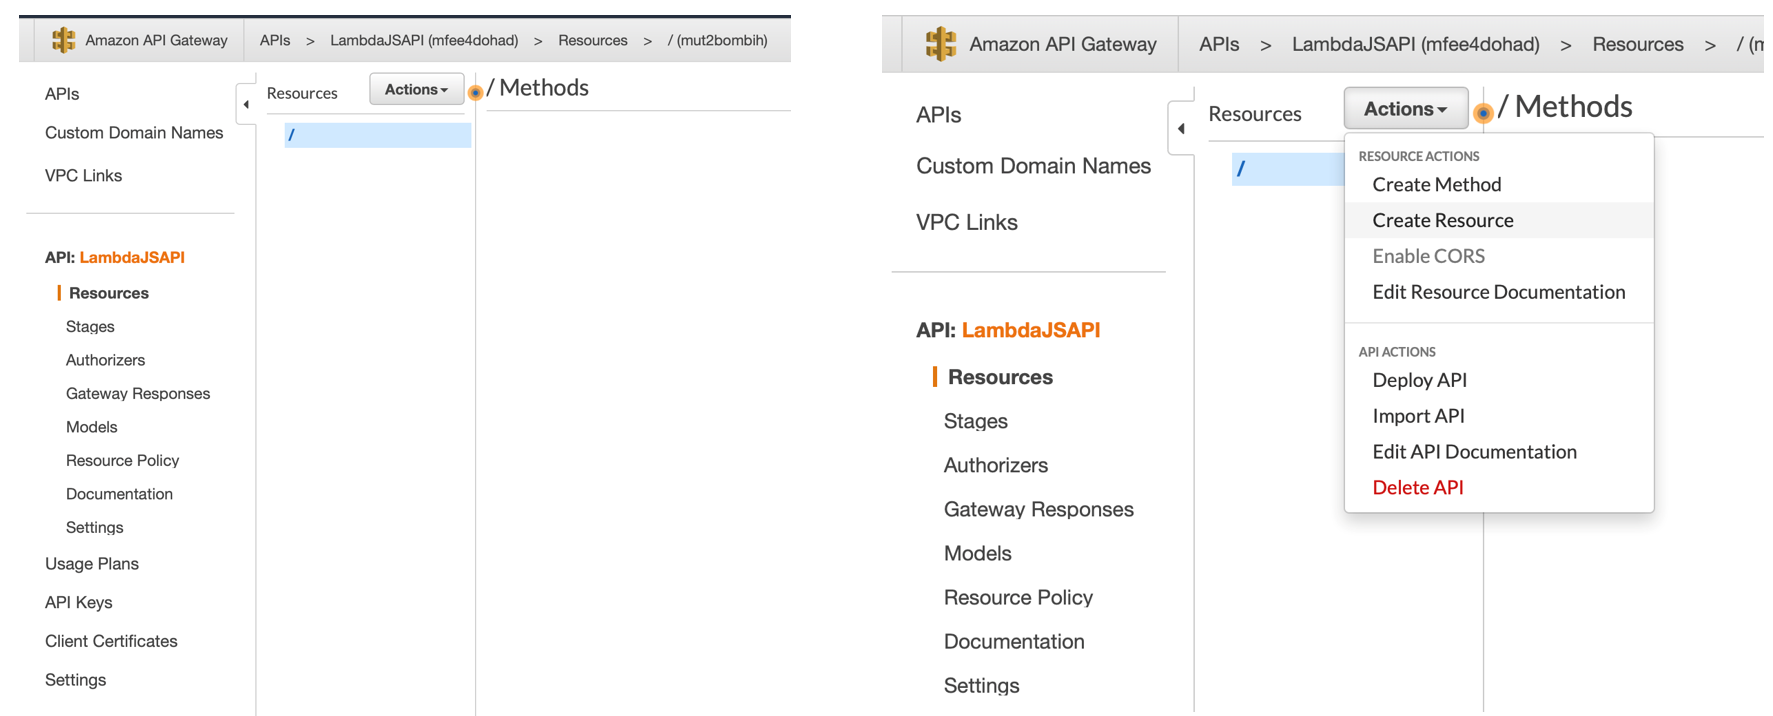
You can create a API Gateway method first

-
Create resource in API Gateway Choose the root resource (/) in the Resources tree. Choose Create Resource from the Actions dropdown menu.
-
Leave Configure as proxy resource unchecked. For Resource Name, enter helloworld. Leave Resource Path set to /helloworld. Leave Enable API Gateway CORS unchecked. Choose Create Resource

-
In a proxy integration, the entire request is sent to the backend Lambda function as-is, via a catch-all ANY method that represents any HTTP method. In the Resources list, choose /helloworld. In the Actions menu, choose Create method. Choose ANY from the dropdown menu

-
As shown in the above figure, leave the Integration type set to Lambda Function. Choose Use Lambda Proxy integration. Set region and type the Lambda Function: CMPE181JSAPI
-
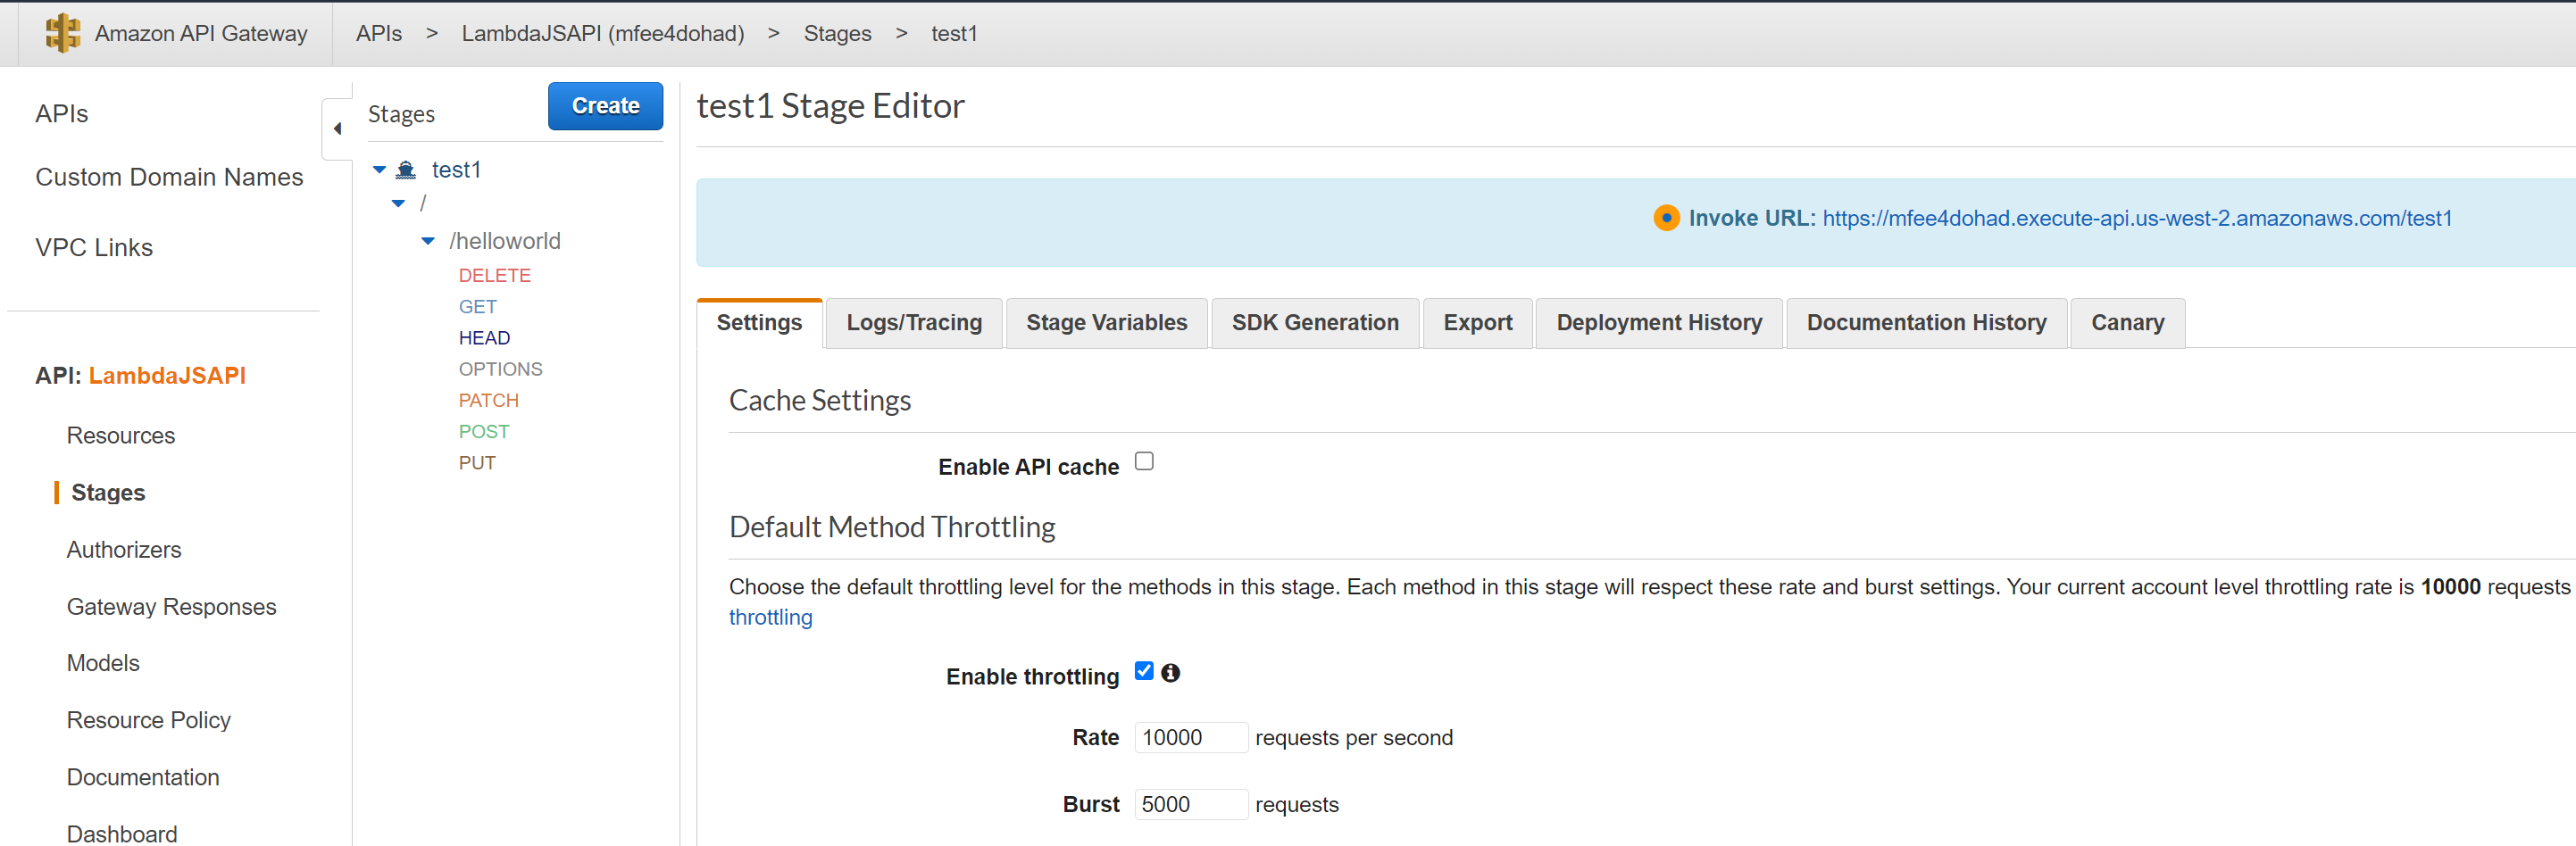
Deploy and test the API. Choose Deploy API from the Actions dropdown menu. For Deployment stage, choose [new stage]. For Stage name, enter test1. Choose Deploy.

-
Note the API's Invoke URL in the Stages->test1 page
You can test the API (GET POST) via Curl command or Postman:
curl -v -X GET 'https://mfee4dohad.execute-api.us-west-2.amazonaws.com/test1/helloworld?deviceID=webtest6&thingType=web'  -H 'content-type: application/json'  -H 'headerdata: Sunday'

curl -v -X POST 'https://mfee4dohad.execute-api.us-west-2.amazonaws.com/test1/helloworld?deviceID=webnew2&thingType=web' -H 'content-type: application/json' -H 'headerdata: Sunday' -d '{ "sensorData" : { "temperature" : "70", "batteryVoltage" : "2000mV" }, "temperature" : { "temp" : "34" } }'FreeRTOS folder the AWS IoT FreeRTOS code for TI CC32xx wifi board. You can check my tutorial from this link. Amazon's tutorial is in [FreeRTOS Getting Started] (https://docs.aws.amazon.com/freertos/latest/userguide/freertos-getting-started.html) and Getting Started TI
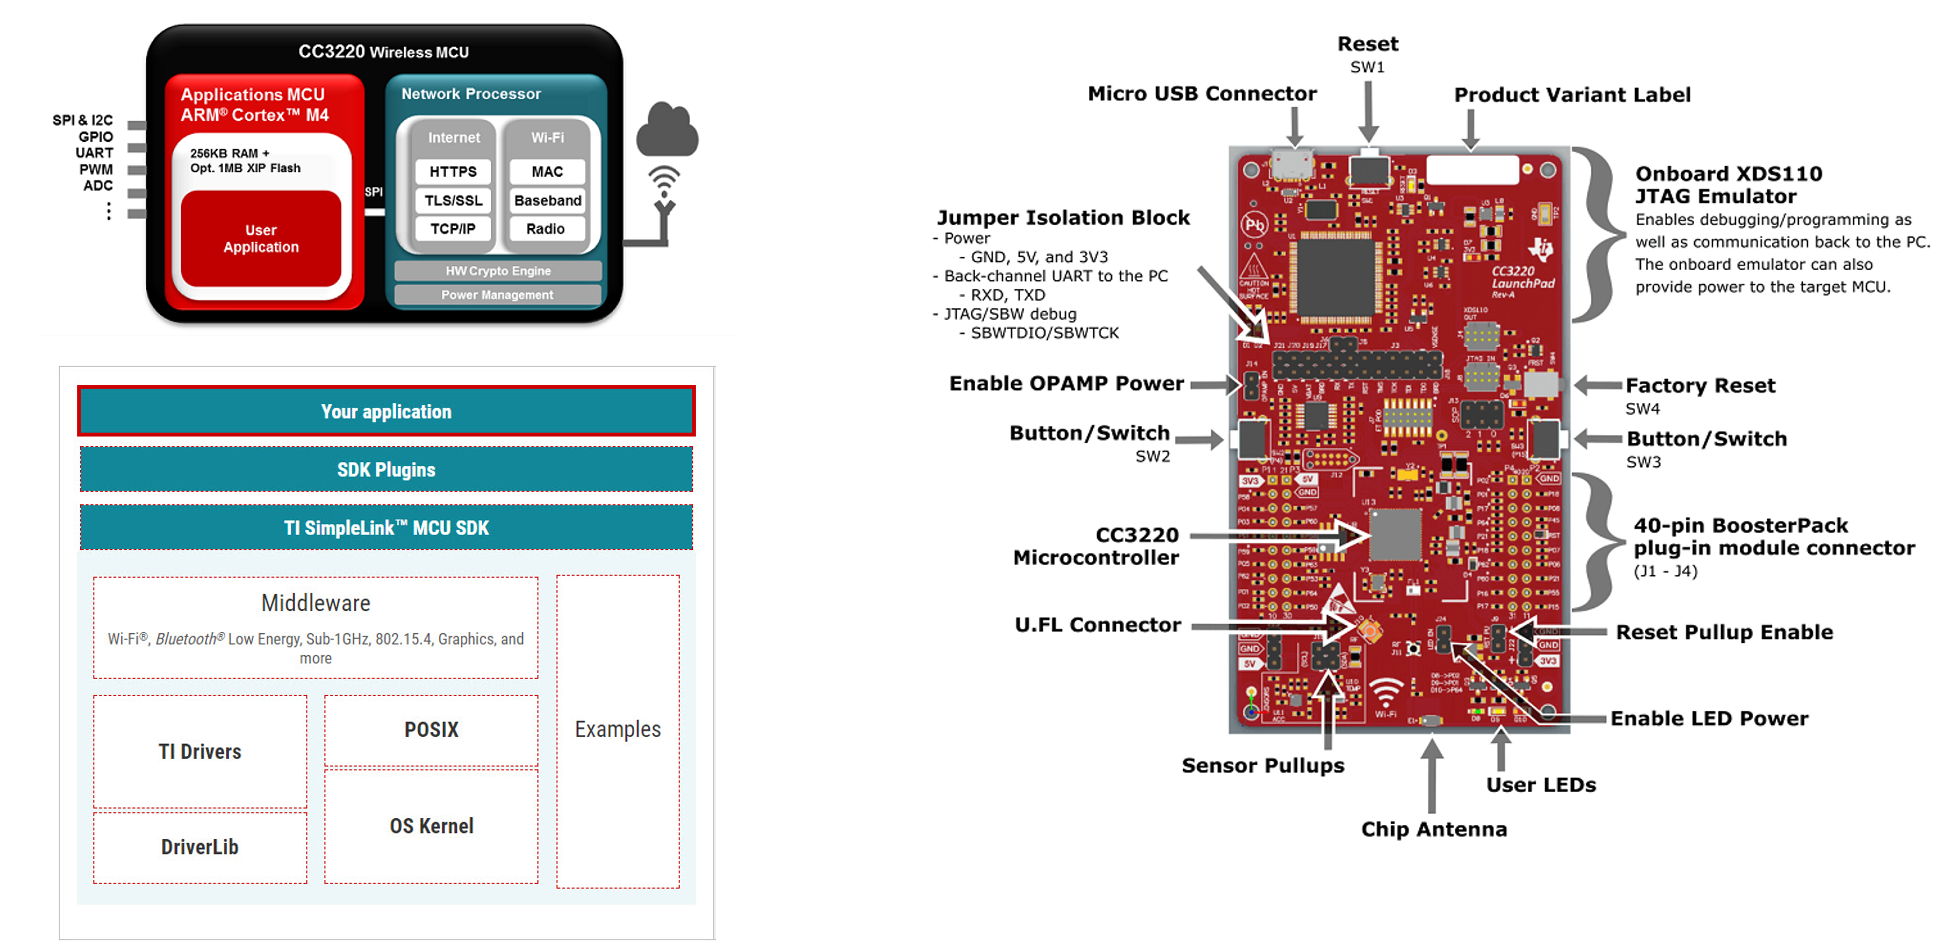
The hardware board used here is TI Simplelink CC3200SF Launchpad based on TI CC3200SF chip, which is a single chip MCU (ARM Cortex M4) with 2.4GHz Wifi. This board is one of the FreeRTOS-Qualified Hardware Platforms supported by Amazon.
Download TI CCS in this link, download and install the latest version of CCS (e.g., CCS 10.3)
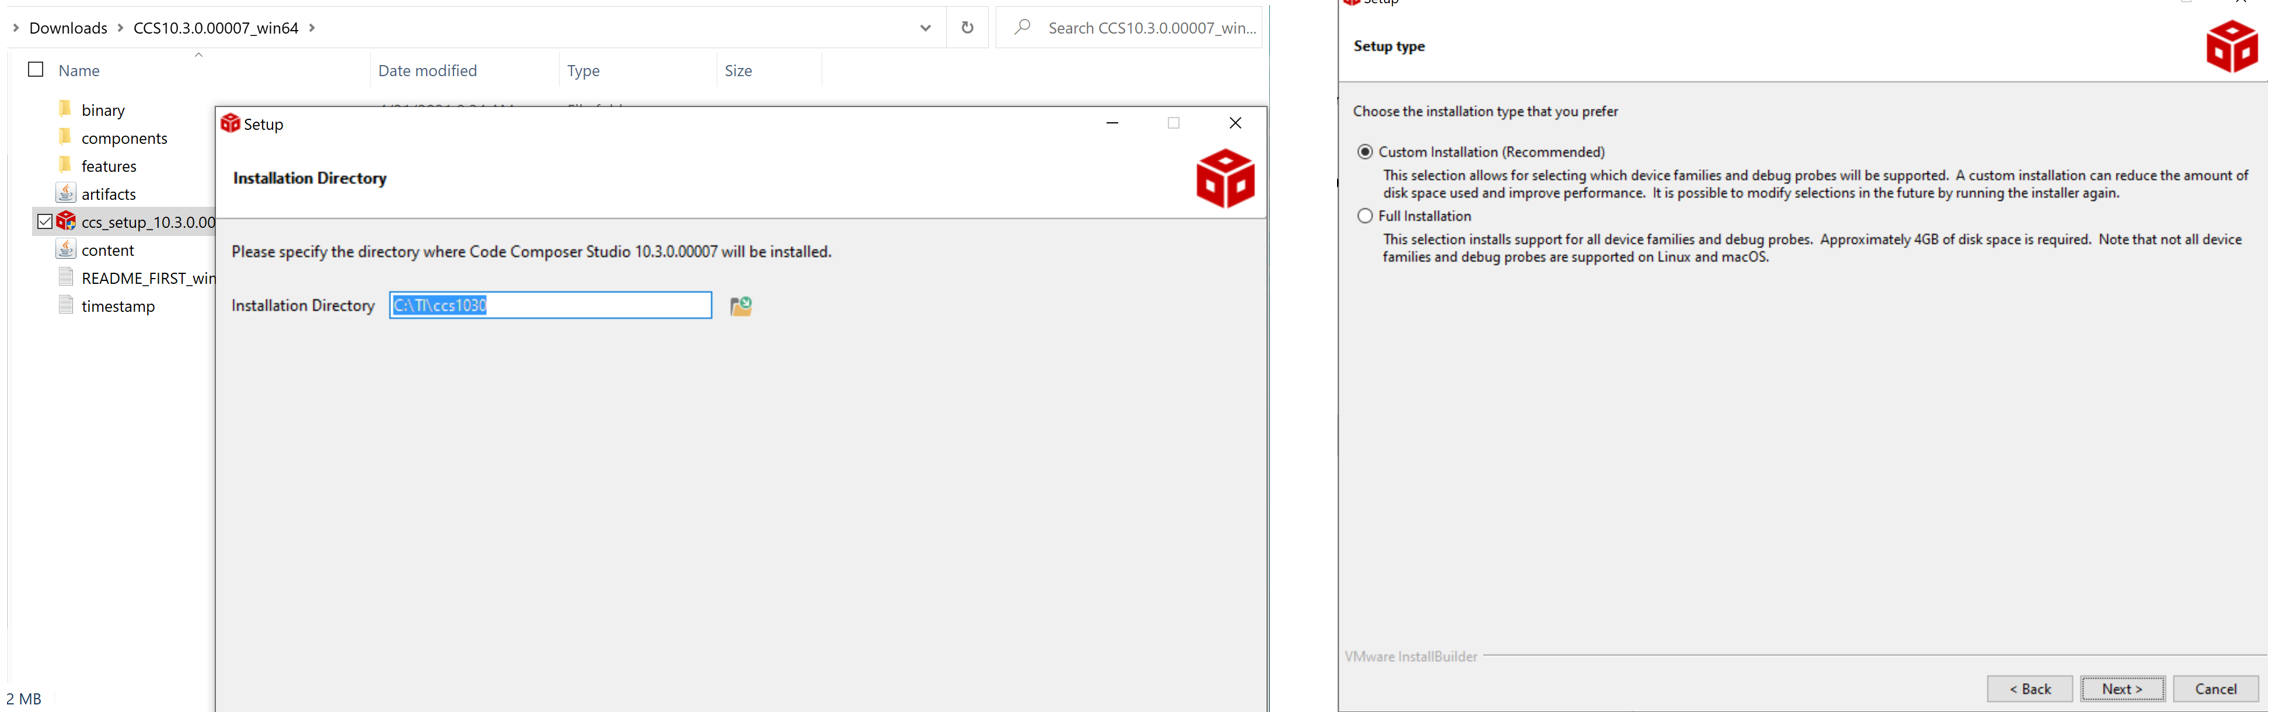
Make sure TI CC32xx is selected during the installation

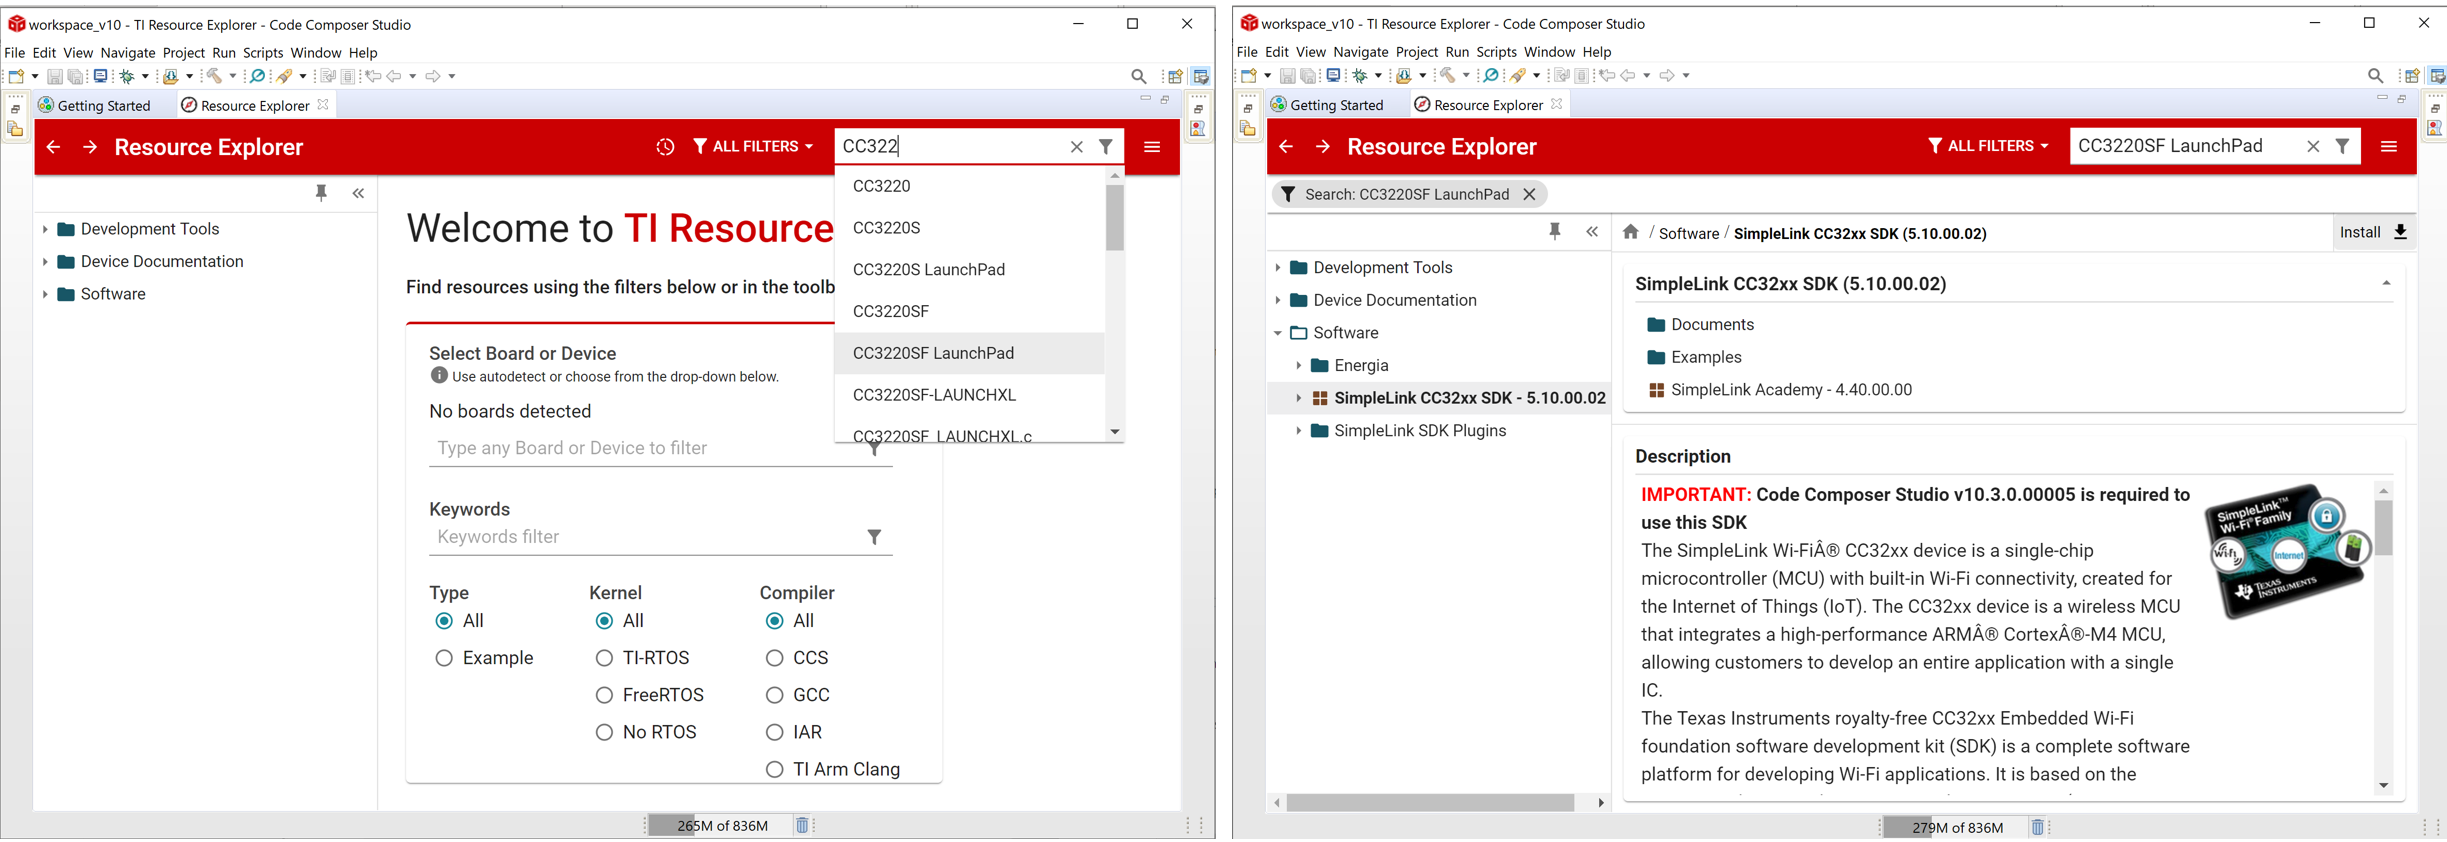
Install TI CC3220 SDK in the TI CCS. Open resource explorer, search CC3220SF launchpad. Select the CC3220SF SDK, then click install (the package is installed under C:\TI)
Download and install TI Uniflash to install the latest service pack to the TI CC32xxSF launchpad.
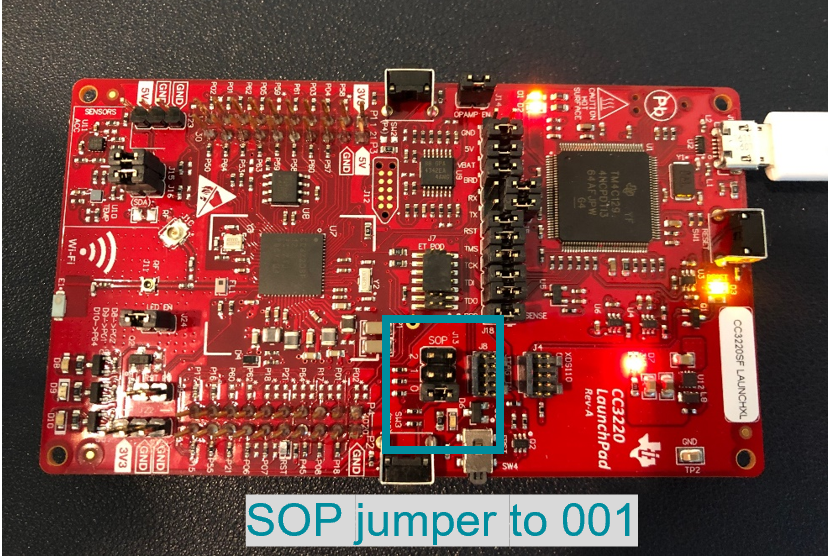
On your TI CC3220SF-LAUNCHXL, place the SOP jumper on the middle set of pins (position = 1) and reset the board.

Start Uniflash. If your CC3220SF LaunchPad board appears under Detected Devices, choose Start. If your board is not detected, choose CC3220SF-LAUNCHXL from the list of boards under New Configuration, and then choose Start Image Creator. Choose New Project.
On the Start new project page, enter a name for your project. For Device Type, choose CC3220SF. For Device Mode, choose Develop, and then choose Create Project. On the right side of the Uniflash application window, choose Connect. If the connect has problems, make sure your SOP jumpter is in 010 position
From the left column, choose Advanced, Files, and then Service Pack. Choose Browse, and then navigate to where you installed the CC3220SF SimpleLink SDK. The service pack is located at your download TI CC32xx SDK folder: ti/simplelink_cc32xx_sdk_VERSION/tools/cc32xx_tools/servicepack-cc3x20/sp_VERSION.bin.
Choose the Burn button, and then choose Program Image (Create & Program) to install the service pack. Remember to switch the SOP jumper back to position 0 and reset the board.
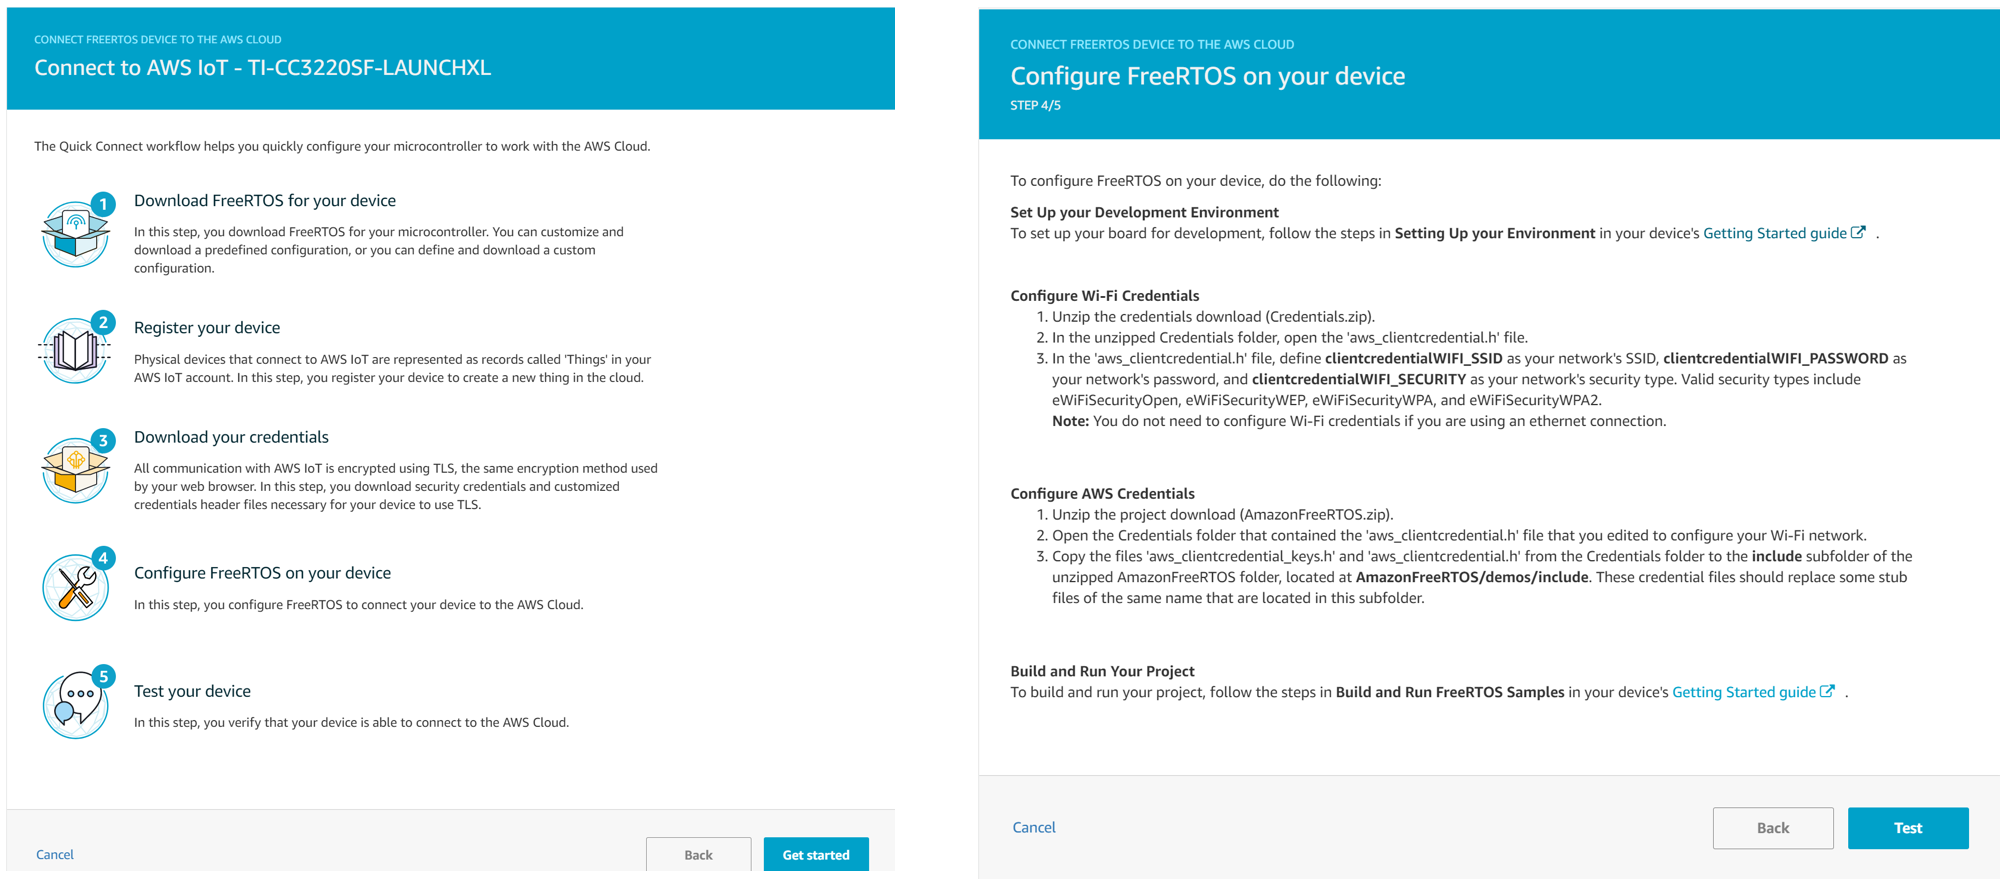
Click the Software section of the AWS IoT Console, select FreeRTOS, then find TI CC3200SF Launchpad. You can follow Amazon's tutorial to configure the FreeRTOS and download the software package.
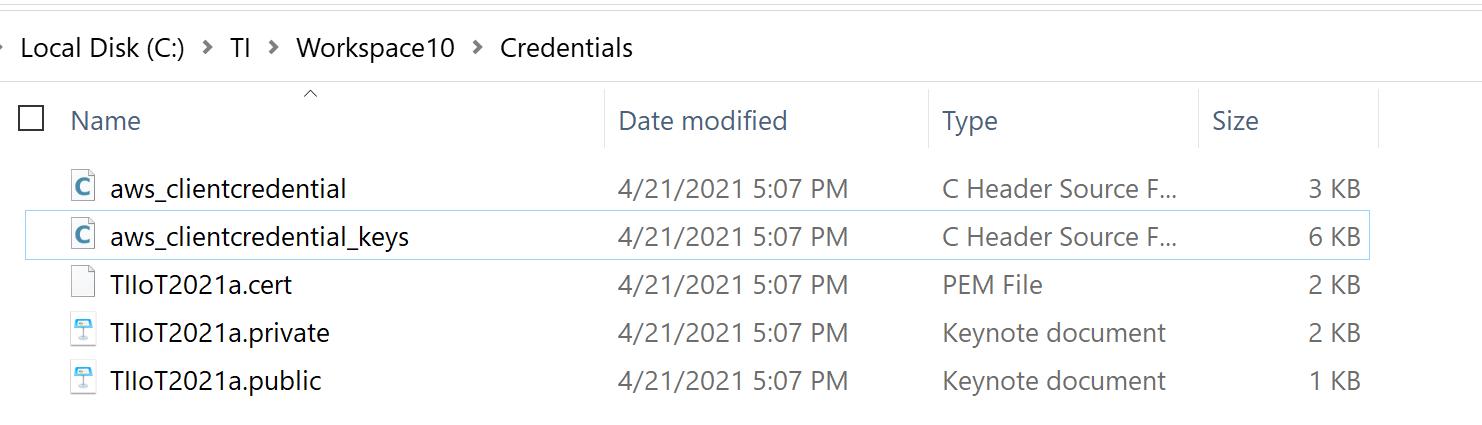
If you created the things and credentials, you will also download a Credential folder (contains the private/public key, certificate, aws_clientcredential and aws_clientcredential_keys c header files)
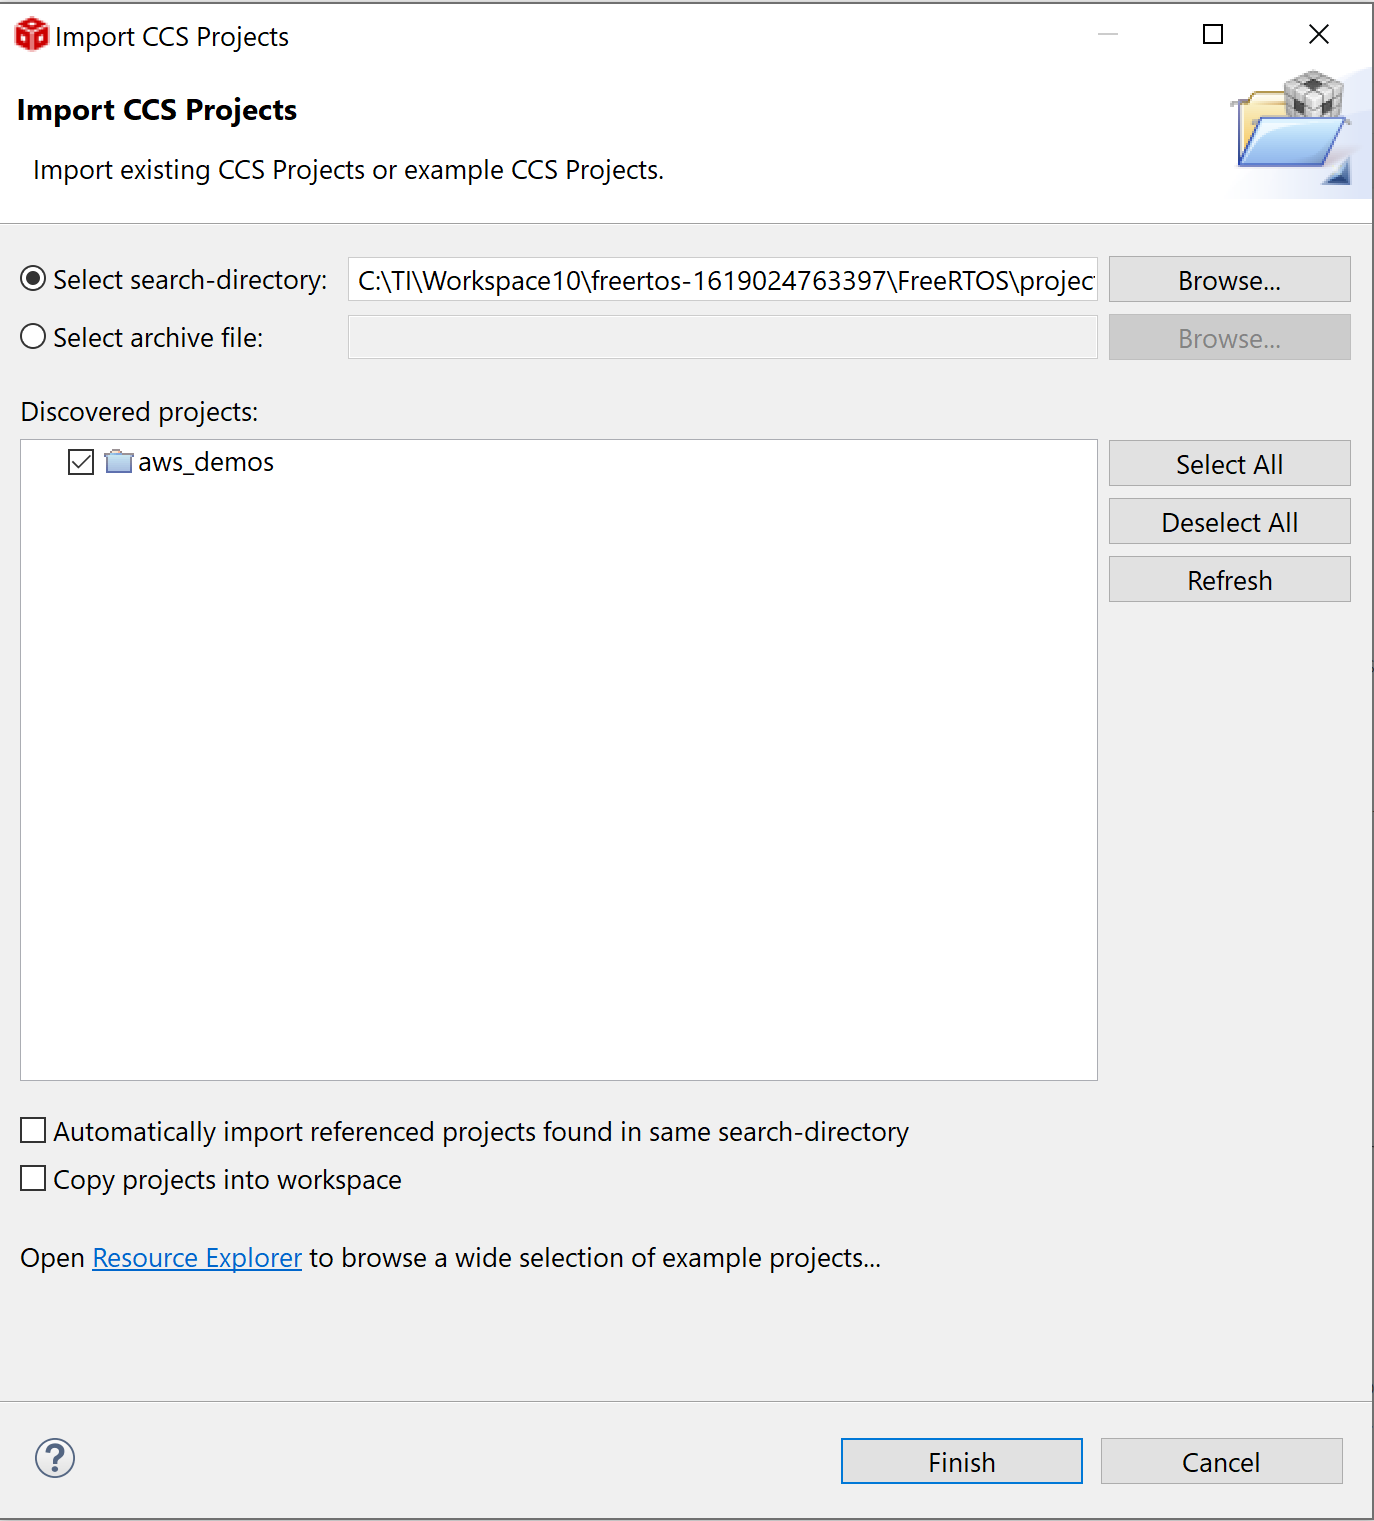
Open TI Code Composer, and choose OK to accept the default workspace name. On the Getting Started page, choose Import Project. In Select search-directory, enter your downloaded AWS FreeRTOS project path, and select subfolders of projects/ti/cc3220_launchpad/ccs/aws_demos. The project aws_demos should be selected by default. To import the project into TI Code Composer, choose Finish.
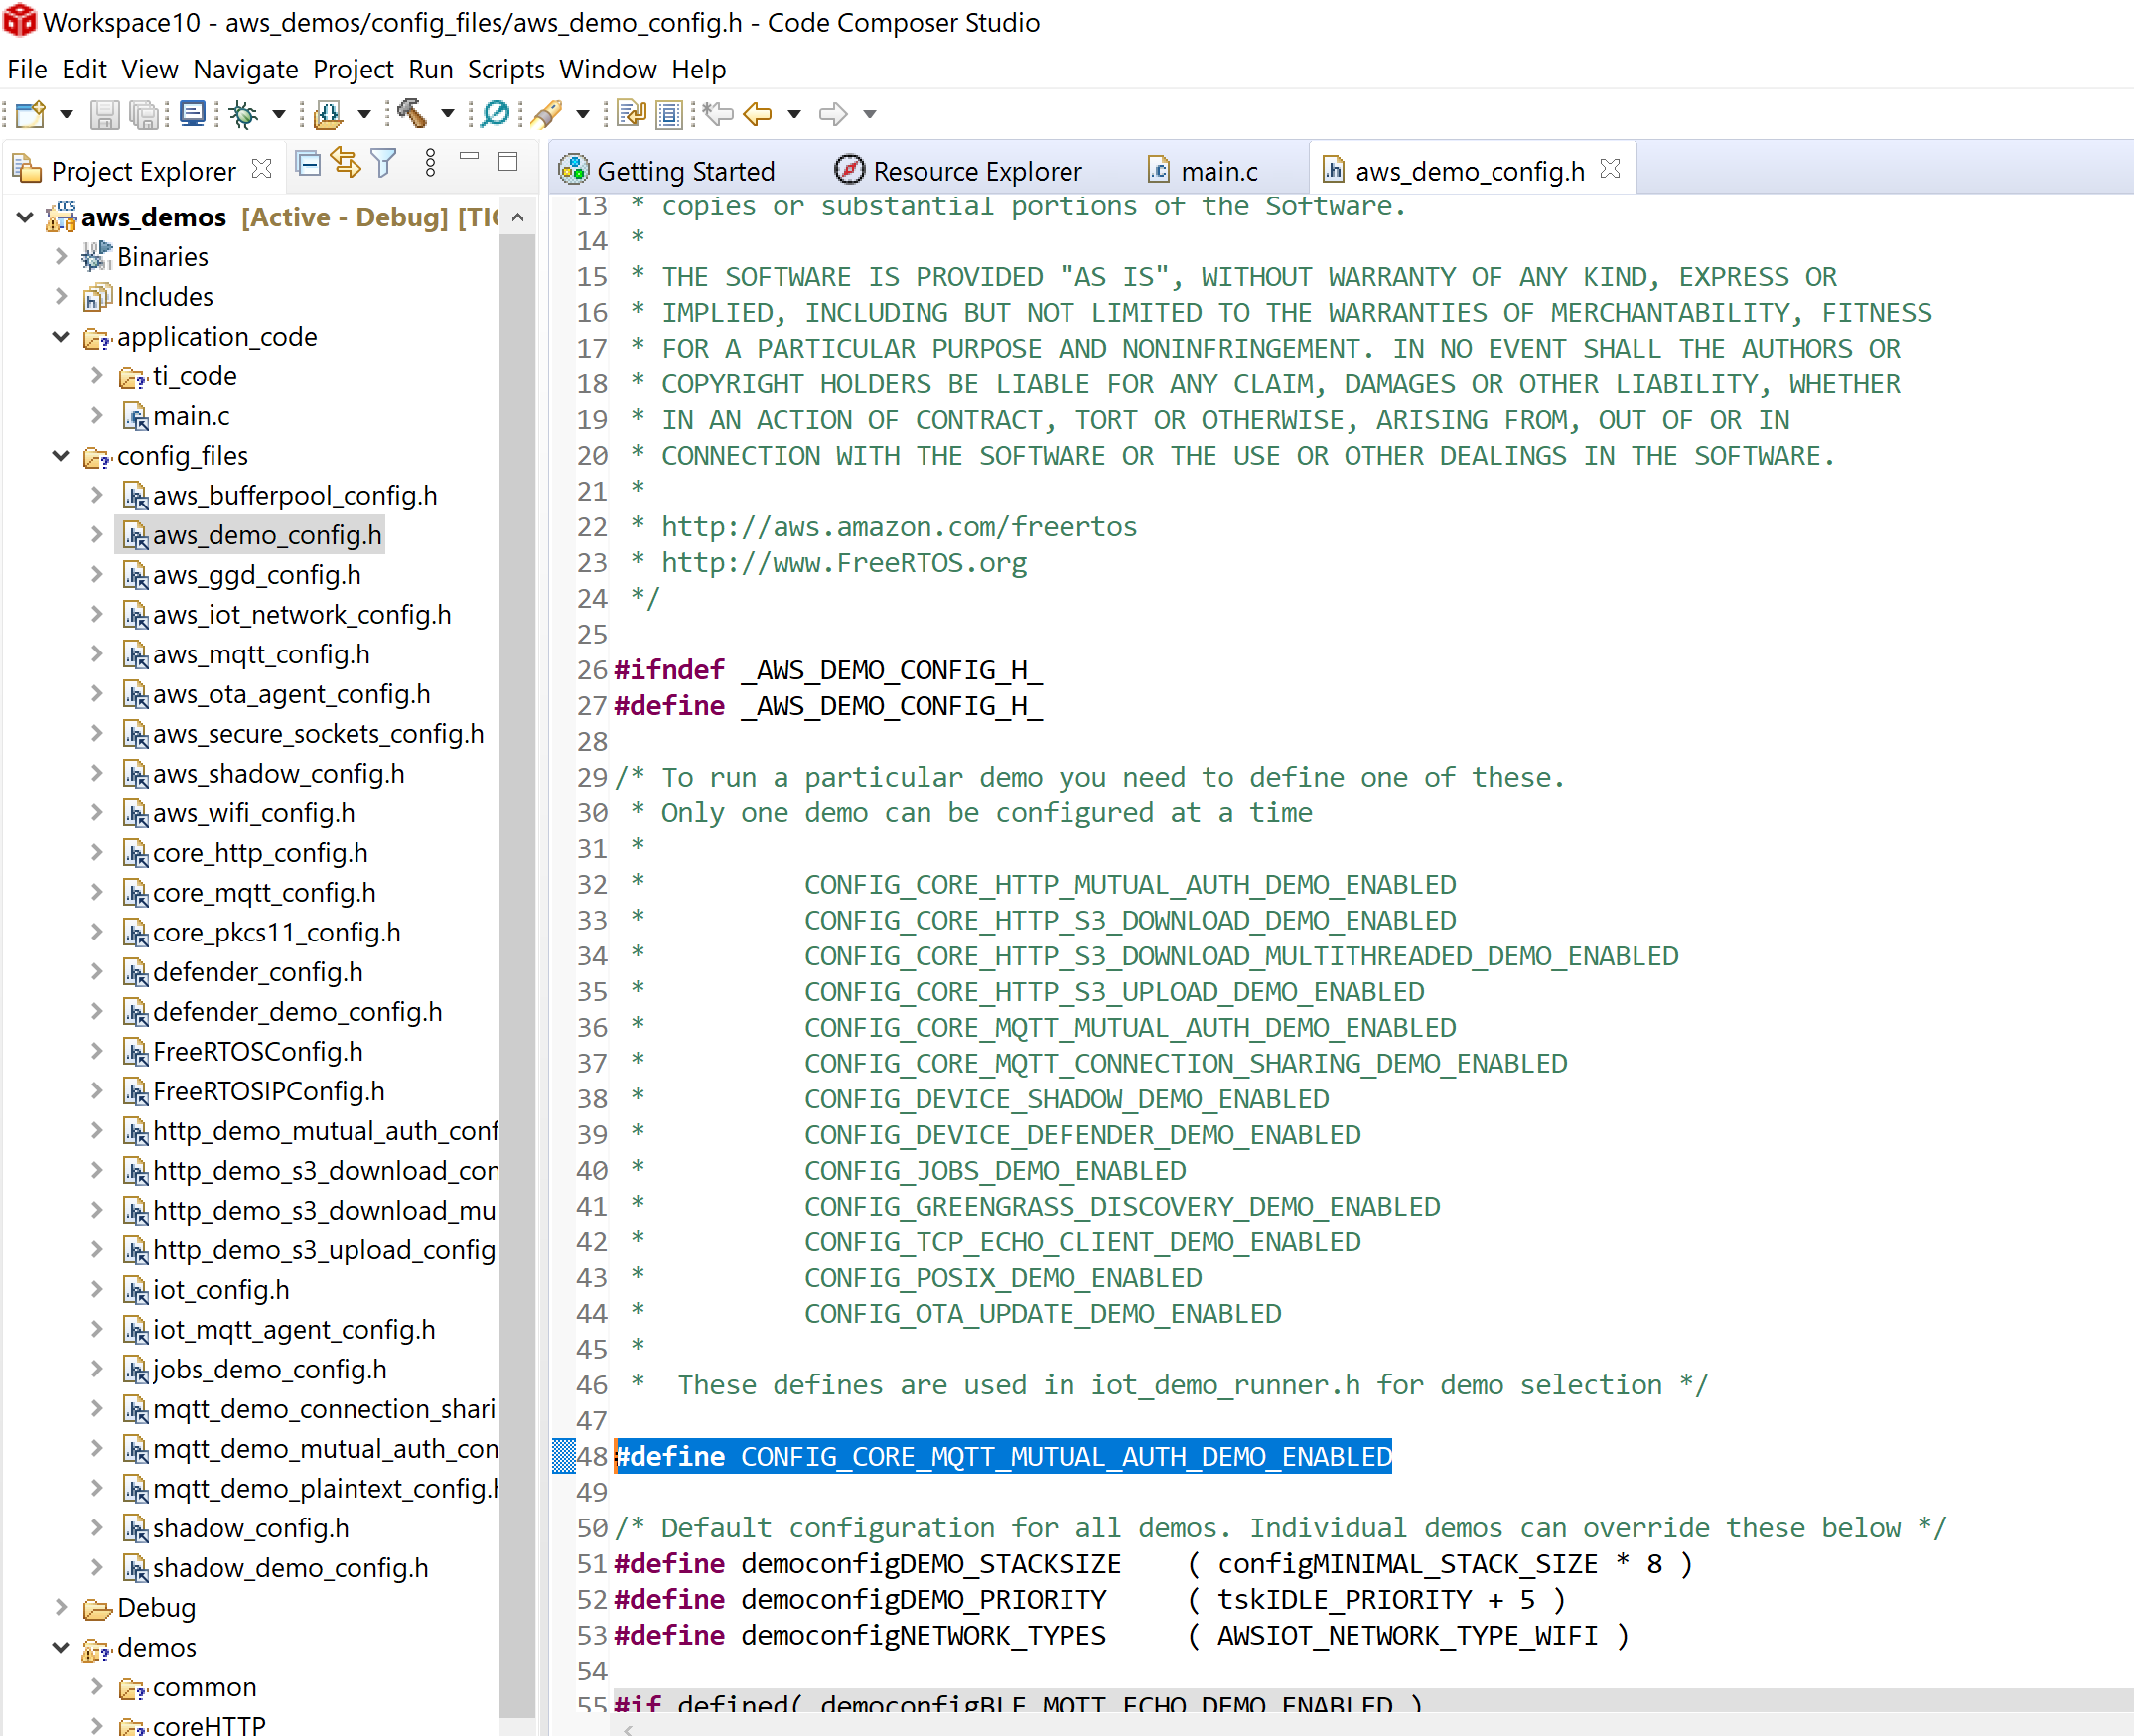
Only a single FreeRTOS demo application can run at a time. When we build a FreeRTOS demo project, the first demo enabled in the freertos/vendors/vendor/boards/board/aws_demos/config_files/aws_demo_config.h header file is the application that runs. The demo application in this tutorial is the coreMQTT Mutual Authentication demo defined in the freertos/demos/coreMQTT/mqtt_demo_mutual_auth.c file. It uses the coreMQTT library to connect to the AWS Cloud and then periodically publish messages to an MQTT topic hosted by the AWS IoT MQTT broker. You can also change the default application in aws_demo_config.h
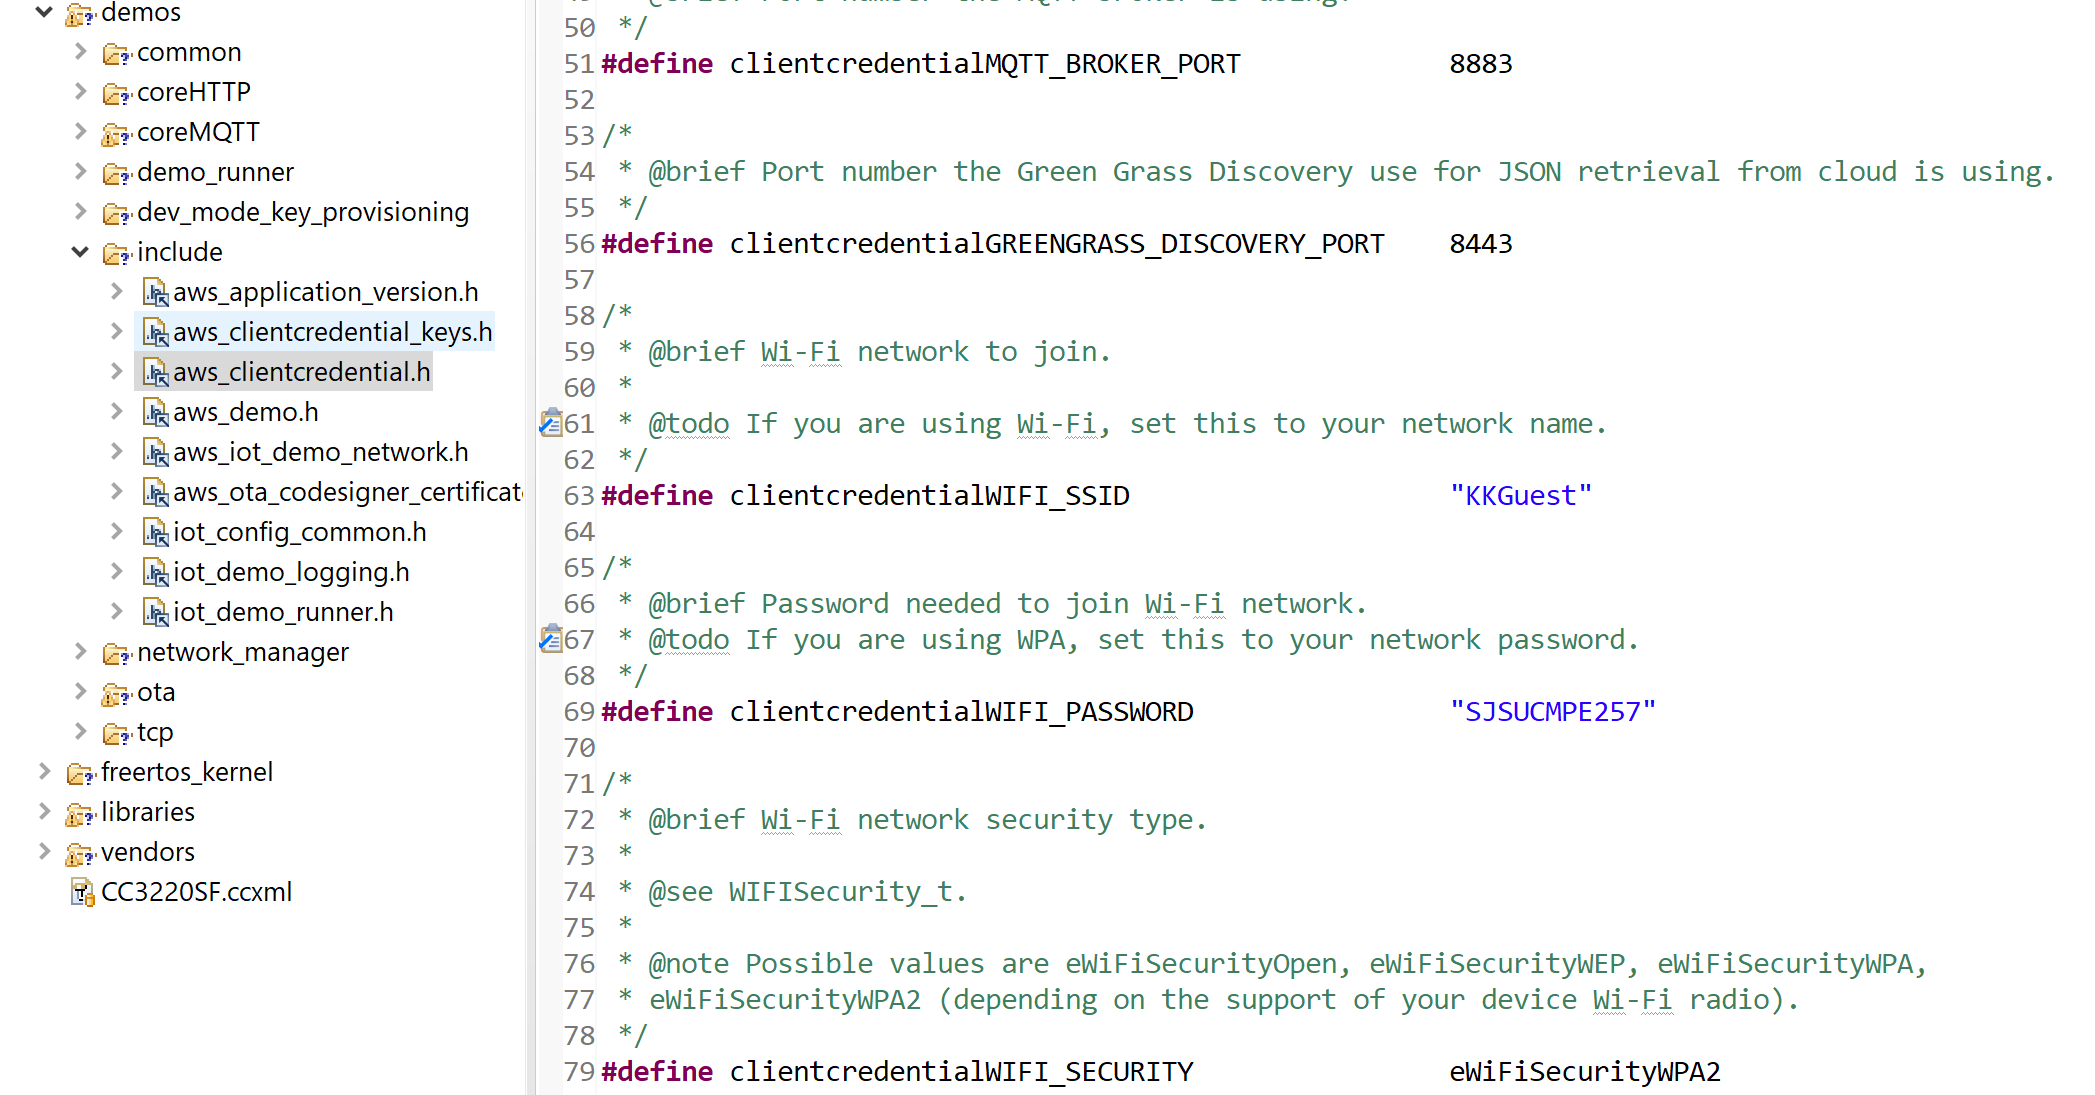
Open demos/include/aws_clientcredential.h. Specify values for the following constants:
#define clientcredentialMQTT_BROKER_ENDPOINT "Your AWS IoT endpoint";
#define clientcredentialIOT_THING_NAME
You also can copy the aws_clientcredential.h in your downloaded Credential folder (contains the private/public key, certificate, aws_clientcredential and aws_clientcredential_keys c header files)

You also need to add your WiFi access point and password in the aws_clientcredential.h
FreeRTOS needs the AWS IoT certificate and private keys associated with your registered thing and its permissions policies to successfully communicate with AWS IoT on behalf of your device. FreeRTOS is a C language project, and the certificate and private key must be specially formatted to be added to the project. Open aws_clientcredential_keys in your downloaded Credential folder (contains the private/public key, certificate, aws_clientcredential and aws_clientcredential_keys c header files) and replace the aws_clientcredential_keys.h under demos/include/aws_clientcredential_keys.h. This file contains the #define keyCLIENT_CERTIFICATE_PEM term and #define keyCLIENT_PRIVATE_KEY_PEM.
You also can generate the #define strings via the tools in tools/certificate_configuration/CertificateConfigurator.html. Under Certificate PEM file, choose the ID-certificate.pem.crt that you downloaded from the AWS IoT console. Under Private Key PEM file, choose the ID-private.pem.key that you downloaded from the AWS IoT console. Choose Generate and save aws_clientcredential_keys.h, and then save the file in demos/include. This overwrites the existing file in the directory.
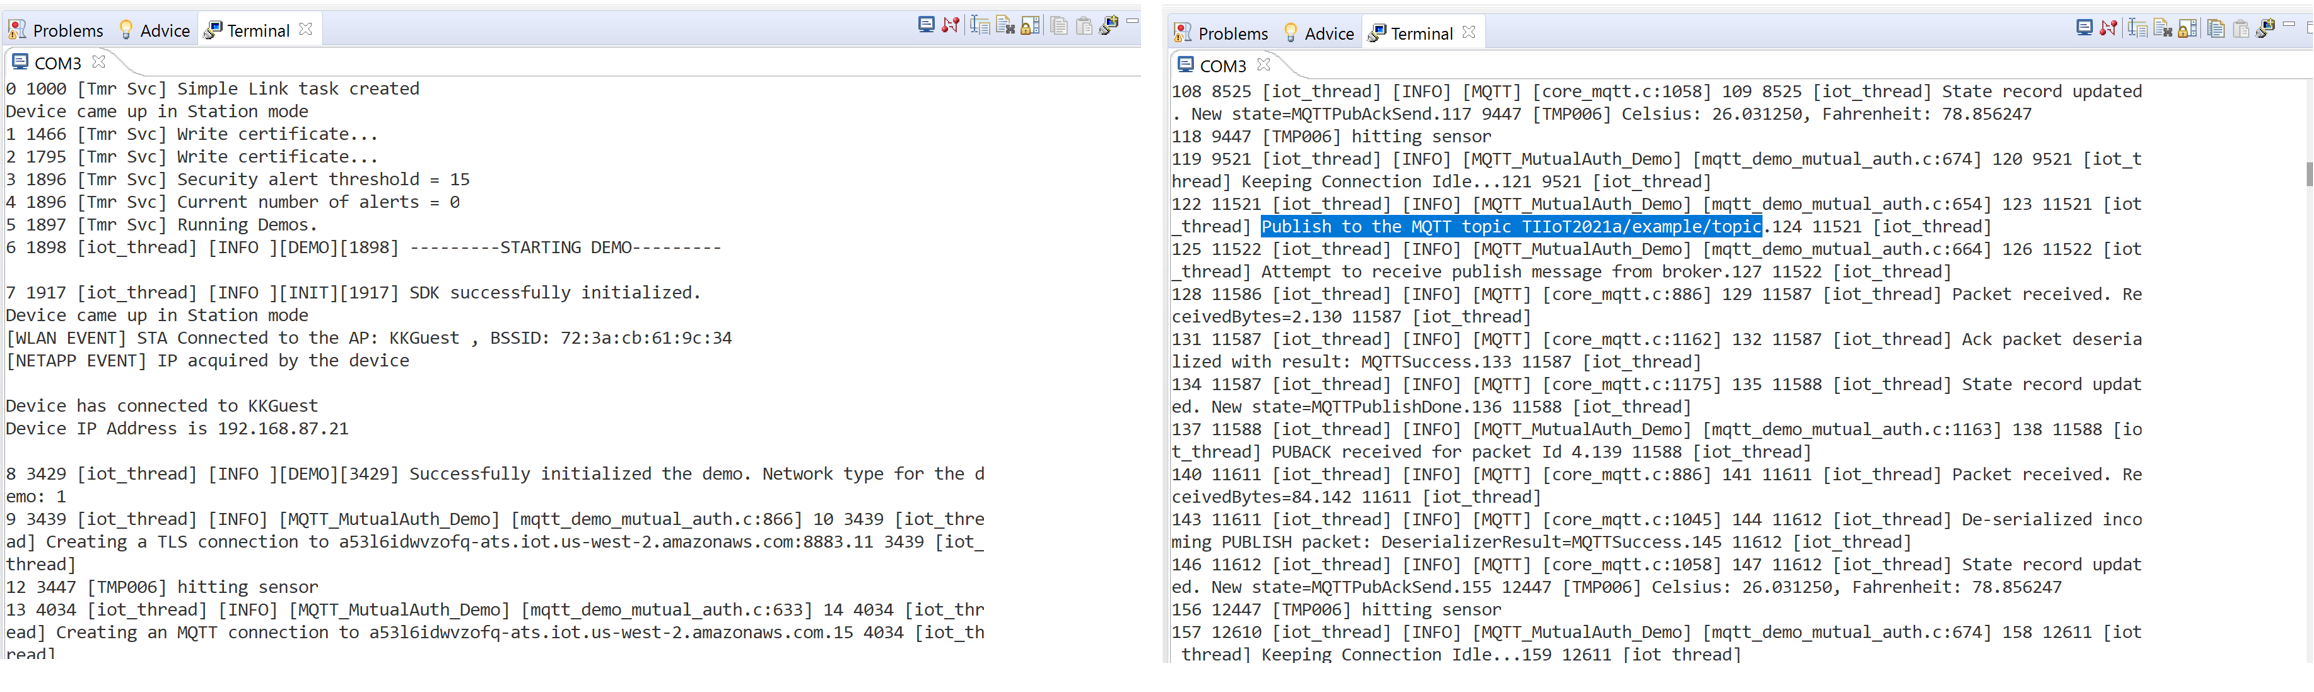
The demo application is in demos/coreMQTT/mqtt_demo_mutual_auth.c, you can change the topic name and message in this file. For example, the topic name is "TIIoT2021a/example/topic"

You can now click build and debug to download the code to the hardware board. You can open the terminal window to see the output of the code. Click View->Terminal, click the first icon in the Terminal window to launch terminal.

The output of the terminal will show the wifi connection and MQTT data publish
You can subscribe the MQTT topic in AWS IoT Test window, and see the received data

Add code in line 447-544 of demos/coreMQTT/mqtt_demo_mutual_auth.c, then start the two tasks in RunCoreMqttMutualAuthDemo (line 574-585)
I2C_init();
xTaskCreate(vGreenTurnOn, "GLED", 512, NULL, 2, NULL);

xMQTTTaskParameter taskParameter_temperature;
memset( taskParameter_temperature.topic, 0x00, sizeof( taskParameter_temperature.topic ) );
snprintf( taskParameter_temperature.topic, sizeof( taskParameter_temperature.topic ), "%s%s", mqttexampleTOPIC, "sensor");
xTaskCreate( prvTempSensorReaderTask,
                                   "TMP006",
                                   TEMP_TASK_STACK_SIZE,
                                   ( void * ) &taskParameter_temperature,
                                   TEMP_TASK_PRIORITY,
                                   &xTempReadHandle );
Add code in function prvMQTTPublishToTopic to read temperature data and put into the json string
snprintf(cDataBuffer, sizeof( cDataBuffer), "{\"message\":\" %s \",\"temp\":%f, \"count\":%d}", mqttexampleMESSAGE, temp, ( int ) xMessageNumber);
xMessageNumber ++;

/* This demo uses QoS1. */
xMQTTPublishInfo.qos = MQTTQoS1;
xMQTTPublishInfo.retain = false;
xMQTTPublishInfo.pTopicName = mqttexampleTOPIC;
xMQTTPublishInfo.topicNameLength = ( uint16_t ) strlen( mqttexampleTOPIC );
xMQTTPublishInfo.pPayload = cDataBuffer;//mqttexampleMESSAGE;
xMQTTPublishInfo.payloadLength = strlen(cDataBuffer);//strlen( mqttexampleMESSAGE );

/* Get a unique packet id. */
usPublishPacketIdentifier = MQTT_GetPacketId( pxMQTTContext );

/* Send PUBLISH packet. Packet ID is not used for a QoS1 publish. */
xResult = MQTT_Publish( pxMQTTContext, &xMQTTPublishInfo, usPublishPacketIdentifier );
Received publish message from AWS IoT console.
724 59456 [iot_thread] [INFO] [MQTT_MutualAuth_Demo] [mqtt_demo_mutual_auth.c:1235] 725 59456 [iot_thread] Incoming Publish Topic Name: TIIoT2021a/example/topic matches subscribed topic.Incoming Publish Message : {
                      "message": "Hello from AWS IoT console"
                                                             }
The subscription code is in function prvMQTTProcessIncomingPublish
static void prvMQTTProcessIncomingPublish( MQTTPublishInfo_t * pxPublishInfo )
{
    configASSERT( pxPublishInfo != NULL );

    /* Set the global for indicating that an incoming publish is received. */
    usPacketTypeReceived = MQTT_PACKET_TYPE_PUBLISH;

    /* Process incoming Publish. */
    LogInfo( ( "Incoming QoS : %d\n", pxPublishInfo->qos ) );

    /* Verify the received publish is for the we have subscribed to. */
    if( ( pxPublishInfo->topicNameLength == strlen( mqttexampleTOPIC ) ) &&
        ( 0 == strncmp( mqttexampleTOPIC, pxPublishInfo->pTopicName, pxPublishInfo->topicNameLength ) ) )
    {
        LogInfo( ( "Incoming Publish Topic Name: %.*s matches subscribed topic."
                   "Incoming Publish Message : %.*s",
                   pxPublishInfo->topicNameLength,
                   pxPublishInfo->pTopicName,
                   pxPublishInfo->payloadLength,
                   pxPublishInfo->pPayload ) );
    }
    else
    {
        LogInfo( ( "Incoming Publish Topic Name: %.*s does not match subscribed topic.",
                   pxPublishInfo->topicNameLength,
                   pxPublishInfo->pTopicName ) );
    }
}