Serial Bridge for Bentel Kyo32G Alarm Central, based on ESP8266 Board and ESPHome Open Source Firmware. Thanks to @dario81 for initial porting to ESPHome and to @lcavalli for code refactor inspiration ;)
If you like this project you can support me with ☕ or simply put a ⭐ to this repository 😊

Warning
⚠️ This software was developed by analyzing serial messages from/to central, it was not sponsored or officially supported by Bentel If someone from Bentel would like to contribute or collaborate please contact me at me@lorenzodeluca.dev
- Bentel Kyo 32G
- Bentel Kyo 32
- Bentel Kyo 8
- Bentel Kyo 8W
- Bentel Kyo 8WG
- If you have another Bentel Kyo unit test and let me know :)
- Hardware Connections
- ESPHome Preparation
- Build and Upload Firmware
- Home Assistant Integration
- Troubleshooting - FAQ
I strongly recommend using an WeMos D1 Mini (https://it.aliexpress.com/item/32651747570.html) but any board based on ESP8266 should be fine. If you encounter disconnections, you might want to try a more powerful one based on the ESP32 instead, like this one https://it.aliexpress.com/item/4001340660273.html.
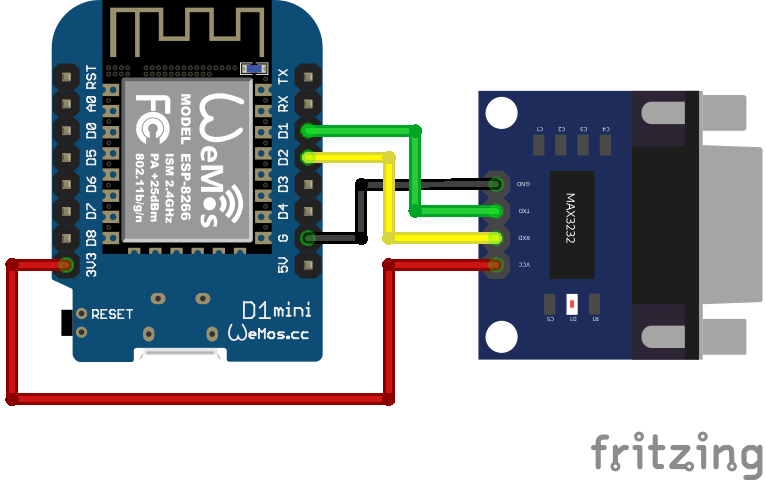
In order to connect to the serial port of the KYO Unit I recommend a connector based on MAX3232 module chip with DB9 connector. This connector should be connected to the classic TX/RX of the ESP board and to the power supply (GND, 5V) on WeMos.
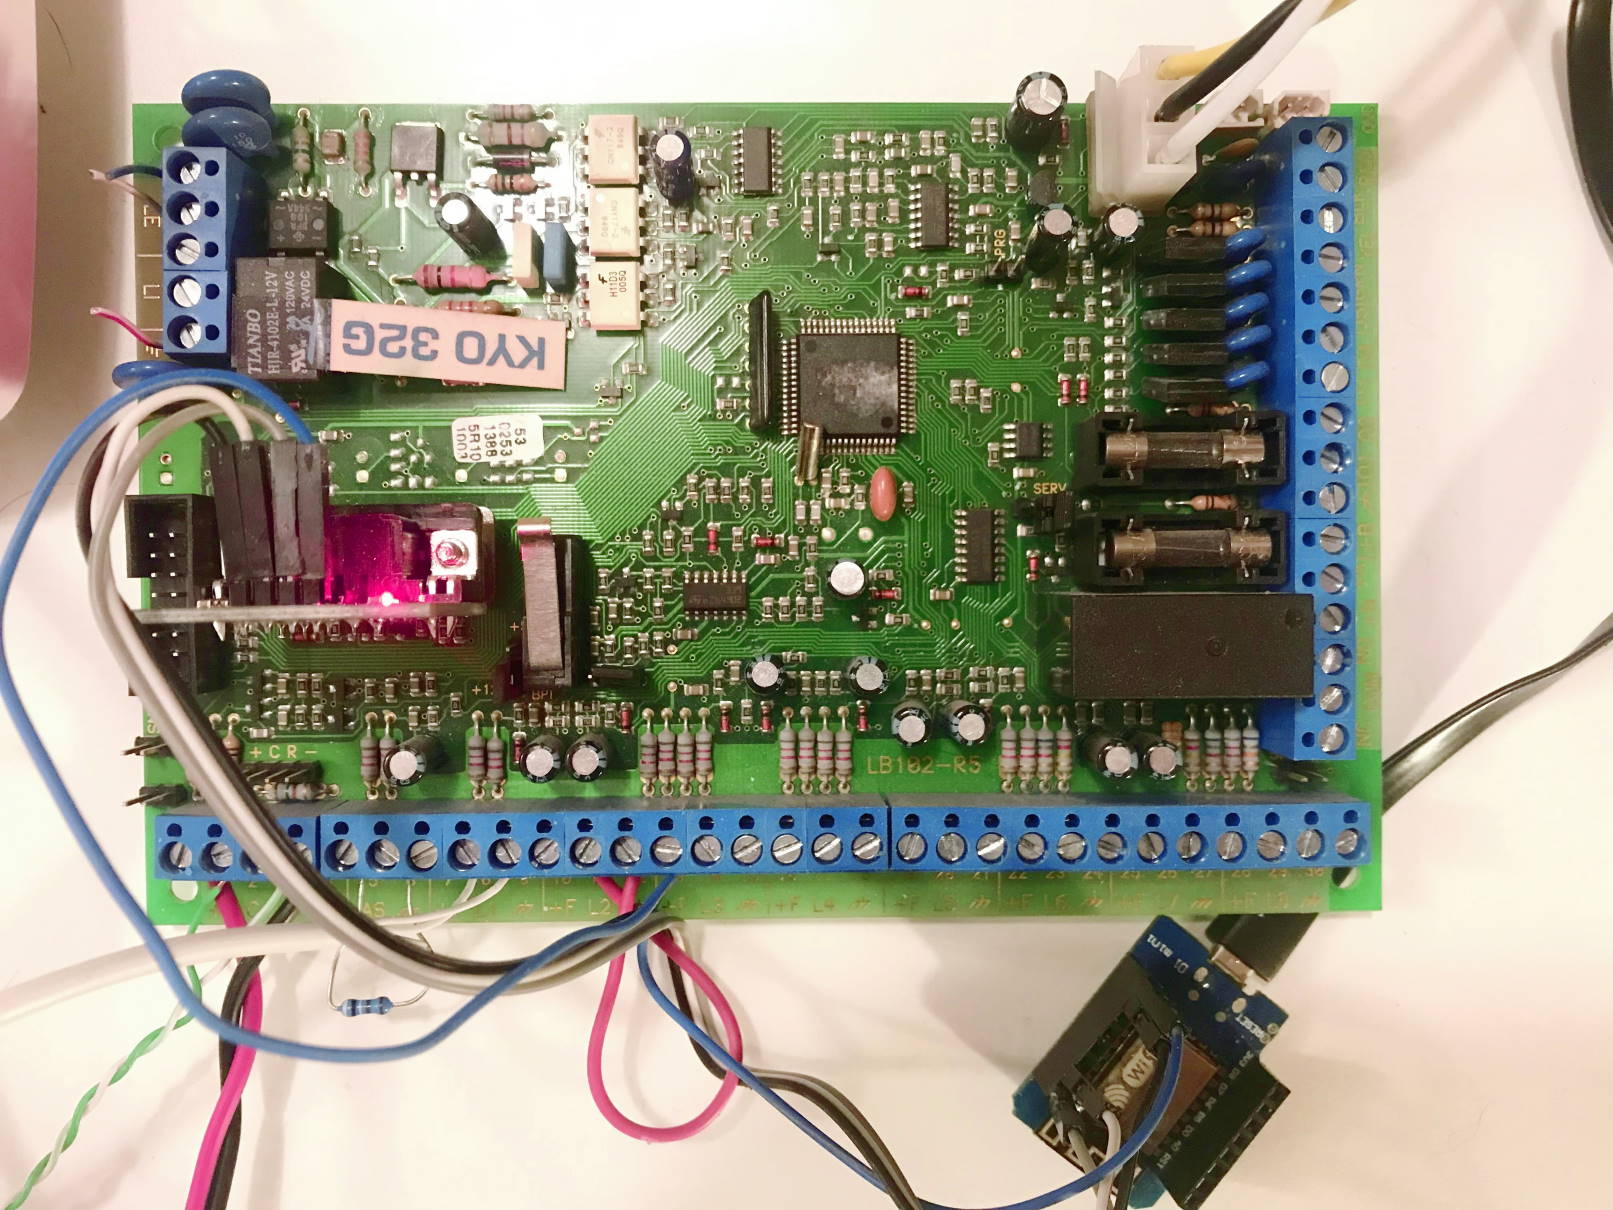
The WeMos can be powered with USB directly from the 12V output of the control unit (the +/- pins on the lower left, powering the sensors) by connecting any 12V->USB converter. Like this one: https://www.amazon.it/FTVOGUE-Regolatore-Trasformatore-Caricabatterie-smartphone/dp/B07NQKBRG1/
Which I recommend because in this way, even in case of power failure, the ESP is powered by the control unit's battery. For connecting the power supply to the control unit I recommend taking the power supply from the terminal for auxiliary devices (+B/AUX). Negative/common can be taken from any negative.

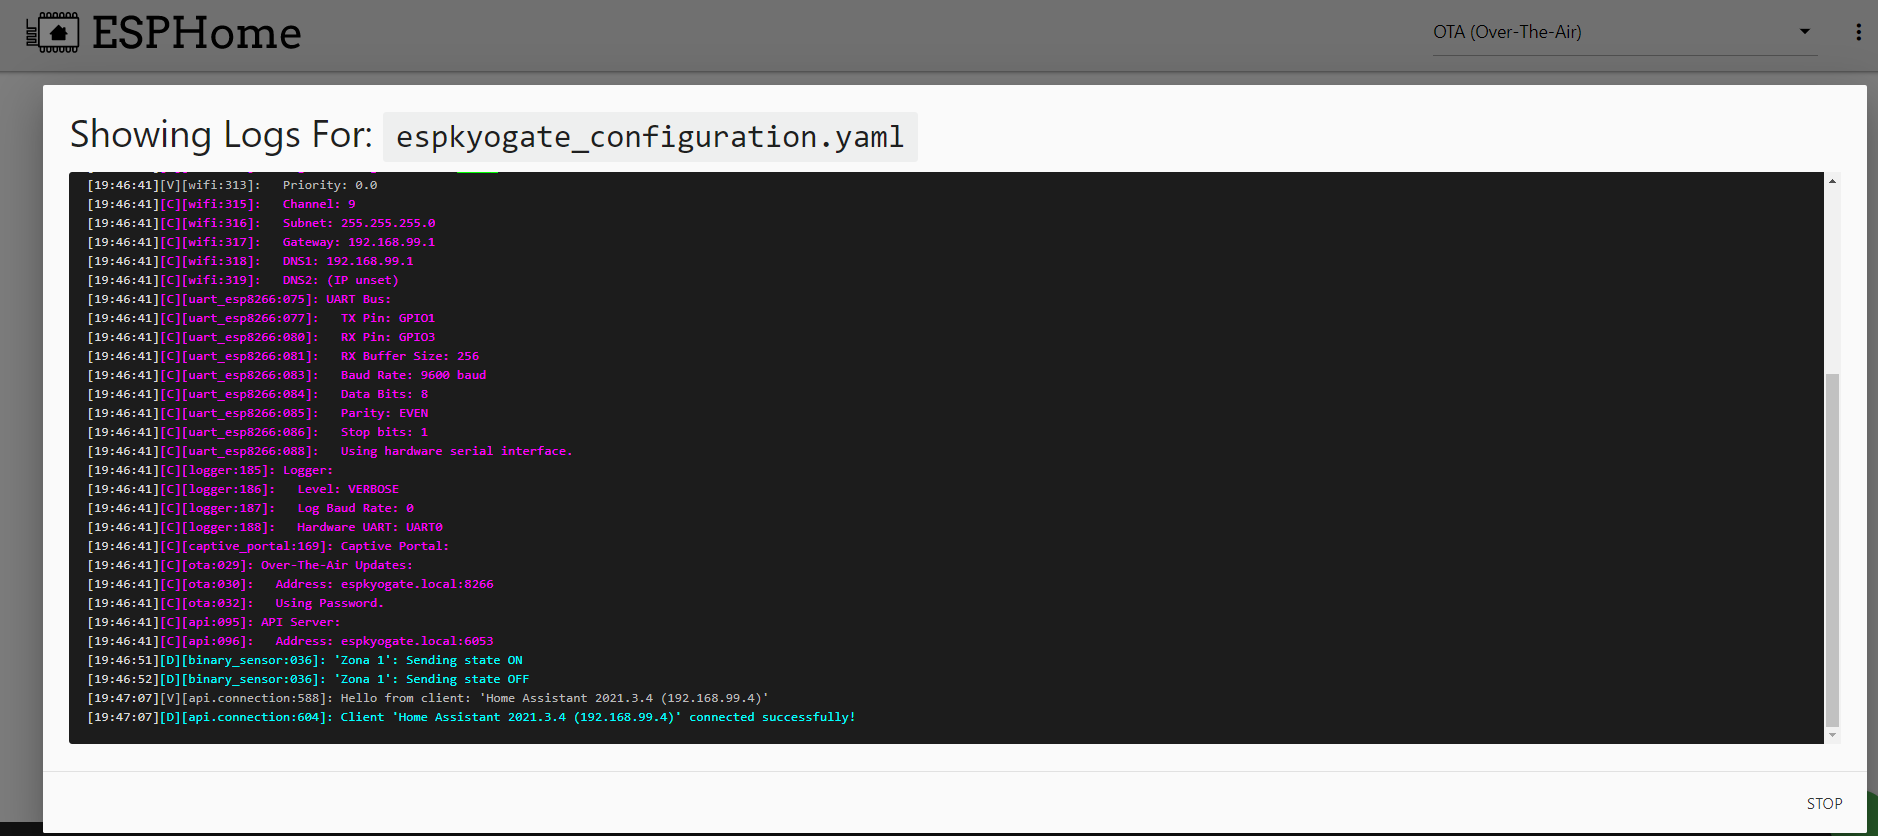
I suggest using the file espkyogate_configuration.yaml as a template and put your customizations there.
- Set
uartsettings in base depending on the board you use, example file is for Wemos D1 mini. - Set
name,friendly_name(how it will be presented in HA). - Edit
binary_sensorsto configure how you want to present the sensors to Home Assistant.- All inputs have to be declared in both
lambdaandbinary_sensors. Add only the ones you need to minimize overhead and complexity. - Make sure the order is respected between the two lists
- All inputs have to be declared in both
Appropriate device classes are (among all device classes supported by Home Assistant):
| Device class | Home Assistant icons |
|---|---|
| motion | |
| window | |
| door | |
| garage_door | |
| smoke |
Finally, create a secrets.yaml file with the following contents:
wifi_ssid: "<your-wifi-ssid>"
wifi_password: "<your-wifi-password>"
hotspot_wifi_ssid: "<fallback-hotspot-wifi-ssid>"
hotspot_wifi_password: "<fallback-hotspot-wifi-password>"
ota_password: "<your-ota-password>"
api_encryption_key: "<your-encryption-key>"- Populate
wifi_ssidandwifi_passwordwith details on how to connect to your network. - Choose and write a
hotspot_wifi_ssidandhotspot_wifi_passwordso the board can create a fallback hotspot in case of a failure of the main wifi network. - Write a random password in
ota_password, which will be used to update the board remotely. - Generate an encryption key from ESPHome and set it in
api_encryption_key
This way is the easiest, just copy the files from this repository to the esphome folder, edit the espkyogate_configuration.yaml file as above, upload and see if everything works from the logs.
You should see something similar.
The ESPHome interface can help if you never used it before.
python3 -m esphome compile espkyogate_configuration.yaml
python3 -m esphome run espkyogate_configuration.yaml
The above command uploads the new firmware and automatically waits for a connection to read logs. It's strongly suggested to set the logger.level to DEBUG at the first run to troubleshoot connection mistakes. Then set it back to INFO once it's stable.
See logs with this command
python3 -m esphome logs espkyogate_configuration.yaml
Make sure you always connect OTA instead of with the serial to USB port becaues it might be disabled due to a bug.
If everything went well now you should find a new autodiscovered device in Home Assistant, called Allarme.
All sensors configured in espkyogate_configuration.yaml will be automatically created and associated to the device.
These methods will be available in the services
service: esphome.espkyogate_arm_area
data:
  arm_type: 1 (total arm) - 2 (partially arm)
  area: <area_number>
specific_area: 1 (arm only <area_number> without changing the others) - 0 (arm only <area_number> and disarm others)service: esphome.espkyogate_disarm_area
data:
area: <area_number>
specific_area: 0 (disarm all areas) - 1 (disarm only <area_number> without changing the others)service: esphome.espkyogate_include_zone
data:
zone_number: <zone_number>service: esphome.espkyogate_exclude_zone
data:
zone_number: <zone_number>service: esphome.espkyogate_reset_alarms
data: {}If an output is configured as 'Remote Command' (Comando Remoto) you can Activate or Deactivate
service: esphome.espkyogate_activate_output
data:
output_number: <output_number>If an output is configured as 'Remote Command' (Comando Remoto) you can Activate or Deactivate
service: esphome.espkyogate_deactivate_output
data:
output_number: <output_number>If an output is configured as 'Remote Command' (Comando Remoto) you can use as Pulse Signal: form Inactive to Active and Inactive after some time You can choose how many milliseconds the signal should remain high level.
service: esphome.espkyogate_pulse_output
data:
  output_number: <output_number>
pulse_time: <pulse_time>You can update the Kyo Date and Time internal Clock
service: esphome.espkyogate_update_datetime
data:
  day: 22
  month: 12
  year: 2022
  hours: 18
  minutes: 15
seconds: 00If you want to arm several areas at the same time you have to call the same service several times, introducing a delay between one call and the next. Below is an example of a script that arms two areas.
alias: Bentel Arma Fuori Casa
sequence:
  - service: esphome.espkyogate_arm_area
    data:
      area: 1
      arm_type: 1
      specific_area: 1
  - wait_template: ''
    timeout: '00:00:05'
  - service: esphome.espkyogate_arm_area
    data:
      area: 2
      arm_type: 1
      specific_area: 1
  - wait_template: ''
    timeout: '00:00:05'
  - service: esphome.espkyogate_arm_area
    data:
      area: 3
      arm_type: 1
      specific_area: 1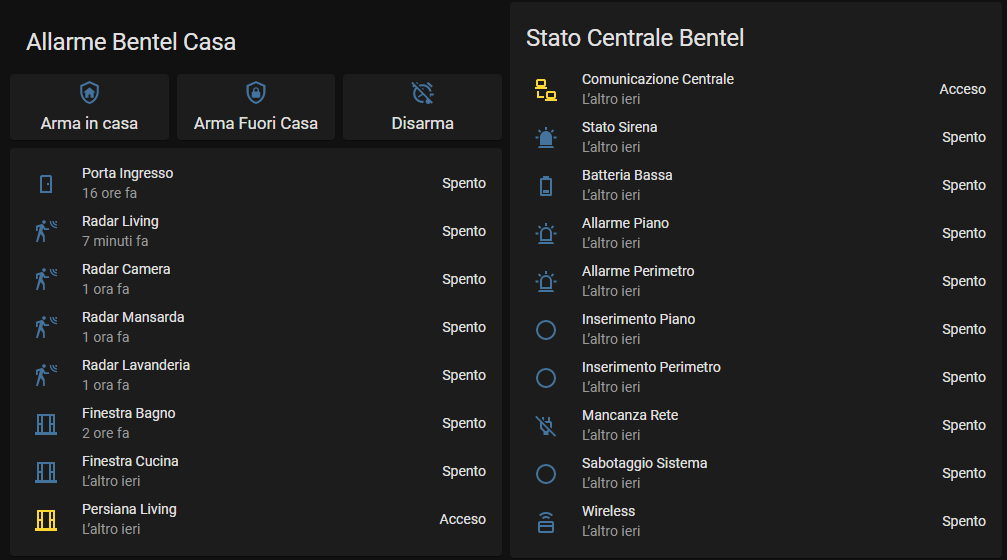
mode: singleHere the code to build Panel show above
type: vertical-stack
title: Allarme Bentel Casa
cards:
  - type: horizontal-stack
    cards:
      - type: button
        name: Arma in casa
        tap_action:
          action: call-service
          service: esphome.espkyogate_arm_area
          service_data:
            arm_type: 1
            area: 3
            specific_area: 1
        show_state: true
        show_icon: true
        show_name: true
        icon: mdi:shield-home-outline
        icon_height: 25px
      - type: button
        name: Arma Fuori Casa
        tap_action:
          action: call-service
          service: script.bentel_arma_fuori_casa
          service_data: {}
          target: {}
        show_icon: true
        show_state: true
        icon: mdi:shield-lock-outline
        icon_height: 25px
      - type: button
        name: Disarma
        tap_action:
          action: call-service
          service: esphome.espkyogate_disarm_area
          service_data:
            area: 1
            specific_area: 0
        show_state: true
        show_icon: true
        icon_height: 25px
        icon: mdi:alarm-note-off
  - type: entities
    entities:
      - entity: binary_sensor.porta_ingresso
        secondary_info: last-updated
      - entity: binary_sensor.radar_living
        secondary_info: last-updated
      - entity: binary_sensor.radar_camera
        secondary_info: last-updated
      - entity: binary_sensor.radar_mansarda
        secondary_info: last-updated
      - entity: binary_sensor.radar_lavanderia
        secondary_info: last-updated
      - entity: binary_sensor.persiana_bagno
        secondary_info: last-updated
      - entity: binary_sensor.persiana_cucina
        secondary_info: last-updated
      - entity: binary_sensor.persiana_living
        secondary_info: last-updated
    state_color: true
show_header_toggle: falseIf you have any problems, make the following checks:
- Exit the programming mode of the control unit, the serial line does not work in programming mode
- Check that the cables are connected correctly
- Check the 232 converter is properly powered
- Try to reverse TX and RX
- (Only for Kyo32G) Verify that the central unit has firmware 2.13, if it isn't you've to update central unit firmware to this version.
For diagnostics you can enable additional software logs through this service. If necessary, contact me with an extract of the logs so that I can help you better.
service: esphome.espkyogate_debug_command
data:
  serial_trace: 1
  log_trace: 1
polling_kyo: 1- serial_trace Enable or Disable Serial Log communication to central unit
- log_trace Enable or Disable Application Log
- polling_kyo Enable or Disable continuative polling to central unit (default always Enable)
GNU AGPLv3 © [Lorenzo De Luca][https://lorenzodeluca.dev]