Smart Bike Lights is a data field IQ Connect application for Garmin devices, that displays and controls ANT+ lights. Garmin has a built-in Auto Light mode setting, which automatically adjusts the light intensity based on the ambient light or time of day. The issue with Auto mode is that is not configurable and that is why this application introduces a special Smart mode, which is fully configurable based on sunset, sunrise, speed, ... (check supported filters).
| Small | Light Panel | Dark Small | Dark Light Panel | ||||||
|---|---|---|---|---|---|---|---|---|---|
|
 |
|
 |


- Smart mode that control lights based on the configured filters
- Records lights modes that are displayed in Garmin Connect
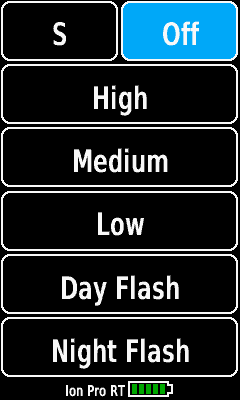
- Configurable full screen light panel for fast switching modes (only for Edge devices with touch screen)
- Support up to one headlight and one taillight that can be displayed on the smallest data field
- Switching light mode by tapping on the light icon (only for Edge devices with touch screen)
- Switching modes by holding the up/menu button (only for devices without touch screen that have CIQ 3.2+ and with more than 32KB memory)
- Has an alternative light network implementation that can be used for lights with partial ANT+ support (only for devices with more than 32KB memory)
- Support multiple light configurations (only for devices with more than 32KB memory)
- Support controlling multiple headlights/taillights at once (only for devices with more than 32KB memory)
- Has a built-in app settings editor (only for Edge touchscreen devices or devices that have CIQ 3.2+ and more than 32KB memory)
- Support controlling lights and play tones by using external controllers (only for devices that have CIQ 3.2+ and more than 32KB memory)
- Download the data field application from Garmin Connect Store and synchronize your Garmin device
- Pair your bike lights with your Garmin device (Garmin manual)
- On your Garmin device set
Light Beam Activatedsetting toTimer StartinMenu->Sensors->Lights->Network Options(optional step. Ignore this step if such setting does not exist on your device) - Configure your paired lights with the Lights Configurator (In case your light is not on the list, check this thread)
- By using Garmin Connect Mobile or Garmin Express, copy the final configuration value from Lights Configurator into the application setting:
Lights Configuration - Select the data screen where you want put the data field
- On the chosen field select
Connect IQ->Smart Bike Lights
| Name | Example | Description |
|---|---|---|
| Smart (S) |  |
Light is controlled by the filters defined with Lights Configurator |
| Network (N) |  |
Light is controlled by the Garmin Light mode |
| Manual (M) |  |
Light is controlled by the user |
For Edge touch screen devices (Edge 1030/1000/Explore/820/830):
- Full screen: The control mode can be changed by tapping on the top left button which contains one character (M, N or S).
- Non full screen: The control mode can be changed by tapping on the light icon
For Edge 530:
- Make sure that the lights are paired and connected with your Garmin device
- On the data screen where you have the data field press the Menu button to open the menu
- Navigate to
Data Fields->Connect IQ data fields->Smart Bike Lights->Control modeand change to the desired mode
For watches with CIQ 3.2 and more than 32KB memory (Fenix 5 Plus/5S Plus/5X Plus, Fenix 6 Pro/6X Pro/6S Pro, Forerunner 245 Music/645 Music/745/945, MARQ, Descent Mk2):
- Make sure that the lights are paired and connected with your Garmin device
- On the data screen where you have the data field hold the
Upbutton until a menu shows up (make sure that you have a recent firmware installed) - Navigate to
ConnectIQ Fields->Smart Bike Lights->Control modeand change to the desired mode
For other devices:
The initial control mode will be determined based on the configuration from the Lights Configurator. When using a configuration where only the lights were selected (without any filters), the initial control mode will be set to Network (N) otherwise it will be set to Smart (S). When in Smart mode the following can be done to switch control modes:
- To go into Manual control mode, use the physical button on the light to switch the light mode. For restoring back to the Smart mode, switch to a different data screen and then back to the original one.
- To go into Network control mode, change the Garmin Light mode to a different one by using the Garmin menu (e.g. from Auto to Individual). For restoring back to the Smart mode, switch to a different data screen and then back to the original one.
| Icon | Description |
|---|---|
| Headlight | |
| Taillight | |
| Full steady beam | |
| Medium steady beam | |
| Low steady beam | |
| Day flash | |
| Medium flash | |
| Night flash | |
| Disconnected light | |
| Unknown light mode |
- Activity color: Used to define the color of the separator line in case two lights are connected and the color of the light panel buttons
- Record lights mode: Whether to record connected lights modes that will be displayed in Garmin Connect
- Lights Configuration: The configuration value generated by the Lights Configurator. Devices with more than 32KB memory have two additional configuration inputs, where the current active is determined by Current configuration setting
- Invert lights: Whether lights icons and their positions should be inverted
- Current configuration: Used to select which
Lights Configurationto use (only for devices with more than 32KB memory)
- Bontrager Ion Pro RT
- Bontrager Ion 200 RT
- Bontrager Ion 800 RT
- Bontrager Flare RT
- Bryton Gardia R300
- Garmin Varia TL300
- Garmin Varia RTL500
- Garmin Varia RTL501
- Garmin Varia RTL510
- Garmin Varia RTL511
- Garmin Varia RTL515
- Garmin Varia RTL516
- Garmin Varia eRTL615
- Garmin Varia RCT715
- Garmin Varia RCT716
- Garmin Varia HL500
- Garmin Varia UT800
- Giant Recon HL1800
- Magene L508
- Trek CarBack
- Trek Commuter Pro RT
- Cycliq Fly12 CE (supported only by using Individual Light Network)
- Cycliq Fly6 CE (supported only by using Individual Light Network)
- See.Sense ACE Front/Rear (supported only by using Individual Light Network)
- See.Sense BEAM/BEAM+ (supported only by using Individual Light Network)
- See.Sense ICON2 (supported only by using Individual Light Network)
NOTE: In case your ANT+ light is not on the list, please check the following garmin thread: https://forums.garmin.com/developer/connect-iq/f/showcase/248492/data-field-smart-bike-lights
Individal Light Network is an alternative light network implementation for connecting and controlling ANT+ lights. In comparison to the Garmin built-in light network, this network does not form a light network when two lights are connected, but instead it establish a separate connection for every light. This mode needs to be used for lights that have issues with the built-in light network (See Sense and Cycliq lights).
NOTE: Lights in Garmin Sensors menu need to be disabled or removed in order to use this feature!
Known limitations:
- It requires to manually set the device numbers for the lights
- It will not turn off the lights when the device goes to sleep
- It uses one ANT channel per light
In order to avoid using Garmin Express or Garmin Connect Mobile for changing app settings, a built-in editor was added that is able to edit the following settings:
- Invert lights
- Activity color
- Current configuration
The app settings editor can be opened only when the data field is set to a 1 Field layout. To open the app settings editor it is required to tap three times the "Off" button or in case the light network is not formed or an error is dispayed, tap once anywhere on the screen to open the editor.


Because within a data field application it is not possible to swipe up/down, a bottom bar is added with up/down arrows to navigate through menu items in case they don't fit the screen.
For devices that support CIQ 3.2+ and have more than 32KB memory, the app setting editor can be reached by using the data field on-device settings view. To reach the app settings menu, hold the Up or Back/Menu button (depends on the device, e.g. Back/Menu for Venu 2, Up for fenix 6) and the navigate to ConnectIQ Fields -> Smart Bike Lights -> Settings.

There are two ways to control more than one light of the same type (e.g. two headlights):
In case there is more than one taillight or headlight paired, the data field will automatically group all headlights or taillights into one virtual light, which will forward commands (e.g. light mode changes) to all grouped lights. For the battery level, it will display the lowest battery level of the grouped lights. When pairing different headlights or taillights (e.g. Varia 515 and Flare RT), the virtual light will display only light modes that both lights support, based on the light mode number. For example when grouping Varia 515 and Flare RT, the following light modes will be available:
0 - Off
5 - Peloton for Varia 515 and Night Steady for Flare RT
7 - Day Flash
even if they both supports "Night Flash" mode, it will not be displayed, because Flare RT uses 63 and Varia 6 for the light mode number.
NOTE: This works only on high memory devices (more than 32KB of memory).
Installing Smart Bike Lights #2 data field
Smart Bike Lights #2 data field is a copy of the original data field, which can be used along with the original one and configured separately. By using both data fields, it is possible to configure two lights of the same type (e.g. two headlights), one configured in the original data field and the other in the copy data field. When creating the configuration for the lights, it is required to set the Serial number input in Lights Configurator, so that the data field will know which of the two lights to control.
This data field can connect to one or more ANT+ light controllers. For connecting to an ANT+ light controller, the data field creates a virtual ANT+ light which has to be paired with the controller. After the virtual light is paired with the controller, the data field can perform various actions configured with the Lights Configurator. These are the currently supported actions:
- Cycle light modes
- Change light mode
- Change configuration
- Play tone
Due to how ANT+ light controllers work, the data field is required to open an ANT channel for every configured button on the remote controller. Before pairing the remote controller, make sure that there are enough free ANT channels left. Check the links below to determine how many simultaneous ANT channels (sensors) your Garmin device supports:
Currently supported remote controllers:
- Bontrager TransmitR MicroRemote (requires one ANT channel)
- Bontrager TransmitR Remote (requires four ANT channels to pair all five buttons. The center button does not require an ANT channel)
Check the following videos:
- Sunrise
- Sunset
- Time of day
- Acceleration
- Speed
- Light battery state
- GPS accuracy
- Timer state
- Start location
- Position (only for devices with more that 32KB memory)
- Bike radar (only for devices with CIQ 3.0+. For devices with 32KB memory, the filter is available only when one light is paired)
- Profile name (only for devices with CIQ 3.2+ that support multiple profiles)
- Gradient (only for devices with more that 32KB memory that have a barometer)
- Solar intensity (only for solar devices with more than 32KB memory)
The following errors can be displayed:
- Error 1: A not supported light type is connected, only headlights and taillights are supported.
- Error 2: Two or more lights of the same type are connected to the network, which is not supported.
- Error 3: Light panel contains a light mode that the connected light does not support.
- Error 4: Configuration value is invalid.
- Error 5: The device does not have enough free ANT channels to be used by the Individual Light Network. Try to disable some sensors from the Garmin Sensors menu.
- Error 6: One of the ANT channels used by the Individual Light Network could not be opened. Make sure that the lights are removed/disabled from the Garmin Sensors menu.
- Error 7: The light with the provided device number does not support the configured light type (headlight/taillight). Make sure that the "Device number" setting on the configured light is not of another light.
- Error 8: One of the ANT channels used for connection to a remote controller could not be opened. Try to disable some sensors from the Garmin Sensors menu.
- Error 9: The device does not have enough free ANT channels to be used for connection to the remote controllers. Try to disable some sensors from the Garmin Sensors menu.