Dynamic Graph Manager is a software for composing realtime control graph for robotics.
This tutorial is a rapid way to grasp of what dynamic graph is and how it works. It also presents a concrete exemple of its usage. In this tutorial, we will show how to control a turtlesim via dynamic graph.
Dynamic graph allows to compose control graphs for your favorite robot. A graph is composed of boxes (entities) and arrows (signals). To get your robot to work with Dynamic Graph, you need a special entity called Device. The Device entity has outputs (robot sensors) and inputs (control commands). You can therefore compose control graphs that connect the device outputs to the device inputs. Composing a graph is done by associating entities one to another by plugging outputs to inputs.
In addition to this every entity might register some commands which provide asynchronous call to the graph. This is described in mor details further in this tutorial.
You may find the concept similar to ROS. In ROS, you compose graphs by associating nodes together, association of nodes being done via services / subscriptions / publications. Here the fundamental difference:
- In ROS, nodes runs asynchronously (i.e. each node may run its own process).
- In Dynamic Graph, the graph is fully walked once per iteration. All entities are hosted by the same process and run synchronously. If running on a realtime OS (rt-preempt patch is supported), the execution of the graph will be realtime safe provided that each entity is realtime safe.
Hence dynamic graph entities and devices must be programmed in realtime friendly C++ code. But composition of the graph can be done in python. Once you have a large collection of entities, programming in C++ may become rare.
Some robot independent entities are already there to be used. For example, the RosSubscribe entity allows to "input" data from ROS to a graph during runtime.
This tutorial will provides examples of devices, entities and graphs.
-
Install ubuntu 18.04
-
Clone "ubuntu installation script"
cd /tmp
git clone https://github.com/machines-in-motion/ubuntu_installation_scripts.git- Run the script (will take a while)
sudo ./ubuntu_installation_scripts/official/setup_ubuntu install allWhat this script does
The script will install various dependencies via "apt install" and pip. These dependencies include ROS and Dynamic Graph. To see the complete list of operations performed, visit the Dockerfile in the folder:
/ubuntu_installation_scripts/official/ubuntu_18_04/docker
The script does not do anything fancy (e.g. messing up with various configuration files), and should not break anything that you already have running on your desktop.
- Create a directory for your workspace (we will use ~/devel in this tutorial, but can be anything)
cd ~
mkdir devel
cd devel- Clone treep configuration folder "machines in motion"
cd ~/devel
git clone https://github.com/machines-in-motion/treep_machines_in_motion.git
treep is a project manager, i.e.
an executable that helps managing several repositories grouped into projects
(e.g. cloning all the repositories at once).
treep_machines_in_motion is a configuration folder for treep, i.e.
where repositories and projects are defined.
See treep doc
- Use treep to clone all required repositories. The command below will clone all the repositories containing the code used for this tutorial. Note that your ssh-key for gihub needs to be active (see documentation)
cd ~/devel
treep --clone DG_TUTORIAL
treep --status
The commands above download the source code in workspace/src/.
The dependencies (dynamic graph code) has already been installed in
/opt/openrobots/ (when running the script "setup_ubuntu install" above).
- Compiling the code using colcon
cd ~/devel/workspace
source /opt/openrobots/setup.bash # activating dynamic graph
source /opt/ros/eloquent/setup.bash # activating ROS and catkin
colcon build
colcon
is a tool working on top of CMake. This is the compilation manager used by ROS2.
All the code used in this tutorial is organized in ROS2 packages.
You will find them in the sub-folder ~/devel/workspace/src.
cd ~/devel/workspace
source ./install/setup.bash
colcon test --event-handlers console_direct+cd ~/devel/workspace
source ./install/setup.bash
colcon build --cmake--args -DGENERATE_DOCUMENTATION=ONYou will find the index.html in
~/devel/workspace/install/dynamic_graph_manager/share/dynamic_graph_manager/doc/html
This tutorial will assume that you environment is setup in each terminal you open:
source /opt/openrobots/setup.bash
cd ~/devel/workspace
source ./install/setup.bash
To avoid having to type this in each new terminal you open, add these lines in ~/.bashrc :
echo "Sourcing DG TUTORIAL"
source /opt/openrobots/setup.bash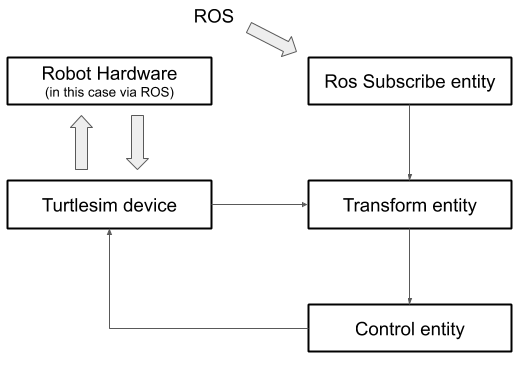
source ~/devel/workspace/devel/setup.bashA DynamicGraphManager is an object in charge of the communication between the
robot drivers and the device entity, i.e. the control graph.
In this section, we will create such object for a turtlesim robot.
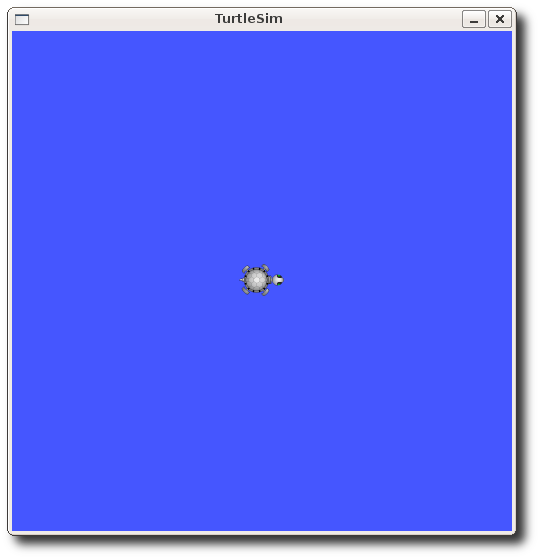
Turtlesim is a cute simulated robot. It is famous for being used in ROS tutorials. See : http://wiki.ros.org/turtlesim.
You can start it:
- In a terminal, start a turtlesim node:
ros2 run turtlesim turtlesim_nodeA window hosting a little turtle should appear.
A turtlesim is controlled by sending velocity command to it via a ROS service. For example, you can send a "velocity impulse" by publishing a command (from yet another terminal) :
ros2 topic pub /turtle1/cmd_vel geometry_msgs/Twist "linear:
  x: 1.0
  y: 0.0
  z: 0.0
angular:
  x: 0.0
  y: 0.0
  z: 1.0"
You may get sensory information by subscribing to the right topic:
ros2 topic echo /turtle1/poseOur DynamicGraphManager will wrap up the turtlesim and generate an according device entity. The output of the device (i.e. the sensory information) will be generated from the pose published by the turtlesim. The input to the device (i.e. velocity commands) will be used to publish velocity commands.
We created a generic c++ turtlesim object ("generic" here means dynamic-graph independent) which allows to interact programmatically with the turtlesim, hiding ROS commands under the hood. Hence this class will act as our robot drivers.
This is generic ROS2 / C++ programming, so this code is out of the scope of this tutorial. The final results is this API:
namespace dg_tutorial_with_turtlesim {

  class Turtlesim {

  public:

    Turtlesim(ros::NodeHandle &node);
    ~Turtlesim();

    // Under the hood: read data from ROS subscription.
    void get_pose(double &x, double &y, double &theta);
    void get_velocity(double &linear, double &angular);

    // Under the hood: publish velocity commands.
    void set_velocity(double linear, double angular);

  };

}
If you are curious, you can see the source code.
cd ~/devel/workspace/src/dg_tutorial_with_turtlesim/src
# or
cd ~/devel/workspace/src/dg_tutorial_with_turtlesim/include
The turtlesim DynamicGraphManager will define for the control graphs the output signals from the robot (sensory information) and the input signals to the robot (velocity command).
The code for the DynamicGraphManager is in
dg_tutorial_with_turtlesim/src/dynamic_graph_manager/dgm_turtlesim.cpp.
Through the inheritance one just need to overload the three methods below.
#include "dg_tutorial_with_turtlesim/dynamic_graph_manager/dgm_turtlesim.hpp"

namespace dg_tutorial_with_turtlesim
{
// This is the code of the Dynamic Graph Manager interfacing with turtlesim
// The hardware part inherit from DynamicGraphManager

DgmTurtlesim::DgmTurtlesim()
    : dynamic_graph_manager::DynamicGraphManager()
{
}

DgmTurtlesim::~DgmTurtlesim()
{
}

// this will be called when creating a new device instance
void DgmTurtlesim::initialize_hardware_communication_process()
{
    rt_printf("\nDG TURTLESIM: initializing hard communication ...");

    // dynamic graph manager will create nodes. ros_init gives access to them
    dynamic_graph_manager::RosNodePtr node =
        dynamic_graph_manager::get_ros_node("dg_tutorial_with_turtlesim");

    // creating the instance of turtlesim (see turtlesim.hpp in same catkin
    // package)
    turtlesim_ = std::make_shared<Turtlesim>(node);

    rt_printf(" done\n\n");
}

// This code is used to fill the "sensors" map with values coming from the robot
// sensors. Note that the keys of the map
// ("position","orientation","odometry_linear_velocity") are the exact same as
// the sensors provided in the configuration file /config/turtlesim.yaml. The
// map will be the "output" of the device, i.e. what can be plugged to the input
// of entities in control graphs
void DgmTurtlesim::get_sensors_to_map(
    dynamic_graph_manager::VectorDGMap& map)
{
    double x, y, theta, linear_velocity, angular_velocity;

    // reading sensory data from the robot
    turtlesim_->get_pose(x, y, theta);

    turtlesim_->get_velocity(linear_velocity, angular_velocity);

    // filling the sensor maps
    map["position"](0) = x;
    map["position"](1) = y;
    map["orientation"](0) = theta;
    map["current_velocity"](0) = linear_velocity;
    map["current_velocity"](1) = angular_velocity;
}

// This code is used to treat commands coming from the graphs. "map" is the
// input of the device, i.e. what can be plugged to output of entities in the
// graph. Note that the keys of the map (linear_velocity, angular_velocity)
// corresponds to controls defined in /config/turtlesim.yaml. Incoming commands
// are fed into turtlesim, having the robot moving.
void DgmTurtlesim::set_motor_controls_from_map(
    const dynamic_graph_manager::VectorDGMap& map)
{
    dynamicgraph::Vector desired_velocity = map.at("desired_velocity");

    turtlesim_->set_velocity(desired_velocity[0], desired_velocity[1]);
}

}  // namespace dg_tutorial_with_turtlesim
Furthermore the std::map above to filled or read from are automatically
generated from a yaml file in dg_tutorial_with_turtlesim/config/turtlesim.yaml.
You clearly see the corresponding fields:
- sensors
- position
- orientation
- current_velocity
- controls
- desired_velocity
is_real_robot: true
device:
  name: "turtlesim"
  sensors:
    position:
      size: 2
    orientation:
      size: 1
    current_velocity:
      size: 2
  controls:
    desired_velocity:
      size: 2
hardware_communication:
  maximum_time_for_user_cmd: 100000
  max_missed_control: 10
  control_period: 1000000
In the previous section, we presented a way to create the device entity through the instanciation of a DynamicGraphManager class. This device has output signals (current position and velocities of the turtlesim) and input signals (velocity commands). We will now be able to control the turtlesim by bridging the output to the input via a control graph that will compute the velocity commands from the current position and velocities of the robot.
In this tutorial, our object will be to have the turtlesim swimming toward a
(moving) virtual point.
The position of this virtual point will be defined by a ROS node which will
publish a geometry.msg.vector3 on the topic /turtle1/target.
Users will be able to change this published position via the service
/turtle1/set_target_position. The code of the node managing this can be found
in dg_tutorial_with_turtlesim/node/publish_target_position.py
To achieve our turtlesim to chase this virtual point, we will create a graph of three entities:
-
a RosSubscribe entity, which will subscribe to
/turtle1/target. This entity has no graph input. It does not have a graph edge input connecting to the device or another entity. But via its ROS subscriber, the entity has an input from ROS. The output signal of the entity will be the absolute position of the target point the robot should swim toward. -
a TurtlesimTransform entity, which will transform the position of the target from the absolute coordinate frame of the simulated world to the frame relative to the turtlesim. This entity has three input signals:
-
- the
[x,y]absolute position of the target,
- the
-
- the orientation of the turtlesim and
-
- the
[x,y]absolute position of the turtlesim. The output signal of this entity will be the position of the target relative to the robot.
- the
-
-
A TurtlesimControl entity, which will apply a simple proportional controller to compute the linear and angular velocities that should be applied. The input is the relative position of the target. The output signal will be the velocities to apply.
In the next sections, we will show and explain the codes of these entities
(with the exception of the ros_subscribe entity, which is part of the core
dynamic_graph_manager code, and that we only reuse here).
Then, the "plugging" of these entities into graphs via python will be shown.
#include "dg_tutorial_with_turtlesim/dynamic_graph/turtlesim_transform_entity.hpp"

#include <iostream>

namespace dg_tutorial_with_turtlesim
{
// Register new Entity type in the factory
// Note that the second argument is the type name of the python class
// that will be created when importing the python module.
DYNAMICGRAPH_FACTORY_ENTITY_PLUGIN(TurtlesimTransform, "TurtlesimTransform");

const double TurtlesimTransform::TIME_STEP_DEFAULT = .005;

const std::string& TurtlesimTransform::getClassName() const
{
    return CLASS_NAME;
}

std::string TurtlesimTransform::getDocString() const
{
    return "transform from absolute position to position relative to turtlesim";
}

TurtlesimTransform::TurtlesimTransform(const std::string& inName)

    // an entity must inherte from dynamicgraph Entity
    : dynamicgraph::Entity(inName),

      // we define here the input signals, i.e. data that will be required to
      // compute the output signals

      // the second argument (string) will be useful to provide information to
      // the users composing graphs using python. The last substring (after
      // '::') will be the attribute name of the signal in Python.

      // the first argument (NULL) indicates the signal does not depends on
      // another signal for computation. This will be always NULL for input
      // signals.

      robot_absolute_positionSIN(
          NULL,
          "TurtleSimTransform(" + name +
              ")::input(vector2d)::robot_absolute_position"),
      robot_orientationSIN(
          NULL,
          "TurtlesimTransform(" + name + ")::input(double)::robot_orientation"),
      absolute_positionSIN(NULL,
                           "TurtlesimTransform(" + name +
                               ")::input(vector2d)::absolute_position"),

      // we define here the output signal of the entity.

      // The first argument indicates that all three input signals are required
      // for computation of this output signal.

      relative_positionSOUT(robot_absolute_positionSIN << robot_orientationSIN
                                                       << absolute_positionSIN,
                            "TurtlesimTransform(" + name +
                                ")::output(vector2d)::relative_position")

{
    // registering the signals

    signalRegistration(robot_absolute_positionSIN);
    signalRegistration(robot_orientationSIN);
    signalRegistration(absolute_positionSIN);
    signalRegistration(relative_positionSOUT);

    // indicating which function will be used for computing the output signal.
    // (see code for transform right below)
    relative_positionSOUT.setFunction(
        boost::bind(&TurtlesimTransform::transform, this, _1, _2));
}

// Function for computing the output signal.
// Note that the output signal is both the input argument
// ("dynamicgraph::Vector& relative_position") and the returned value
// (dynamicgraph::Vector&) of the function.

dynamicgraph::Vector& TurtlesimTransform::transform(
    dynamicgraph::Vector& relative_position, const int& inTime)
{
    if (relative_position.size() != 2)
    {
        relative_position.resize(2);
    }

    // getting the values of input signals

    const dynamicgraph::Vector& robot_absolute_position =
        robot_absolute_positionSIN.access(inTime);
    double theta = robot_orientationSIN.access(inTime)[0];
    const dynamicgraph::Vector& absolute_position =
        absolute_positionSIN.access(inTime);

    // computing the output signal (position in the robot frame)
    // and returning it

    for (int i = 0; i < 2; i++)
    {
        diff_position_[i] = absolute_position[i] - robot_absolute_position[i];
    }

    double gamma = atan2(diff_position_[1], diff_position_[0]);
    double beta = gamma - theta;

    double s = 0;
    for (int i = 0; i < 2; i++)
    {
        s += diff_position_[i] * diff_position_[i];
    }
    double d = sqrt(s);

    relative_position[0] = d * cos(beta);
    relative_position[1] = d * sin(beta);

    return relative_position;
}

// to get documentation when composing graph using python

void TurtlesimTransform::display(std::ostream& os) const
{
    os << "TurtlesimTransform " << getName();

    try
    {
        os << "relative position = " << relative_positionSOUT;
    }
    catch (dynamicgraph::ExceptionSignal e)
    {
    }
}

}  // namespace dg_tutorial_with_turtlesim
You may also check the header file in
dg_tutorial_with_turtlesim/include/dg_tutorial_with_turtlesim/
In the CMakeLists.txt file of the dg_tutorial_with_turtlesim package,
the following lines are present:
# Entity compilation
add_library(
  ${PROJECT_NAME}_entities SHARED
  src/dynamic_graph/turtlesim_control_entity.cpp
  src/dynamic_graph/turtlesim_transform_entity.cpp)
target_include_directories(
  ${PROJECT_NAME}_entities
  PUBLIC $<BUILD_INTERFACE:${PROJECT_SOURCE_DIR}/include>
         $<INSTALL_INTERFACE:include>)
target_link_libraries(${PROJECT_NAME}_entities ${PROJECT_NAME})
# Install the target and it's python bindings.
install_dynamic_graph_plugin_python_bindings(${PROJECT_NAME}_entities)
# Install the plugin.
get_dynamic_graph_plugin_install_path(plugin_install_path)
install(
  TARGETS ${PROJECT_NAME}_entities
  EXPORT export_${PROJECT_NAME}
  LIBRARY DESTINATION ${plugin_install_path}
  ARCHIVE DESTINATION ${plugin_install_path}
  RUNTIME DESTINATION ${plugin_install_path}
  INCLUDES
  DESTINATION include)
this leads to the compilation and creation of various python bindings,
resulting in a python module called "dg_turtlesim_entities"
which will allow to instantiate and call functions of entities in python.
In order to get the entities exported in python one need to register them in
a boost::python standard header file you can find in
dg_tutorial_with_turtlesim/srcpy. The file name must be named:
<plugin_name>_python_module.hpp (the add_library above defines the
plugin_name)
/**
 * @file
 * @license BSD 3-clause
 * @copyright Copyright (c) 2020, New York University and Max Planck Gesellschaft
 *
 * @brief Expose the vicon_client_entity dynamic_graph module to python.
 */

#include "dg_tutorial_with_turtlesim/turtlesim_control_entity.hpp"
#include "dg_tutorial_with_turtlesim/turtlesim_transform_entity.hpp"

typedef boost::mpl::vector<
    dg_tutorial_with_turtlesim::TurtlesimControl,
    dg_tutorial_with_turtlesim::TurtlesimTransform
> entities_t;
The python packages and modules are created during compilation
(call to 'colcon build'), and should already be part of your python path upon
sourcing the ./install/setup.bash.
To create an instance of TurtlesimTransform, in a ipython terminal
(note: 'ipython' must start interactive python for python3):
from dg_tutorial_with_turtlesim.dynamic_graph.dg_tutorial_with_turtlesim_entities import TurtlesimTransform

absolute_to_relative = TurtlesimTransform("absolute_to_relative")

absolute_to_relative.displaySignals()

# displays :

# --- <absolute_to_relative> signal list:
#     |-- <Sig:TurtlesimTransform(absolute_to_relative)::input(vector2d)::absolute_position (Type Cst) UNPLUGGED
#     |-- <Sig:TurtlesimTransform(absolute_to_relative)::output(vector2d)::relative_position (Type Fun)
#     |-- <Sig:TurtleSimTransform(absolute_to_relative)::input(vector2d)::robot_absolute_position (Type Cst) UNPLUGGED
#     |-- <Sig:TurtlesimTransform(absolute_to_relative)::input(double)::robot_orientation (Type Cst) UNPLUGGED

# You may note this corresponds to what was declared in the c++ code of
# TurtlesimTransform.
To check if the entity is working as expected, we compute its output signal. For this, we will :
- attribute arbitrary constant value to the input signals
- ask the output signal to be computed
import time, math
import numpy as np

# setting constant values to input signals
absolute_to_relative.absolute_position.value = np.array([2,2])
absolute_to_relative.robot_absolute_position.value = np.array([1,1])
absolute_to_relative.robot_orientation.value = np.array([math.pi/4.0])

# computing relative position
# (recompute for the first iteration, which is 1)
absolute_to_relative.signal("relative_position").recompute(1)

# printing results
absolute_to_relative.signal("relative_position").value

# displays: array([1.41421356, 0. ])The device control velocity input will be computed using a simple proportional controller.
The code is very similar to the one of the TurtlesimTransform, so will not be fully shown here.
You may check the source code in
dg_tutorial_with_turtlesim/src/turtlesim_control_entity.cpp.
Additionally to a method for computing the output signal, TurtlesimControl provides a command allowing users to set the gain values. A command is a c++ function that will be automatically python binded during compilation, so it will be possible to change gains using python, including at runtime.
The code for setting the command in the constructor:
std::string docstring;
docstring = "\n Set proportional gain (double) \n";
addCommand(std::string("setKp"),
            new ::dynamicgraph::command::Setter<TurtlesimControl,
                                                dynamicgraph::Vector>(
                *this, &TurtlesimControl::setKp, docstring));
setKp needs to be defined in c++:
void TurtlesimControl::setKp(const dynamicgraph::Vector& proportional_gains)
{
    if (proportional_gains_.size() == 0)
    {
        proportional_gains_.resize(proportional_gains.size());
    }
    for (int i = 0; i < proportional_gains.size(); i++)
    {
        proportional_gains_[i] = proportional_gains[i];
    }
}
consequently, the following code can be used in an interactive python terminal:
from dynamic_graph_manager import dg_turtlesim_entities
import time

control = dg_turtlesim_entities.TurtlesimControl("turtlesim_control")
control.error.value = [0.1,0.1]
control.setKp([0.2,0.4])

control.desired_velocity.recompute(1)
print(control.desired_velocity.value)

# out: [0.02 0.31415927]So far, we covered:
- creating a DynamicGraphManager, i.e. c++ code (with python bindings) that wraps our turtlesim robot into a class that can interface with dynamic graph (i.e. defining the robot output and input signals)
- creating entities, i.e. c++ code (with python bindings) that can be used to create a control graph that will bridge the outputs of the devices to its inputs
- we ran the entities in python
Next we will:
- Compose the graph in a python script.
- Start the turtlesim dynamic graph manager,
- have it interpret the python script,
- and start controlling the robot accordingly.
We have code for the devices and the entity, but we miss the code that will start DynamicGraphManager, i.e. the manager that will instantiate the device, interpret the graph, and run it.
The c++ code is in
dg_tutorial_with_turtlesim/src/dynamic_graph_manager/turtlesim_dg_main.cpp:
#include "dg_tutorial_with_turtlesim/dynamic_graph_manager/dgm_turtlesim.hpp"


int main(int /*argc*/, char* /*argv*/[]) {

  std::string yaml_params_file = std::string(CONFIG_PATH);

  std::cout << "Loading parameters from "
            << yaml_params_file
            << std::endl;
  YAML::Node param = YAML::LoadFile(yaml_params_file);

  dg_tutorial_with_turtlesim::DgmTurtlesim dgm;

  dgm.initialize(param);
  dgm.run_single_process();
  // or
  // dgm.run(); // for multi-process (use with real-robots)
}
CONFIG_PATH is resolved during compilation to the file
workspace/install/dg_tutorial_with_turtlesim/share/dg_tutorial_with_turtlesim/dynamic_graph_manager/turtlesim.yaml
(see CMakeLists.txt).
This file has already been mentioned when we described the code of the turtlesim
DynamicGraphManager: there had to be a match between content in the source code
of the device, and the signals declared by the device.
The source code turtlesim_dg_main.cpp is used to generate the dg_turtlesim_run, which allows us to start dynamic graph.
In a first terminal:
# starts ROS, turtlesim and publication of the target
ros2 launch dg_tutorial_with_turtlesim start_turtlesim.launch.py
in a second terminal:
ros2 run dg_tutorial_with_turtlesim dgm_main_turtlesimThis will start dynamic graph manager, with an output similar to :
Loading parameters from $HOME/devel/workspace/install/share/dg_tutorial_with_turtlesim/dynamic_graph_manager/turtlesim.yaml
registration of sensors_map_0 of size 1
registration of sensors_map_1 of size 1
registration of sensors_map_2 of size 1
registration of sensors_map_3 of size 2
registration of motor_controls_map_0 of size 1
registration of motor_controls_map_1 of size 1
open /dev/cpu_dma_latency: Permission denied
Log will be saved in : "$HOME/dynamic_graph_manager/2019-08-05_16-39-41/"
pid of dynamic graph process: 15866
pid of hardware communication process: 15856

DG TURTLESIM: initializing hard communication ... done

Warning this thread is not going to be real time.
hardware communication loop started
HARDWARE: Start loop
print("Executing python interpreter prologue...")
Output:Executing python interpreter prologue...

import sys, os
pythonpath = os.environ['PYTHONPATH']
path = []
for p in pythonpath.split(':'):
  if p not in sys.path:
    path.append(p)
path.extend(sys.path)
sys.path = path
if not hasattr(sys, 'argv'):
    sys.argv  = ['dynamic_graph_manager']
from dynamic_graph_manager.device.prologue import robot
print("Executing python interpreter prologue... Done")
Output:Executing python interpreter prologue... Done

wait to start dynamic graph
Dynamic graph is now running, and ready to interpret and start a control graph In order to launch all three nodes on can use:
ros2 launch dg_tutorial_with_turtlesim start_turtlesim_dgm.launch.pyIn this section, we will compose a control graph interactively, i.e. using a "live" python terminal.
To start the python terminal, in another terminal:
ros2 run dynamic_graph_manager remote_python_clientThe python terminal started using this command is very different to the python terminal we used previously (started with 'ipython'). This terminal will "forward" all commands to the dynamic graph manager (using a ROS backend). Dynamic graph manager runs a python interpreter internally, which will allow it to create the c++ graph from the python instructions.
You can compose the graph in the python terminal:
import numpy as np
from dynamic_graph import plug

# note that dg_turtlesim_entities is the name of the library
# containing the compiled c++ code of the entities. See CMakeLists.txt
# of this package
from dg_tutorial_with_turtlesim.dynamic_graph.dg_tutorial_with_turtlesim_entities import (
    TurtlesimTransform,
    TurtlesimControl,
)


def create_graph():

    # 'robot' is a global variable declared by default, which contains the device and generic entities
    # 'vector3' indicated to ros_subscribe that it will subscribe to a ROS topic with message geometry_msg/Vector3
    # 'absolute_target_position' is the name of the output signal
    # '/turtle1/target' is the name of the topic the entity should subscribe to

    robot.ros.ros_subscribe.add("vector3", "absolute_target_position", "/turtle1/target")

    # will transform absolute_target_position into a position in the frame of the turtlesim,
    # based on output signals from the ros_subscribe above and from the device

    absolute_to_relative = TurtlesimTransform("absolute_to_relative")
    plug(robot.device.position, absolute_to_relative.robot_absolute_position)
    plug(robot.device.orientation, absolute_to_relative.robot_orientation)
    plug(
        robot.ros.ros_subscribe.signal("absolute_target_position"),
        absolute_to_relative.absolute_position,
    )

    # will compute the desired velocity based on the relative position

    pd_controller = TurtlesimControl("linear_control")
    pd_controller.setKp(np.array([0.05, 0.01]))
    plug(absolute_to_relative.relative_position, pd_controller.error)

    # inputing the velocity to the device

    plug(pd_controller.desired_velocity, robot.device.desired_velocity)


if "robot" in globals():

    create_graph()
note: 'tabs' for autocompletion should(may not) work in the python terminal.
The graph has now been declared in the manager, and can be started (i.e. the turtlesim should start to move) by calling a ROS service:
ros2 service call /dynamic_graph_manager/start_dynamic_graph std_srvs/srv/EmptyYou can set the target the robot should move to by calling the service (x=0 and y=0 means the lower left corner. z is ignored):
ros2 service call /turtle1/set_target_position  "position:
  x: 7.0
  y: 4.0
z: 0.0" IN order to chain launch files with each other one may just do:
from launch import LaunchDescription
from launch.actions import IncludeLaunchDescription
from launch.substitutions import ThisLaunchFileDir
from launch.launch_description_sources import PythonLaunchDescriptionSource
from launch_ros.actions import Node


def generate_launch_description():
    return LaunchDescription(
        [
            IncludeLaunchDescription(
                PythonLaunchDescriptionSource(
                    [ThisLaunchFileDir(), "/start_turtlesim_dgm.launch.py"]
                )
            ),
            IncludeLaunchDescription(
                PythonLaunchDescriptionSource(
                    [ThisLaunchFileDir(), "/start_target_publisher.launch.py"]
                )
            ),
            Node(
                package="dg_tutorial_with_turtlesim",
                node_executable="sequencer",
                output="screen",
            ),
        ]
    )
This file launch the full application with only one command:
ros2 launch dg_tutorial_with_turtlesim start_turtlesim_dgm.launch.py
In the python terminal:
from dynamic_graph import writeGraph
writeGraph('/tmp/my_graph.dot')
You can open this file using 'xdot', or you may convert it to pdf:
dot -Tpdf /tmp/my_graph.dot > /tmp/my_graph.pdf
For the graph used below:

You can also run a file by running:
rosrun dynamic_graph_manager run_command <path to the python file>For example, the python script corresponding to the control graph above is in dg_tutorial_with_turtlesim/python/follow_target_graph.py
If dynamic graph crashes when running the graph, it may be that there is some error in the code of the device or of an entity. GDB can help tracking down the error.
When starting the manager (rosrun dg_tutorial_with_turtlesim dg_turtlesim_run), two processes ids are displayed in the terminal, e.g.
pid of dynamic graph process: 749
pid of hardware communication process: 739
If the workspace has been compiled in debug mode, i.e.
catkin_make install -DCMAKE_BUILD_TYPE=Debugyou can start GDB and attach it to one of the process id ('pid of dynamic graph process' if you want to debug an entity, 'pid of hardware communication process' to debug the device).
For example:
sudo gdb -p 739
# this will STOP the process, you will need to type "continue" for the process to restart
If the dynamic graph manager crashes, you may then see the error trace in gdb by typing "backtrace"
You can create control graphs using python scripting, which is quite powerful. As an example, a graph and the corresponding python code

from dynamic_graph import plug
from dynamic_graph.sot.core.vector_constant import VectorConstant
from dynamic_graph.sot.core.fir_filter import FIRFilter_Vector_double
from dynamic_graph.sot.core.operator import (Multiply_double_vector,
                                             Selec_of_vector, Stack_of_vector,
                                             Substract_of_vector)
from dynamic_graph import writeGraph

def create_simple_graph():
    """
    We create a simple graph and create its graphical representation
    """

    # here we create some input to graph. These a constant vector but it could
    # anything coming from the hardware
    centered_slider = VectorConstant("4_robot_sliders")
    centered_slider.sout.value = [0.5, 0.5, 0.5, 0.5]

    # Filter the centered sliders
    # Hence we create a "Finite Impendance Response" filter.
    # the filter is in the following form:
    # out = sum_{i=0}^{N} data_i * alpha_i
    #   - the data_i are the collected elements, their number grows until the
    #     size of the filter is reached.
    #   - the alpha_i are the gains of the filter, they are defined by the
    #     method "setElement(index, value)"
    # in the end here we do an averaging filter on 200 points.
    slider_filtered = FIRFilter_Vector_double("slider_fir_filter")
    filter_size = 200
    slider_filtered.setSize(filter_size)
    for i in range(filter_size):
        slider_filtered.setElement(i, 1.0/float(filter_size))
    # we plug the centered sliders output to the input of the filter.
    plug(centered_slider.sout, slider_filtered.sin)

    # Now we want the slider to be in [-qref, qref]
    # So we multiply all sliders by a constant which is max_qref.
    scaled_slider = Multiply_double_vector("scaled_slider")
    scaled_slider.sin1.value = 2.0
    plug(slider_filtered.sout, scaled_slider.sin2)

    # Now we need to solve the problem that we have 4 sliders for 8 motors.
    # Hence we will map each slider value to 2 motors.
    state = {}
    for i, leg in enumerate(["fr", "hr", "hl", "fl"]):
        # first of all we define the references for the hip joint:
        state[leg + "_hip_qref"] = Selec_of_vector(leg + "_hip_qref")
        state[leg + "_hip_qref"].selec(i, i+1)
        plug(scaled_slider.sout, state[leg + "_hip_qref"].sin)

        # Then we define the reference for the knee joint. We want the knee to move
        # twice as much as the hip and on the opposite direction
        state[leg + "_knee_qref"] = Multiply_double_vector(
            leg + "_knee_qref")

        state[leg + "_knee_qref"].sin1.value = - 2.0
        plug(state[leg + "_hip_qref"].sout,
             state[leg + "_knee_qref"].sin2)

        # now we need to stack the signals 2 by 2:
        state[leg + "_qref"] = Stack_of_vector(leg + "_qref")
        state[leg + "_qref"].selec1(0, 1)
        state[leg + "_qref"].selec2(0, 1)
        # first element is the hip
        plug(state[leg + "_hip_qref"].sout,
             state[leg + "_qref"].sin1)
        # second element is the knee
        plug(state[leg + "_knee_qref"].sout,
             state[leg + "_qref"].sin2)

    robot_state_front_legs = Stack_of_vector("front_legs_state")
    plug(state["fr_qref"].sout, robot_state_front_legs.sin1)
    plug(state["fl_qref"].sout, robot_state_front_legs.sin2)

    robot_state_back_legs = Stack_of_vector("hind_legs_state")
    plug(state["hr_qref"].sout, robot_state_back_legs.sin1)
    plug(state["hl_qref"].sout, robot_state_back_legs.sin2)

    robot_state = Stack_of_vector("robot_des_state")
    plug(robot_state_front_legs.sout, robot_state.sin1)
    plug(robot_state_back_legs.sout, robot_state.sin2)


def draw_simple_graph():
    writeGraph('/tmp/robot_state_reference_from_slider.dot')

create_simple_graph()
draw_simple_graph()