
The complete Maestrano infrastructure can be deployed on demand on AWS using these deployment scripts. Automation is based on Ansible using a two steps process: Creation of the infrastructure on AWS (Virtual Private Cloud, Auto Scaling Groups, Elastic Load Balancers, private DNS entries, etc…) Automatic setup of new servers launched by the ASGs
Tested with Ansible 2.4.3.0
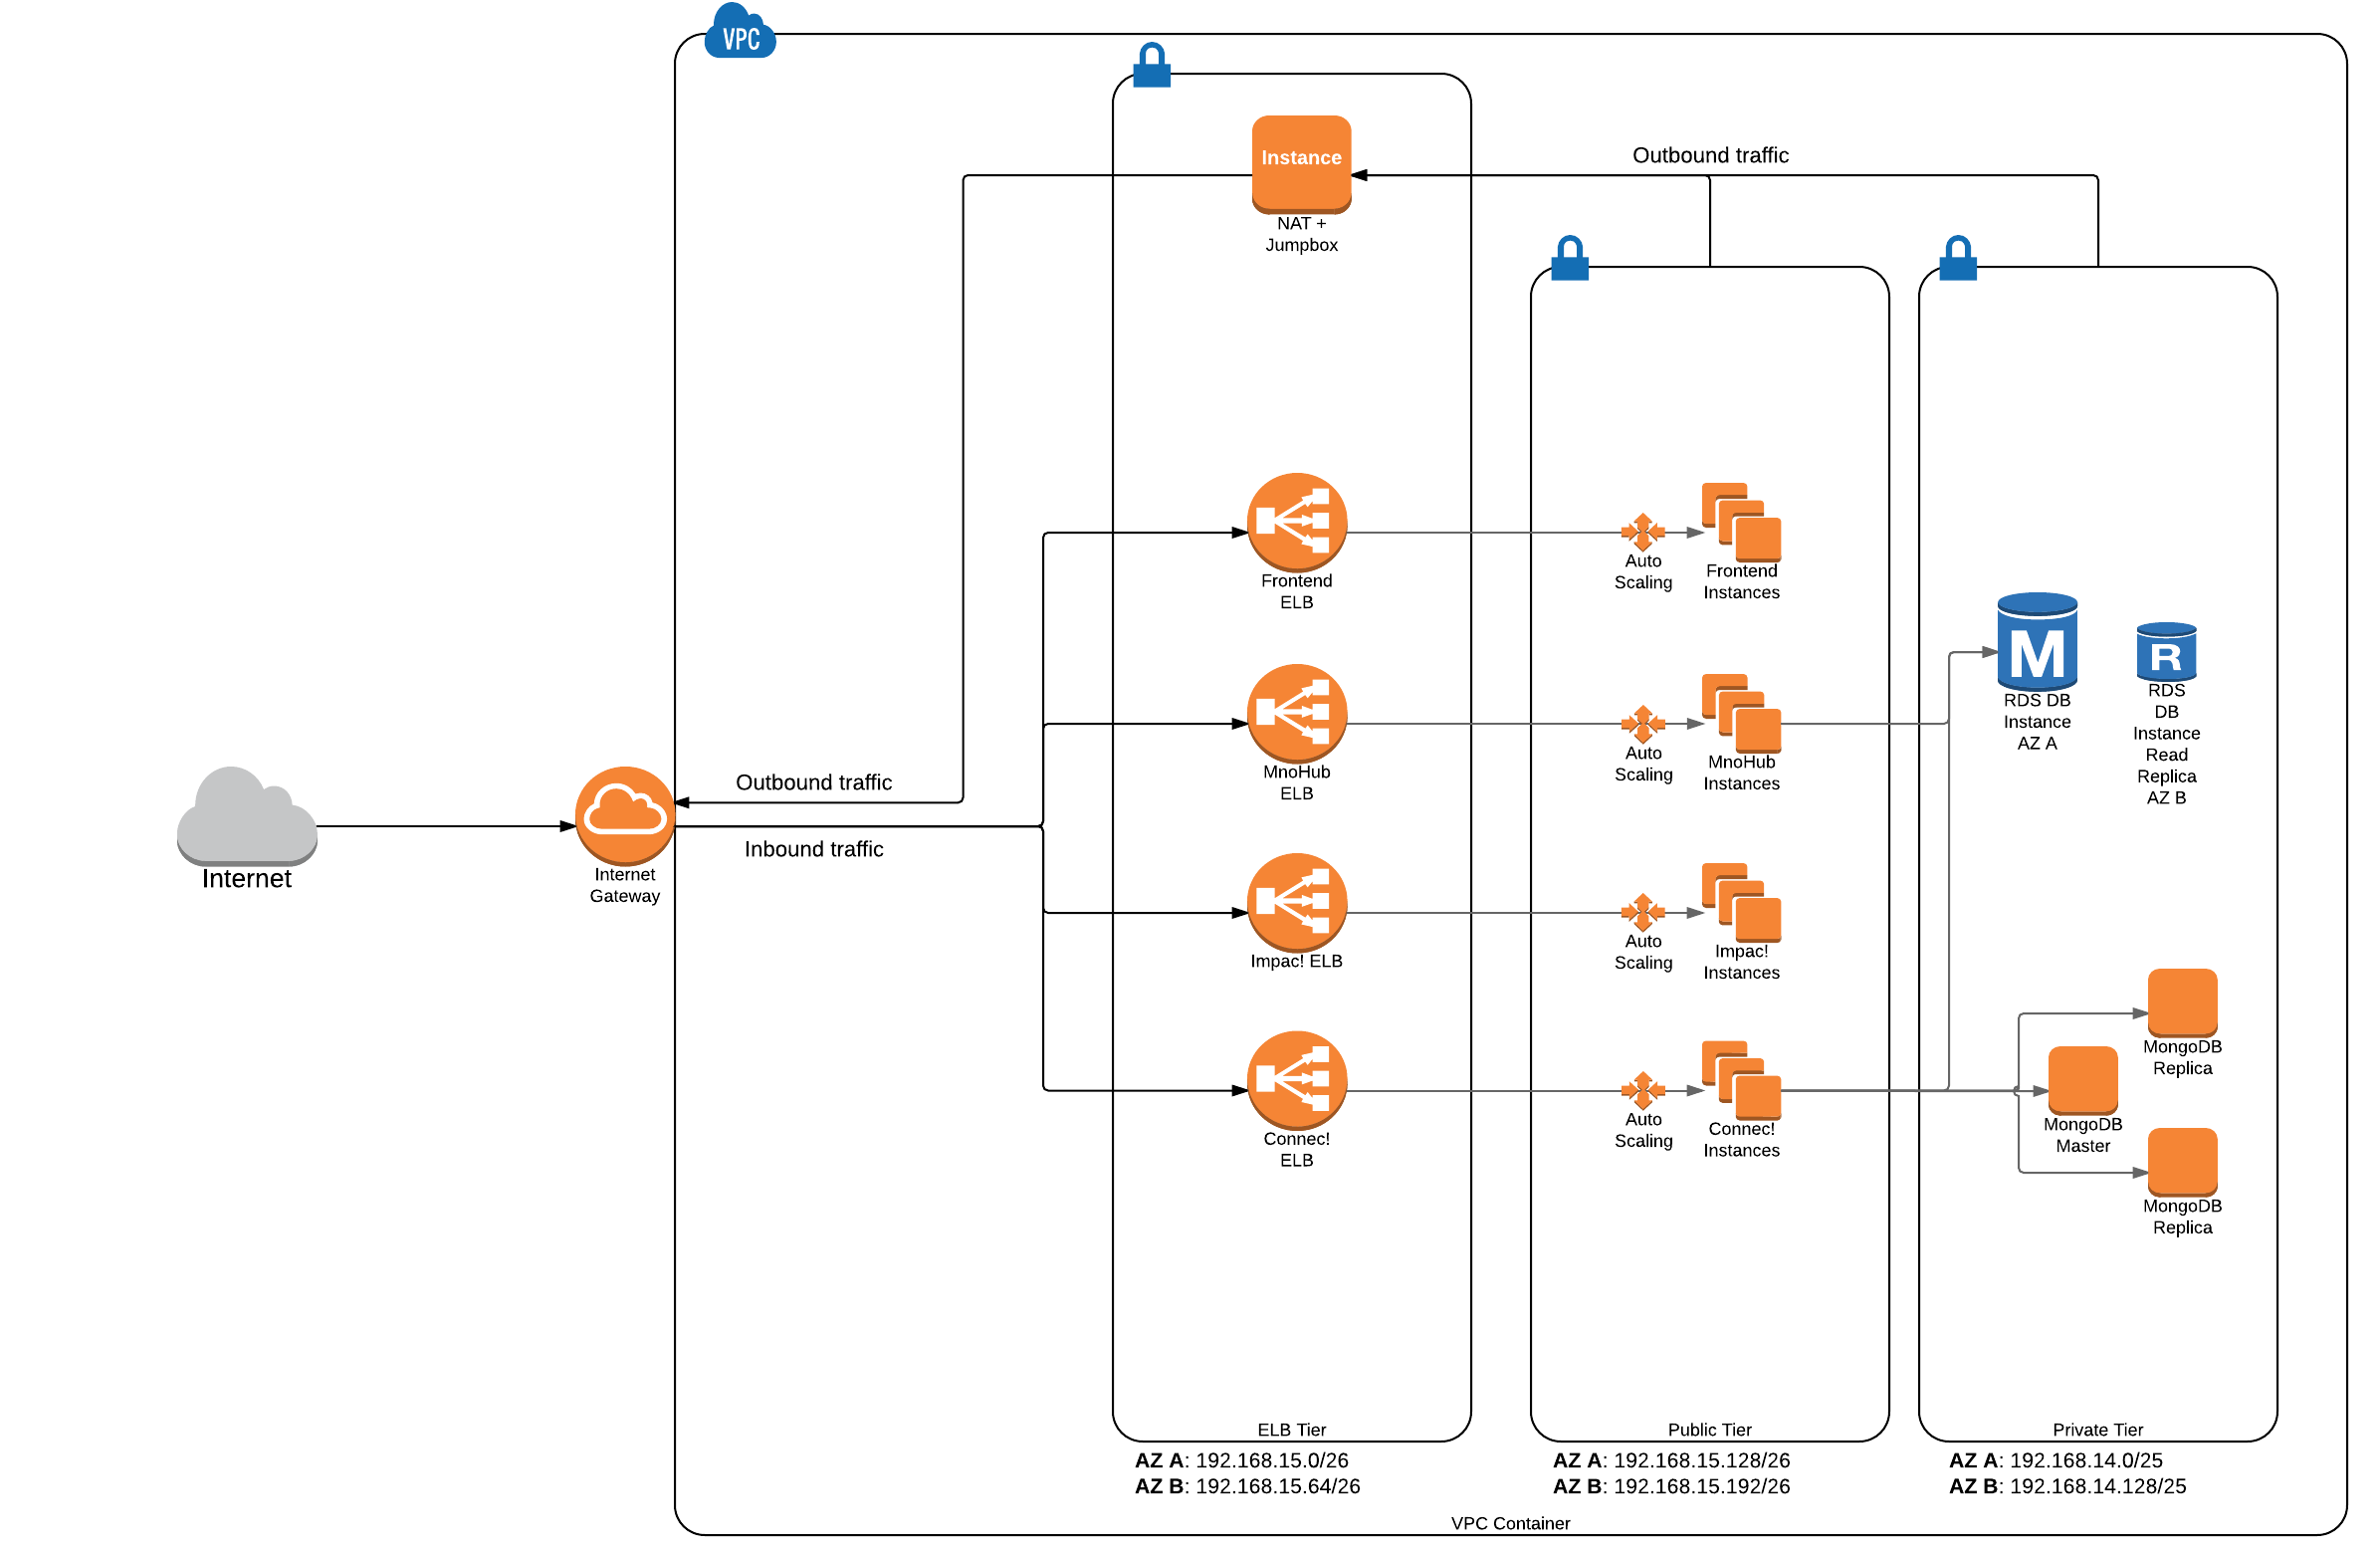
The default cloud provider used to deploy the Maestrano platform is Amazon Web Services running inside a VPC. The different components of the platform are deployed independently (frontend, mnohub, nex!, connec!, impac!)
This set of scripts is generic and needs to be configured on a per environment basis. The recommended approach is to create a new project to pull down the deployment scripts and merge them with your local configuration.
Create a directory structure as follows and copy the scripts files setup_infrastructure.sh, setup_instance.sh and vault_pass.sh under the directory myproject/scripts.
+-- _myproject
|   +-- _ansible
|       +-- _files
|           +-- _public_keys
|           +-- _xero_certs
|       +-- _vars
|   +-- scripts
|       +-- setup_infrastructure.sh
|       +-- setup_instance.sh
|       +-- vault_pass.sh
Copy the default configuration file from mno-deploy/ansible/vars/example.yml to ansible/vars/myenv.yml and set the values. A complete list of configuration properties is defined in the file ansible/group_vars/all.
An example of configuration file is available under mno-deploy/tests/ci_environments/aws_ubuntu/ansible/vars/aws_ubuntu_ci.yml
Copy the default secrets file from mno-deploy/ansible/vars/example_secrets.yml to ansible/vars/myenv_secrets.yml and update with your passwords and secrets. This file will be encrypted using ansible vault commands:
ansible-vault encrypt ansible/vars/myenv_secrets.yml
Store the ansible vault password in a text file that will be reused as part of the deployment scripts to decrypt this file at runtime.
The provided default scripts/setup_infrastructure.sh sets up the infrastructure using the following steps
- Pull the latest version of the mno-deploy scripts from the Maestrano S3 bucket
- Merge with the local ansible configuration and scripts
- Execute the Ansible scripts to setup the AWS infrastructure
This script can be modified to suit your needs if you want to pull a specific version of the deployment scripts or use your own version.
To run the deployment scripts, you need to have Ansible installed on the machine running the setup script. It is recommended to use Ansible version 2.4.3.0.
To create a new infrastructure, you need to have an AWS account with access keys having access to EC2, S3, Route53, RDS and Elasticache.
When running the script for the first time, make sure to set the AutoScaling Groups minimum and desired capacity to 0 so no instances are launched (see ansible/vars/myenv_secrets.yml).
Run the following script:
export AWS_ACCESS_KEY_ID=<some-key>
export AWS_SECRET_ACCESS_KEY=<some-key>
export AWS_REGION=<some-region> (eg: ap-southeast-2)
export ANSIBLE_VAULT_PASSWORD_FILE=path/to/ansible/vault/key
export ENVIRONMENT_CONFIGURATION=myenv
export MNO_DEPLOY_VERSION=develop/latest
sh scripts/setup_infrastructure.sh
Follow the Ansible setup steps on screen and verify the AWS infrastructure has been created under the AWS console:
- A new VPC should be created under AWS > VPC
- A new Hosted Zone should be created under AWS > Route 53 Update the created Hosted Zone and associated the created VP to it (AWS > Route 53 > Select the Hosted Zone, under the right hand side menu, associate a new VPC)
Now update the AutoScaling Groups to start instances by incrementing the minimum and desired capacities.
Verify that the ansible scripts run properly by checking logs under /var/log/ansible.log
The tasks defined under the role common will be executed on all the infrastructure compoenents.
To add SSH keys to the instances, you need to add the keys to the folder ansible/files/public_keys and them to the Ansible configuration:
# List of user SSH keys
ssh_users:
  - { name: "ubuntu", file: "files/public_keys/my-ssh-key" }
To support Xero API Partner access, certificate files must be added to ansible/files/xero_certs/RAILS_ENVIRONMENT/
The list of file to include are:
- privatekey.pem
Ansible AWS modules in their current versions do not allow to automate the creation of elasticache parameters groups - this operation has to be done manually after the infrastructure has been deployed.
The default Redis parameter group sets the eviction policy at volatile-lru, which means only the cache keys with an expiration date will be removed as the cache fills, starting with the least recently used.
For Redis caching to work properly with the different components of the Maestrano Suite, you need to configure this eviction policy in a different way. Indeed, most of the cache keys in Impac! won't have any expiration date set. As a result, if the eviction policy is kept at this default value, the cache keys will never be evicted and the cache will reach its limit.
To avoid this scenario, the following has to be done:
- Create a new parameter group based on the default one.
- Set the value:
maxmemory-policytoallkeys-lru: it will evict the least recently used cache keys regardless whether or not they have an expiration date set. - Edit the Redis instance so they use the newly created parameters group.