Skip to content
New issue

Have a question about this project? Sign up for a free GitHub account to open an issue and contact its maintainers and the community.

By clicking “Sign up for GitHub”, you agree to our terms of service and privacy statement. We’ll occasionally send you account related emails.

Already on GitHub? Sign in to your account

Animation: camera setting lost while rotating multiple mesh objects #504

Closed
XushanLu opened this issue Nov 2, 2021 · 20 comments
Closed

Comments

@XushanLu
Copy link
Contributor

XushanLu commented Nov 2, 2021

Hi @marcomusy,

I am playing with the Animation class and I found that my camera setting got lost while I try to rotate multiple mesh objects.

The code I used is something like this:

#!/usr/bin/env python3

import numpy as np
from vedo import TetMesh, show, screenshot, settings, Picture, buildLUT, Box, \
    Plotter, Axes
from vedo.applications import Animation

import time as tm

# Do some settings
settings.useDepthPeeling=False  # Useful to show the axes grid
font_name = 'Theemim'
settings.defaultFont = font_name
settings.multiSamples=8
# settings.useParallelProjection = True # avoid perspective parallax

# Create a TetMesh object form the vtk file
tet = TetMesh('final_mesh.vtk')

# Clone the TetMesh object and threshold it to get the conducotrs
cond = tet.clone().threshold(name='cell_scalars', above=0, below=15)

# Clone the TetMesh object and threshold it to get southern part of BSMT1
bm1 = tet.clone().threshold(name='cell_scalars', above=22, below=22)
# The southern part of BSMT2
bm2 = tet.clone().threshold(name='cell_scalars', above=24, below=24)

# This will get rid of the background Earth unit and air unit in the model
# which leaves us with the central part of the model
tet.threshold(name='cell_scalars', above=0, below=21)

# Crop the entire mesh using a Box object (which is considered to be a mesh
# object in vedo)
# First build a Box object with its centers and dimensions
cent = [504700, 6416500, -615]
box = Box(pos=cent, size=(3000, 5000, 2430))
# So, we now cut the TetMesh object with a mesh (that Box object)
tet.cutWithMesh(box, wholeCells=True)
# We can also cut msh directly rather than cutting tet, but that gives us
# something uglier, like what you would get without click the 'crinkle clip'
# option in Paraview and much worse because it would not keep mesh cells intact
# bounds = [503500, 505000, 6414000, 6417000, -1830, 600]
# msh.crop(bounds=bounds, wholeCells=True)

# And we need to convert it to a mesh object for later plotting
msh = tet.tomesh().lineWidth(1).lineColor('w')

# Crop the conductor TetMesh object using a larger box
cent = [505500, 6416500, -615]
box_cond = Box(pos=cent, size=(3200, 5000, 2430))
cond.cutWithMesh(box_cond, wholeCells=True)
cond_msh = cond.tomesh().lineWidth(1).lineColor('w')

# Also need to crop bm1 and bm2, but with a smaller box than that used for the
# entire mesh
cent = [504500, 6416500, -615]
box = Box(pos=cent, size=(1500, 5000, 2430))
bm1.cutWithMesh(box, wholeCells=True)
bm1_msh = bm1.tomesh().lineWidth(1).lineColor('w')
bm2.cutWithMesh(box, wholeCells=True)
bm2_msh = bm2.tomesh().lineWidth(1).lineColor('w')

# We need to build a look up table for our color bar, and now it supports
# using category names as labels instead of the numerical values
# This was implemented upon my request
lut_table = [
    # Value, color, alpha, category
    (12.2, 'dodgerblue', 1, 'C1'),
    (15.2, 'skyblue', 1, 'C1-North'),
    (16.2, 'lightgray', 1, 'Overburden'),
    (18.2, 'yellow', 1, 'MFc'),
    (19.2, 'gold', 1, 'MFb'),
    (21.2, 'red', 1, 'PW'),
    (23.2, 'palegreen', 1, 'BSMT1'),
    (25.2, 'green', 1, 'BSMT2'),
]
lut = buildLUT(lut_table)

msh.cmap(lut, 'cell_scalars', on='cells')
cond_msh.cmap(lut, 'cell_scalars', on='cells')
bm1_msh.cmap(lut, 'cell_scalars', on='cells')
bm2_msh.cmap(lut, 'cell_scalars', on='cells')
bm_msh = bm1_msh + bm2_msh
# msh.cmap("coolwarm", 'cell_scalars', on='cells')
msh.addScalarBar3D(
    categories=lut_table,
    pos=(508000, 6416500, -1830),
    title='Units',
    titleSize=1.5,
    sx=100,
    sy=4000,
    titleXOffset=-2,
)

group = msh + cond_msh + bm_msh
zlabels = [(500, '500'), (0, '0'), (-500, '-500'), (-1000, '-1000'),
           (-1500, '-1500')]
axes = Axes(group,
            xtitle='Easting (m)',
            ytitle='Northing (m)',
            ztitle='Elevation (m)',
            xLabelSize=0.015,
            xTitlePosition=0.65,
            yTitlePosition=0.65,
            yTitleOffset=-1.18,
            yLabelRotation=90,
            yLabelOffset=-1.6,
            # yShiftAlongX=1,
            zTitlePosition=0.85,
            # zTitleOffset=0.04,
            zLabelRotation=90,
            zValuesAndLabels=zlabels,
            # zShiftAlongX=-1,
            axesLineWidth=3,
            yrange=msh.ybounds(),
            xTitleOffset=0.02,
            # yzShift=1,
            tipSize=0.,
            yzGrid=True,
            xyGrid=True,
            gridLineWidth=5,
            )

# Set the camera position
plt = Animation()
plt.camera.SetPosition( [512921.567, 6407793.637, 8217.335] )
plt.camera.SetFocalPoint( [505099.133, 6415752.321, -907.462] )
plt.camera.SetViewUp( [-0.494, 0.4, 0.772] )
plt.camera.SetDistance( 14415.028 )
plt.camera.SetClippingRange( [7367.387, 23203.319] )

size = [3940, 2160]

# Trying to play with the Animation class
plt.showProgressBar = True
plt.timeResolution = 0.025  # secs

# It would be okay if I only plot one mesh object
# plt.fadeIn(msh, t=0, duration=0.5)
# plt.rotate(msh, axis="y", angle=180, t=1, duration=2)

# If I try to plot multiple objects, then things quickly go wrong: the mesh objects become a small point
# in the middle of the mesh and then disappear
plt.fadeIn([cond_msh, msh, bm1_msh, bm2_msh], t=0, duration=0.5)
plt.rotate([cond_msh, msh, bm1_msh, bm2_msh], axis="z", angle=180, t=1, duration=3)
plt.totalDuration = 4 # can shrink/expand total duration

plt.play()
# plt.show(msh, cond_msh, bm_msh, axes, size=size, interactive=False, resetcam=0, zoom=1.0)
# screenshot('model_mesh_vedo.png')

Here is the data required for this script to work:
final_mesh.vtk.zip

While I can try to just plot with one mesh object, it would still be interesting to make the above script work to add some more flexibility. I am not entirely sure whether I am doing something wrong or this is just the default behaviour. When you get a chance, could you please take a look at this?

Here is what things look like before they disappear (very last frame generated in the call to faceIn function):
image
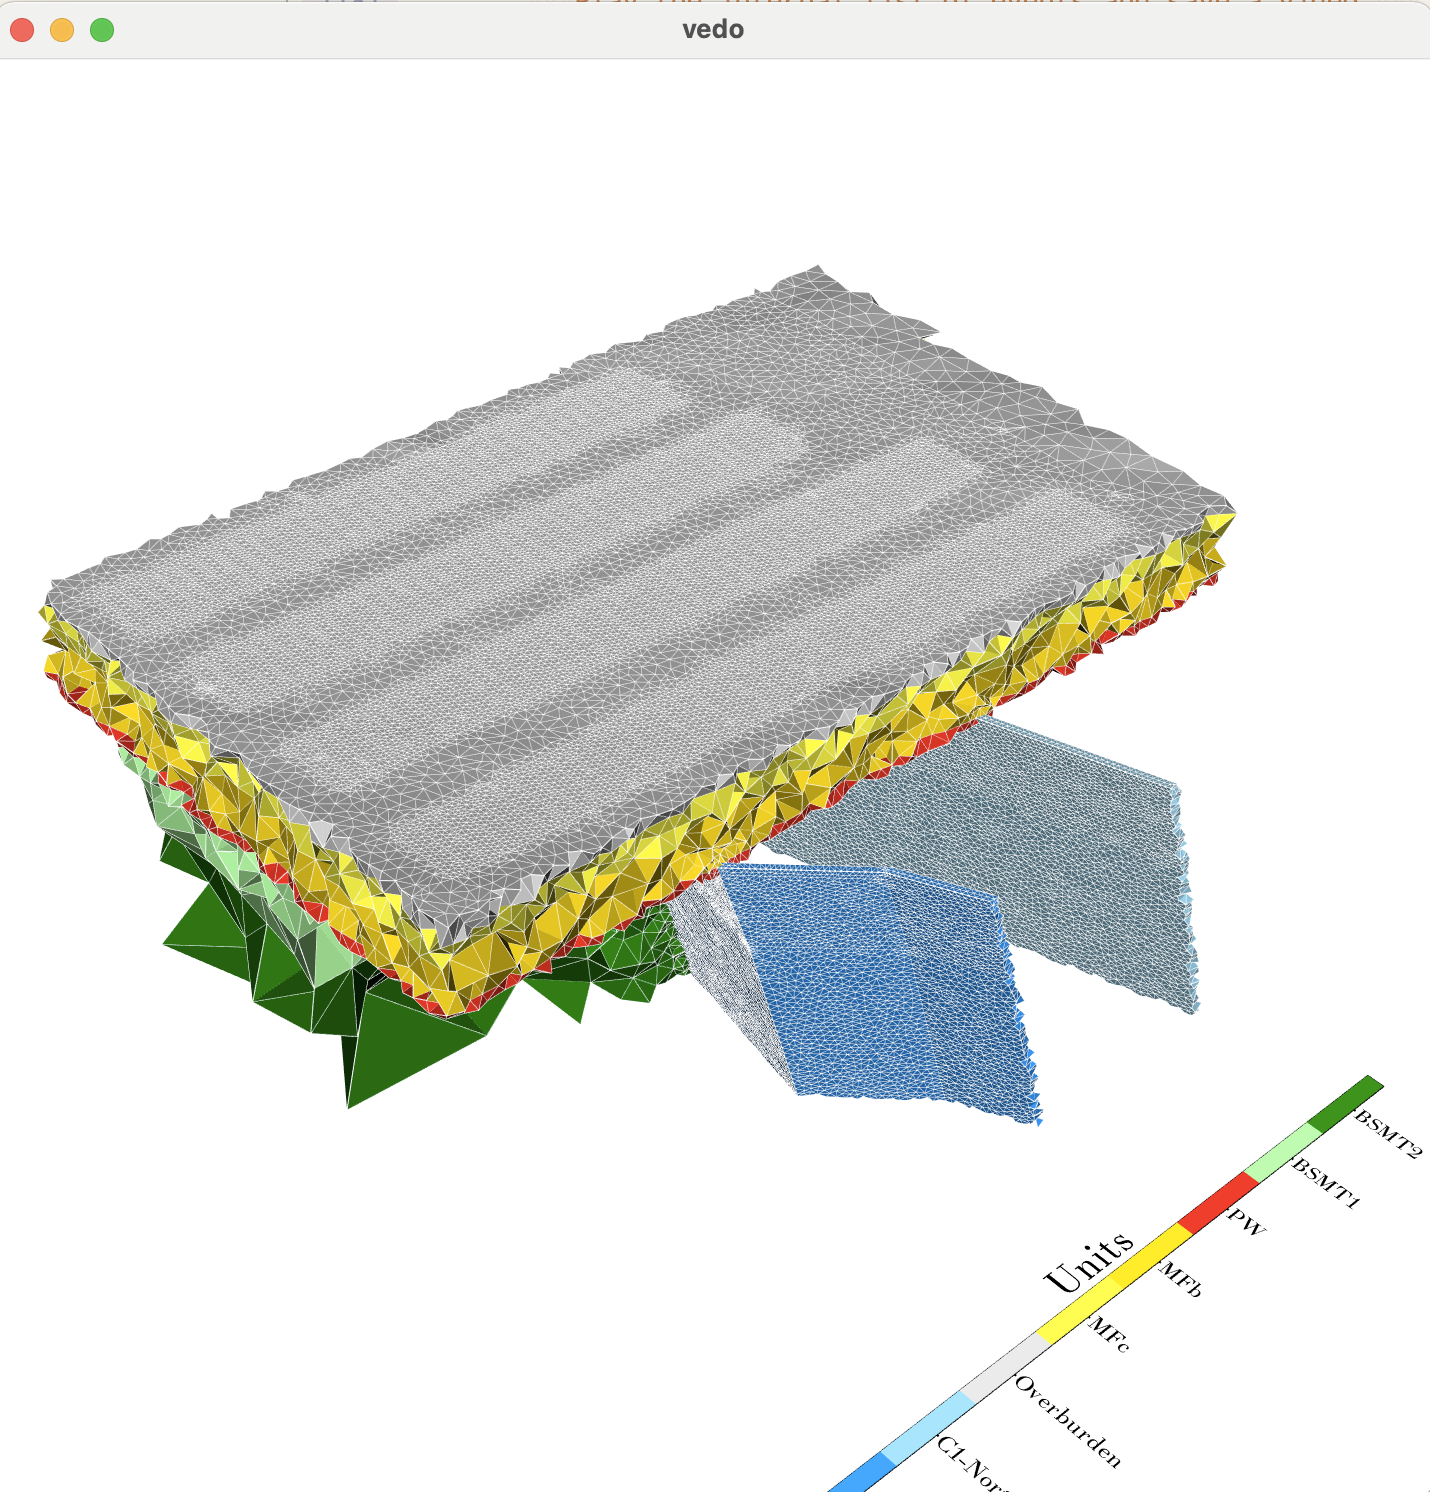
And here is what I mean by 'disappear' (can still be visible at the bottom-right coner):
image
You can see that they are still there if you zoom in to that area:
image

Well, I just discovered that it does not matter how many objects I rotate. This would happen even if I just rotate one object.

Also, there is no way for me to add Axes objects because of the following error: AttributeError: 'Assembly' object has no attribute 'alpha'".

The added 3D scalar bar also disappears.

The .mp4 file cannot be viewed using QuickTime Player on Mac. I've tried another video player and it does not work either.

Thanks very much,
Xushan

@marcomusy
Copy link
Owner

I will check, my first guess is that rotate() rotates around the origin (0,0,0) that's why everything goes off scale (you have LARGE scales!)

no way for me to add Axes objects because of the following error: AttributeError

this is actually a bug, needs fixing..

The added 3D scalar bar also disappears.

see #505

The .mp4 file cannot be viewed using QuickTime Player on Mac. I've tried another video player and it does not work either.

this is probably the ffmpeg encoder.... you can still save screenshot series and then join them (i use a lot https://ezgif.com/)

@marcomusy marcomusy added the bug label Nov 3, 2021
@XushanLu
Copy link
Contributor Author

XushanLu commented Nov 3, 2021

Thanks very much for the comment.

this is probably the ffmpeg encoder.... you can still save screenshot series and then join them (i use a lot https://ezgif.com/)

I guess I will just use the command-line ffmpeg. I was thinking of generating a series of screenshots but I decided to just use the Animation class but it did not work. I've already created a rotation video using just a single mesh object and recorded the screen while the movie is playing in the GUI. I think I can just use that one for the current task. I am happy to learn new tricks using vedo. Thanks very much for your help.

@XushanLu
Copy link
Contributor Author

Hi @marcomusy, I just updated to 2021.0.7 and I don't see the video is played inside the GUI anymore?

@marcomusy
Copy link
Owner

..what GUI, you mean the rendering window?

@XushanLu
Copy link
Contributor Author

Yes. Previously I can watch it playing in that window but now nothing shows up!

@marcomusy
Copy link
Owner

what is the output of
vedo --info

@XushanLu
Copy link
Contributor Author

vedo version : 2021.0.7 https://vedo.embl.es
vtk version : 9.0.1
python version : 3.8.11 (default, Aug 6 2021, 08:56:27) [Clang 10.0.0 ]
python interpreter: /Users/xsl/opt/anaconda3/bin/python
vedo installation : /Users/xsl/opt/anaconda3/lib/python3.8/site-packages/vedo
system : Darwin 21.1.0 posix x86_64

@marcomusy
Copy link
Owner

Are you sure it is still woking with vedo.2021.0.6 ? I noticed that on mac Monterrey it behaves differently..
What if you set

from vedo import settings
settings.allowInteraction=True

@XushanLu
Copy link
Contributor Author

That solved the problem!

@marcomusy marcomusy removed the bug label Nov 19, 2021
@XushanLu
Copy link
Contributor Author

That only solved the problem of showing things in the GUI but still the mp4 file cannot be viewed.

@marcomusy
Copy link
Owner

I guess this is a problem of ffmpeg... cannot do much on that, you may use screenshot(f"file{i}.png") in the loop and then join the series with external software

@ttsesm
Copy link

ttsesm commented Jan 5, 2022

@marcomusy I am also having an issue animating multiple objects. For example I would like to show in parallel the two meshes from here #567 (comment) rotating but when I give:

plt = Animation()
plt.showProgressBar = True
plt.timeResolution = 0.025  # secs

plt.rotate([mesh, reco_mesh], axis="y", angle=180, t=1, duration=2)
plt.play()

I am getting the following:

Error in rotate(), can move only one object.
�ideo Video animation.mp4 is open...
Recalculated video FPS to 47.0
\save Video saved as animation.mp4

Then I added the plt.fadeIn(mesh, t=0, duration=0.5) command but again it happens what @XushanLu mentions above the objects goes away also one of the two meshes is not showing up:
output
If I load only one mesh then it seems to work (I would like to avoid this zoom in/zoom out effect though):
output1

(ignore the yellow shade, it is an effect from the ffmpeg transformation of the video to .gif)

Any idea? Also is the fadeIn() necessary to show the mesh because if I remove it I get a blank output.

Also would be possible to have two sub-windows like in:

vd.show(mesh, "Before", at=0, N=2, axes=1)
vd.show(reco_mesh, "After", at=1, interactive=True).close()

image
and rotate each mesh on each own sub-figure.

@ttsesm
Copy link

ttsesm commented Jan 11, 2022

Hi @marcomusy,

Ok, I've managed to have the different meshes in different sub-windows buy using the Plotter instead of using the animation class:

vp = Plotter(shape=[3, 3], axes=0, interactive=0)

# vp.camera.Zoom(1.2)
vp.interactive = False

for t in np.arange(0, 1, 0.005):
    vp.show(mesh_models[0].c('gray'), at=0)
    vp.show(mesh_models[1].c('gray'), at=1)
    vp.show(mesh_models[2].c('gray'), at=2, resetcam=0)
    vp.show(mesh_models[3].c('gray'), at=3)
    vp.show(mesh_models[4].c('gray'), at=4)
    vp.show(m.c('gray'), at=5)
    vp.camera.Azimuth(2)

vp.show(interactive=1)

output

but I have two questions, 1) do you know why I am getting these kind of flashing artifacts on some of the pieces and 2) how I can save this directly as a .gif or .mp4 file? I couldn't find something on the Plotter class.

@marcomusy
Copy link
Owner

marcomusy commented Jan 11, 2022

Hi

  1. because you are not resetting camera the flashing I guess is due to the camera depth clipping.. try adding
    vp.camera.SetClippingRange( [dmin, dmax] )

  2. You can either vp.screenshot(f'filename{t}.png') or use the Video() class (which depends on your system specs so it might not work..). Check out examples/other/makeVideo.py

@ttsesm
Copy link

ttsesm commented Jan 11, 2022

Ok, apparently for the 1. most likely is a fault of my desktop renderer since on the final file (using the Video()) the flashing issues doesn't show up:
output

For 2. Video() works perfectly ;-).

@ttsesm
Copy link

ttsesm commented Jan 11, 2022

@marcomusy I am trying to save directly to .gif format. However, do you know which parameter to pass to address this yellow glow:
tombstone2

According to this and this it is due to the transparency but passing the command:

video = Video("tombstone2.gif", backend='ffmpeg')  # backend='opencv/ffmpeg'
video.options = "-b:v 8000k -vf format=rgba"

doesn't really help much. Then I tried to set the bg2='white' in the Plotter() initialization but it didn't work as well. While using the opencv backend gives me:

OpenCV: FFMPEG: tag 0x7634706d/'mp4v' is not supported with codec id 12 and format 'gif / CompuServe Graphics Interchange Format (GIF)'
[gif @ 0x55c302d1b880] GIF muxer supports only a single video GIF stream.

@marcomusy
Copy link
Owner

Uhm sorry I'm not an expert on this... if nothing works you can still save the separate png screenshots and merge them.
An online toll which I used a lot is https://ezgif.com/

@ttsesm
Copy link

ttsesm commented Jan 12, 2022

Uhm sorry I'm not an expert on this... if nothing works you can still save the separate png screenshots and merge them. An online toll which I used a lot is https://ezgif.com/

Fair enough, no worries. Actually after a lot of trial and error I managed to have the following working and which also gives a good quality .gif file:

video = Video("tombstone.gif", backend='ffmpeg')  # backend='opencv/ffmpeg'
video.options = "-b:v 8000k -filter_complex \"[0:v] split [a][b];[a] palettegen=stats_mode=single [p];[b][p] paletteuse=new=1\""

tombstone2

Sources: [1] and [2]

Also I would suggest to comment/remove this line

vedo/vedo/io.py

Line 1909 in 444b759

self.name = self.name.split('.')[0]+'.mp4'
since it hard codes the .mp4 extension to the output file.

Moreover, another thing I want to ask you is whether it is possible to individually and/or automatically adjust the camera zoom per window depending on the object's size. For example in the following output the first object is bigger that the other two so it appears closer to the camera (thus you also have the clipping) while the other two appear fine. The vp.camera.SetClippingRange( [dmin, dmax] ) command you mentioned above affects all the sub-windows.
tombstone1

@marcomusy
Copy link
Owner

Fair enough, no worries. Actually after a lot of trial and error I managed to have the following working and which also gives a good quality .gif file:

Looks great thanks for that.

Also I would suggest to comment/remove this line

Yes - removed

Moreover, another thing I want to ask you is whether it is possible to individually and/or automatically adjust the camera zoom per window depending on the object's size. For example in the following output the first object is bigger that the other two so it appears closer to the camera (thus you also have the clipping) while the other two appear fine.

Either you share the same camera or have separate ones of each renderer. This is controlled by plt = Plotter(sharecam=True).
If you have separate cameras you should be able to access them via:
cam = plt.renderer.GetActiveCamera() # vtkCamera obj

@ttsesm
Copy link

ttsesm commented Jan 12, 2022

Fair enough, no worries. Actually after a lot of trial and error I managed to have the following working and which also gives a good quality .gif file:

Looks great thanks for that.

👍 possibly it could be connected also with the issue #210

Also I would suggest to comment/remove this line

Yes - removed

👍

Moreover, another thing I want to ask you is whether it is possible to individually and/or automatically adjust the camera zoom per window depending on the object's size. For example in the following output the first object is bigger that the other two so it appears closer to the camera (thus you also have the clipping) while the other two appear fine.

Either you share the same camera or have separate ones of each renderer. This is controlled by plt = Plotter(sharecam=True). If you have separate cameras you should be able to access them via: cam = plt.renderer.GetActiveCamera() # vtkCamera obj

❤️ worked like a charm:
tombstone1

Sign up for free to join this conversation on GitHub. Already have an account? Sign in to comment
Labels
None yet
Projects
None yet
Development

No branches or pull requests

3 participants