This is a project to embed a Raspberry Pi in an NES cartridge to use as a graphics accelerator, similar to the SNES SuperFX chip or the Genesis SVP. It theoretically allows you to build a cartridge that can run any Pi game on an unmodified NES.
For now the only supported game is DOOM, but I'm sure more games will come.
Here's a brief overview - https://www.youtube.com/watch?v=FzVN9kIUNxw
The folders are as follows :
- Appmods - patches for SDL2 and Chocolate Doom to interface them with the NES/
- Fx2firmware - source code for the FX2 firmware. This handles all the comms between the Pi and the NES.
- Music - arrangements of the Doom MIDI music to the NES' programmable sound generator.
- Nesrom - Source code for the PRG ROM used to set up the PPU and handle frame sync, controller input, and music.
- OS - Buildroot configuration for the custom linux distribution that runs on the Pi/
- PPUSquirt - Source code for the program that handles graphics conversion and PPU communication. Runs on the Pi.
The project is based around the Raspberry Pi 3A+. It interfaces with the NES via a Cypress Semiconductor FX2LP, which is a very flexible high-speed USB controller. The FX2 is connected directly to the NES' Graphics memory bus, and takes full control of the Picture Processing Unit.
PPU + Pi = PiPU.
The NES itself runs a very simple game ROM which sets up the PPU, handles frame synchronization, sends controller input back to the Pi, and plays music when requested. All of this can be easily fit inside a standard NES cartridge enclosure, and runs on stock unmodified NESs.
These are the instructions to build a PiPU cartridge. I highly recommend using this guide in conjunction with the build video, as there are a few useful assembly hints there too - https://www.youtube.com/watch?v=gCWhWBtu0LA
- A donor or reproduction cartridge - The only requirement for the cartridge is that it has all the neccesary pins (many carts omit the WRITE strobe pin). I used a CNROM cartridge (Major League Baseball), so if you want to be able to follow my guide exactly then get that - or use something like the Repro-X from gametech.us.
- Raspberry Pi 3A+ - A Raspberry Pi 3B in a smaller form factor, ideal for our purposes.
- SD Card - At least 2GB in size, to store the Pi's operating system.
- FX2LP CY7C68013A USB Development Board - Available very cheaply on eBay, these are often sold as "logic analyzer" boards.
- EEPROM Programmer - I used the TL866, again available very cheaply on eBay
- 32K x 8bit Parallel (E)EPROM - Such as the 28c256.
-
Grab the 0.1 release from here : https://github.com/rasteri/PiPU/releases/download/v0.1/PiPU-v0.1.zip
-
If using a donor cart, disassemble it and remove all the ICs from the PCB (except the lockout chip). You’ll need a 3.8mm Gamebit screwdriver, and some sort of desoldering tool. Personally I just dremelled all the pins off the ICs then desoldered and removed each pin individually with tweezers.
-
Program an (E)EPROM with the PRG code. I used a 28c256 EEPROM since I don’t really like UV-erasable ones, but feel free to use whatever you like if you know what you're doing. My programmer is a TL866, which is dirt cheap and works pretty well. Remember to pick the correct ROM file, there's one for NTSC and one for PAL.
-
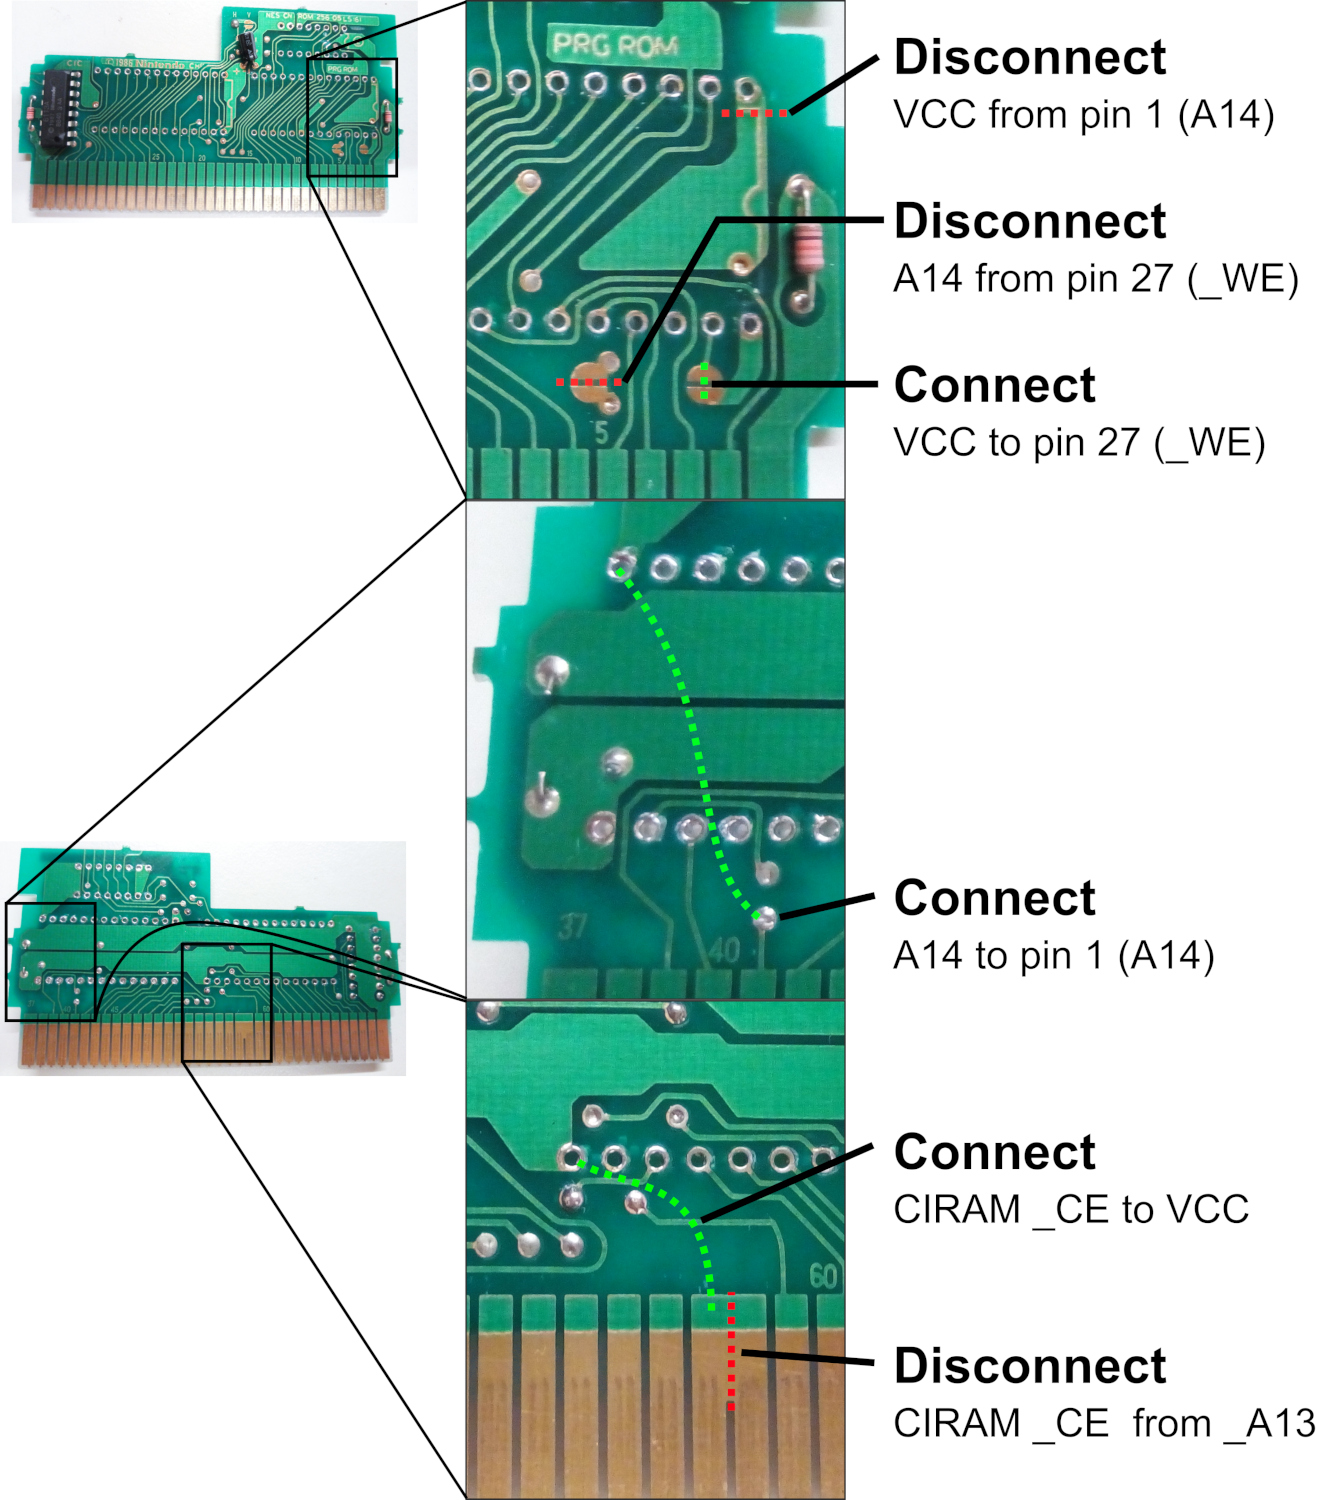
Modify the PCB to accept the ROM. This step will vary depending on which board and ROM you pick, but instructions on how to modify a CNROM board for the 28C256 are available here. Otherwise, you can follow any NES reproduction guide on the internet, but be aware you only need to replace the PRG ROM, not the CHR.
-
Solder the PRG ROM to the board
-
Test the ROM. Put the board back in the cartridge and into a NES. If you’ve built the board correctly, the NES will start playing the DOOM intermission music. If not, check your connections.
-
Program the FX2LP board with the custom firmware. This is a bit of an arse to do if you’re not familiar with FX2 software, but the basic process is as follows :
- Install the FX2LP development kit - https://www.cypress.com/file/135301/download
- Disable the FX2’s EEPROM. Confusingly, depending on which FX2 board you have, this is accomplished by either connecting or disconnecting a jumper. You might need to try it both ways.
- Connect the FX2 board to your computer via USB. It will probably ask you to provide drivers, the default install location is “C:\Cypress\USB\CY3684_EZ-USB_FX2LP_DVK\1.1\Drivers” and then whichever subfolder of that is appropriate to your operating system (the Windows 8.1 driver works fine on Windows 10).
- Start Cypress USB Control Center. It can be found, by default, at C:\Cypress\USB\CY3684_EZ-USB_FX2LP_DVK\1.1\Windows Applications\Application Source files\c_sharp\controlcenter\bin\Release\CyControl.exe. The FX2 device should be listed as “Cypress FX2LP No EEPROM Device”
- Put it in firmware download mode. Go to “Program->FX2->RAM” and select file “Vend_Ax.hex”. If all goes well, it will say “Programming Succeeded” at the bottom of the window.
- Re-enable the FX2’s EEPROM. Either connect or disconnect the EEPROM jumper, without disconnecting or resetting the FX2.
- Download the firmware. Go to “Program->FX2->64KB EEPROM” and select file “slave.iic”. Again, if all goes well, it will say “Programming Succeeded” at the bottom of the window. If it fails, you probably got your jumper settings wrong, or you didn't manage to get it into firmware download mode properly.
- Reboot the FX2 by disconnecting and reconnecting it, or by using the power or reset switches. It might prompt you to install drivers again, but when it finishes it should be listed in the USB Control Center as “EZ-USB FX2 GPIF to Ext FIFO Example using Single Transactions”. All good!
-
Attach the FX2LP board to the Rasberry Pi’s USB connector. There isn’t enough space for a cable, so I personally just hacked a MINI USB cable and soldered it directly to the underside of the Raspberry Pi’s USB port.
-
Connect the FX2LP board to the NES Cartridge PCB. This is the most involved step. You have to connect wires between the FX2’s headers and the pads on the cartridge that used to hold the CHR ROM. I would advise de-soldering the FX2’s headers first, then soldering wires directly into the pads. The connections to make are as follows :
| NES CHR Memory Signal | Mask ROM pin | FX2LP pin(s) |
|---|---|---|
| Ground | 14 | GND, PA4 |
| Read Strobe | 22 | PA1, PA2, PA5, RDY0 |
| Write Strobe | Cartridge 56 | RDY1 |
| Data 0 | 11 | PB0 |
| Data 1 | 12 | PB1 |
| Data 2 | 13 | PB2 |
| Data 3 | 15 | PB3 |
| Data 4 | 16 | PB4 |
| Data 5 | 17 | PB5 |
| Data 6 | 18 | PB6 |
| Data 7 | 19 | PB7 |
The write strobe/RDY1 isn't present on the Mask ROM pins, it should be connected directly to pin 56 on the cartridge connector.
Note that a number of FX2 boards I’ve ordered have had slightly wrong pin labelling - RDY0 and RDY1 were swapped. I would advise double-checking these pins are connected to the correct pins on the FX2 chip itself. RDY0 should be pin 8 and RDY1 should be pin 9.
-
Copy the operating system image to an SD card. You will need an SD card interface, either USB or built-in to your PC. You can use dd on Linux/MacOS or Etcher on Windows to transfer the image. You can optionally copy the WAD file(s) from the full version of DOOM and/or DOOM 2 to the root directory of the Fat32 partition of the SD card, and they will automatically be detected.
-
Connect the Raspberry Pi to the power rails of the cart PCB. Anywhere you can find power on the cartridge will be fine, I suggest tracing from the VCC/ground pins of the ICs and finding a suitable place.
-
Test everything works together, ideally with a dismantled NES so you can watch the green activity light on the Raspberry Pi flashing and/or connect a serial interface to the Pi to watch bootup messages.
-
Assemble the cartridge - Dremel out any internal supports from the cartridge enclosure that get in the way, and secure the Raspberry Pi and FX2 board with double-sided sticky foam pads. Then simply screw the cart together, swap the label for a more appropriate one, and you’re done!
Turn on the NES with the cartridge in, and the DOOM intermission music will start to play. After about 10 seconds, the game will start. If you have both DOOM and DOOM2 installed, DOOM will start first, then you can quit it to start DOOM 2.
Controls are as follows :
| NES Control | DOOM function |
|---|---|
| D-Pad | Movement |
| Button A | Fire |
| Button B | Use/Strafe |
| Select | Change Weapon |
| Start | Main Menu |
Copyright (C) 2019 Andrew Tait rasteri@gmail.com
This program is free software; you can redistribute it and/or modify it under the terms of the GNU General Public License version 2, as published by the Free Software Foundation.
This program is distributed in the hope that it will be useful, but WITHOUT ANY WARRANTY; without even the implied warranty of MERCHANTABILITY or FITNESS FOR A PARTICULAR PURPOSE. See the GNU General Public License version 2 for more details.
You should have received a copy of the GNU General Public License version 2 along with this program; if not, write to the Free Software Foundation, Inc., 51 Franklin Street, Fifth Floor, Boston, MA 02110-1301, USA.