If you want just a easy way to get Arduino act like e.g. controller, keyboard or mouse, go to https://github.com/mcgurk/Arduino-USB-HID-RetroJoystickAdapter.
If you can't/don't want to use USB, keep reading.
Convert (game)controller signals with Arduino or ESP8266 to Serial TTL -signal and use it in Linux like any other joystick (/dev/input/jsX).
There can be situations, when you cannot do or use USB-HID-joystick adapter and you still need way to use Linux with some kind of (game)controller.
Orange Pi has 4 hardware serial ports (UART), which are rarely used, so one reason is simply to save USB-port(s).
This page is for information how to connect some controllers to serial port. You will get /dev/input/jsX-device (joysticks and gamepads), /dev/eventX-device (keyboard) or /dev/mouseX-device (mouse).
Look ma! I'm driving without USB! (about $3 Wemos ESP8266 and Wii Classic Controller with Orange Pi PC UART1)
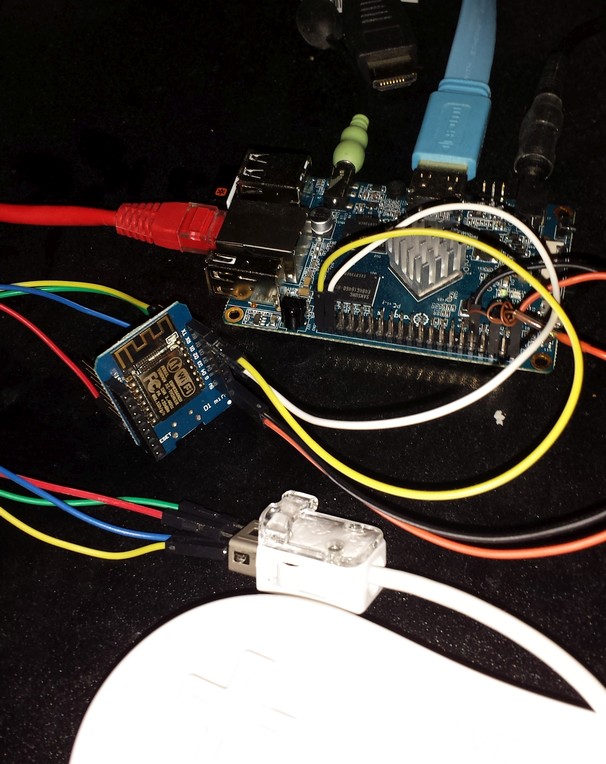
Stinger_WiiClassicController.ino emulates Gravis Stinger controller. It reads 6 data bytes from Wii Classic Controller with I²C. Then it converts them to Gravis Stinger 4 data bytes and sends them through serial port (physical or USB). Linux are set up like there would be real Stinger connected to physical serial port. (analog sticks of Wii Classic Controller are disabled)
This needs serport.ko and stinger.ko -modules. Serport is compiled to kernel (CONFIG_SERIO_SERPORT=y). From this github-page you can download stinger-module for RetrOrangePi 2.5.2. Put it /lib/modules/3.4.112-sun8i/kernel/drivers/input/joystick/stinger.ko and do sudo depmod -a. inputattach-command loads it automatically, so you don't have to start it by hand.
(I have not yet tested module with clean install of ROPi)
Install inputattach:
sudo apt install inputattach
Joystick-device is created with command:
sudo inputattach --baud 9600 --always --stinger /dev/ttyS1
You can test it with (device number depends your another controllers):
jstest /dev/js0
Start automatically at boot /etc/rc.local:
inputattach --baud 9600 --always --stinger --daemon /dev/ttyS1
Wii Classic Controller (I²C):
ESP8266: SDA = D2 (GPIO4), SCL = D1 (GPIO5)
ESP8266, Wii Classic Controller and Orange Pi GPIO's are 3.3V, so there is no need for voltage level shifting.
Instructions to add ESP8266-support to Arduino IDE:
https://github.com/esp8266/Arduino
Short version:
-
File -> Preferences -> Additional Boards Manager URLs: http://arduino.esp8266.com/stable/package_esp8266com_index.json
-
Tools -> Board -> Boards manager... -> esp8266 -> Install
Wii Classic Controller (I²C) (3.3V!):
Uno: SDA = A4, SCL = A5
Pro Micro: SDA = D2, SCL = D3
Remember, Orange Pi GPIO's are 3.3V. So if you gonna connect Arduino's TX to OPi, use 3.3V Arduino or do voltage level shifting. Wii Classic Controller is also 3.3V.
Many Arduinos resets when serial communication starts. When Linux driver asks for initialization, Arduino doesn't answer fast enough, because it is resetting itself.
sudo inputattach --baud 9600 --always --stinger /dev/ttyACM0 &
One software solution is to use socat. It creates new serialport device, keeps original port open and makes link between virtual and real port.
sudo socat open:/dev/ttyACM0 PTY,link=/dev/ttyV0
sudo inputattach --baud 9600 --stinger /dev/ttyV0 &
Command must be given every time after Arduino is connected.
http://playground.arduino.cc/Main/DisablingAutoResetOnSerialConnection
Orange Pi has 4 hardware serialports.
UART0 "Debug TTL UART" (may be in debug/terminal use):

UART1, UART2, UART3:

Orange Pi, activate 3 serial ports in GPIO pins:
[uart0]
uart_used = 1
uart_port = 0
uart_type = 2
uart_tx = port:PA04<2><1><default><default>
uart_rx = port:PA05<2><1><default><default>

[uart1]
uart_used = 1
uart_port = 1
uart_type = 2
uart_tx = port:PG06<2><1><default><default>
uart_rx = port:PG07<2><1><default><default>

[uart2]
uart_used = 1
uart_port = 2
uart_type = 2
uart_tx = port:PA00<2><1><default><default>
uart_rx = port:PA01<2><1><default><default>

[uart3]
uart_used = 1
uart_port = 3
uart_type = 2
uart_tx = port:PA13<3><1><default><default>
uart_rx = port:PA14<3><1><default><default>
For testing purposes you can start inputattach with dump-device:
inputattach --baud 9600 --dump /dev/ttyUSB0
It prints out hexadecimal numbers and ascii characters from serial device to console.
--daemon : Forks into the background.
--always : Ignore initialization failures when attaching the device.
--noinit : Skip device initialization.
--baud : Specify the baud rate to use. (This is only necessary if the default rate is incorrect.)
https://github.com/torvalds/linux/blob/master/drivers/input/joystick/stinger.c
https://github.com/torvalds/linux/blob/master/drivers/input/joystick
https://www.kernel.org/doc/Documentation/input/joystick.txt
https://sourceforge.net/p/linuxconsole/code/ci/master/tree/utils/inputattach.c
inputattach source: https://sourceforge.net/projects/linuxconsole/files/
http://www.orangepi.org/Docs/OrangePiFexConfiguration.html
http://linux-sunxi.org/Fex_Guide
http://linux-sunxi.org/A10/PIO
Get some programs:
sudo apt get install socat inputattach minicom
(minicom exit: ctrl-a, x, enter)
sudo socat PTY,link=/dev/ttyS10 PTY,link=/dev/ttyS11 &
sudo chmod 666 /dev/ttyS1?
minicom -D /dev/ttyS10
with other cosole/terminal/window: minicom -D /dev/ttyS11
inputattach --baud 9600 --dump /dev/ttyS0
sudo socat open:/dev/ttyACM0 PTY,link=/dev/ttyV0
sudo socat PTY,link=/dev/ttyS10 PTY,link=/dev/ttyS11 &
sudo chmod 666 /dev/ttyS1?
sudo inputattach --ps2serkbd /dev/ttyS10 &
minicom -D /dev/ttyS11
(careful! if you send example only an 'A' (0x1C), it repeats forewer until you send breakcode (0xF01C) or kill inputattach)
http://www.computer-engineering.org/ps2keyboard/scancodes2.html
- ESP8266 with 1200baud makes lot of garbage to ESP8266 TX-pin - Try to avoid
- inputattach baud-parameter takes only speeds 2400, 4800, 9600, 19200, 38400 (you can compile it yourself to support more speeds)
- because of previous limitation, inputattach doesn't support dump-device with 1200baud
- baud-parameter in inputattach must be given before device
- I get inputattach to work only first time after boot with Orange Pi PC built-in UART and RetrOrangePi 2.5.2. Second time it doesn't detect any buttons (maybe some kind of interrupt problem?)