


This tutorial teaches FIWARE users about batch commands and entity relationships. The tutorial builds on the data created in the previous store finder example and creates and associates a series of related data entities to create a simple stock management system.
The tutorial uses cUrl commands throughout, but is also available as Postman documentation.


🇯🇵 このチュートリアルは日本語でもご
覧いただけます。
🇪🇸 Este tutorial también está disponible en
español
Details
Within the FIWARE platform, the context of an entity represents the state of a physical or conceptural object which exists in the real world.
For a simple stock management system, we will only need four types of entity. The relationship between our entities is defined as shown:
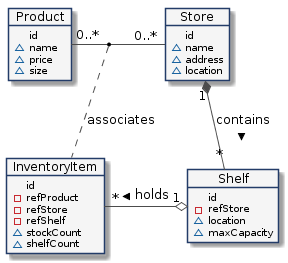
- A store is a real world bricks and mortar building. Store entities would have properties such as:
- A name of the store e.g. "Checkpoint Markt"
- An address "Friedrichstraße 44, 10969 Kreuzberg, Berlin"
- A phyiscal location e.g. 52.5075 N, 13.3903 E
- A shelf is a real world device to hold objects which we wish to sell. Each Shelf entity would have properties
such as:
- A name of the shelf e.g. "Wall Unit"
- A phyiscal location e.g. 52.5075 N, 13.3903 E
- A maximum capacity
- An association to the store in which the shelf is present
- A product is defined as something that we sell - it is conceptural object. Product entities would have
properties such as:
- A name of the product e.g. "Melons"
- A price e.g. 13.99 Euros
- A size e.g. Small
- An inventory item is another conceptural entity, used to assocate products, stores, shelves and physical objects.
Inventory Item entities would have properties such as:
- An association to the product being sold
- An association to the store in which the product is being sold
- An association to the shelf where the product is being displayed
- A stock count of the quantity of the product available in the warehouse
- A stock count of the quantity of the product available on the shelf
As you can see, each of the entities defined above contain some properties which are liable to change. A product could change its price, stock could be sold and the shelf count of stock could be reduced and so on.
Note
This tutorial uses the following typographic styling :
- Entity types have been made bold text
- Data attributes are written in
monospace text - Items in the real world use plain text
Therefore a store in the real world is represented in the context data by a Store entity, and a real world shelf
found in a store is represented in the context data by a Shelf entity which has a refStore attribute.
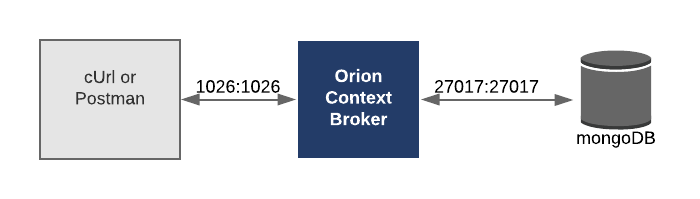
This application will only make use of one FIWARE component - the Orion Context Broker. Usage of the Orion Context Broker is sufficient for an application to qualify as “Powered by FIWARE”.
Currently, the Orion Context Broker relies on open source MongoDB technology to keep persistence of the context data it holds. Therefore, the architecture will consist of two elements:
- The Orion Context Broker which will receive requests using NGSI-v2
- The underlying MongoDB database :
- Used by the Orion Context Broker to hold context data information such as data entities, subscriptions and registrations
Since all interactions between the two elements are initiated by HTTP requests, the entities can be containerized and run from exposed ports.
The necessary configuration information can be seen in the services section of the associated docker-compose.yml file:
orion:
    image: quay.io/fiware/orion:latest
    hostname: orion
    container_name: fiware-orion
    depends_on:
        - mongo-db
    networks:
        - default
    expose:
        - '1026'
    ports:
        - '1026:1026'
command: -dbhost mongo-db -logLevel DEBUGmongo-db:
image: mongo:4.2
hostname: mongo-db
container_name: db-mongo
expose:
- '27017'
ports:
- '27017:27017'
networks:
- defaultBoth containers are residing on the same network - the Orion Context Broker is listening on Port 1026 and MongoDB is
listening on the default port 27017. Both containers are also exposing the same ports externally - this is purely for
the tutorial access - so that cUrl or Postman can access them without being part of the same network. The command-line
initialization should be self explanatory.
To keep things simple both components will be run using Docker. Docker is a container technology which allows to different components isolated into their respective environments.
- To install Docker on Windows follow the instructions here
- To install Docker on Mac follow the instructions here
- To install Docker on Linux follow the instructions here
Docker Compose is a tool for defining and running multi-container Docker applications. A YAML file is used configure the required services for the application. This means all container services can be brought up in a single command. Docker Compose is installed by default as part of Docker for Windows and Docker for Mac, however Linux users will need to follow the instructions found here
You can check your current Docker and Docker Compose versions using the following commands:
docker-compose -v
docker version
Please ensure that you are using Docker version 20.10 or higher and Docker Compose 1.29 or higher and upgrade if necessary.
We will start up our services using a simple Bash script. Windows users should download cygwin to provide a command-line functionality similar to a Linux distribution on Windows.
All services can be initialised from the command-line by running the services Bash script provided within the repository. Please clone the repository and create the necessary images by running the commands as shown:
git clone https://github.com/FIWARE/tutorials.Entity-Relationships.git
cd tutorials.Entity-Relationships
git checkout NGSI-v2

./services start
This command will also import seed data from the previous Store Finder tutorial on startup.
Note
If you want to clean up and start over again you can do so with the following command:
./services stop
In the previous tutorial, we created each Store entity individually,
Lets create five shelf units at the same time. This request uses the convenience batch processing endpoint to create
five shelf entities. Batch processing uses the /v2/op/update endpoint with a payload with two attributes -
actionType=APPEND means we will overwrite existing entities if they exist whereas the entities attribute holds an
array of entities we wish to update.
To differenciate Shelf Entities from Store Entities, each shelf has been assigned type=Shelf. Real-world
properties such as name and location have been added as properties to each shelf.
curl -iX POST \
  'http://localhost:1026/v2/op/update' \
  -H 'Content-Type: application/json' \
  -d '{
  "actionType":"APPEND",
  "entities":[
    {
      "id":"urn:ngsi-ld:Shelf:unit001", "type":"Shelf",
      "location":{
        "type":"geo:json", "value":{ "type":"Point","coordinates":[13.3986112, 52.554699]}
      },
      "name":{
        "type":"Text", "value":"Corner Unit"
      },
      "maxCapacity":{
        "type":"Integer", "value":50
      }
    },
    {
      "id":"urn:ngsi-ld:Shelf:unit002", "type":"Shelf",
      "location":{
        "type":"geo:json","value":{"type":"Point","coordinates":[13.3987221, 52.5546640]}
      },
      "name":{
        "type":"Text", "value":"Wall Unit 1"
      },
      "maxCapacity":{
        "type":"Integer", "value":100
      }
    },
    {
      "id":"urn:ngsi-ld:Shelf:unit003", "type":"Shelf",
      "location":{
        "type":"geo:json", "value":{"type":"Point","coordinates":[13.3987221, 52.5546640]}
      },
      "name":{
        "type":"Text", "value":"Wall Unit 2"
      },
      "maxCapacity":{
        "type":"Integer", "value":100
      }
    },
    {
      "id":"urn:ngsi-ld:Shelf:unit004", "type":"Shelf",
      "location":{
        "type":"geo:json", "value":{"type":"Point","coordinates":[13.390311, 52.507522]}
      },
      "name":{
        "type":"Text", "value":"Corner Unit"
      },
      "maxCapacity":{
        "type":"Integer", "value":50
      }
    },
    {
      "id":"urn:ngsi-ld:Shelf:unit005", "type":"Shelf",
      "location":{
        "type":"geo:json","value":{"type":"Point","coordinates":[13.390309, 52.50751]}
      },
      "name":{
        "type":"Text", "value":"Long Wall Unit"
      },
      "maxCapacity":{
        "type":"Integer", "value":200
      }
    }
  ]
}'
Similarly, we can create a series of Product entities by using the type=Product.
curl -iX POST \
  'http://localhost:1026/v2/op/update' \
  -H 'Content-Type: application/json' \
  -d '{
  "actionType":"APPEND",
  "entities":[
    {
      "id":"urn:ngsi-ld:Product:001", "type":"Product",
      "name":{
        "type":"Text", "value":"Apples"
      },
      "size":{
        "type":"Text", "value": "S"
      },
      "price":{
        "type":"Integer", "value": 99
      }
    },
    {
      "id":"urn:ngsi-ld:Product:002", "type":"Product",
      "name":{
        "type":"Text", "value":"Bananas"
      },
      "size":{
        "type":"Text", "value": "M"
      },
      "price":{
        "type":"Integer", "value": 1099
      }
    },
    {
      "id":"urn:ngsi-ld:Product:003", "type":"Product",
      "name":{
        "type":"Text", "value":"Coconuts"
      },
      "size":{
        "type":"Text", "value": "M"
      },
      "price":{
        "type":"Integer", "value": 1499
      }
    },
    {
      "id":"urn:ngsi-ld:Product:004", "type":"Product",
      "name":{
        "type":"Text", "value":"Melons"
      },
      "size":{
        "type":"Text", "value": "XL"
      },
      "price":{
        "type":"Integer", "value": 5000
      }
    }
  ]
}'
In both cases we have encoded each entity id according to the NGSI-LD
specification - the proposal
is that each id is a URN follows a standard format: urn:ngsi-ld:<entity-type>:<entity-id>. This will mean that every
id in the system will be unique.
Shelf information can be requested by making a GET request on the /v2/entities endpoint. For example to return the
context data of the Shelf entity with the id=urn:ngsi-ld:Shelf:unit001.
curl -X GET \
'http://localhost:1026/v2/entities/urn:ngsi-ld:Shelf:unit001/?type=Shelf&options=keyValues'{
"id": "urn:ngsi-ld:Shelf:unit001",
"type": "Shelf",
"location": {
"type": "Point",
"coordinates": [13.3986112, 52.554699]
},
"maxCapacity": 50,
"name": "Corner Unit"
}As you can see there are currently three additional property attributes present location, maxCapacity and name
In databases, foreign keys are often used to designate a one-to-many relationship - for example every shelf is found in
a single store and a single store can hold many shelving units. In order to remember this information we need to add an
association relationship similar to a foreign key. Batch processing can again be used to amend the existing the
Shelf entities to add a refStore attribute holding the relationship to each store. According to the Smart Data
Modelling Guidelines on linked data, when an entity attribute is used as a link to other
entities it should be named with the prefix ref plus the name of the target (linked) entity type.
The value of the refStore attribute corresponds to a URN associated to a Store entity itself.
The URN follows a standard format: urn:ngsi-ld:<entity-type>:<entity-id>
The following request associates three shelves to urn:ngsi-ld:Store:001 and two shelves to urn:ngsi-ld:Store:002
curl -iX POST \
  'http://localhost:1026/v2/op/update' \
  -H 'Content-Type: application/json' \
  -d '{
  "actionType":"APPEND",
  "entities":[
    {
      "id":"urn:ngsi-ld:Shelf:unit001", "type":"Shelf",
      "refStore": {
        "type": "Relationship",
        "value": "urn:ngsi-ld:Store:001"
      }
    },
    {
      "id":"urn:ngsi-ld:Shelf:unit002", "type":"Shelf",
      "refStore": {
        "type": "Relationship",
        "value": "urn:ngsi-ld:Store:001"
      }
    },
    {
      "id":"urn:ngsi-ld:Shelf:unit003", "type":"Shelf",
      "refStore": {
        "type": "Relationship",
        "value": "urn:ngsi-ld:Store:001"
      }
    },
    {
      "id":"urn:ngsi-ld:Shelf:unit004", "type":"Shelf",
      "refStore": {
        "type": "Relationship",
        "value": "urn:ngsi-ld:Store:002"
      }
    },
    {
      "id":"urn:ngsi-ld:Shelf:unit005", "type":"Shelf",
      "refStore": {
        "type": "Relationship",
        "value": "urn:ngsi-ld:Store:002"
      }
    }
  ]
}'
Now when the shelf information is requested again, the response has changed and includes a new property refStore,
which has been added in the previous step.
curl -X GET \
'http://localhost:1026/v2/entities/urn:ngsi-ld:Shelf:unit001/?type=Shelf&options=keyValues'The updated response including the refStore attribute is shown below:
{
    "id": "urn:ngsi-ld:Shelf:unit001",
    "type": "Shelf",
    "location": {
        "type": "Point",
        "coordinates": [13.3986112, 52.554699]
    },
    "maxCapacity": 50,
    "name": "Corner Unit",
    "refStore": "urn:ngsi-ld:Store:001"
}We can also make a request to retrieve the refStore attribute relationship information from a known Shelf entity
by using the options=values setting
curl -X GET \
'http://localhost:1026/v2/entities/urn:ngsi-ld:Shelf:unit001/?type=Shelf&options=values&attrs=refStore'["urn:ngsi-ld:Store:001"]This can be interpreted as "I am related to the Store entity with the id=urn:ngsi-ld:Store:001"
Reading from a parent to a child can be done using the options=count setting
curl -X GET \
  'http://localhost:1026/v2/entities/?q=refStore==urn:ngsi-ld:Store:001&options=count&attrs=type&type=Shelf'
This request is asking for the id of all Shelf entities associated to the URN urn:ngsi-ld:Store:001, the
response is a JSON array as shown.
[
    {
        "id": "urn:ngsi-ld:Shelf:unit001",
        "type": "Shelf"
    },
    {
        "id": "urn:ngsi-ld:Shelf:unit002",
        "type": "Shelf"
    },
    {
        "id": "urn:ngsi-ld:Shelf:unit003",
        "type": "Shelf"
    }
]
In plain English, this can be interpreted as "There are three shelves in urn:ngsi-ld:Store:001". The request can be
altered use the options=values and attrs parameters to return specific properties of the relevant associated
entities. For example the request:
curl -X GET \
  'http://localhost:1026/v2/entities/?q=refStore==urn:ngsi-ld:Store:001&type=Shelf&options=values&attrs=name'
Can be interpreted as request for Give me the names of all shelves in urn:ngsi-ld:Store:001.
[["Corner Unit"], ["Wall Unit 1"], ["Wall Unit 2"]]Bridge Tables are often used to relate many-to-many relationships. For example, every store will sell a different range of products, and each product is sold in many different stores.
In order to hold the context information to "place a product onto a shelf in a given store" we will need to create a new
data entity InventoryItem which exists to associate data from other entities. It has a foreign key relationship to
the Store, Shelf and Product entities and therefore requires relationship attributes called refStore,
refShelf and refProduct.
Assigning a product to a shelf is simply done by creating an entity holding the relationship information and any other
additional properties (such as stockCount and shelfCount)
curl -iX POST \
  'http://localhost:1026/v2/entities' \
  -H 'Content-Type: application/json' \
  -d '{
    "id": "urn:ngsi-ld:InventoryItem:001", "type": "InventoryItem",
    "refStore": {
        "type": "Relationship",
        "value": "urn:ngsi-ld:Store:001"
    },
    "refShelf": {
        "type": "Relationship",
        "value": "urn:ngsi-ld:Shelf:unit001"
    },
    "refProduct": {
        "type": "Relationship",
        "value": "urn:ngsi-ld:Product:001"
    },
    "stockCount":{
        "type":"Integer", "value": 10000
    },
    "shelfCount":{
        "type":"Integer", "value": 50
    }
}'When reading from a bridge table entity, the type of the entity must be known.
After creating at least one InventoryItem entity we can query Which products are sold in urn:ngsi-ld:Store:001?
by making the following request
curl -X GET \
'http://localhost:1026/v2/entities/?q=refStore==urn:ngsi-ld:Store:001&options=values&attrs=refProduct&type=InventoryItem'[["urn:ngsi-ld:Product:prod001"]]Similarly we can request Which stores are selling urn:ngsi-ld:Product:001? by altering the request as shown:
curl -X GET \
'http://localhost:1026/v2/entities/?q=refProduct==urn:ngsi-ld:Product:001&options=values&attrs=refStore&type=InventoryItem'[["urn:ngsi-ld:Store:001"]]Context data relationships should only be set up and maintained between entities that exist - in other words the URN
urn:ngsi-ld:<entity-type>:<entity-id> should link to another existing entity within the context. Therefore we must
take care when deleting an entity that no dangling references remain. Imagine urn:ngsi-ld:Store:001 is deleted - what
should happen to the associated the Shelf entities?
It is possible to make a request to see if any remaining entity relationship exists prior to deletion by making a request as follows
curl -X GET \
'http://localhost:1026/v2/entities/?q=refStore==urn:ngsi-ld:Store:001&options=count&attrs=type'The response lists a series of Shelf and InventoryItem entities - there are no Product entities since there is no direct relationship between product and store.
[
    {
        "id": "urn:ngsi-ld:Shelf:unit001",
        "type": "Shelf"
    },
    {
        "id": "urn:ngsi-ld:Shelf:unit002",
        "type": "Shelf"
    },
    {
        "id": "urn:ngsi-ld:Shelf:unit003",
        "type": "Shelf"
    },
    {
        "id": "urn:ngsi-ld:InventoryItem:001",
        "type": "InventoryItem"
    }
]
If this request returns an empty array, the entity has no associates.
Want to learn how to add more complexity to your application by adding advanced features? You can find out by reading the other tutorials in this series
MIT © 2018-2024 FIWARE Foundation e.V.