HIDNinja is Linux based wireless HID keystroke injector with a remote payload interface. This project was inspired by projects such as COTTONMOUTH-I, Bash Bunny, and Rubber Ducky.
USB is a flexible protocol that provides a lot of functions and HID functionality which is trust by default on most host systems. This makes it not only versatile but also an attractive point of attack. Among the wide range of USB based attacks, even simple methods like keystroke injections represent a significant security risk.
This project is based on a Linux SBC which will be mimicking an HID device and is capable of receiving payloads over an onboard WNIC. It would be also possible to adjust this project for a more compact hardware setup and alternative communication methods could be used to interface with.
We can summarize the core functionality of the software side as follows:
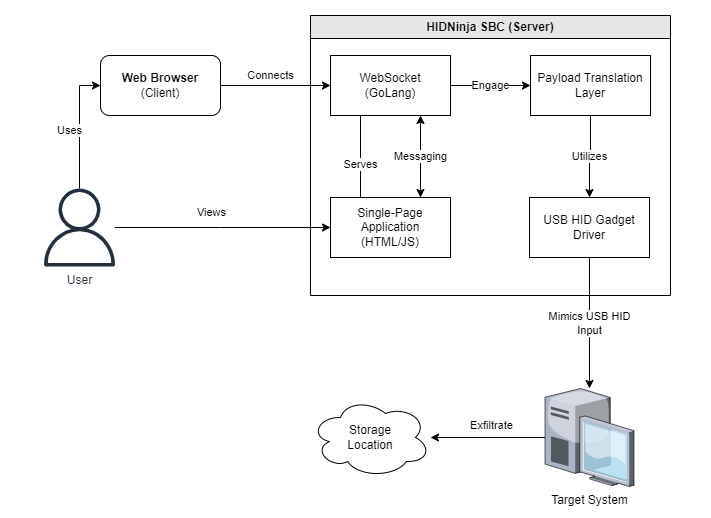
- The SBC runs a Web Socket Server which sets up routes with a http.HandleFunc() so that we can provide a connection to either the web socket endpoint for payload processing or the web/payload interface. Therefore, the server listens for an incoming client connection and routes it accordingly.
- If a client connection is detected and the web interface route triggered, the HTML file for the payload web interface is served in return over HTTP.
- The web interface accepts user input in the form of text-based payloads, which can then be sent back to the web socket servers secondary endpoint route. We implemented a reader function which listens for incoming payloads. Once a payload string is received a status message will be returned to the client and the payload execution process triggered if no errors were reported.
- Once the payload execution chain is triggered on the server side, the received payload-string is dissected into individual characters and sent to a translation layer. Beware that this process is currently not case-sensitive and will need to be modified in the future to account for modifier keys and other special instructions.
- The translation layer will run the individual characters through a scan code map where Strings are mapped against specific byte values. The reason why we use string values and not char values here is because we plan to communicate modifiers as multi character strings. This implementation method might be subject to change in future releases. Once the byte value has been correctly identified it will be returned to the payload execution function.
- With the freshly acquired information we can now assemble a keypress with the scan code byte value. A keypress consists of a byte sequence containing 8 bytes, and each keypress can contain up to six scan codes (USB Implementer’s Forum 2001, 30). It is important to remember to also release the keypress again. This can be simply done by sending an zero value byte array, such as []byte{0x00, 0x00, 0x00, 0x00, 0x00, 0x00, 0x00, 0x00}.
- Once the “keypress” is assembled, we pass it to a function that will append the freshly constructed byte sequence to our USB gadget file /dev/hidg0. Once it is appended to the file it will be sent directly as a keystroke to the target host. The relative simplicity of this design allows us to achieve a somewhat compact and efficient implementation with a conservative amount of code. In the future with added features and functionalities the quantity of code will certainly increase but we aim to avoid code bloat as much as possible.
The current implementation is very barebones, therefore, I have an extensive list of missing features:
- Payload repository and payload management (CRUD)
- Communication support with the SBC for Bluetooth
- Communication support with the SBC for radiofrequency (RF)
- Dynamic USB peripheral emulation (on the fly change of device types) for the purpose of local exfiltration
- Data receival of encoded exfiltration transfers from to Host to SBC through the USB control transfer pipeline to evade detection.
- Dynamic keystroke timing which mimics human input patterns as closely as possible to evade detection algorithms.
- Customizable delays as part of the payload
- Support for modifier keys
- Make the scan code translation case sensitive.
- Support for the handling and managing of multiple SBCs (swarm) from one user interface, and deployment of payloads to multiple targets at the same time.
- Implement relay/mesh networking over multiple SBCs to extend communication range.
Before we can plug our SBC into another machine and have it masquerade as a keyboard (or any other USB peripheral) and start sending over keystroke injection payloads, we are required to do some configuration work on our SBC. For this purpose, I prepared a corresponding script on the repo which runs the correct configurations and creates a service that upkeeps the necessary configuration state.
The setup script will execute the following changes on our SBC to turn it into a “keyboard”:
- Check if dwc2 exists in the boot configuration, if not we append it to the file. This will enable the device tree overlay for the dwc2 module which is required to run the USB gadget mode.
- Check if dwc2 exists in etc/modules if not we append it to the modules file. This adds the dwc2 module to the kernel module list that is loaded on boot.
- Setting the path for a secondary script which activates the “HID gadget mode” on the SBC and setting the execution permissions for the script (with chmod +x). This subscript contains the following actions:
- Loading the libcomposite kernel module, which is essential for the setup of USB gadgets.
- Create a new directory that represents our USB gadget which we aim to emulate. You may also create multiple different gadgets depending on your requirements and use case.
- Inside our new directory we set the attributes of our USB gadget. Feel free to adjust these attributes to your liking. Our predefined attributes are:
- Vendor ID: We went with 0x1d6b which is the ID associated with the Linux Foundation
- Product ID: We use 0x0104 which corresponds to a Multifunctional Composite Gadget.
- Device Version: Set to v.1.0.0
- USB Version: Set to USB 2.0
- Device Class: Set to 0x02 which translates to “Common Class”
- Device Protocol: Set to 0x01 which stands for Interface Association Descriptor (IAD)
- Next up we define the properties of the gadget configuration.
- Setting the STRINGS_DIR to “strings/0x409” and creating said directory. The code 0x409 stands for US English, which we will be using for our purposes.
- We set the serial number of our device. We just used here the hex value of “Hello World!” which equates to fedcba9876543210.
- The manufacturer value we set to Unit37 which is the name of our personal website.
- For the product name we used HIDNinja Keyboard, based on the codename of our project.
- Additionally, we are required to add a so-called function for the USB gadget:
- We create a new folder for said function and define its path in a variable.
- The protocol value is set to 1 which stands for a keyboard.
- Subclass is set to 0 which equates to “no subclass”.
- The report length is configured as 8 bytes and we set the report descriptor for the function. The report descriptor contains a hard coded array of bytes which are responsible for describing the generated data packets.
- Furthermore, we need to set up the USB configuration by defining and creating the directory path for the configuration. When setting the maximum power consumption in mA we chose 250. Other configuration properties include the directory path for English configuration strings, a configuration string directory, and the setting of the configuration string.
- Now, we can link the HID function inside the configuration to the symbolic link named hid.usb0 within the config and enable the USB gadget through the writing of the gadget name into the USB Device Controller (UDC) file “sys/class/udc”. We are also required to ensure the correct access permissions for “/dev/hidg0” (777), otherwise access to the HID gadget will be denied.
- Reload the systemd manager configuration to apply changes.
- Enable the “usb-gadget” service on boot.
- This systemd service unit file sets up the "hidninja.service" to run the "HIDNinja" USB Gadget during system startup after the syslog service is ready. It runs with root privileges and is enabled to start when the local file systems are mounted.
- And as a last step we reboot the system.