Cpp Custom Visualizer Sample
The Visual Studio C/C++ Expression Evaluator allows customization of the display of variables in the debugger based on the type of that variable (example: change the way CExampleClass variables are displayed) using .natvis files. Natvis files add rules to format a type either declaratively or by running custom code in the debugger. This custom code is called a Custom Visualizer. Most of the time it is easier and much less error prone to use the declarative approach. But Custom Visualizers are useful when formatting a type is too complicated to be done declaratively.
Natvis documentation can be found on docs.microsoft.com.
This repo contains two sample C/C++ Custom Visualizers.
Sample Visualizer 1: The sample
changes how FILETIME variables are formatted so that instead
of showing up as a pair of unsigned 32-bit values they instead show up as a date and time. This is a very basic example, and so is a good place to start. It works by reading the structure directly from the target process using DkmProcess.ReadMemory and formatting it.
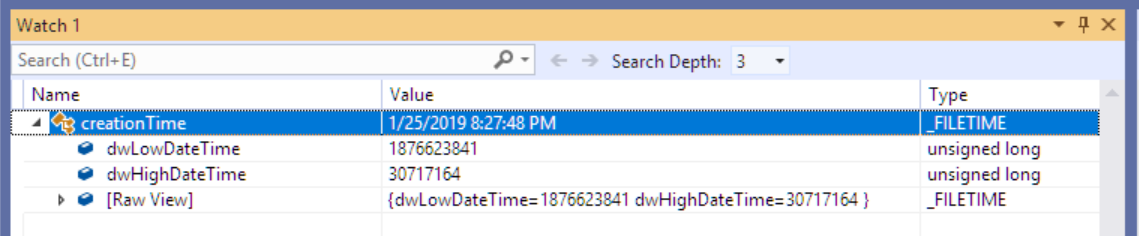
Screenshot:
Sample Visualizer 2: This sample visualizers a custom type (Sample) that contains two std::vector<int> and therefore the type layout isn't trivial or permanent. It demonstrates how to utilize the C++ EE to help format the type, and how to add child nodes through a custom visualizer.
To run the sample in Visual Studio, open CppCustomVisualizer.sln from the CppCustomVisualizer or CppCustomVisualizer2 directory. Then do the following:
- Ensure you have the Visual Studio Extension Development workload installed.
- In Solution Explorer, right click on the 'vsix' project and use 'Set As StartUp Project'.
- Using the solution/platform configurations drop down menu from the toolbar, make sure that the solution configuration is 'Debug' and the platform is 'x64'.
- If you using Visual Studio 2019 or newer and you want to debug the extension, setup the Child Process Power Tool. See instructions for details.
- Hit F5 to launch an experimental instance of Visual Studio under the debugger. NOTE: This project pulls in some NuGet packages so Visual Studio will need to be able to download packages during build. If downloading packages fails, make sure 'Allow NuGet to download missing packages during build.' from Tools -> Options -> NuGet Package Manager, is checked.
- In the Experimental Instance:
- The experimental instance should load the 'TargetApp' project
- Hit F5 to build and run 'TargetApp' under the debugger
- The debugger should stop at the
__debugbreak();line - Evaluate
creationTimein the watch window. If everything worked correctly, you should seecreationTimevisualized as a date time rather than two raw 32-bit unsigned integers.
If hitting F5 on the vsix project doesn't cause an experimental instance of VS to start, see troubleshooting instructions below.
The CppCustomVisualizer directory contains three subdirectories with source code -- dll, vsix and TargetApp. Let's look at 'dll' first since this has the most important files.
The 'dll' directory contains the Concord extension
| File | Description |
|---|---|
| _EntryPoint.cpp/.h | The one and only public (exported) class in the sample. In Concord, classes implement interfaces, and Concord calls into these classes through the implemented interfaces. Custom visualizers implement the IDkmCustomVisualizer interface. So _EntryPoint.cpp contains the implementation of this interface. |
| CppCustomVisualizer.natvis | The C++ Expression Evaluator (EE) uses .natvis files to control how types are formatted. For types formatted with a Custom Visualizer, the only important thing is declare the 'VisualizerId' to indicate which visualizer to use. |
| CppCustomVisualizer.vsdconfigxml | CppCustomVisualizer.vsdconfigxml is an XML file which describes the sample component – what classes does it have, which interfaces does each class implement, when should these interfaces be called. The sample’s build process runs a custom tool over this file (vsdconfigtool.exe) which validates this file and turns it into a binary file (CppCustomVisualizer.vsdconfig) which is deployed alongside CppCustomVisualizer.dll. For a custom visualizer, the important thing is to indicate that IDkmCustomVisualizer is implemented with a particular VisualizerId. |
| RootVisualizer.cpp/.h (CppCustomVisualizer2 only) | The root node of the formatted value. It visualizes its own value and type, and constructs its child nodes. |
| ChildVisualizer.cpp/.h (CppCustomVisualizer2 only) | A child of the root node. Similar to CRootVisualizer, it visualizes its own value and type, and constructs its child nodes. The key difference is that, it builds its child node using the default visualization in EE, instead of another custom visualizer class. |
| packages.config, packages.version.props | This project obtains Concord headers, libs and build tools from nuget.org. These two files indicate the version to obtain. |
The 'vsix' directory contains a project file used to package the sample into a .vsix file so that it can be installed into Visual Studio. The Installing Extensions page has more information about how Visual Studio extensions are installed.
| File | Description |
|---|---|
| source.extension.vsixmanifest | Declares metadata about the extension, such as its name, company, and version. |
| VSIXSourceItems.props | This declares the set of files to be included in the .vsix file for this extension. This could also be done as a project-to-project reference, but because older versions required including multiple architectures, this was packaged this way. In the future, this may be important again, so this structure is maintained, but it is no longer required. |
The 'TargetApp' directory contains just an example project that uses the types being visualized.
When you 'F5' from your primary Visual Studio instance on the vsix project, it should start up a second 'experimental' instance of Visual Studio, and this experimental instance should load the 'TargetApp' project. If this isn't happening for you, a few troubleshooting steps:
- Make sure that your startup project is the vsix project, and the solution/platform is Debug/x64.
- Right click on the vsix project in solution explorer and bring up project properties. Then switch to the 'Debugging' tab, and make sure that the settings are correct:
- 'Debugger to launch' is
Local Windows Debugger - 'Command' is
$(DevEnvDir)devenv.exe - 'Command Arguments' is
/rootsuffix Exp $(SolutionDir)\TargetApp\TargetApp.sln - 'Working Directory' is
$(ProjectDir)
- 'Debugger to launch' is
If your debugging project settings are different then somehow the project system must have decided to ignore the defaults set in 'vsix.vcxproj'. You could try to force the project system to go back to the defaults by closing your solution, deleting ConcordExtensibilitySamples\CppCustomVisualizer\vsix\vsix.vcxproj.user and then reopening the solution. You could also just correct these settings by hand by pasting in these values into project properties.