Starting a new project
- Note: This tutorial assumes you've successfully installed some prerequisite software. If you haven't, please check out the Installing Page.
- Another note: This tutorial assumes you have some html, javascript, clojure, and clojurescript knowledge. If you don't, or maybe just feel you're a little rusty, I recommend Eloquent Javascript, Brave Clojure, and The Second Edition of Modern Clojurescript. They're all free, but really well done.
- Yet Another note: While you only need basic Blender knowledge to complete this tutorial, I recommend learning more about Blender to make more complex scenes. I suggest Blender Cookie, Blender Guru and Blender Sushi. Blend4Web's tutorials are very transferable too.
- Final Note: I've used the bash (Born Again SHell) shell extensively. This is usual language that you type into a Terminal emulator such as Terminal.app or iTerm 2. If you haven't tried using bash before, it might help to familiarize yourself first. There's lots of free resources to learn this, Bash Academy's Guide will more than prepare you. Bash is also specific to Linux and OS X. While I suspect you can do similar commands on Windows with its Powershell tool, I'm unsure, as I don't have access to a Windows machine. If you know how to get this, please fork me/open an issue.
Like most Boot-based clojure projects, you'll have a directory with a build.boot file in its root. So on a *nix system, dial this into your terminal emulator of choice:
mkdir new-project
cd new-project
touch build.boot
Next, let's add a directory for our clojurescript source code. The code that will eventually control the WebGL scene.
So assuming you're still in ../new-project
mkdir -p src/new_project- Note the subdir name has swapped the hyphen for an underscore. This is important as Java has some difficulty with hyphens in its classpath.
While we're looking at this directory, let's add a .cljs file into the src/new_project with the ever-so-creepy touch command:
touch src/new_project/core.cljsNow let's open core.cljs in your text editor of choice, and enter this code:
(ns new-project.core
  (:require blend4web))

(def m-version (.require js/b4w "version"))

(.log js/console "Using Blend4Web Version" (.version m-version))- Note again how we're using dashes in the namespace. This is because Java is goofy and likes to overcomplicate our lives. Just remember, dashes in code, underscores in the directory names that contain that code.
The above code will return the blend4web version in your browser's javascript console. Save that file, close it down.
Let's add another directory for our resources (.blend, .json, .bin, .html, [css optionally]). So assuming we're still in our top directory..
mkdir resourcesLet's make an index.html which will point to our compiled JS code:
touch resources/index.htmlLet's open up index.html in our text editor, and add this:
<!DOCTYPE html>
<html>
<head>
  <script src="main.js"></script>
</head>
<body onload="new_project.core.start('new_project.json');"</script>
  <canvas id="container" width="500" height="500"></canvas>
</body>
</html>
Save that, close it down.
At this point, we have our basic project structure. Here's what the new-project directory should look like:
.
├── build.boot
├── resources
│   └── index.html
└── src
    └── new_project
└── core.cljsAssuming you...
- Have Blender
- Know how to install blender-addons and therefore downloaded and installed the blend4web add-on.
- Have ensured add-on has been enabled.
- Somewhat comfortable with Blender and its interface.
..then you're ready for basic scene exporting! Let's make a basic-cube scene. Fire up Blender with the default cube in the middle. You should see something like this:

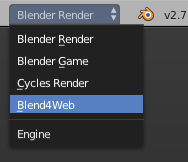
To start, let's switch our rendering mode to Blend4Web. Go to the top of Blender's file menu-bar, and where it says Blender Render, click on it and change it to Blend4Web:
Next, let's save this .blend in our project resources directory. In Blender, goto File >> Save As.. and navigate to our project's resources directory:

Let's save the file as new_project.blend.
Now we want to save the .json (and its accompanying .bin file) into that same resources directory. So head to the top menu-bar, hit File>> Export >> Blend4Web (.json).

For consistency's sake, let's keep the name of the .json file the same as the .blend:

- Note: you'll notice a .bin file after you save the json. Don't worry, this is normal, and is required by blend4web's engine.
At this point, we have the basic setup for a blend4web scene to be controlled by clojurescript. For now, we'll close Blender and configure build.boot.
Open up our build.boot. First we need to set Boot's basic environment variables, and declare dependencies.
(set-env!
  :source-paths #{"src"}
  :resource-paths #{"resources"}
  :dependencies '[[adzerk/boot-cljs "1.7.228-1"]
                  [cljsjs/blend4web "16.09-1"]
                  [tailrecursion/boot-jetty "0.1.0"]])
To note: :source-paths key is where you enter the name of your clojurescript source code directory. :resource-paths key is where we plug in our resources directory.
Also note that we'll use a basic web-server (Jetty) as blend4web is meant to be used on a webserver, even if you're just working on a local machine. This is because blend4web loads external files when it gets invoked, and because of most browsers' security policies, will not allow those resources to be loaded unless its being loaded via the HTTP protocol.
Before we make our main build task, let's load some of boot's (and its jetty iteration) in our namespace:
(require '[adzerk.boot-cljs :refer [cljs]]
         '[tailrecursion.boot-jetty :refer [serve]])
cljs will give us the ability to compile to javascript, and serve will give us an easy way of serving our files via HTTP.
Next, we need to ensure that our output html gets uranium.js, and uranium.js.mem in its same directory. Add this task to ensure this happens:
(deftask uranium
  "Ensure uranium.js and uranium.js.mem are in target directory.  This is not
  needed to build the package, rather its for any projects using the package."
  []
  ;;uranium.js and uranium.js.mem need to both be in the same subdir as b4w's target html.
  (sift :add-jar {'cljsjs/blend4web #"^*/uranium.js*"}
        :move {#"^*cljsjs/blend4web/common/uranium.js"
               "uranium.js"}
:to-resource #{#"uranium.js*"}))- Optionally, you could just move the files into your designated asset directory too. I'm unsure which approach is less awkward.
Finally, let's define a task that will compile our code whenever we save our source files. This should also invoke our uranium function, so make sure you invoke that function in our build task, e.g. save-n-build.
(deftask save-n-build
  []
  (comp
    (watch)
    (cljs :optimizations :none)
    (uranium)
    (target)
(serve :port 8000)))- Important: you might notice cljs's optimizations are set to
none. This is unfortunately the only optimization that works at the moment. Here's more information about the issue.
Let's re-open our core.cljs file we made in section 1. Let's add a function called start:
(defn ^:export start
  [json]
  (let [m-main      (.require js/b4w "main")
        m-data      (.require js/b4w "data")
        canvas      (.getElementById js/document "container")]

  (.load m-data (str json))
  (.init m-main canvas)))
This is a minimal scene setup. To note:
-
m-mainloads the blend4web engine and plugs it into our html's canvas node (in our case,canvas) -
m-dataloads our Blender-exported .json file.
While the above code is all that is needed to start, its good practice to have b4w's config module running as well. b4w's config module can give us lots of useful information about the engine's state.
Require in the "config" module (here it's m-config), and set it's console_verbose property to true, it will print various stats about the blend4web engine as its running, and can be useful for any potential errors. Let's add that now:
(defn ^:export start
  [json]
  (let [m-main      (.require js/b4w "main")
        m-data      (.require js/b4w "data")
        canvas      (.getElementById js/document "container")
        m-config    (.require js/b4w "config")]

  (.set m-config "console_verbose" true)
  (.load m-data (str json))
(.init m-main canvas)))- Note the .set method is actually specific to m-config as well. Kudos to the blend4web team for making it nicer to change object properties.
We're ready to fire up our scene. The entire core.cljs file should look like:
(ns new-project.core
  (:require blend4web))

(def m-version (.require js/b4w "version"))

(.log js/console "Using Blend4Web Version" (.version m-version))

(defn ^:export start
  [json]
  (let [m-main      (.require js/b4w "main")
        m-data      (.require js/b4w "data")
        canvas      (.getElementById js/document "container")
        m-config    (.require js/b4w "config")]

  (.set m-config "console_verbose" true)
  (.load m-data (str json))
  (.init m-main canvas)))
This is what our final build.boot should be:
(set-env!
  :source-paths #{"src"}
  :resource-paths #{"resources"}
  :dependencies '[[adzerk/boot-cljs "1.7.228-1"]
                  [cljsjs/blend4web "16.09-1"]
                  [tailrecursion/boot-jetty "0.1.0"]])

(require '[adzerk.boot-cljs :refer [cljs]]
         '[tailrecursion.boot-jetty :refer [serve]])

(deftask uranium
  "Ensure uranium.js and uranium.js.mem are in target directory."
  []
  ;;uranium.js and uranium.js.mem need to both be in the same subdir as b4w's target html.
  (sift :add-jar {'cljsjs/blend4web #"^*/uranium.js*"}
        :move {#"^*cljsjs/blend4web/common/uranium.js"
               "uranium.js"}
        :to-resource #{#"uranium.js*"}))

(deftask save-n-build
  []
  (comp
    (watch)
    (cljs :optimizations :none)
    (uranium)
    (target)
    (serve :port 8000)))
And our entire project directory should look like:
.
├── build.boot
├── resources
│   ├── index.html
│   ├── new_project.bin
│   ├── new_project.blend
│   └── new_project.json
└── src
    └── new_project
        └── core.cljs
...And our index.html should look like:
<!DOCTYPE html>
<html>
<head>
  <script src="main.js"></script>
</head>
<body onload="new_project.core.start('new_project.json');"</script>
  <canvas id="container" width="500" height="500"></canvas>
</body>
</html>
If those all look the same -- great! We're finally ready to fire up our clojurescript-controlled scene. Open up your terminal emulator, and get into our project root. You should be in the same directory as our build.boot file. Enter:
boot save-n-buildGive it a moment to compile everything. Notice boot creates a target directory, which will output all our final files.
Once boot describes the elapsed compile time, it means its finished compiling (until you save something in resources/ or src/).
Fire up Chrome/FF, and hit localhost:8000 in the address bar. Open up your developer console. You should see something like this:

If so, congrats! If not, please re-trace your steps, or examine the console. If you think this tutorial has an error, please open an issue/fork me with the correction.