Creating Skins
Skins can change the look and feel of Mixxx. Some skins merely make the program more aesthetically pleasing while others rearrange elements of the interface to fit different use-cases.
A skin for Mixxx is basically a folder with various images, a text file named skin.xml, other XML template files and a style.qss file. The skin.xml and template files define all the elements (widgets) of the skin, what the images are used for and where they are placed on screen.
To create a new skin, navigate to your local Mixxx resource folder, duplicate the directory of the skin you want to base your work on and rename it. Use the content of the new folder as starting point for your first skin. Read this page, understand how things were done in the skin you copied and try to work from there. Familiarity with HTML will have you feel at home editing the skin.xml.
You can download the most recent source files for skins from Github, our code hosting platform.
It is helpful to run Mixxx in Developer Mode when working on a skin. Use
the --developer command line option to start Mixxx in Developer Mode.
A new Developer menu will appear with a Reload Skin item so you do not
have to restart Mixxx to test every change. Also, Developer Mode fills
tooltips with a lot of helpful debugging information. If you do not see
tooltips when you hover your mouse over parts of the skin, go to Options
> Preferences > Interface and select "Skin and Library" for the
Tooltip option.
Keep in mind the Skin Guidelines.
Images are in the .png format and Mixxx does support png transparency.
Element colors are defined in hexadecimal values.
Element positions are defined with X,Y coordinates (from upper left
). Element sizes are defined with W,H values (width,heigh). All
values are given in pixels.
General structure of the skin.xml. See Skin.xml in-depth review for more in-depth informations on elements and their attributes defined in the skin.xml.
<!--Comment--><!-- Optional comments (i.e. skin changelog) -->
<!DOCTYPE skin><!-- Doctype declaration -->
<skin><!-- Skin opening tag -->
  <manifest>...</manifest><!-- Manifest describing skin properties (author, title, version, etc.) -->
  <elementname><!-- Elements opening tag -->
    <TooltipId>...</TooltipId><!-- Tooltips to display on mouse-over, available IDs are in src/skin/tooltips.cpp -->
    <Pos>X,Y</Pos><!-- Position on the screen, relative to parent widget -->
    <Size>W,H</Size><!-- Size (depending on the element) -->
    <MinimumSize>W,H</MinimumSize><!-- Minimum Size -->
    <MaximumSize>W,H</MaximumSize><!-- Maximum Size -->
    <SizePolicy>WPolicy,HPolicy</SizePolicy><!-- Size Policy -->
    <options>values(depends)</options><!-- Options(depending on the element) -->
  </elementname><!-- Elements closing tag -->
</skin><!-- Skin closing tag -->Lets have a look at this simplified example of the Mixxx user interface
(deprecated Outline skin template).
The various elements of the skin are marked and explained below.

- Manifest - specifies information about the skin (title, artist, description, version) and allows you to set Mixxx controls when the skin is loaded (e.g. enable 4-deck mode).
- Skin Colour Scheme - allows the creation of different colour schemes of a skin
- Library display - Widget holds all your music information, playlists, search bar etc.
- Waveform - shows the loaded tracks waveforms near the playback position
- Waveform overview - shows a waveform visualization of the whole song
- Volume level display - shows the playback volume of the song / master
- Peak indicator - shows if a songs / master volume is too high
- Label (not shown) - displays a text label
- Clock (not shown) - displays the current time
- Track information - shows some ID3 information of the song ( Name, Artist )
- BPM Information - shows the tempo of the song
- Playing position / Time remaining - shows current playback position or remaining time (click to switch)
- Pitch rate information - shows how much the song is speed up / slowed down (in percent)
- Channel Volume - controls the volume of the selected channel
- Crossfader - fade between the channels
- Pitch control - changes the tempo of a song
- [InternalClock], bpm - tempo of the internal master sync clock (also viewable as plain text)
- Play - plays / pauses a song
- Cue - places a Cue-point at the current position
- Hotcue - places a Hotcue-point at the current playback position
- Looping - places start- and endpoint of a loop , enables the loops playback
- Reverse play - toggles reverse playback during regular playback
- Fast forward/rewind - seeks trough a song fast in both directions
- Sync Enabled - Tap to match bpm of playing tracks, or hold to enable sync mode.
- Master - Push to designate an explicit deck master for sync mode.
- Pitch adjustment - apply fine adjustment to the tempo of a song
- BPM tap - sets the bpm to the average value of the last 4 taps
- Key lock - activate pitch-independent time stretch
- Pitch bend - apply a temporary pitch-bend to the tempo of a song
- Pre-listen - sends the channel's audio to the Headphones
- Repeat - repeats track if you go past the end or before the start
- Frequency Kill - cuts the high, mid and low frequencies
- Master Volume - controls the volume and of the master output
- Balance - controls the balance (stereo distribution) of the master output
- Headphone volume - controls the volume of the headphone output
- Headphone mix - controls what you hear on the headphone output
- Gain - apply extra amplification to a song
- Channel filter - perform equalization on the high, mid and low frequencies
7.Special nodes (not displayed)
- TrackProperty - pull advanced informations from tracks and display them
- WidgetGroup - make a group of relatively positioned widgets
- Splitter - allows proportional splits between WidgetGroup
- WidgetStack - allows to switch between multiple different widgets to occupy a certain space
So you created a nice button with a drop shadow blur effect in svg format, only to find the button is displayed without the drop shadow in Mixxx? Qt supports the static features of SVG 1.2 Tiny. ECMA scripts and DOM manipulation are currently not supported, see http://doc.qt.io/qt-5/svgrendering.html
Additional skins for Mixxx can be downloaded in the skin section of the Mixxx forum.
In this example we are going to install the file "NewSkin.zip"
-
Close Mixxx.
-
Create a folder
skinsin the folder where the Mixxx config file is located:
Linux:~/.mixxx/ **Windows** (Vista and up):%LOCALAPPDATA%\Mixxx`
Windows (XP and below):%USERPROFILE%\Local Settings\Application Data\Mixxx\
macOS (Mixxx 2.2.x and earlier):~/Library/Application Support/Mixxx
macOS (Mixxx 2.3.x):~/Library/Containers/org.mixxx.mixxx/Data/Library/Application Support/Mixxx -
Download & unzip
NewSkin.zipand copy the whole unzipped folderNewSkinto the newskinsfolder -
Start Mixxx
-
Open
Options>Preferences>Interface, in theSkindrop-down menu selectNewSkin -
Save preferences with Apply.
-
Done, the new skin should now be displayed.
If you want to tweak an existing skin the procedure is the same, except that you pick (and rename) an existing skin folder from the Mixxx resource directory:
Linux: /usr/share/mixxx/skins/
Windows: C:\Program Files\Mixxx\skins
macOS: /Applications/Mixxx.app/Contents/Resources/skins
TODO Verify paths for Mixxx 2.3
The principles on licensing found on the Creative Common Wiki apply for other licenses too.
If you are going to make a skin from scratch , think about which license
to choose for your work. Make sure you have the rights to apply the
license.
Popular choices are GPL and
Creative Common license.
**The skins license must be compatible with the
DebianFreeSoftwareGuidelines or
they can not be distributed with Mixxx. **
If you are going to make a skin based on others work, make sure you
comply with their license terms. If you are not sure, ask the original
author.
Add the license in the manifest at the beginning of skin.xml (see example).
Further reads:
- Which CC license to choose
- Non-commercial licenses vs open licenses
- Frequently Asked Questions about the GNU GPL
- Free Code editors - Cross-platform (Visual Code Studio), (Atom)
- Free Images editors - Online (Phoenix, Pixlr), Windows (Paint.net) macOS (Pixelmator -trial-), Linux (Gimp, Inkscape)
- Free color tools - Online (Color Palette Generator, Colorblender , Paletton, the color scheme designer)
- Free knob tools - Cross-platform (JKnobman)
In this section all elements and the values of their keys are explained
with examples.
Open up the skin.xml in the skin folder you duplicated earlier with your
favorite text editor and get started :-)
New in Mixxx 1.11.0
The skin manifest section tells Mixxx details about the skin. Some of the details are currently unused but may be used in a future version. Additionally we may expand the manifest to include things like minimum-Mixxx-version required or recommended screen resolution.
<manifest><!-- start manifest tag -->
  <title>...</title><!-- Skin title -->
  <author>...</author><!-- Skin author -->
  <version>...</version><!-- Skin version (not the Mixxx version) -->
  <description>...</description><!-- A brief description of the skin -->
  <language>en</language><!-- Skin language (if language-independent, omit or put *) -->
  <license>...</license><!-- Skin copyright license (e.g. Creative Commons Attribution, Share-Alike 3.0 Unported) -->
  <attributes><!-- Begin skin attributes -->
    <!-- Set \"[Master],num_decks\" ConfigKey to 4 when skin is loaded.
      Requires additional code per Deck in the skin.xml -->
    <attribute config_key=\"[Master],num_decks\">4</attribute>
    <attribute config_key=\"[Master],num_samplers\">16</attribute>
    <attribute config_key=\"[Master],num_preview_decks\">1</attribute>
    <!-- Set \"[Samplers],show_samplers\" WidgetGroup to be visible by default.
      Works for existing WidgetGroups with <BindProperty>visible</BindProperty>key -->
    <attribute config_key=\"[Samplers],show_samplers\">1</attribute>
  </attributes><!-- End skin attributes -->
</manifest><!-- end manifest tag -->
The only part of the manifest that is used in 1.11.0 is the <attributes> section. This section allows the skin to specify changes to Mixxx controls that should be executed when the skin is loaded. For example, Mixxx defaults to 2-decks in its mixing engine but when you load a skin that supports 4-decks, the skin can specify that the Control "[Master],num_decks" should be set to 4 (see the above example). This will enable a 3rd and 4th deck in Mixxx's engine for the skin to interact with. This attribute list can change any Mixxx control but will only take effect when the skin is loaded.
To specify how skins look (for example colors and text sizes), skins use a Qt Style Sheet (QSS) file which is similar to a Cascading Style Sheet (CSS) file used to specify how web pages look. The QSS file is linked to the skin XML with a <Style> element that is a child of the root <skin> element:
<skin>
  <manifest>
    <!-- skin manifest goes here -->
  </manifest>

  <Style src="skin:style.qss" src-windows="skin:style-windows.qss"
   src-mac="skin:style-mac.qss" src-linux="skin:style-linux.qss"/>

  <!-- rest of skin goes here -->
</skin>
All the skins included in Mixxx name the QSS file as style.qss in the
root directory of the skin. Any name with the *.qss or *.css file
extension will work. Optionally, you can add up to three additional QSS
files to your skin directory, e.g. to work around platform-dependent
quirks in styling: src-windows="...", src-mac="..." and src-linux="..."
Note: You can add style sheets to colour schemes, as well. They are added to the style sheets described above and will override attributes in case of conflicts.
Widgets are selected in QSS by the name of their widget type (the "Mixxx
internal name" column in the table below) or by a defined name. To
define a name for a widget, use the <ObjectName> element. For example:
<WidgetGroup>
  <ObjectName>SomeWidgetGroup</ObjectName>
  <Children>
    <!-- A group of widgets you want to apply style to go here -->
  </Children>
</WidgetGroup>
This is similar to setting an id attribute on an element in HTML
except that multiple widgets can share the same <ObjectName>. To style
the above <WidgetGroup> in QSS, you would select it with #. For
example:
#SomeWidgetGroup {
  background-color: black;
}
Knowing what options are available to style is tricky and it involves knowing what Qt widget the associated Mixxx widget derives from.
Handy resources:
- Qt Style Sheet Documentation
- Qt Style Sheet Syntax
- Qt Style Sheet Widget Reference -- tells you what widgets support which properties.
Here is a potentially out-of-date list of which Mixxx widgets derive
from which Qt widgets. If not listed, the widget inherits from
QWidget.
| Skin Tag | Mixxx Internal Name | Qt Widget |
|---|---|---|
| WidgetStack | WWidgetStack | QStackedWidget |
| WidgetGroup | WWidgetGroup | QGroupBox |
| (none) | WTrackTableView | QTableView |
| (none) | WLibraryTableView | QTableView |
| Library | WLibrary | QStackedWidget |
| LibrarySidebar | WLibrarySidebar | QTreeView |
| SearchBox | WSearchLineEdit | QLineEdit |
| Spinny | WSpinny | QGLWidget |
| Visual | WWaveformViewer | QWidget |
| NumberRate | WNumberRate | QWidget with a QLabel child |
| NumberPos | WNumberPos | QWidget with a QLabel child |
| NumberBpm | WNumber | QWidget with a QLabel child |
| Number | WNumber | QWidget with a QLabel child |
| Label | WLabel | QWidget with a QLabel child |
| Text | WTrackText | QWidget with a QLabel child |
| TrackProperty | WTrackProperty | QWidget with a QLabel child |
| Time | WTime | QWidget with a QLabel child |
| Key | WKey | QWidget with a QLabel child |
| Splitter | WSplitter | QSplitter |
| DefineSingleton | WSingletonContainer | QWidget |
| EffectSelector | WEffectSelector | QComboBox |
You can use variables throughout the skin templates for various
purposes, as well as in colour
schemes,
to set channel numbers, effect numbers, <ObjectName>s or to define
colors for widgets, just to name a few.
If a skin contains color schemes, this would be the the first place
where the skin parser would look for them. As variables are inherited by
all child templates the <Scheme> node would also be a good place to
define scheme-specific properties like RGB signal colors, background
colors or the alignment of cue markers in all waveform and overview
widgets in decks, samplers and preview decks.
If the skin doesn't bring color schemes, the second best place to make
variables available to multiple templates is in skin.xml directly
after the first <Children> opening tag, before any other template is
loaded.
Set variables like this: <SetVariable name="veryDescriptiveName">String</SetVariable>
Recall variables: <Variable name="veryDescriptiveName"/>
Note: Variables can not be used within tags or within values:
<Template src="skin:deck_container_<Variable name="side"/>.xml"/> <!-- Wrong. skin parser will fail -->
<Template <SetVariable name="Alignment">left|top</SetVariable>src="skin:library.xml"/> <!-- Wrong... -->
For example, let's load a deck template, pass the channel number and deck side to it and define a background color:
<Template src="skin:deck_container.xml>
   <SetVariable name="side">Left</SetVariable>
   <SetVariable name="channum">1</SetVariable>
   <SetVariable name="SignalBgColor">#0a0a0a</SetVariable>  <!-- dark grey -->
</Template>
channum is a perfect example of how to make use of the inheritance:
the variable is automatically passed on to button templates or
Spinny templates loaded by that specific
deck template (other deck templates would load with other variables).
Here, the variables defined above are used to set up a waveform overview
widget:
  <Overview>
    <Size>XX,YY</Size>
    <Objectname>Overview<Variable name="side"/></Overview> <!-- = <Objectname>OverviewLeft</Overview> -->
    ...
    <Channel><Variable name="channum"/></Channel> <!-- = <Channel>1</Channel> -->
    <!-- Or, if this was a sampler we'd inject the variable 'samplernum': -->
    <Group>[Sampler<Variable name="samplernum"/>]</Group>
    <BgColor><Variable name="SignalBgColor"/></BgColor> <!-- exactly, it's <BgColor>#0a0a0a</BgColor> -->
    ...
</Overview>Every skin widget is declared in a block with an opening XML tag and a closing tag. For example, this block defines a musical key widget that shows the current key of a playing deck:
    <Key>
        <TooltipId>visual_key</TooltipId>
        <Pos>X,Y</Pos>
        <Size>W,H</Size>
        <Connection>
            <ConfigKey>[ChannelX],visual_key</ConfigKey>
        </Connection>
    </Key>
Sub-tags like the <Size> tag tell Mixxx how it should size, style and
layout the widget. There are certain sub-tags that are common to all
widgets and behave in the same way regardless of the widget type.
<Pos> tags tell Mixxx where to position a widget. The position is
relative to the widget's parent. For example, if the position is 0,50
then this means position the widget 0 pixels from the horizontal
location (left edge) of the parent widget and 50 pixels from the vertical location (top edge)
of the widget's parent.
| Examples: | |
|---|---|
<Pos>0,50</Pos> |
0 pixels from top left edge of the parent, 50 pixels from the top edge |
<Pos>50,0</Pos> |
50 pixels from the horizontal position of parent, 0 pixels from the vertical position |
<Pos>50,50</Pos> |
50 pixels from the horizontal position of parent, 50 pixels from the vertical position |
<Size> tags tells Mixxx what size to make a widget. The size tag has a
lot of historical baggage associated with it because it has been around
since the first version of Mixxx and has a bunch of hacks added to it.
<Size> is formatted as the horizontal size and the vertical size
separated by a comma. You can also specify a size policy using the size
tag alone. As of Mixxx 2.00.0 there is a dedicated <SizePolicy> tag
for this. Simply append the SizePolicy skin abbreviation (see the table
in the <SizePolicy> section below) at the end of each dimension's
value.
| Examples: | |
|---|---|
<Size>100,50</Size> |
100 pixels wide and 50 pixels tall. |
<Size>100me,50p</Size> |
100 pixels wide and 50 pixels tall. The horizontal size policy is MinimumExpanding and the vertical policy is Preferred. |
<Size>100me,50</Size> |
100 pixels wide and 50 pixels tall. The horizontal size policy is MinimumExpanding. |
<Size>me,e</Size> |
The horizontal size policy is MinimumExpanding and the vertical size policy is Expanding. No explicit size is set. |
New in Mixxx 2.00.0
<MinimumSize> tags tell Mixxx the smallest size a widget should be.
The widget will never be resized to be smaller than this size.
<MinimumSize> is formatted as the minimum horizontal size and the
minimum vertical size separated by a comma. A value of -1 for a
dimension means no minimum in that dimension.
| Examples: | |
|---|---|
<MinimumSize>100,50</MinimumSize> |
minimum width 100, minimum height 50 |
<MinimumSize>200,-1</MinimumSize> |
minimum width 200, no minimum height |
<MinimumSize>-1,300</MinimumSize> |
no minimum width, minimum height 300 |
New in Mixxx 2.00.0
<MaximumSize> tags tell Mixxx the largest size a widget should be. The
widget will never be resized to be larger than this size.
<MaximumSize> is formatted as the maximum horizontal size and the
maximum vertical size separated by a comma. A value of -1 for a
dimension means no maximum in that dimension.
Examples:
| value | result |
|---|---|
<MaximumSize>100,50</MaximumSize> |
maximum width 100, maximum height 50 |
<MaximumSize>200,-1</MaximumSize> |
maximum width 200, no maximum height |
<MaximumSize>-1,300</MaximumSize> |
no maximum width, maximum height 300 |
New in Mixxx 2.00.0
<SizePolicy> tags tell Mixxx how widgets should grow or shrink based
on the available space. Size policy refers to the Qt
QSizePolicy.
| SizePolicy | Skin Abbreviation | What it does |
|---|---|---|
| Fixed | f | The size in the given dimension is fixed and should not grow or shrink. |
| Minimum | min | The widget size in this dimension is the minimum it should be. It can grow but will not be smaller than this. |
| Maximum | max | The widget size in this dimension is the maximum it should be. It can shrink but will not be larger than this. |
| Preferred | p | The widget size in this dimension is the preferred size. It can be shrunk and still be useful. It can grow but there is no advantage to it growing. |
| Expanding | e | The widget size in this dimension can be shrunk and still be useful. The widget can make use of extra space in this dimension so it should receive as much space as possible. |
| MinimumExpanding | me | The widget size in this dimension is the minimum it should be. The widget can make use of extra space in this dimension so it should receive as much space as possible. |
| Ignored | i | The widget size in this dimension is ignored. The widget will get as much space as possible. |
The <SizeHint> property is formatted as the skin abbreviation (from
the above table) for the horizontal size and the skin abbreviation for
the vertical size policy separated by a comma.
| Examples: | |
|---|---|
<SizePolicy>f,min</SizePolicy> |
Fixed horizontal, Minimum vertical |
<SizePolicy>me,me</SizePolicy> |
MinimumExpanding for both horizontal and vertical |
<SizePolicy>p,f</SizePolicy> |
Preferred horizontal, Fixed vertical |
<TooltipId> tags indicate what tooltip Mixxx should use for the
widget. We used to embed tooltips directly into skins but then we found
this was a massive hassle to keep up to date and translate into
different languages. As a result, we have created a list of standard
tooltips that you can use in most cases.
The <TooltipId> tag tells Mixxx to use an existing tooltip that is
built into Mixxx. To see the list of tooltips that exist, the only
current way is to browse the
src/skin/tooltips.cpp
and look at all the add("example") lines in the file. If you would
like to use a tooltip, you should make the TooltipId the word "example"
for the appropriate tooltip.
| Examples: | |
|---|---|
<TooltipId>track_artist</TooltipId> |
Use the "track_artist" tooltip from the tooltip file. |
| eject` | Use the "eject" tooltip from the tooltip file. |
If no existing tooltip meets your needs, you can create a custom tooltip
using the <Tooltip> tag.
| Examples: | |
|---|---|
<Tooltip>My Custom Tooltip</Tooltip> |
Use the phrase "My Custom Tooltip" as the widget tooltip. |
Translation or internationalization of these tooltips is not currently possible.
The connection block can be used to bind a ControlObject to the widget.
It binds either to the default connection or to any widget property
using the <BindProperty> element.
The ControlObject value can be transformed using on or more
transformers.
Currently supported properties:
-
visibleDisplay the widget only if (transformed) <ConfigKey> equals1 -
highlight' Apply styles to the widget via qss when (transformed) <ConfigKey> equals N. QSS code: #NameOfObject[highlight="N"] { ... }
Example:
<Connection>
  <!-- ConfigKey of the ControlObject Widget proprty -->
  <ConfigKey>[EffectRack1_EffectUnit1],single_effect_focus</ConfigKey>
  <BindProperty>highlight</BindProperty>
  <Transform>
    <Invert/>      <!-- p = -co -->
    <Not/>         <!-- p = !co -->
    <Add>0.5</Add> <!-- p = co + 0.5 -->
    <IsEqual>2</IsEqual> <!-- p = (co == 2) New in Mixxx 2.1 -->
  </Transform>
</Connection>
Allows the creation of different color schemes, see Color scheme architecture for details
The library manages all of your music files. This is where you can find the tracks you want to play and load them into a deck or sampler.
The library typically consist of:
- library sidebar: Contains different collections of music, and let you browse for files.
- library table: The track list view displays the tracks in those collections.
- Library searchbox: The search function filters the currently displayed list (e.g. a playlist, a crate, or even the whole library) for tracks that match your search query.
FIXME: Add code example for typical library
<LibrarySidebar></LibrarySidebar> |
<Library></Library> |
<SearchBox></SearchBox> |
| ` | |
| waveform_display | |
| X | |
| X,Y | |
| W,H | |
| # | |
| custom_background.png | |
| X | |
| X | |
| # | |
| # | |
| # | |
| # | |
| # | |
| # | |
| # | |
| # | |
| # | |
| # | |
| # | |
| # | |
| # | |
| # | |
| # |
| ``begin Visual tag Tooltip to be displayed on mouseover, depends on selected IDs. Make sure to select the correct ID for each key, available IDs are in //src/skin/tooltips.cpp//
Which channel the settings are connected to (X=1 or 2)
Defines the element position
Defines the element size
Color of waveform background (until Mixxx 1.10. a default gradient was added , not for #000000)
New in Mixxx 1.10: Loads a background image and will tile it when smaller than the waveform widget
New in Mixxx 2.1: Indicates whether to display horizontal or vertical waveform ( X = "horizontal" or "vertical" ). Default is horizontal.
New in Mixxx 1.11: Show full waveform centered (default) or only bottom/top half ( X = "bottom" or "top" ) (for horizontal waveform) or only left/right half ( X = "left" or "right" ) (for vertical waveform).
Color of waveform
New in Mixxx 1.11: Colors of low frequencies in waveform. If no low/mid/high colors are provided, fallback to
New in Mixxx 1.11: Colors of mid frequencies in waveform
New in Mixxx 1.11: Colors of high frequencies in waveform
New in Mixxx 2.00: Colors of low frequencies in RGB waveform. Allows separate color config for RGB waveforms, if selected in ''Preferences>Waveforms>Summery Type>RGB (GL)''
New in Mixxx 2.00: Colors of mid frequencies in RGB waveform.
New in Mixxx 2.00: Colors of high frequencies in RGB waveform
Color of beatgrid (multiple vertical lines)
New in Mixxx 1.11: Color of notification overlay displayed within the last seconds of a track
New in Mixxx 1.11: Color of static horizontal line
New in Mixxx 1.11: Color of static vertical line
Deprecated in Mixxx 1.11: Highlight color when beatgrid is near playback position
Deprecated in Mixxx 1.11: Color of horizontal line
Deprecated in Mixxx 1.11: Color center marker (single vertical line)
Deprecated in Mixxx 1.11: Color of Cuepoint marker
end Visual tag
`` |
| ` | |
| cue_point | |
| custom_marker.png | |
| CUEPOINT | |
| X|Y | |
| # | |
| # |
|begin Mark tag
Defines the Cuepoint, max. one cuepoint per channel
Optional: Uses an image from the skin's folder to define a custom marker, if available it overrides the default triangle
Text visible when Cuepoint is set (and no custom marker is defined)
Defines where text is positioned (X = "left" or "hcenter" or "right"; Y = "top" or "vcenter" or "bottom"). Note: "center" can be used as a shorthand for "hcenter|vcenter".
Defines text background color
Defines text color
end Mark tag
` |
| ` |
|begin Mark tag
max. 36 Hotcues(X=1-36), define every Hotcue for its own
Optional: uses an image from the skin's folder to define a custom marker, if available it overrides the default triangle
Text visible when Hotcue point is set (and no custom marker is defined)
Defines where text is positioned (X = "left" or "hcenter" or "right"; Y = "top" or "vcenter" or "bottom"). Note: "center" can be used as a shorthand for "hcenter|vcenter".
Defines text background color
Defines text color
end Mark tag
` |
| ` |
|begin Mark tag
Optional: Uses an image from the skin's folder to define a custom marker, if available it overrides the default triangle
Defines where text is positioned (X = "left" or "hcenter" or "right"; Y = "top" or "vcenter" or "bottom"). Note: "center" can be used as a shorthand for "hcenter|vcenter".
Defines text background color
Defines text color
Is filled with Hotcue number when not defined by respective custom mark
end Mark tag
` |
| ` |
|begin Mark tag
Defines a loops end point
Optional: Uses an image from the skin's folder to define a custom marker, if available it overrides the default triangle
Text visible when end point is set (and no custom marker is defined)
Defines where text is positioned (X = "left" or "hcenter" or "right"; Y = "top" or "vcenter" or "bottom"). Note: "center" can be used as a shorthand for "hcenter|vcenter".
Defines text background color
Defines text color
end Mark tag
` |
| ` |
|begin MarkRange tag
|---for drawing the color overlay between loop-in & loop-out, these lines are not variable
/
Defines overlay color when loop is enabled
Defines overlay color when loop is disabled
end MarkRange tag
` |
| ` | |
| waveform_overview | |
| X | |
| X,Y | |
| W,H | |
| #AARRGGBB | |
| custom_background.png | |
| # | |
| # | |
| # | |
| # | |
| # | |
| #AARRGGBB | |
| #AARRGGBB | |
| #AARRGGBB | |
| X | |
| # | |
| # | |
| X |
Must be same value as under above, (X = 1 or 2) Defines if action is performed on click on element ( true or false); Can be omitted in Mixxx >= 2.00
end Overview tag ` |
New in Mixxx 1.10.0
| ` | |
| spinny | |
| X | |
| W,H | |
| background.svg | |
| mask.svg | |
| foreground.svg | |
| foreground_ghost.svg | |
| true |
| ` | |
| channel_VuMeter | |
| active.png | |
| default.png | |
| X,Y | |
| false | |
| 5 | |
| 400 | |
| 80 | |
| 5 |
|begin VuMeter tag
Tooltip to be displayed on mouseover
Button/slider main image (from the skin's folder, shows as top layer)
Button/slider background image (from the skin's folder, shows as bottom layer)
Defines the element position
Orientation (false=vertical, true=horizontal)
Size of peak (in pixels); cropped from top of image defined in , default is 5
Time a peak is displayed (in ms), default is 400
Time a peak falls down (in ms), default is 20
Number of steps (in pixels) a peaks falls down in , Default is 1
Defines connected Channel & Stereo-balance (X = Channel1 .. 4 or Master), (Y= VuMeter or VuMeterL or VuMeterR)
end VuMeter tag ` |
| ` | |
| PeakIndicator | |
| active.png | |
| default.png | |
| X,Y |
|begin StatusLight (Volume Peak Indicator) tag
Tooltip to be displayed on mouseover
peak indicator main image (from the skin's folder, shows as top layer)
peak indicator background image (from the skin's folder, shows as bottom layer)
Defines the element position
Defines connected Channel (X = Channel1 .. 4 or Master)
end StatusLight (Volume Peak Indicator) tag ` |
| | | |
| ----------------------------------------------------------------------------- | | ----------------------------------------------------------------------------------------------------------- |
| <Label> <Pos>X,Y</Pos> <Size>W,H</Size> <Text>Hello</Text> </Label> | | `
Displays a text label.
Defines the element position
Defines the element size
The text to be displayed
` |
New in Mixxx 1.10
| | | |
| ------------------------------------------------------------------------------------------------------------------------------------------------------ | | ----------------------------------------------------------------------------------------------------------------------------------------------------------------------------------------------------------------------------------------------------------------------------------------------------------------------------------------------------------------------------------------------------------------------------------------------------------------------------------------------------------------------------------------------------------------------------------------------------------------------------------------------------------------------------------------------------------------------------------------------------------------------------------------------------------------------------------------------------------------------------------------------------- |
| <Time> <TooltipId>time</TooltipId> <Pos>X,Y</Pos> <Size>W,H</Size> <ShowSeconds>false</ShowSeconds> <ClockFormat>24</ClockFormat> </Time> | | This widget displays the current time. Tooltip to be displayed on mouseover Defines the element position Defines the element size Determines, whether seconds are shown ("true") or not ("false"). Default is "false". Deprecated as of v2.00. We display the time with a format appropriate to the chosen locale instead. Has determined, whether the time is shown in 24 hour format or 12 hour format. "24" and "24hrs" set the format to 24 hour format. "12", "12hrs" and "12ap" set the format to 12 hour format (e.g. 1:45 am). "12AP" sets it to 12 hour format with capitalized AM/PM (e.g. 1:45 AM). Default is "12AP". <ShowSeconds> determines, whether seconds are shown or not. Default was false. You could set a custom format with <CustomFormat> instead of <ClockFormat>, which accepts the same expressions as QTime::toString (https://doc.qt.io/qt-4.8/qtime.html#toString) |
New in Mixxx 1.9
You can replace the whole <Text> node with TrackProperty`s to display more advanced track informations.
| | | |
| --------------------------------------------------------------------------------------------------------- | | --------------------------------------------- |
| <Text> <TooltipId>text</TooltipId> <Channel>X</Channel> <Pos>X,Y</Pos> <Size>W,H</Size> </Text> | | `
Defines connected Channel (X = 1 or 2)
` |
Changed in Mixxx 2.00
Use visual_bpm key instead bpm
| | | |
| -------------------------------------------------------------------------------------------------------------------------------------------------------------------------------------------------------------------------------------------- | | ---------------------------------------------------------------------------------------------------------------- |
| <NumberBpm> <TooltipId>visual_bpm</TooltipId> <Channel>X</Channel> <Pos>X,Y</Pos> <Size>W,H</Size> <NumberOfDigits>6</NumberOfDigits> <Connection> <ConfigKey>[ChannelX],visual_bpm</ConfigKey> </Connection> </NumberBpm> | | `
Defines connected Channel (X = 1 .. 4)
?
Must be same value as under above, (X = 1 or 2)
` |
New in Mixxx 2.00
| | | |
| -------------------------------------------------------------------------------------------------------------------------------------------------------------------------------------------------------- | | --------------------------------------------------------------- |
| <Key> <TooltipId>visual_key</TooltipId> <Pos>X,Y</Pos> <Size>W,H</Size> <DisplayCents>true</DisplayCents> <Connection> <ConfigKey>[ChannelX],visual_key</ConfigKey> </Connection> </Key> | | `
Display the distance to the next key
(X = 1 .. 4)
` |
| | | |
| ---------------------------------------------------------------------------------------------------------------------------------------------------------------------------------------------------------------------------------------------- | | ---------------------------------------------------------------------------------------------------------------- |
| <NumberPos> <TooltipId>track_time</TooltipId> <Channel>X</Channel> <Pos>X,Y</Pos> <Size>W,H</Size> <NumberOfDigits>6</NumberOfDigits> <Connection> <ConfigKey>[ChannelX],playposition</ConfigKey> </Connection> </NumberPos> | | `
Defines connected Channel (X = 1 or 2)
?
Must be same value as under above, (X = 1 or 2)
` |
New in Mixxx 2.1
| | | |
| ------------------------------------------------------------------------------------------------------------------- | | -------------------------------------------------------------------------------------------------------------------------------------------------------------------------------------------- |
| <RecordingDuration> <Pos>X,Y</Pos> <Size>W,H</Size> <InactiveText>foo</InactiveText> </RecordingDuration> | | `
Displays the duration of the running recording.
Defines the element position
Defines the element size
Custom text to be displayed when recording is inactive/stopped, default is “–:–”
` |
| | | |
| ------------------------------------------------------------------------------------------------------------------------------------------------------------------------------------------------------ | | ---------------------------------------------------------------------------------------------------------------------------------------------------------------------------------------------------------- |
| <NumberRate> <TooltipId>rate_display</TooltipId> <Channel>X</Channel> <Pos>X,Y</Pos> <Size>W,H</Size> <Connection> <ConfigKey>[ChannelX],rate</ConfigKey> </Connection> </NumberRate> | | `
Defines connected Channel (X = 1 or 2)
Remove the whole block for Mixxx v1.10+, needed in older versions Must be same value as under above, (X = 1 or 2)
` |
New in Mixxx 2.00
| | | |
| -------------------------------------------------------------------------------------------------------------------------------------- | | --------------------------------------------------------------------------------------------------------------- |
| <NumberDb> ... <Text>Gain %1 dB</Text> <Connection> <ConfigKey>[Channel1],pregain</ConfigKey> </Connection> </NumberDb> | | `
Optional Text. %1 is replaced by the bB value. If this is missing the value is displayed like "-39 dB"
` |
| ` | |
| channel_volume | |
| handle.png | |
| slider.png | |
| X,Y | |
| false |
Slider image (knob) which can de dragged with mouse Slider background image the moves up and down on
Orientation (false or true, means vertical or horizontal)
Defines connected Channel (X = 1 or 2 ) Can be omitted in Mixxx >= 2.00
` |
| ` | |
| crossfader | |
| handle.png | |
| slider.png | |
| X,Y | |
| true |
Slider image (knob) which can de dragged with mouse Slider background image the moves left and right on
Orientation (false or true, means vertical or horizontal)
Use always default value Can be omitted in Mixxx >= 2.00
` |
| ` | |
| rate | |
| handle.png | |
| slider.png | |
| X,Y | |
| false |
Slider image (knob) which can de dragged with mouse Slider background image the moves up and down on
Orientation (false or true, means vertical or horizontal)
Defines connected Channel (X = 1 .. 4 ) Can be omitted in Mixxx >= 2.00
` |
Hint:
The <NumberStates> key means "number of states" for the respective
element (Buttons or Knobs/Rotary Fader).
For example a Repeat button is a 2-state button
(off/activated).
The <Number> key identifies the index of the <State> block. Each
time you click on one of these multi-state buttons, it flips to the next
state.
The <EmitOnDownPress> key determines when Mixxx will get feedback
when the button goes down or/and when it comes up.
If you compare that with a regular push button in your OS, the button
triggers only when you release the button (not when you press it). See
Hotcue for example.
The <ButtonState> key tells Mixxx that the given connection should be triggered when that particular mouse button (left or right) is down.
| ` | |
| ??? | |
| 3 | |
| true | |
| true |
Button that allows toggle of recording and notifies "[Recording],status" of status changes. Can be omitted in Mixxx >= 2.00 Can be omitted in Mixxx >= 2.00
Can be omitted in Mixxx >= 2.00
Can be omitted in Mixxx >= 2.00
The latest no button connection is the Display connection
Can be omitted in Mixxx >= 2.00
` |
| ` | |
| play_cue_set | |
| 2 |
Left Click: Pause/Play, Right Click: Set cue point Overall quantity of states the button have
First state Default image displayed Image displayed on mouse-down
Second state Default image displayed Image displayed on mouse-down
Left Button connection Defines connected Channel (X = 1 .. 4), performed action (play) Defines if action is performed on down-click on element (true or false) Which mouse button must be clicked so the action is performed
Right Button connection Defines connected Channel (X = 1 .. 4), performed action (cue_set) Defines if action is performed on down-click on element (true or false) Which mouse button must be clicked so the action is performed
No button connection = Display connection Defines connected Channel (X = 1 .. 4), performed action (cue_set)
` |
| ` | |
| cue_default_cue_gotoandstop | |
| 2 |
Go to and play (while playing), Set cue point (while stopped), Go to and stop (right-click)
Defines connected Channel (X = 1 .. 2) , performed action (cue_default) Defines if action is performed on down-click on element (true or false) Which mouse button must be clicked so the action is performed Hint: Default cue behavior can be changed in Mixxx preferences
Defines connected Channel (X = 1 .. 2) , performed action (cue_gotoandstop) Defines if action is performed on down-click on element (true or false) Which mouse button must be clicked so the action is performed
` |
Hint: Hotcues can utilize more functions in the <ConfigKey> then shown in this example. See MIDI Controller Mapping File Format for details
| ` | |
| hotcue | |
| 1 |
Set and play Hotcue (while playing), play Hotcue (while stopped), delete Hotcue (right-click)
Channel (X=1 or 2), Hotcue # (Y=1-36) & performed action (activate), depends on # of Hotcues defined , see hotcue_X_position Action is performed while playing (true) on click on element
Action is performed while down pressing the element and playback is stopped (false) Playback from Hotcue X position when the player is stopped (aka Hotcue preview ) Which mouse button must be clicked so the action is performed
Channel (X=1 .. 4 ), Hotcue # (Y=1-36) & performed action (clear)
Which mouse button must be clicked so the action is performed
` |
| ` | |
| loop_in | |
| 1 |
Channel (X=1 or 2), performed action (loop_in) Action is performed when clicking on element Works when playback has stopped too
` |
| ` | |
| loop_out | |
| 1 |
The "Loop-Out" point can not be set if:
- No "Loop-In" point has been set before
- The "Loop-In" point has been set before but the current playback position is prior to the "Loop-In" point
Channel (X=1 or 2), performed action (loop_out) Action is performed when clicking on element Works when playback has stopped too
` |
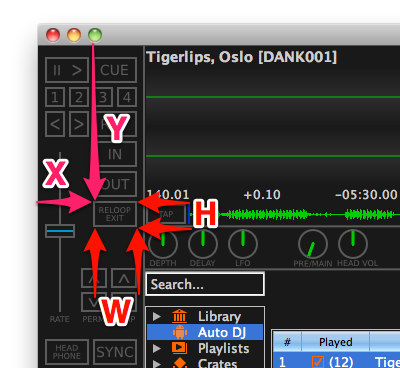
| ` | |
| reloop_exit | |
| 1 |
The "Looping" feature can not be activated if:
- No "Loop-In" point has been set before
- No "Loop-Out" point has been set before
Channel (X=1 or 2), performed action (reloop_exit) Action is performed when clicking on element
` |
| ` | |
| reverse | |
| 1 |
Defines connected Channel (X = 1 or 2) , performed action (reverse)
` |
| ` | |
| fwd_end | |
| 1 |
Defines connected Channel (X = 1 or 2) , performed action (Y=fwd or back)
Defines connected Channel (X = 1 or 2) , performed action (Y=fwd or back)
Defines connected Channel (X = 1 or 2) , performed action jump to (Y=end or start)
` |
| ` | |
| ??? | |
| 1 |
Defines connected Channel (X = 1 or 2) , performed action (beatsync)
` |
| ` | |
| ??? | |
| 1 |
Defines connected Channel (X = 1 or 2), performed action (Y= rate_temp_up or rate_temp_down)
Defines connected Channel (X = 1 or 2), performed action (Y= rate_temp_up_small or rate_temp_down_small)
` |
| ` | |
| ??? | |
| 1 |
Defines connected Channel (X = 1 or 2) , performed action (Y= rate_temp_up or rate_temp_down)
Defines connected Channel (X = 1 or 2) , performed action (Y= rate_temp_up_small or rate_temp_down_small)
` |
| ` | |
| pfl | |
| 2 |
Default button visible
Button visible when active
Defines connected Channel (X = 1 or 2) , performed action (beatsync)
` |
| ` | |
| ??? | |
| 1 |
Takes the progressive average of the last 4 taps and sets the bpm of the deck to that value
Defines connected Channel (X = 1 or 2) , performed action
` |
| ` | |
| keylock | |
| 2 |
Activates position-independent time stretch
Defines connected Channel (X = 1 or 2) , performed action
` |
| ` | |
| repeat | |
| 2 |
Track repeat if you go past the end or reverse before the start
Defines connected Channel (X = 1 .. 4) , performed action
` |
| ` | |
| ??? | |
| 2 |
???= filterHighKill or filterMidKill or filterLowKill Cuts the high, mid and low frequencies on Channel X
Default button visible
Button visible when active
Defines connected Channel (X = 1 .. 4), performed action (Y= filterHighKill or filterMidKill or filterLowKill)
` |
| ` | |
| ??? | |
| X | |
| knob_rotary_s%1.png | |
| X,Y |
???= master_volume or balance You need X single knobs where #(X/2)+1 is the 0-state. Example: X=41 states (270 degree rotation / 40 knobs + the 0-state) . You need 20 knobs rotate from -135 degree to 0 degree, one knob 0 degree (default knob visible) , 20 knobs rotate from -135 degree to 0 degree Defines connected Channel (Master) , performed action (Y=volume or balance)
` |
| ` | |
| ??? | |
| X | |
| knob_rotary_s%1.png | |
| X,Y |
???= headVolume or headMix
Defines connected Channel (Master), performed action (Y=headVolume or headMix)
` |
| ` | |
| ??? | |
| X | |
| knob_rotary_s%1.png | |
| X,Y |
???= pregain or filterHigh or filterMid or filterLow
Defines connected Channel (X = 1 or 2), performed action (Y= pregain or filterHigh or filterMid or filterLow)
` |
Check out the skins in Mixxx 1.11 as blueprint, they make heavy use of these special nodes.
New in Mixxx 1.9
Replace the Text node with TrackProperty`s to display more advanced track informations. You can display more than one TrackProperty node in a skin.
| ` |
  <TooltipId>???</TooltipId>
  <Property>...</Property>
  <Channel>X</Channel>
  <Pos>x,y</Pos>
  <Size>a,b</Size>
???= check //src/skin/tooltips.cpp// for the correct tooltip ID for each key
The "Property" field can be any of: artist, title, album, genre, year, track_number, times_played, comment, bpm, bpmFormatted, duration, durationFormatted, key (new in Mixxx 1.11)
bpm will be the full precision number (i.e. 1.333333333) while bpmFormatted is to 3 decimal places (1.333), duration is the duration in seconds, while durationFormatted is the duration in hh:mm:ss.xx format. ` |
New in Mixxx 1.9
It is probably cumbersome to have to give the absolute positions of every node in the tree. WidgetGroups allow to make a group of relatively positioned widgets. You can display more than one WidgetGroup node in a skin.
| ` | |
| 100,200 | |
| w,h | |
| background.png | |
| alt.png |
New in Mixxx 1.11 New in Mixxx 2.1: if highlight > 0
New in Mixxx 2.1: Can be used in styles
New in Mixxx 2.1
` |
<size> is optional, this will limit the size so that any part of a child widget outside of the size rectangle is not shown
In that example, the PushButton child will be at 0,0 relative to its parent, or the absolute position 100,200. The SliderComposed widget will be at 20,0 relative to its parent or 120,200.
New in Mixxx 1.11: Loads a background image from the skin folder. Support resizing and color schemes. Note: The style sheet is painted on top of the new background set by the <BackPath> node.
New in Mixxx 2.1: The highlight property is used to restyle the widget with CSS. The declaration #MyGroup[highlight="1"] { } will define the style for the highlighted state. Note: The background property does not support color schemes for images, a workaround is to set the background image via <BackPath> and <BackPathHighlighted> from the skin.
Never have to specify <Pos> again!
You can use a <Layout> tag in a WidgetGroup to have the widget group
automatically layout its children according to their size policies and
minimum/maximum widths (see <SizePolicy> info above). As of Mixxx
2.00.0 the valid layout types are "horizontal" and "vertical". These
correspond to putting all the child widgets in a
QHBoxLayout and
QVBoxLayout, respectively.
Example:
<WidgetGroup>
  <Pos>100,200</Pos>
  <Size>w,h</Size>
  <Layout>horizontal</Layout><!-- Layout widgets horizontally -->
  <BackPath>background.png</BackPath><!-- New in Mixxx 1.11: Loads a background image from the skin folder. Support resizing and color schemes -->
  <!-- Note: The style sheet is painted on top of the new background set by the <BackPath> node -->
  <Children>
    <PushButton>
      ...
    </PushButton>
    <SliderComposed>
      ...
    </SliderComposed>
    <!-- as many regular widgets as you like in here -->
  </Children>
</WidgetGroup>
The result of this is that the pushbutton and slider will be automatically sized and laid out horizontally within the widget group.
New in Mixxx 1.11.0
This allows you to create a QSplitter dynamically and to control the size of child widgets by dragging the boundary between the children.
New in Mixxx 2.10: Allows to specify which children can be collapsed
New in Mixxx 2.00: Remember splitter layout
    <Splitter>
      <Pos>100,200</Pos>
      <Size>w,h</Size>
      <SplitSizesConfigKey>[$skin_name],$config_key</SplitSizesConfigKey>
      <SplitSizes>60,60,600</SplitSizes>
      <Orientation>horizontal</Orientation>
      <Collapsible>0,0,0</Collapsible>
      <Children>
        <WidgetGroup>
        </WidgetGroup>
        <WidgetGroup>
        </WidgetGroup>
        <WidgetGroup>
        </WidgetGroup>
        <!-- as many regular widgets as you like in here -->
      </Children>
    </Splitter>
SplitSizes gives the absolute splits between the children of the
'Splitter' in pixels. There must be as many split sizes as there are children or else it
will be ignored.
From the example, the first 2 WidgetGroups will each have 60px of the splitter width initially and the 3rd WidgetGroup will have
600px. Any additional/missing space is distributed amongst the widgets according to their size policies.
Orientation holds the orientation of the splitter. Default is
horizontal (i.e. the widgets are laid out side by side). The possible
orientations are horizontal or vertical.
Mixxx remembers remember the position of moveable GUI elements,
SplitSizesConfigKey saves the splits in ConfigKey provided by the skin
e.g.
<SplitSizesConfigKey>[Deere1280x1024-SXGA],LibrarySidebarSplitSize</SplitSizesConfigKey>.
Collapsible gives which of children can be collapsed. From the
example, none of the 3 WidgetGroup can collapse. E.g. if you wish to
have the 1st widgetgroup collapsible, just change to
<Collapsible>1,0,0</Collapsible>
NOTE: Splitter derives from QSplitter. As of Qt 4.8.3 the
default SizePolicy for QSplitter is QSizePolicy::Expanding
horizontally and QSizePolicy::Preferred vertically. If you do not
provide a size for the splitter this is the default policy.
New in Mixxx 1.11.0
A WidgetStack is a widget that only shows one widget at a time. By
default, the shown widget is the first child in the <Children> block.
If the NextControl or PrevControl is set to 1, then the next or
previous widget in the stack is shown and the current widget is hidden.
If an optional trigger attribute is given to any child, then the
control named by the attribute will automatically switch to the widget
when the control is set to 1 and when the widget is hidden the control
will be set to 0 by the WidgetStack. This allows you to create radio
buttons that let the user switch between multiple different widgets to
occupy a certain space.
Example:
<WidgetStack>
  <NextControl>[Channel1],hotcuepage_next</NextControl> <!-- Optional: Control that switches to the next widget in the stack. (will be created if doesn't exist) -->
  <PrevControl>[Channel1],hotcuepage_prev</PrevControl> <!-- Optional: Control that switches to the previous widget in the stack. (will be created if doesn't exist) -->
  <Children>
    <WidgetGroup trigger="[Channel1],hotcuepage_show1"></WidgetGroup> <!-- A WidgetGroup that is shown when the 'trigger' control is set to 1. (will be created if doesn't exist) -->
    <WidgetGroup trigger="[Channel1],hotcuepage_show2"></WidgetGroup> <!-- A WidgetGroup that is shown when the 'trigger' control is set to 2. (will be created if doesn't exist) -->
    <WidgetGroup trigger="[Channel1],hotcuepage_show3"></WidgetGroup> <!-- A WidgetGroup that is shown when the 'trigger' control is set to 3. (will be created if doesn't exist) -->
    <!-- as many regular widgets as you like in here -->
  </Children>
</WidgetStack>
Some example applications:
- Multiple pages of hotcue buttons.
- A collapsed/expanded view of a deck: two children in a
WidgetStack, one with the full deck widgets and one with the collapsed deck widgets. A single<NextControl>and a<PushButton>attached to that control allows the user to toggle between the collapsed and expanded view of the deck. - Tabbed UIs / Screen Sets. The entire skin could be one large
WidgetStackthat lets you switch the UI between different layouts.
New in Mixxx 2.00.0:
If you need the stacks to remember which index they were closed with so
they can start back up in the right state, do it like this:
<WidgetStack currentpage="[EffectRack1],current" persist="true">
The "currentpage" CO doesn't need to be defined anywhere else.
New in Mixxx 2.00.0:
You can define which page to select if a group gets a hide signal.
on_hide_select adds a page to the stack. If this page is hidden, the
the page with the 0-based index given by on_hide_select will be shown.
If this value is -1, the next page on the stack will be shown.
Example:
<WidgetStack>
  <Children>
    <WidgetGroup on_hide_select="0"></WidgetGroup> <!-- First page of the stack -->
    <WidgetGroup trigger="[Channel1],hotcuepage_show1" on_hide_select="0"></WidgetGroup> <!-- When any page is hidden, go back to the first page. -->
    <WidgetGroup trigger="[Channel1],hotcuepage_show2" on_hide_select="0"></WidgetGroup> <!-- When any page is hidden, go back to the first page. -->
    <WidgetGroup trigger="[Channel1],hotcuepage_show3" on_hide_select="0"></WidgetGroup> <!-- When any page is hidden, go back to the first page. -->
    <!-- as many regular widgets as you like in here -->
  </Children>
</WidgetStack>New in Mixxx 2.00.0
A SizeAwareStack selects the best fitting widget based on available
space. It allows GUI elements to easily adopt to window size without
manual actions.The algorithm is very basic and requires children sorted
by size, smallest first.
Example:
<SizeAwareStack>
  <Children>
    <WidgetGroup>
      <MinimumSize>10,10</MinimumSize><!-- A WidgetGroup that is shown when the available screen estate -->
      <MaximumSize>10,10</MaximumSize><!-- is at least 10x10 pixel -->
      <Style>QGroupBox {background: blue;}</Style>
    </WidgetGroup>
    <WidgetGroup>
      <MinimumSize>100,10</MinimumSize><!-- A WidgetGroup that is shown when the available screen estate -->
      <MaximumSize>199,10</MaximumSize><!-- is 100x10 up to 199x10 pixel. -->
      <Style>QGroupBox {background: red;}</Style>
    </WidgetGroup>
    <WidgetGroup>
      <MinimumSize>200,10</MinimumSize><!-- A WidgetGroup that is shown when the available screen estate -->
      <MaximumSize>200,10</MaximumSize><!-- is at least 200x10 pixel -->
      <Style>QGroupBox {background: green;}</Style>
    </WidgetGroup>
  </Children>
</SizeAwareStack>New in Mixxx 2.00.0
    <ComboBox>
      <State>
        <Number>1</Number>
        <Text>Text</Text>
        <Icon>icon.png</Icon>
      </State>
      <State>
        <Number>2</Number>
        <Text>Text</Text>
        <Icon>icon.png</Icon>
      </State>
      <Connection>
        <ConfigKey>[XXX],combobox_selector</ConfigKey>
      </Connection>
    </ComboBox>
Both <Text> and <Icon> tags are optional. The order in which the states are displayed is determined by the order they have in the xml, not by the <Number> tag. What does the <Number> tag do?
The control object that holds the state of the combobox is determined with the <Connection> tag.
New in Mixxx 2.00.0
Defines widgets that should only be instantiated once but may appear in multiple places in a skin definition. This is useful for complex widgets like the library, which are memory intensive. The container mostly looks like a special WidgetGroup which is defined in special ways.
Usage:
First, the Singleton container is defined, meaning it is described to the skin system by name, and what the singleton consists of. This definition should be very early in the skin file. Note that the singleton does not actually appear where it is defined.
Example definition:
<SingletonDefinition>
  <ObjectName>LibrarySingleton</ObjectName>
  <!-- The ObjectName is used to identify this singleton elsewhere in the skin files -->
  <Children>
    <Template src="skin:library.xml"/>
    <!-- The skin:prefex is replaced by the skin folder first, if this fails the current directory is used -->
  </Children>
</SingletonDefinition>
Example usage:
<WidgetGroup>
  <ObjectName>SomeUiElement</ObjectName>
  <Layout>vertical</Layout>
  <SizePolicy>min,i</SizePolicy>
  <Children>
    <SingletonContainer>
      <ObjectName>LibrarySingleton</ObjectName>
    </SingletonContainer>
    ...
  </Children>
</WidgetGroup>
The skin system sees the Singleton tag, and any time the containing group gets a show event, the Singleton widget is reparented to this location in the skin. Note that if a Singleton is visible twice at the same time, behavior is undefined and could be crashy.
New in Mixxx 2.1.0, changed in Mixxx 2.3.0
To provide users a rough impression of what skins look like before they
switch to a different skin, show a preview screenshot when a skin is
selected with the combobox in Preferences --> Interfaces --> Skin.
The screenshoot should show skins in their default configuration. Save
as skin_preview.png in the root folder of the corresponding skin (was
preferences_preview_screenshot.png prior to Mixxx 2.3). Is no
screenshoot provided, a placeholder is displayed.
New in Mixxx 2.3.0
If color schemes are supported by
the selected skin, show a preview screenshots for a set of color
variations to choose from in Preferences -> Interface -> Color Scheme.
Save as skin_preview_$SchemeName.png ( replace $SchemeName with the
actual value of the respective
<Name> key) in the
root folder of the corresponding skin.
New in Mixxx 2.00.0
Mixxx features a default launch image that is shown during Mixxx launching. It features a centered label with a progress bar below.
All elements are style-able by Qt stylesheets as shown in the example below:
Example definition:
<LaunchImageStyle>
  LaunchImage { background-color: #202020; }
  QLabel {
    image: url(skin:/style/mixxx-icon-logo-symbolic.png);
    padding:0;
    margin:0;
    border:none;
    min-width: 208px;
    min-height: 48px;
    max-width: 208px;
    max-height: 48px;
  }
  QProgressBar {
    background-color: #202020;
    <!-- You can also use an image instead. To avoid blur, size it according to data below -->
    background: url(skin:/style/progressbar_bg.svg);
    border:none;
    min-width: 208px;
    min-height: 3px;
    max-width: 208px;
    max-height: 3px;
  }
  QProgressBar::chunk {
    background-color: #ec4522;
    <!-- You can also use an image instead. To avoid blur, size it like the QProgressBar -->
    background: url(skin:/style/progressbar.svg);
  }
</LaunchImageStyle>New in Mixxx 2.1.0
A a widget to show the laptop battery status.
<Battery>
  <BackPath>battery_background.png</BackPath><!-- default background -->
  <PixmapUnknown>battery_unknown.png<PixmapUnknown><!-- displayed when battery status is unknown -->
  <PixmapCharged>battery_charged.png</PixmapCharged><!-- displayed when battery is full -->
  <NumberStates>10</NumberStates><!-- number of charging / discharging pixmaps -->
  <PixmapsCharging>battery_%1_charging.png</PixmapsCharging><!-- displayed when battery is charging -->
  <PixmapsDischarging>battery_%1_discharging.png</PixmapsDischarging><!-- displayed when battery is discharging -->
</Battery>
The charging/discharging pixmaps are 0-indexed, %1 will be replaced with 0 to [NumberStates - 1].
Changed in Mixxx 2.3:
The Battery widget is hidden by default and only becomes visible once
the status is known. This means that the unknown-icons are never
presented to the user.
The status can be unknown if there is no battery present or if there are problems reading the status.
Deprecated in Mixxx 1.11.0, use WidgetGroup instead.
<Background><!-- start background tag -->
  <!-- Defines which image in the skins folder to use for the background. All elements are displayed over this image and its size defines the skin size (see Guidelines) -->
  <Path>background.png</Path>
  <!-- Defines a background color. Example: <BgColor>#000000</BgColor> (000000 being the hex value for black) -->
  <BgColor>#</BgColor>
</Background><!-- end background tag -->Deprecated in Mixxx 1.11.0, use the different keys of the Library display instead
| ` | |
| X,Y | |
| W,H | |
| # | |
| # | |
| # | |
| # |
|start TableView tag
Defines the element position
Defines the element size
Background color library widget (i.e. background color search widget)
Foreground color library widget (i.e. text in "Analyze" widget)
Background color even line right library pane
Background color uneven lines right library pane
end TableView tag
` |
Deprecated in Mixxx 1.9.0, use the Repeat button instead
| ` | |
| 3 |
End of track mode control (see manual)
Button visible in STOP mode
Button visible in NEXT mode
Button visible in LOOP mode
Defines connected Channel (X = 1 .. 2) , performed action (TrackEndMode)
` |
Deprecated in Mixxx 1.11.0, use the effects framework instead
| ` | |
| flanger | |
| 2 |
Apply flanger effect to Channel X
Default button visible
Button visible when active
Defines connected Channel (X = 1 .. 4) , performed action (flanger)
` |
Deprecated in Mixxx 1.11.0, use the effects framework instead
| ` | |
| ??? | |
| X | |
| knob_rotary_s%1.png | |
| X,Y |
Defines connected Channel (Flanger), performed action (Y=lfoDelay or lfoDepth or lfoPeriod)
` |
- Skin Colour Scheme Architecture - Explains how color schemes work in Mixxx 1.6.0+
- Mixxx Skinning Guidelines
- Skin Color Schemes Tips and Tool - A "walkthrough" on creating schemes, includes a link to an online Javascript tool that will help determine correct HSVTweak values.
- Skin layout tutorial - A walkthrough on creating a minimal skin, with focus on the common problems a skin designer will encounter when setting the layout of various skin elements.
- Skin System Changelog - Follow the changes as Mixxx evolves, and learn how to apply these changes when creating skins.
 This is the Mixxx Wiki -
 Mixxx is a free and open-source DJ software.
Manual
Hardware Compatibility
Reporting Bugs
Getting Involved
Contribution Guidelines
Coding Guidelines
Using Git
Developer Guide
Creating Skins
Contributing Mappings
Mixxx Controls
MIDI Scripting
Components JS
HID Scripting