
Uber’s business model has given rise to a large number of Uber-for-X services. Among other things, X equals moving, parking, courier, groceries, flowers, alcohol, dog walks, massages, dry cleaning, vets, medicines, car washes, roadside assistance and marijuana. Through these on-demand platforms, supply and demand are aggregated online for services to be fulfilled offline.
This open source repo/s uses HyperTrack SDK for developing real world Uber-like consumer & driver apps.
- Ridesharing Rider app can be used by customer to :
- Allow customer to select pickup and dropoff location
- Book a ride from desired pickup and dropoff location
- Track driver to customer's pickup location
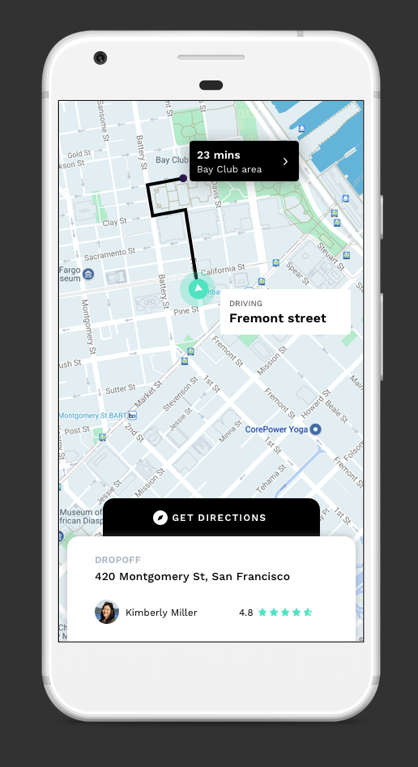
- Track the ongoing ride to dropoff location
- Let customers share live trip with friends and family
- Show trip summary with distance travelled
- Ridesharing Driver app can be used by driver to :
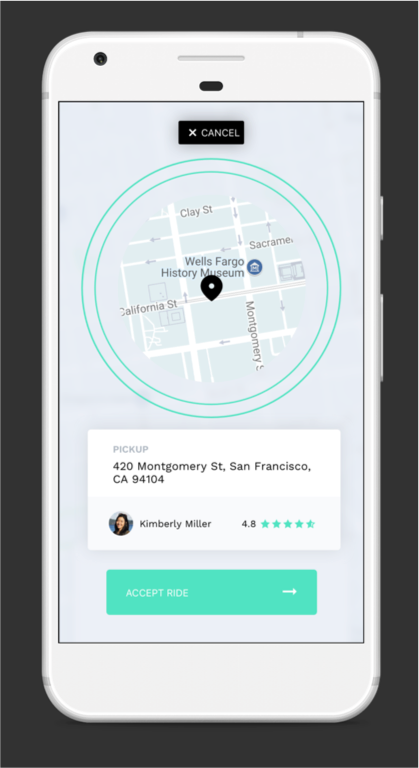
- Find new rides
- Accept a ride
- Track and navigate till customer's pickup location, and mark the pickup as complete
- Track and navigate from customer's pickup to dropoff location, and mark the dropoff as complete
- Show trip summary with distance travelled
- Signup to get your HyperTrack Publishable Key
# Clone this repository
$ git clone https://github.com/hypertrack/ridesharing-ios.git

# cd into the project directory
$ cd ridesharing-ios

# Install dependencies (can take a while)
$ pod install- Open Ridesharing.xcworkspace
- Add the publishable key to Utility >
Interface.swift>let publishableKeyconstant
public let publishableKey: String = "YOUR_PUBLISHABLE_KEY_HERE"- Create a Firebase project. For detail steps refer to Step 1: https://firebase.google.com/docs/ios/setup#create-firebase-project
- Register Driver app with
com.hypertrack.ridesharing.driver.ios.githubbundle ID and Rider app withcom.hypertrack.ridesharing.rider.ios.githubbundle ID. More details in Step 2: https://firebase.google.com/docs/ios/setup#register-app - Move Driver app's
GoogleService-Info.plistto the Driver app target and Rider's to Riders. Described in Step 3: https://firebase.google.com/docs/ios/setup#add-config-file No need to follow Step 4 and 5, they are already implemented in the app. - Create Cloud Firestore database in test mode by following the "Create a Cloud Firestore database" section from this guide https://firebase.google.com/docs/firestore/quickstart#create No need to follow other steps, they are already implemented in the app.
- Follow instructions in our firebase repo to setup Firebase Cloud Functions that act as a backend, interacting with HyperTrack APIs.
- Note that Firebase Cloud Firestore and Cloud Functions are not required to use HyperTrack SDKs. You may have your own server that is connected to your apps.
- You can run the Rider app in Simulator, but Driver app needs to be run on-device due to Simulator's lack of motion hardware.
- Being able to run the apps and signup means that the whole setup works.
- In these samples apps, Driver app creates actions for pickup and drop, which are tracked by Driver & Rider apps. See architecture for details.
For detailed documentation of the APIs, customizations and what all you can build using HyperTrack, please visit the official docs.

- The driver app uses HyperTrack SDK (iOS/Android) to send his location, name, and metadata to HyperTrack's servers.
- Driver and Rider apps use HyperTrack Views (iOS/Android) to show the driver's current location and trip's route.
- Driver and Rider apps are subscribed to Firebase Cloud Firestore to sync users and orders between them.
- Firebase Cloud Functions react to the order status field in Cloud Firestore, create and complete trips using HyperTrack APIs, listen to HyperTrack Webhooks and update the order status and trip fields with new results.
Step by step process of communication:
- Driver sign-ups with his data. This
- Creates a new document with driver's data in users collection in Cloud Firestore
- Adds the name and metadata through HyperTrack SDK for the driver. HyperTrack SDK starts tracking the driver's location. From this point, the driver can be seen in HyperTrack Dashboard
- The driver is checking Cloud Firestore's orders collection periodically, looking for orders with the
NEWstatus - Rider sign-ups with his data. This creates a new document with rider's data in users collection in Cloud Firestore
- Rider chooses pickup and dropoff places, which creates a new order in orders collection in Cloud Firestore
- The driver is accepting this order, changing its status to
ACCEPTEDand setting his data in the order - This change triggers
updateOrderStatusFirebase Cloud Function. The function creates a trip from the driver's current position to the rider's pickup point using HyperTrack API. Then it changes the order status toPICKING_UP. - Driver and Rider apps are subscribed to their order. When they see that the status is
PICKING_UP, they use HyperTrackViews SDK to display the trip from the order on a map. - When a driver crosses destination geofence of the rider's pickup point, a webhook from HyperTrack to Firebase Cloud Function is triggered. This function updates the order to
REACHED_PICKUPstate. - Upon receiving
REACHED_PICKUPorder state, the Driver app shows a "Start Trip" button. When the driver presses it, Driver app changes the order status toSTARTED_RIDEstate - Upon receiving the
STARTED_RIDEstate, Firebase Cloud Function call HyperTrack APIs to complete the previous trip and create a new trip to the rider's destination. After the trip is created, the function updates the order status toDROPPING_OFF. - When Driver and Rider apps see the
PICKING_UPstatus, they use HyperTrackViews SDK to display the new trip on a map. - When a driver crosses destination geofence of the rider's dropoff point, a webhook from HyperTrack to Firebase Cloud Function triggers again. This function updates the order to
REACHED_DROPOFFstate. - Upon receiving
REACHED_DROPOFForder state, the Driver app shows a "End Trip" button. When the driver presses it, Driver app changes the order status toCOMPLETEDstate. - Firebase Cloud Function completes the dropoff trip at this point.
- When this trip is completed, Rider and Driver app show trip summary using HyperTrackViews SDK.
Ridesharing Driver app uses HyperTrack SDK to track driver's position in 3 cases:
- When app is active to display all drivers locations on riders maps
- When driver is picking up rider
- When driver is dropping off rider
You can find the SDK documentation here.
Driver app integrates HyperTrack SDK with silent push notifictions to:
- Start tracking location immediately when Firebase creates a trip for accepted order
- Stop tracking location when app is backgrounded and there are no trips lift
HyperTrack SDK has four methods to integrate silent push notifications:
registerForRemoteNotifications(), registers the app in OS to receive notificationsdidRegisterForRemoteNotificationsWithDeviceToken(_:)to transfer device token to HyperTrack SDKdidFailToRegisterForRemoteNotificationsWithError(_:)to signal failure to register for remote notificationsdidReceiveRemoteNotification(_:fetchCompletionHandler:)transfers silent push notification to HyperTrack SDK
Here is how they are integrated in Driver app:
 func application(
    _: UIApplication,
    didFinishLaunchingWithOptions
    _: [UIApplication.LaunchOptionsKey: Any]?
  ) -> Bool {
    /// Register for remote notifications to allow bi-directional communication model with the
    /// server. This enables the SDK to run on a variable frequency model, which balances the
    /// fine trade-off between low latency tracking and battery efficiency, and improves robustness.
    /// This includes the methods below in the Remote Notifications section
    HyperTrack.registerForRemoteNotifications()
    /// Configure Firebase
    FirebaseApp.configure()
    return true
  }

  func application(
    _: UIApplication,
    didRegisterForRemoteNotificationsWithDeviceToken deviceToken: Data
  ) {
    HyperTrack.didRegisterForRemoteNotificationsWithDeviceToken(deviceToken)
  }

  func application(
    _: UIApplication,
    didFailToRegisterForRemoteNotificationsWithError error: Error
  ) {
    HyperTrack.didFailToRegisterForRemoteNotificationsWithError(error)
  }

  func application(
    _: UIApplication,
    didReceiveRemoteNotification userInfo: [AnyHashable: Any],
    fetchCompletionHandler completionHandler:
    @escaping (UIBackgroundFetchResult) -> Void
  ) {
    HyperTrack.didReceiveRemoteNotification(
      userInfo,
      fetchCompletionHandler: completionHandler
    )
}HyperTrack SDK initializes successfully when nothing prevents it from tracking. This is modeled by Result type. Here, in Driver app, when Result is .success we present one UI and when it's .failure another. This ensures that UI that get initialized SDK won't get null, and can use the SDK freely, and UIs designed for error handling won't get SDK at all, and will only display errors.
switch HyperTrack.makeSDK(
  publishableKey: HyperTrack.PublishableKey(getPublishableKeyfromPlist())!
) {
  case let .success(hypertrack):
    let store = Store(
      initialValue: AppState(),
      reducer: appReducer
    )
    let dataflow = DriverDataFlow(store: store, hypertrack: hypertrack)
    return AnyView(ContentView(
      store: store,
      dataflow: dataflow,
      hypertrack: hypertrack
    ))
  case let .failure(error):
    switch error {
      case let .developmentError(devError):
        fatalError("\(devError)")
      case let .productionError(prodError):
        return AnyView(ErrorView(store: Store(
          initialValue: AppState(),
          reducer: appReducer
        ), error: HError(error: prodError)))
    }
}
DeviceID is used to identify a device on HyperTrack. Driver app uses this ID when creating a user in Firebase.
private func makeNewUser() {
  let user = User(
    id: nil,
    role: .driver,
    name: name,
    phone_number: phone,
    device_id: hypertrack.deviceID,
    car: User.Car(model: carModel, license_plate: carPlate)
  )
  setNewFirestoreUser(db, user) { result in
    switch result {
      case let .success(user):
        self.makeHTUser(user)
        self.store.value.user = user
        self.store.update(.permissions)
      case let .failure(error):
        print("An error occurred: \(error)")
    }
  }
}
Later in Views SDK snippets, both Driver and Rider app are using this ID to display driver on a map.
Device name and metadata are displayed in HyperTrack's dashboard. To make it easy for operators to find drivers by their name or filter them by metadata, Driver app sets those fields using User model from Firebase:
private func makeHTUser(_ user: User) {

  let id = user.id ?? ""
  let name = user.id ?? ""
  let phoneNumber = user.phone_number ?? ""
  let carModel = user.car?.model ?? ""
  let carLicensePlate = user.car?.license_plate ?? ""
  let car = ["model": carModel, "license_plate": carLicensePlate]

  hypertrack.setDeviceName(user.name)
  if let metadata = HyperTrack.Metadata(dictionary: [
    "user_id": id,
    "name": name,
    "phone_number": phoneNumber,
    "car": car
  ]) {
    hypertrack.setDeviceMetadata(metadata)
  }
}Driver app tracks the driver in an interesting way. We want to always track driver when the app is running in foreground. This allows us to show cars of available drivers in Rider app's map. At the same time we want to track drivers in background only when they have an active order. In this snippet we subscribe to OS notifications and call start() tracking when app is brought to foreground. But when the app is going into background we consult with syncDeviceSettings() to stop tracking if driver doesn't have active trips.
.onReceive(appStateReceiver.$notification) { notification in
  switch(notification.name, self.store.value.user) {
    case (UIApplication.didBecomeActiveNotification, let user):
      self.hypertrack.start()
    case (UIApplication.didEnterBackgroundNotification, _):
      self.hypertrack.syncDeviceSettings()
    default: break
  }
}Both Rider and Driver apps use HyperTrackViews SDK to display realtime location and trip updates on a map.
Both Driver and Rider apps subscribe to driver's location updates using subscribeToMovementStatusUpdates(for:completionHandler:) method:
func createUserMovementStatusSubscription() {
  ht_cancelable =
    hyperTrackViews.subscribeToMovementStatusUpdates(
      for: self.hypertrack.deviceID,
      completionHandler: { [weak self] result in
        guard let self = self else { return }
        switch result {
          case let .success(movementStatus):
            self.movementStatusWillChange.send(movementStatus)
            self.getTripSummary()
          case let .failure(error):
            dump(error)
            self.createUserMovementStatusSubscription()
        }
      }
    )
}MapKit part of the library can put any CLLocation as devices location.
Driver's location is taken from MovementStatus:
private func configureForNewState(_ mapView: MKMapView) {
  removeAllAnnotationExceptDeviceAnnotation(mapView: mapView)
  mapView.addAnnotations(dataflow.orderList.map { OrderAnnotation(order: $0) } )
  if let movementStatus = self.movementStatus {
    put(.location(movementStatus.location), onMapView: mapView)
  }
}
Rider's location is taken from the map itself:
private func configureForLookingState(_ mapView: MKMapView) {
  guard let location = self.location else { return }
  put(.location(location), onMapView: mapView)
}
When driver is picking up or dropping off rider, the estimated route is displayed. This route comes from a trip, and .locationWithTrip enum is used to display both driver's current position and his route to destination:
private func configureForDrivingState(_ mapView: MKMapView) {
  if let device = self.dataflow.userMovementStatus, let trip = mStatus.trips.first(
    where: { $0.id == self.dataflow.store.value.order?.trip_id }
  ) {
    put(.locationWithTrip(device.location, trip), onMapView: mapView)
  } else {
    configureForLookingState(mapView)
  }
}In apps that show tracking data, usually user needs to see all the data on the screen, be it current location, trip polylines or destination markers. This view needs to re-zoom with animation every time the data is changing. This is done in the Uber app.
We also don't want to auto-zoom if user touched the map and zoomed in to his location of choise. In this snippet a private function decides, based on user's input, if auto-zoom is needed and uses our Views function (zoom(withMapInsets:interfaceInsets:onMapView:)) that understands what is shown on the screen (be it current location, trip or summary) and auto-zooms on it.
This function can take different values for insets based on distance in meters (here we are making an inset for 100 meters in all directions, so elements won't touch the screen. But also there are cases where UI elements are shown on top of our map, and in those cases we don't want to accidentally miss relevent data under those elemets. For those cases the zoom function has interfaceInsets parameter.
In this case we have a card at the bottom 250 points in height, and a statusbar element at the top for 10 points.
private func isZoomNeeded(_ mapView: MKMapView) {
  if self.isAutoZoomEnabled {
    zoom(
      withMapInsets: .all(100),
      interfaceInsets: .custom(
        top: 10,
        leading: 10,
        bottom: 250,
        trailing: 10),
      onMapView: mapView)
  }
}Feel free to clone, use, and contribute back via pull requests. We'd love to see your pull requests - send them in! Please use the issues tracker to raise bug reports and feature requests.
We are excited to see what live location feature you build in your app using this project. Do ping us at help@hypertrack.com once you build one, and we would love to feature your app on our blog!
Join our Slack community for instant responses. You can also email us at help@hypertrack.com.