HybPiper Legacy Wiki
These documents will cover more in depth installation instructions and tutorials for different ways to use HybPiper.
HybPiper expects "clean" sequencing reads in FASTQ format. What "clean" means is up to the user, but we recommend Trimmomatic, which can remove poor quality reads, trim poor quality base calls, and remove adapter sequences. If you are interested in calculating coverage depth exactly, you may also want to remove PCR duplicates, but this is not necessary.
HybPiper can accept either single-end or paired-end data. As of version 1.2, you may also include a file containing unpaired reads with the --unpaired flag.
It is a good idea to rename your read-files so that they contain a unique identifier for each sample. This will be useful for running HybPiper automatically on many samples. For an example, see the test dataset in the Tutorial.
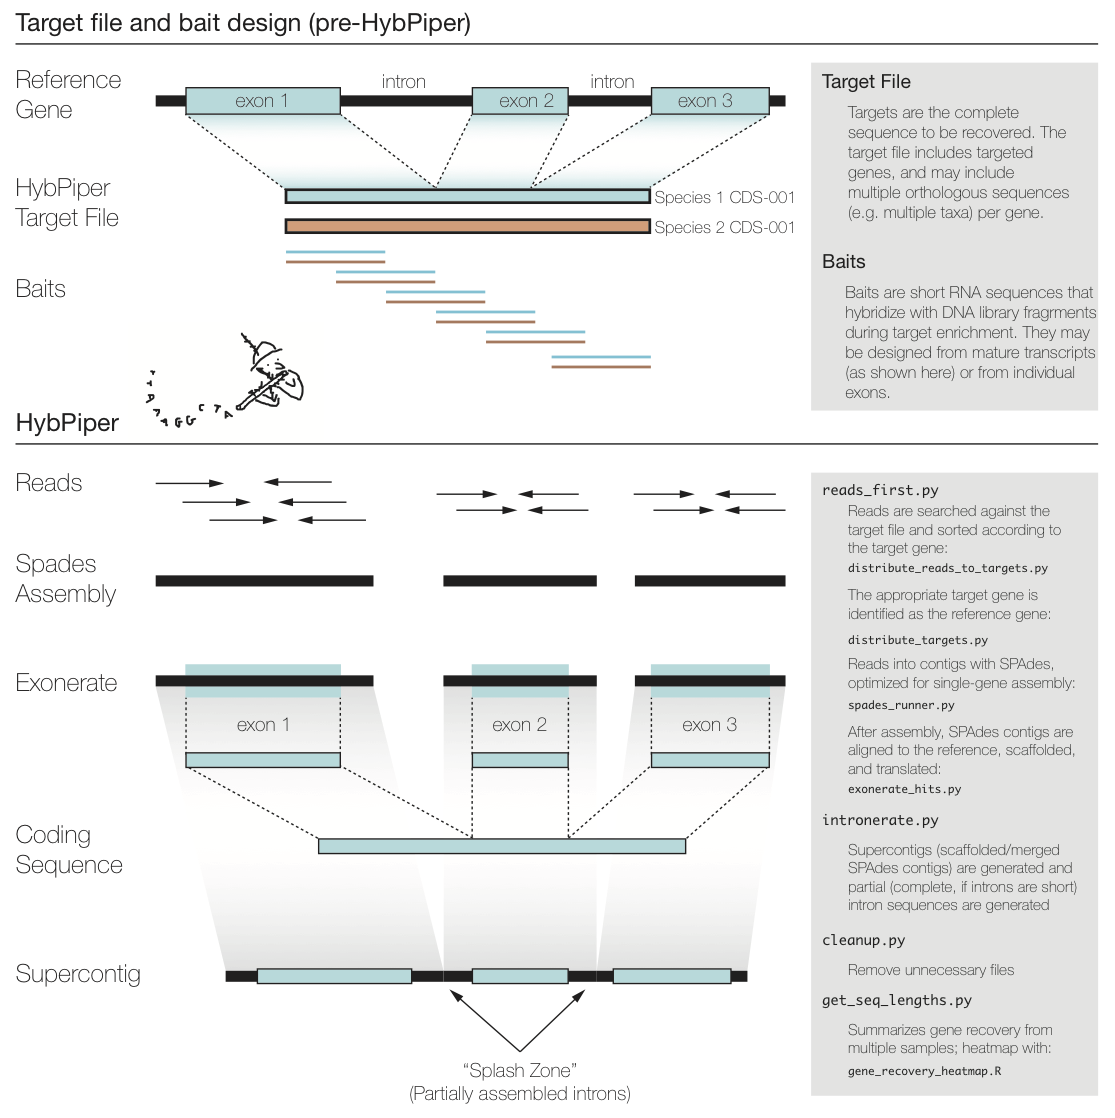
The figure above summarizes a typical exon enrichment setup that targets coding regions of genes for phylogenetics. The baits (short lines) are tiled across the exons. HybPiper uses the coding sequence portion of a gene for both mapping sequencing reads and for alignment of contigs. When generating a "target file" for HybPiper (see below), exon sequences should be concatenated for each gene. Another way to think of the target sequence is as the mature RNA sequence produced by this gene.
The reason HybPiper treats coding sequences this way is to more accurately detect the exon/intron boundary when aligning the assembled contigs against the reference sequence. HybPiper will align assembled contigs to the full gene sequence and will separate exon sequences from intron sequences.
HybPiper uses target sequences to first sort the reads and then extract exon sequences from assembled contigs, for each gene sepearately. In order to run HybPiper, you will need to prepare a "target file," a FASTA file that contains one or more homologous sequences for each gene.
If you are using HybPiper on data generated using HybSeq, the target file should contain the full-length reference sequences for each gene, NOT the probe sequences.
IMPORTANT: If you are using BLAST to map reads to targets, you need a PROTEIN target file. If you are using BWA, you need a NUCLEOTIDE target file.
Construct a "target file" of protein sequences in FASTA format. It is ok to have more than one "source sequence" per bait. The ID for each sequence should include the bait source and the protein ID, separated by a hyphen. For example:
>Amborella-atpH
MNPLISAASVIAAGLAVGLASIGPGVGQGTAAGQAVEGIARQPEAEGKIRGTLLLSLAFM
>Aneura-atpH
MNPLIPAASVIAAGLAVGLASIGPGIGQGTAAGQAVEGIARQPEAEGKIRGTLLSSPASM
>Amborella-rbcL
MSPKTETKASAGFKAGVKDYRLTYYTPDYETLATDILAAFRVTPQPGVPPEEAGAAVAAE
>Aneura-rbcL
MSPQTETKAGVGFKAGVKDYRLTYYTPEYETKETDILAAFRMTPQPGVPPEEAGAAVAAE
Clone the HybPiper repository from GitHub:
git clone https://github.com/mossmatters/HybPiper.git
#Dependencies
- Python 2.7 or later (to use the argparse module for help documents)
- BIOPYTHON 1.59 - 1.79 (For parsing and handling FASTA and FASTQ files)
- EXONERATE (For aligning recovered sequences to target proteins)
- BLAST command line tools (Aligning reads to target protiens)
- SPAdes (Assembling reads into contigs)
- GNU Parallel (Handles parallelization of searching, assembling, and aligning)
Required for BWA version of the pipeline and for the intron and depth calculation scripts:
NOTE: A previous version of the pipeline required Velvet and CAP3 for assembly. These have been unreliable at assembling individual genes, and SPAdes has replaced them.
#Setup
##Install the dependencies.
Normal installations are fine for most tools, as long as they are in your $PATH. Here are some tips on installing individual tools. Your mileage may vary!
###Python and BioPython The Anaconda distribution may be easiest to use and install. If you use Anaconda, installing BioPython is as easy as:
conda install biopython
Or with a plain installation of Python and the pip package manager:
pip install biopython or sudo pip install biopython
###BLAST
The BLAST command-line tools may be downloaded as pre-compiled binaries from the NCBI website (see above), and the binaries should be in your $PATH.
###Spades
If you download pre-compiled binaries, make sure that the contents of spades/bin and spades/share/spades are in your $PATH
For GNU Parallel, you will have to accept the "license" before you are able to use the tool as part of HybPiper. From the command line run:
parallel --bibtex
This will display citation information on GNU Parallel. You remove the message by typing will cite and hitting enter.
###MACOSX installation notes
Both Exonerate and SPAdes require zlib. Installation of libraries can be messy, so on MacOSX, perhaps the easiest way to install Exonerate is with homebrew: http://brew.sh/
Install homebrew, and then "tap" the science repository:
brew tap homebrew/science
Now install exonerate:
brew install exonerate
Homebrew will install zlib as part of the dependencies for exonerate.
You can also install most of the other tools this way:
brew install bwa
brew install samtools
brew install spades
brew install blast
brew install parallel
I have also found that on some systems (typically after the El Capitan update), Spades may fail with an "image not found" error. If this happens, the most reliable fix is to use homebrew to install the most recent version of GCC:
brew install gcc
Also make sure that the homebrew directory, /usr/local/bin is first in your $PATH in your .bash_profile.
You can check the installation by executing the reads_first.py script with the --check-depend flag.
For a full tutorial using a test dataset, check out the Tutorial below.
HybPiper is run separately for each sample (single or paired-end sequence reads). When HybPiper generates sequence files from the reads, it does so in a standardized directory hierarchy. Many of the post-processing scripts rely on this directory hierarchy, so do not modify it after running the initial pipeline. It is a good idea to run the pipeline for each sample from the same directory. You will end up with one directory per run of HybPiper, and some of the later scripts take advantage of this predictable directory structure.
To execute the entire pipeline, create a directory containing the paired-end read files.
The script reads_first.py will create a directory based on the fastq filenames (or use the --prefix flag):
Anomodon-rostratus_L0001_R1.fastq ---> Anomodon-rostratus/
The following command will execute the entire pipeline on a pair of Illumina read files, using the baits in the file baits.fasta. The HybPiper scripts should be in a different directory:
python /Users/mehmattski/HybPiper/reads_first.py -r MySpecies_R1.fastq MySpecies_R2.fastq -b baits.fasta
The BLASTx version of the pipeline (default) will map the reads to amino acid bait sequences sequences. Although it is slower than the BWA version, it may have higher specificity. Reads may not align to divergent nucleotide bait sequences, which are required for the BWA version. If you find the recovery efficiency is poor with BWA, you may want to try again with BLASTx.
A wrapper script that:
-
Can check if all dependencies are installed correctly. (
--check-depend) -
Creates sub-directories.
-
Calls downstream analyses
You can tell the script to skip upstream steps (for example: --no-blast) but the script will still assume that the output files of these steps still exist!
This script will call, in order:
-
Blastx (or BWA)
-
distribute_reads_to_targets.py(ordistribute_reads_to_targets_bwa.py) anddistribute_targets.py -
Run SPAdes assembler.
-
exonerate_hits.py
Some program-specific options may be passed at the command line.
For example, the e-value threshold for BLASTX (--evalue, default is 1e-9), the coverage-cutoff level for SPAdes assemblies (--cov_cutoff, default is 8), or the percent-identity threshold for aligning contigs to the reference sequences (--thresh, the default is 55).
Use reads_first.py -h for a full list of customizable parameters
After a BLASTx search of the raw reads against the target sequences, the reads need to be sorted according to the successful hits. This script takes the BLASTx output (tabular) and the raw read files, and distributes the reads into FASTA files ready for assembly.
If there are multiple BLAST results (for example, one for each read direction), concatenate them prior to sorting.
After a BWA search of the raw reads against the target sequences, the reads need to be sorted according to the successful hits. This script takes the bam output (parsed using samtools) and the raw read files, and distributes the reads into FASTA files ready for assembly.
If there are multiple BAM results (for example, one for each read direction), concatenate them prior to sorting.
Given a file containing all of the "baits" for a target enrichment, create separate FASTA files with all copies of that bait. Multiple copies of the same bait can be specified using a "-" delimiter. For example, the hits against the following two baits will be sorted in to the same file:
Anomodon-rbcl
Physcomitrella-rbcl
Given multiple baits, the script will choose the most appropriate 'reference' sequence using the highest cumulative BLAST scores across all hits. If the search was BWA rather than BLAST, it will use the bait with the highest total BWA alignment score for each gene.
Output directories can also be created, one for each target category (the default is to put them all in the current one). The field delimiter may also be changed.
This script generates alignments of SPAdes contigs against the target sequence.
If BLASTx is used, the model is protein2genome
If BWA is used, the model is coding2genome
Contigs are not expected to overlap much. An inital exonerate search is filtered for hits that are above a certain threshold (default is 55, can be changed in reads_first.py with --thresh). Contigs that pass this filter are arranged in order along the alignment. If one contig completely subsumes the range of another contig, the longer contig is saved.
To maximize the chance that Exonerate may find introns, all contigs that pass the previous steps are concatenated into a "supercontig" and the exonerate search is repeated. Once again, unique hits that pass a percent identity threshold and do not overlap with longer hits are saved, and from this the full length CDS and protein sequences are generated.
In the older version of the script ("assemble-first"), the script was used after the query_file_builder is complete. The minimal inputs are the tailored target file and the assembly.
If run immediately after query_file_builder, use the --prefix flag to specify the file names:
EXAMPLE COMMAND LINE:
exonerate_hits.py speciesName/baitfile.FAA speciesName/assembly.fasta --prefix=speciesName
The threshold for accepting an exonerate hit can be adjusted with -t (Default: 55 percent)
Optional utilities after running the pipeline for multiple assemblies:
NOTE: for these utilities to work, the files must be in the same directory hierarchy created by the pipeline. (i.e. species/sequences/FAA/ and species/sequences/FNA/)
HybPiper generates a lot of output files. Most of these can be discarded after the run. This script handles deleting unnecessary files, and can reduce the size of the directory created by HybPiper by 75%.
python cleanup.py hyb_seq_directory
By default the script will delete all the files generated by Spades. Other options may be added in the future.
This script will summarize the recovery of genes from multiple samples. If you have all of these separate runs of the HybPiper in the same directory, create a namelist.txt file that contains a list of all the HybPiper directories for each sample (one per line):
Sample1
Sample2
Sample3
Specify the location of the target file and whether it is amino acid or nucleotide on the command line:
python get_seq_lengths.py baitfile.fasta namelist.txt dna > gene_lengths.txt
The script will output a table to stdout. The first line is a header containing the gene names. The second line contains the length of the reference for each gene. If there are multiple reference sequences for each gene, an average is reported. The remaining lines are the lengths recovered by the HybPiper for each sample, one sample per line (one column per gene). If the gene is missing, a 0 is indicated.
A warning will print to stderr if any sequences are longer than 1.5x the average reference length for that gene.
Species	26S	18S
MeanLength	3252.0	1821.6
funaria	3660	1758
timmia	3057	1821
This script will summarize target enrichment and gene recovery efficiency for a set of samples. The output is a text file with one sample per line and the following statistics:
- Number of reads
- Number of reads on target
- Percent reads on target
- Number of genes with reads
- Number of genes with contigs
- Number of genes with sequences
- Number of genes with sequences > 25% of the target length
- Number of genes with sequences > 50% of the target length
- Number of genes with sequences > 75% of the target length
- Number of genes with sequences > 150% of the target length
- Number of genes with paralog warnings
NOTE: The number of reads and percent reads on target will only be reported if mapping was done using BWA.
Example Command Line
python hybpiper_stats.py test_seq_lengths.txt namelist.txt > test_stats.txt
This script takes the ouput of get_seq_lengths.py and creates a figure to visualize the recovery efficiency.
Unlike the python scripts, you will need to open the R script in a text editor or RStudio and edit a few parameters before running the script within R.
The script requires two R packages: gplots and heatmap.plus
Install these using install.packages before running the script.
You will need to set the name of your input file (the one produced by get_seq_lengths.py) at the top of the script.
The output will look something like this:
Each row shows a sample, and each column is a gene. The amount of shading in each box corresponds to the length of the gene recovered for that sample, relative to the length of the reference (target coding sequence).
In this case, there are a few samples for which few or no genes were recovered (white rows) and a few genes that were not recovered in any sample (white columns).
This script fetches the sequences recovered from the same gene for many samples and generates an unaligned multi-FASTA file for each gene.
This script will get the sequences generated from multiple runs of the HybPiper (reads_first.py). Have all of the runs in the same directory (sequence_dir). It retreives all the gene names from the target file used in the run of the pipeline.
python retrieve_sequences.py baitfile.fasta sequence_dir dna
You must specify whether you want the protein (aa) or nucleotide (dna) sequences.
If you ran intronerate.py on these samples, you can also specify "supercontig" or "intron" to recover those sequences instead.
Will output unaligned fasta files, one per gene, to the current directory.
(Specified by --prefix or generated from the read file names)
- The master target file.
- A BLAST (
prefix.blastx) or BWA database (prefix.bam) is generated - One directory is generated for every gene with BLAST or BWA hits.
- A file
bait_tallies.txtsummarizes which target sources were chosen. -
spades_genelist.txt: List of genes with mapped reads. -
exonerate_genelist.txt: List of genes with assembled contigs. -
genes_with_seqs.txt: List of genes for which a coding sequence was extracted. -
genes_with_paralog_warnings.txt: List of genes which had multiple long-length contigs (putative paralogs).
####If intronerate.py is run
-
intron_stats.txt: List of genes and the number of internal introns recovered.
-
GeneName_interleaved.fasta: All reads that mapped to the target. (The read pairs are interleaved.) - SPAdes output. Final assembly is in
GeneName_contigs.fasta -
GeneName_baits.fasta: Fasta file for reference target chosen by thedistribute_targets.pyscript. - Directory of Exonerate results (with same name as the sample)
-
exonerate_results.fasta-- Results of the initial exonerate search for all contigs. -
supercontig_exonerate.fasta-- Long concatenated contig from final exonerate search. -
exonerate_stats.csv: information on all contigs with exonerate hits against the target sequence -
sequencesdirectory
-
intronerate_raw.gff: raw GFF output of exonerate, contains comments -
interonerate.gff: Modified GFF output used byinteronerate.py
- paralogs directory
-
FNA/GeneName.FNA: In-frame nucleotide sequence -
FAA/GeneName.FAA: Amino acid sequence.
-
intron/GeneName_introns.fasta: intron sequence recovered -
intron/GeneName_supercontig.fasta: gene region sequence (introns + exons)
The major steps of the pipeline include:
-
Blast (or BWA) search of the reads against the target sequences.
-
Distribution of reads into separate directories, one per gene.
-
Assembly of reads for each gene into contigs with SPAdes.
-
Conduct one or more exonerate searches for each contig in the assembly. If multiple contigs match the same protein in non-overlapping sequences, stitch the hits together into a “supercontig”
-
In a subdirectory, generate separate FASTA files containing either the nucleotide (FNA) or amino acid (FAA) sequence for each protein.
In many HybSeq bait designs, care is taken to avoid enrichment for genes with paralogous sequences in the target genomes. However, gene duplication and paleopolyploidy (especially in plants) makes it difficult to completely avoid paralogs. Given enough read depth, it may be possible to identify paralogous sequences with HybPiper.
If SPAdes assembler generates multiple contigs that contain coding sequences represeting 75% of the length of the reference protein, HybPiper will print a warning for that gene. It will also print the names of the contigs in prefix/genename/paralog_warning.txt and will print a list of all genes with paralog warnings to prefix/genes_with_paralog_warnings.txt.
If many of your genes have paralogs, one approach could be to add the paralog coding sequence to your target file as a separate gene, and re-running HybPiper. Reads that have a better mapping to the paralog will be sorted accordingly.
For more in-depth discussion about paralogs, see the examples in the paralog tutorial.
Using a High Performance Computing Cluster (HPCC) will greatly reduce the time required to run HybPiper.
Ensure the necessary dependencies have been installed. Whether the dependencies were installed locally or by a systems administrator, make sure the executables and Python packages are accessible in your $PATH. One way to check is by running:
reads_first.py --check-depend
It is a good idea to test this both interactively (on the Head Node) and via a job submission script.
If you intend to run HybPiper on multiple samples, generate a text file that contains the names of all of your samples, one per line. Rename your read files if necessary so they retain a common pattern.
Several users have reported strange behavior of HybPiper on HPCC systems. HybPiper may affect some HPCC systems because it creates a large number of intermediate files (roughly 130 files per gene per sample). Typically, these files are generated by one of the compute nodes, but is stored somewhere else. If HybPiper or one if its dependencies attempts to read a file that has not yet transferred to the storage drive, there will be errors.
One solution is to use Local Scratch Space, or a portion of the disk that is local to the compute node. Files can be generated temporarily, then copied to the user's storage space when HybPiper completes. How to access local scratch space will depend on your HPCC set up. Some systems use an automated $TMPDIR that will be automatically deleted when the job finishes. In other systems, the user must manually delete files before exiting the job.
Check with your HPCC System Administrator to see how to best utilize local storage space. Some systems may not support it. For example, on some systems a job may be moved to a new node mid-job, and HybPiper would lose access to previously generated files.
This script is written for the Torque/PBS Queuing System. It uses $TMPDIR to temporarily store the files. HybPiper is run sequentially on the sample names listed in namelist.txt. The output from one sample is copied to user storage and deleted before the next sample begins. The script requests a node with 12 free processors.
#!/bin/bash

#PBS -l nodes=1:ppn=12
#PBS -j oe
#PBS -q default
#PBS -o hybpiper.out

cd $TMPDIR

while read samplename
do
/path/to/HybPiper/reads_first.py \
   -r "/home/username/reads/$samplename_R1.fastq" \
   "/home/username/reads/$samplename_R1.fastq" \
   -b /home/username/targets.fasta \
   --bwa \
   --prefix $samplename \
   --cpu 12
python /path/to/HybPiper/cleanup.py $samplename
cp -r $samplename /home/username/hybpiper_results/$samplename
rm -r $samplename
done < /home/username/namelist.txt
Given a completed run of reads_first.py for a sample, run this script to generate "gene" sequences for each locus. The script will generat two new sequence files for each gene:
supercontig: A sequence containing all assembled contigs with a unique alignment to the reference protein, concatenated into one sequence.
introns: The supercontig with the exon sequences removed.
python interonerate.py --prefix hybseq_directory
Specify the name of a directory generated by reads_first.py in the prefix argument.
The default behavior is to refer to the file genes_with_seqs.txt to recover full length sequences only for the genes where exons were previously recovered. You may optionally supply a file containing a list of genes with --genelist filename
NOTE: The script will extract all sequence NOT annotated as exons by exonerate. This may be introns (or intergenic sequence), but it may also be mis-assembled contigs. While it may be difficult ot tell whether the sequence is "real" from a single sample, I recommend running intronerate.py on several samples. Then, extract the supercontig sequences with retrieve_sequences.py and align them. Sequences that appear in only one sample are probably from mis-assembled contigs and may be trimmed, for example using Trimal.
The purpose of this tutorial is to help familiarize you with the format of the input you need and output you should expect from running HybPiper. The tutorial uses a test dataset that is a subset of real Illumina data from an enriched library.
This tutorial assumes that you have some experience executing programs from the command line on a UNIX-like system. If you would like to learn more about the command line, or need a refresher, you can find a command line tutorial here.
Click this link to download the fastq files for the test dataset. Save it to the test_dataset directory.
in the HybPiper package downloaded from the repository, in the test_dataset directory:
test_reads_fastq.tar.gz contains paired reads from nine samples chosen from the initial HybPiper manuscript. It includes six "ingroup" samples (genus Artocarpus) and three outgroup samples. Each sample has a pair of fastq files, representing the forward and reverse read, generated on an Illumina MiSeq 2x300 platform. Note: If you cloned this git repository and do not have the "large file storage" add-on to git, the test_reads_fastq.tar.gz file in your repository will NOT be a real compressed archive. Please download the reads from the link above!
test_targets.fasta is a file containing the full coding sequence from 13 target genes based on the Artocarpus probe set described in the HybPiper manuscript. There are two "sources" of sequence for each target: Artocarpus (sequences from a draft genome in the target group) and Morus (a reference genome in the same family as Artocarpus). For example, both of these sequences represent gene002:
>Artocarpus-gene002
ATGATGAAGCAGGACGCCACCAACGGCGGCGAGAACTGGGTGCGCGTGTGCGACACGTGC
CGCTCGGCGGCGTGCACGGTTTACTGCCGCGCCGACTCGGCTTACCTCTGCGCCGGATGC
>Morus-gene002
ATGATGAAGGAGGACACAAACGGGGGCAACTCCAGCAAGAACTGGGCGCGCGTGTGTGAC
ACGTGCCGTTCCGCGGCGTGCGCGGTGTACTGCCGTGCCGACTCGGCGTACCTTTGCGCG
Having multiple sources for each gene increases the likelihood that reads will map to the targets during the first phase. HybPiper then chooses the version with the best overall mapping score to serve as a reference for extracting coding sequences.
namelist.txt A file containing the list of sample names, one per line. While not required, this file will help run the main HybPiper script and post-processing scripts on multiple samples.
run_tests.sh This shell script contains a few of the examples we will cover in this tutorial. The script can be run from within the test_dataset directory simply by:
./run_tests.sh
All of the commands in the bash script will be covered in more detail in the following sections.
First, change directories to the test_dataset directory. Uncompress the read files using tar:
tar -zxvf test_reads_fastq.tar.gz
This will generate 18 FASTQ files in your current directory, representing the forward and reverse Illumina reads for nine samples.
The main script of HybPiper is reads_first.py. HybPiper needs sequencing reads and a file containing the target coding sequences, in either amino acid or nucleotides.
HybPiper is run separately for each sample, and generates a directory that contains all of the output files, organized by gene.
Run this command from the `test_dataset' directory:
../reads_first.py -b test_targets.fasta -r NZ281_R*_test.fastq --prefix NZ281 --bwa
Using the wild card (asterisk) saves some typing and instructs HybPiper to use both the R1 (forward) and R2 (reverse) read files. The --prefix flag will be the name of the directory genreated by HybPiper, as well as the identifier for all sequences generated. The --bwa flag is required when the target file contains nucleotide sequences.
HybPiper will generate coding sequences and translated proteins from the sequencing reads in three phases:
- Read Mapping. BLASTX is used if the targets are amino acid sequences, and BWA is used if the targets are nucleotide sequences. Sequencing reads that map to each gene are sorted into separate directories. Liberal parameters for mapping quality are used to ensure the maximum number of reads are used for contig assembly.
- Contig assembly. Each gene is assembled separately from the pool of reads identified in the first step. Assembly is conducted using SPAdes, which automatically detects the best k-mer values to use. If one or more k-mer values fails (usually due to lack of depth), HybPiper re-runs SPAdes with smaller k-mer values.
- Coding Sequence Extraction First, HybPiper uses Exonerate to align the contigs to the appropriate target sequence. Next, the contigs are sorted according to their alignment position. If there is one contig that represents the entire aligned portion, it is chosen. Otherwise, a set of selection criteria are applied, including length of alignment to the target locus, percent identity between the contig and the target, and depth of coverage.
Briefly, if two contigs have non-overlapping alignments to the reference, they are combined into a "supercontig" and Exonerate is run again, for more accurate detection of intron boundaries. If two contigs have similar alignment to the target sequence, the contig with the longer alignment is chosen. If two contigs have identical alignment positions, but one contig has a much greater depth of coverage (10x more by default), it is chosen. If they both have similar depth, the contig with the greater percent identity to the target is chosen.
Although HybPiper is set up to run on each sample separately, if the input files are organized and named appropriately, it is easy to set up and run HybPiper on multiple samples consecutively.
Here, we will employ a "while loop" to get the names of samples from a file namelist.txt and use that name as a variable to access the names of read files and set the --prefix flag. From the test_dataset directory:
while read name;
do ../reads_first.py -b test_targets.fa -r $name*.fastq --prefix $name --bwa
done < namelist.txt
This should take only a few minutes to run through every sample. The "while loop" syntax and the namelist.txt file will also be used for other post-processing scripts later in the tutorial.
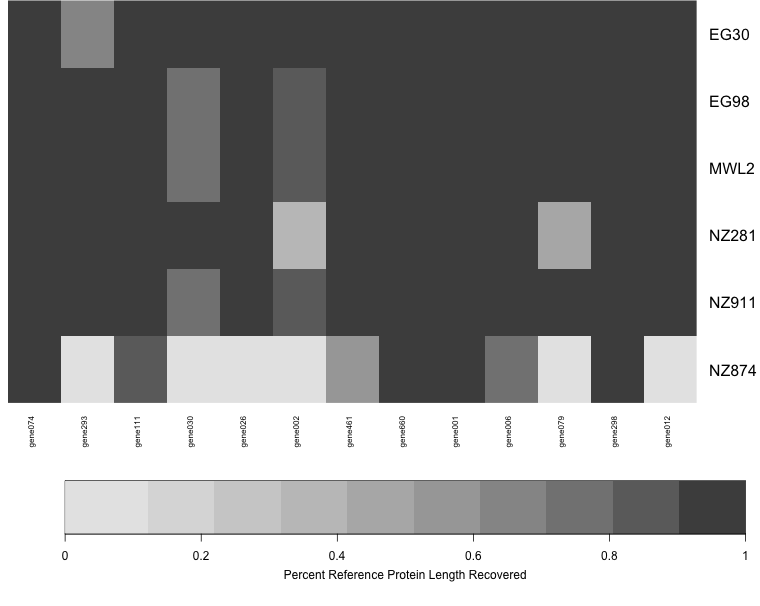
A heatmap is one way to get a quick glance of the overall success of HybPiper in recovering coding sequences. To generate the heatmap, we first need to collect the length of coding sequence recovered by HybPiper for each gene and sample. This uses the script get_seq_lengths.py:
python ../get_seq_lengths.py test_targets.fasta namelist.txt dna > test_seq_lengths.txt
The first line of test_seq_lengths.txt has the names of each gene. The second line has the length of the target gene, averaged over each "source" for that gene. The rest of the lines are the length of the sequence recovered by HybPiper for each gene. If there was no sequence for a gene, a 0 is entered.
To use the heatmap script gene_recovery_heatmap.R, open the script in an interactive R session (for example, using RStudio). You will need to install two R packages, gplots and heatmap.plus. On the sixth line of the script, enter the full path to your test_seq_lengths.txt file, and then execute the entire script.
This should plot a heatmap representing HybPiper's success at recovering genes at each locus, across all the samples.

Each column is a gene, and each row is a sample. The darkness of shading in each cell represents the length of the sequence recovered, expressed as a percentage of the length of the target gene. In the test dataset, most genes worked very well, bu it is easy to see at a glance that some samples did not work well (NZ874) and some genes did not work as well (gene022).
hybpiper_stats.py
This script will summarize target enrichment and gene recovery efficiency for a set of samples. The output is a text file with one sample per line and the following statistics:
- Number of reads
- Number of reads on target
- Percent reads on target
- Number of genes with reads
- Number of genes with contigs
- Number of genes with sequences
- Number of genes with sequences > 25% of the target length
- Number of genes with sequences > 50% of the target length
- Number of genes with sequences > 75% of the target length
- Number of genes with sequences > 150% of the target length
- Number of genes with paralog warnings
NOTE: The number of reads and percent reads on target will only be reported if mapping was done using BWA.
Example Command Line
python hybpiper_stats.py test_seq_lengths.txt namelist.txt > test_stats.txt
retrieve_sequences.py
This script fetches the sequences recovered from the same gene for many samples and generates an unaligned multi-FASTA file for each gene.
This script will get the sequences generated from multiple runs of the HybPiper (reads_first.py). Have all of the runs in the same directory (sequence_dir). It retreives all the gene names from the target file used in the run of the pipeline.
python ../retrieve_sequences.py test_targets.fasta . dna
You must specify whether you want the protein (aa) or nucleotide (dna) sequences.
If you ran intronerate.py on these samples, you can also specify "supercontig" or "intron" to recover those sequences instead.
The script will output unaligned fasta files, one per gene, to the current directory.
We have prepared more in-depth discussions about extracting introns or diagnosing putative paralogs on separate pages.
Optional utilities after running the pipeline for multiple assemblies:
NOTE: for these utilities to work, the files must be in the same directory hierarchy created by the pipeline. (i.e. species/sequences/FAA/ and species/sequences/FNA/)
###cleanup.py
HybPiper generates a lot of output files. Most of these can be discarded after the run. This script handles deleting unnecessary files, and can reduce the size of the directory created by HybPiper by 75%.
python ../cleanup.py EG30
By default the script will delete all the files generated by Spades. Other options may be added in the future.
When running the main script, you may notice occasional warnings about paralogs. These warnings are triggered when HybPiper detects multiple contigs containing long coding sequences-- by default at least 85% of the reference sequence. HybPiper will choose among these competing long contigs by first checking whether one of the contigs has coverage depth that greatly exceeds the others (10x by default). If all competing long contigs have similar depth, the sequence with the greatest percent identity to the reference is chosen.
These criteria may not be ideal in all cases, especially in the event of gene (or genome) duplication. Choosing the appropriate gene copy to use for phylogenetics requires careful consideration, and HybPiper flags the genes that may require further attention. Note that there may be other reasons for multple long-length contigs: recent polyploidy, contamination, or even allelic variation may result in multiple reads.
HybPiper includes a post-processing script, paralog_investigator.py to extract coding sequences from alternative contigs. To run it on the test data, use the namelist.txt file and a while loop:
while read i
do
echo $i
python ../paralog_investigator.py $i
done < namelist.txt
The script will report the number of paralogs found for each gene. If many samples have more than one copy for many genes, it may indicate an ancient gene duplication. If one sample tends to have many copies, it may indicate it is a polyploid.
Paralog coding sequences are extracted into a file located at: prefix/gene/prefix/paralogs/gene_paralogs.fasta
Not all samples have paralog warnings, such as EG30. Some genes do not have any paralogs found, such as gene001. However, HybPiper recovered coding sequence from two contigs in the sample EG98 for gene002:
>EG98.0 NODE_4_length_1358_cov_56.9293_ID_43,Artocarpus-gene002,17,282,89.27,(-),1358,572
>EG98.main NODE_3_length_1380_cov_111.618_ID_41,Artocarpus-gene002,0,282,91.49,(+),17,869
The main refers to the paralog that was chosen during the initial run of HybPiper. The original names of the contigs from SPAdes is also shown. The main contig had about twice as much depth of coverage as the other paralog (111x vs 57x), and also had a higher percent identity (91.49% vs 87.27%).
Are these two sequences paralogs or alleles? The best way to check is to use multiple samples and build gene trees from the sequences. HybPiper includes the script paralog_retriever.py for this task. paralog_retriever.py will collect all paralogs from each sample in namelist.txt, along with all coding sequences from samples without paralogs, and output them to "standard output." If you have a list of genes for which you want to assess paralogs, you can use GNU Parallel:
parallel "python paralog_retriever.py namelist.txt {} > {}.paralogs.fasta" ::: gene002 gene006 gene030
The output to the screen should look like this:
gene030	1	6	4	1	5	1	4	4	4
gene006	1	2	2	1	2	1	2	2	2
gene002	1	2	2	1	2	1	2	2	2
This shows the number of paralogs for each gene. The columns are in the same order as namelist.txt.
The unaligned FASTA files generated by paralog_retriever.py can be used in a phylogenetics pipeline to align and reconstruct a phylogeny. If you have mafft and FastTree installed, you can create the tree directly from paralog_retriever.py using pipes:
python ../paralog_retriever.py namelist.txt gene074 | mafft --auto - | FastTree -nt -gtr > gene074.paralogs.tre

From the tree above (plotted using FigTree), you can see that for each species, the two sequences recovered form a clade. This means there is no evidence of an ancient duplication event for this gene. There may be another explanation for why HybPiper commonly found two competing sequences, such as alleles. For phylogenetics, choosing the main sequence for each species is sufficient.
Other genes have more complicated histories:
python ../paralog_retriever.py namelist.txt gene002 | mafft --auto - | FastTree -nt -gtr > gene002.paralogs.tre

We see that there are two distinct clades of sequences, sister to a clade of the outgroups (NZ874, EG30, and NZ281). The main sequences form one clade, meaning that this gene had an ancestral duplication within the outgroup.
Cases like the one above were common in the Artocarpus data on which the test dataset is based. By investigating each gene tree, it is possible to delineate which sequence is appropraite for phylogenetics. However, some samples may be missing one or both copies of the duplicated gene. Although the genes may really be lost, it is also possible that HybPiper was not able to recover both copies.
To test this possibility, one option is to create a new target file for HybPiper that includes examples of both copies. HybPiper will map reads against each copy separately, treating them as separate loci. For the Artocarpus dataset, this allowed us to nearly double the number of "loci" for phylogenetics!
In most cases, issues with HybPiper can be identified by investigating which stage of HybPiper failed: mapping (BWA or BLAST), distribution of reads/targets, assembly (SPAdes), exon extraction (Exonerate). Saving the output of HybPiper to a file is the best way to identify problems. Here are some common issues and how to solve them:
parallel: command not found
One or more of the dependencies may be missing from the user's $PATH. Check to see that the dependencies are in the correct place with:
reads_first.py --check_depend
If you are running HybPiper on a Cluster, it is a good idea to also run this command as a submitted job-- the $PATH may be different for submitted vs. interactive jobs.
ImportError: No module named importlib
ImportError: No module named argparse
Both of these errors suggest that HybPiper was called with an earlier version of Python. HybPiper requires Python 2.7.x (and Python 3 support is coming soon!).
If multiple versions of Python are on your system, ensure that the correct version is being called by HybPiper.
protname = hitname[1]
Index Error: list index out of range
This error occurs during the distribution of reads/targets. Typically, it means the target FASTA file is not properly formatted. Sequences in the target file should be named in the format >Source-GeneName. This allows for multiple orthologous sequences to be used for each gene. Please see the Tutorial and the example dataset for a full explanation of target file format.
option --cov-cutoff not recognized
This error is caused by an older version of SPAdes, which does not support the --cov-cutoff option. HybPiper requires SPAdes 3.5 or higher.