-
API
-
UI
The original example is from the book AWS CDK in Practice. I trimmed the parts I do not like, and added things I think are necessary; particularly temporary stacks, edit and delete endpoints, and all the enhancements to make things work in CI with Github Actions. You can find the original code in the chapters folder.
The repo showcases several AWS services working in tandem:
- The frontend gets deployed to an S3 bucket.
- Domain management is handled with Route 53, paired with ACM for SSL certificates.
- Data persistence is achieved with DynamoDB.
- The backend logic involves several Lambda functions.
- Step Functions orchestrate workflows.
The CDK code initializes various constructs like Route 53, ACM, and S3. The S3 construct, for instance, takes in ACM and Route 53 as dependencies to facilitate web hosting with a custom domain and SSL. Similarly, the API Gateway construct ties together Route 53, ACM, and DynamoDB.
The book considered only prod and dev environments. Instead, in the temp stack approach, any hardcoded values in the CDK constructs are replaced with dynamic values fetched from the environment configuration. The core of this setup lies in a couple of utility functions that enable temporary stacks: one that fetches the current branch name (either locally via Git or through GitHub Actions when running in a CI environment) and another that retrieves environment-specific configuration. Serverless Framework thinks of these and a lot of it is easier to setup and use. With cdk, it needs some work but it’s not impossible.
These scripts are generally run once to set up or scaffold the necessary environment:
cdk init app --language typescript # scaffold cdk
aws configure --profile cdk # configure the cdk profile
cdk bootstrap --profile cdk # configure cdk for that regionIf you're working on a feature branch or any other temporary branch and you want to deploy resources specific to that branch:
cd infrastructure
yarn build:branch
yarn cdk:branch deploy
yarn export:env
yarn cdk:branch destroy
yarn cdk:synth-branch

# at infrastructure folder
yarn cy:open
# at web folder
yarn cy:open-branchcd infrastructure
yarn build:dev
yarn cdk:dev
yarn export:env
yarn cdk:dev destroy
yarn cdk:synth
# at infrastructure folder
yarn cy:open
# at web folder
yarn cy:opencd infrastructure
yarn build:stage
yarn cdk:stage deploy
yarn export:env
yarn cdk:stage destroy
yarn cdk:synth-stage
# at infrastructure folder
yarn cy:open
# at web folder
yarn cy:open-stagecd infrastructure
yarn build:prod
yarn cdk:prod deploy
yarn export:env
yarn cdk:prod destroy
yarn cdk:synth-prodaws sts get-caller-identity --query Account --output text # retrieve your AWS account ID
cd infrastructure
yarn test # cdk tests with Jest
yarn cdk:reset # deletes cdk generated files, useful if synth failsgetEnvironmentConfig function at ./infrastructure/lib/get-env-config.ts is
used in the API gateway and S3 constructs to identify the backend and frontend
sub domains. It retrieves the environment configuration based on the provided
environment name (which could be a predefined one like 'dev', 'stage', 'prod' or
a dynamic branch name for other cases). The acquisition of the branch name
addresses both CI (GITHUB.REF in Github Actions) and local concerns (using git
rev-parse). The returned configuration includes the backend and frontend
subdomains specific to that environment or branch.
// For a predefined environment:
getEnvironmentConfig('dev')
// Returns:
// {
//   backend_subdomain: "dev-backend-cdk-book",
//   frontend_subdomain: "dev-frontend-cdk-book",
//   deployment: "dev"
// }

// For a custom branch named 'feature-x':
getEnvironmentConfig('feature-x')

// {
//   backend_subdomain: "feature-x-backend-cdk-book",
//   frontend_subdomain: "feature-x-frontend-cdk-book",
//   deployment: "feature-x"
// }The NODE_ENV environment variable is utilized in every lambda and the
construct as a naming convention to distinguish in the fixed deployments (dev,
stage, prod) and the temporary stacks (named after the branch).
NODE_ENV is in turn used in the scripts to control what environment we are
working with. Check out the package.json scripts.
In comparison to serverless framework, we mostly had to worry about the
package.jsonscripts (example) because stage parameter is built-in to the framework, abstracting away the need to get the environment config and utilize additional environment variables."get:branch": "git rev-parse --abbrev-ref HEAD", "sls": "sls", "deploy": "sls deploy", "deploy:branch": "BRANCH=$(npm run get:branch | awk 'END{print}') && sls deploy -s $BRANCH --param='ssmStage=dev'", "deploy:stage": "sls deploy -s stage --param='ssmStage=dev'", "export:env": "sls export-env --all", "export:env-branch": "BRANCH=$(npm run get:branch | awk 'END{print}') && npm run sls export-env -- -s $BRANCH --all --param='ssmStage=dev'", "export:env-stage": "sls export-env -s stage --all --param='ssmStage=dev'", "remove:branch": "BRANCH=$(npm run get:branch | awk 'END{print}') && npm run sls -- remove -s $BRANCH --param='ssmStage=dev'",
OIDC has been configured as shown here. The primary benefits are:
- No need to store long-term credentials and plan for their rotation
- Use your cloud provider’s native IAM tools to configure least-privilege access for your build jobs
- Even easier to automate with Infrastructure as Code (IaC)
We set it up once, use aws-actions/configure-aws-credentials and give the
GithubActions user free reign, while being confident that things are secure.

Cypress is used for backend API crud tests and UI crud tests.
getEnvironmentConfig is used to
identify the baseUrl for the backend in cypress.config file. The same file is
used for all deployments.
When building the frontend, a pre script uses the same function to identify
the backend url for the React app.
The same function is also used for the front-end cypress.config. In addition to that, at the frontend we utilize a function configAWSForLocal to configure AWS for local development by initializing the AWS credentials and retrieving the UI base URL (the S3 bucket) from the CloudFormation stack outputs. Mind that in CI that script is not run because the GithubActions user is different than our local user. Therefore in CI we acquire the S3 bucket url in a different manner, check PR.yml.
Also interesting, in PRs where we use temporary stacks, we identify the
environment via the branch name acquisition. On the other hand, in fixed
deployments like dev, stage, and prod, we calculate the deployment dynamically,
check out dev-stage-prod.yml.
At the time we did not have the ability to
export:env(which you will see below). If we had that available, we would not need to implementgetBaseUrlatweb/cypress/support/config-aws.ts. Albeit, these varied implementations showcase solutions where one or the other is not possible. In my opinion,export:envis preferred if available.
There is this neat plugin in Serverless Framework called
export-env that can
export your stack's env vars to the .env file. CDK does not have this utility
built in, but we can make it work. It will be slightly different in every cdk
setup, but the idea is about using CfnOutputs (in any construct) then utilzing a
script that uses AWS SDK's cfn.describeStacks to remotely get the specified
stack's data, and write it to the .env file.
There are a few constructs we are utilizing CfnOutput already, and these can
be added anywhere.
new CfnOutput(this, 'ApiGatewayUrl', {
  value: apiGateway.url,
})
At the end of a deployment, these values are already being printed out. The idea
is a to have a script to extract these values using AWS SDK's
cfn.describeStack.
First, as a convenience so that we do not have to think about stack name (temp stacks will be different each time, right?) we can add a write to a gitignored text file in our app. This way, we will not have to pass in an argument as the stack name (but we still could if we wanted)
// infrastructure/bin/infrastructure.ts
#!/usr/bin/env node
import 'source-map-support/register'
import * as cdk from 'aws-cdk-lib'
import fs from 'fs'
import path from 'path'
import {FinalStack} from '../lib/final-stack'

const app = new cdk.App()

const branchName = process.env.NODE_ENV || 'dev'
const stackName = `FinalStack-${branchName}`

new FinalStack(app, stackName, {
  env: {region: 'us-east-1', account: process.env.CDK_DEFAULT_ACCOUNT},
})

// Write the stack name to a file
const stackNameFilePath = path.resolve(__dirname, 'stack-name.txt')
fs.writeFileSync(stackNameFilePath, stackName)
Write the stack name to stack-name.txt. For temp branch named output-env it
would look like:
FinalStack-output-envAWS SDK's cfn.describeStacks uses AWS CloudFormation API to get the details of
the specified stack remotely from the actual source. In the main script
create-env-file.js, we can use the stack name and cfn.describeStacks, and
write out to the data to .env
// ./infrastructure/create-env-file.js

// uses AWS SDK's cfn.describeStacks, to remotely get the specified stack's data
// and writes them to the .env file
// Run this script after you deploy your CDK app.
const AWS = require('aws-sdk')
const fs = require('fs')
const path = require('path')

// Set the AWS region
AWS.config.update({region: 'us-east-1'})

// if process.env is provided (the case in CI), set the AWS credentials from the environment
if (process.env.AWS_ACCESS_KEY_ID && process.env.AWS_SECRET_ACCESS_KEY) {
  AWS.config.credentials = new AWS.Credentials(
    process.env.AWS_ACCESS_KEY_ID,
    process.env.AWS_SECRET_ACCESS_KEY,
    process.env.AWS_SESSION_TOKEN,
  )
} else {
  // Otherwise, assume the credentials are stored in the (local) credentials file
  AWS.config.credentials = new AWS.SharedIniFileCredentials({profile: 'cdk'})
}

// Create the CloudFormation service object
const cfn = new AWS.CloudFormation()

// pass the stack name in or read it from stack-name.txt
const stackNameFilePath = path.resolve(__dirname, './bin/stack-name.txt')
const stackName = process.argv[2] || fs.readFileSync(stackNameFilePath, 'utf-8')

if (!stackName) {
  console.error('Error: Please provide the stack name as an argument.')
  process.exit(1)
}

// Get the stack details
cfn.describeStacks({StackName: stackName}, (err, data) => {
  if (err) {
    console.error(`Error: ${err.message}`)
    return
  }

  // Extract the outputs from the stack details
  const outputs = data.Stacks[0].Outputs

  // Path to the .env file
  const envFilePath = path.resolve(__dirname, '.env')

  // Convert the outputs to a .env file format
  const envFileContent = outputs
    .map(output => `${output.OutputKey}=${output.OutputValue}`)
    .join('\n')

  fs.writeFileSync(envFilePath, envFileContent)

  console.log(`Wrote environment variables to ${envFilePath}`)
  console.log(envFileContent)
})
Mind that in CI we need write the values out to the CI envrionment:
- name: Export environment variables
  run: |
    cd infrastructure
    yarn export:env
echo "FrontendUrl=$(cat ./.env | grep FrontendUrl | cut -d '=' -f 2)" >> $GITHUB_ENVWe have 2 different openapi files covering the 2 approaches. The first approach
produces an openapi.json file, the second produces an openapi.yaml file. The
file type does not matter; use what fits your needs.
Alongside the 2 openapi spec files, we have 2 sets of diff and lint scripts; in the real world you will not have something like this. The approach was necessary to showcase both examples distinctively in a single repository.
For this approach we are using an
openapi.jsonfile at./infrastructure/api-specsfolder.
Optic helps in detecting schema changes in your OpenAPI specification
(openapi.json). It categorizes these changes as either breaking or
non-breaking.
# in ./infrastructure folder
yarn update:api-docs      # Generates JSON schemas and OpenAPI docs.
yarn optic:lint-json      # Lints the OpenAPI docs with Optic.
yarn optic:diff-json      # Detects breaking schema changes with Optic.
Use case scenario:
-
A breaking change is made to our types.
-
The OpenAPI docs are auto-generated from these types using
update-api-docs. -
optic:diff-jsonidentifies any breaking changes. -
Depending on the situation, we either roll back the change or update our API documentation to reflect it, informing service consumers about the potential impact. For the breaking change, we must update the version of our OpenAPI spec, so that the breaking change is communicated and Optic passes the test.
If no breaking changes are detected, the API documentation is updated, and
optic:diff-json executes successfully.
Sniffing on e2e tests against localhost -> schema diffing or schema updating with Optic (openapi.yml example)
For this approach we are using an
openapi.ymlfile at root folder.
Optic can also validate the accuracy of the OpenAPI spec by capturing traffic
from E2E tests and comparing it against the OpenAPI spec (openapi.json or
yml file).
# in ./infrastructure folder
yarn optic:verify # Captures E2E test traffic, detects breaking schema changes
This method also allows for interactive updates to the OpenAPI spec. It's
similar to optic:verify but includes prompts for additional observed changes
during E2E test capture.
# in ./infrastructure folder
yarn optic:update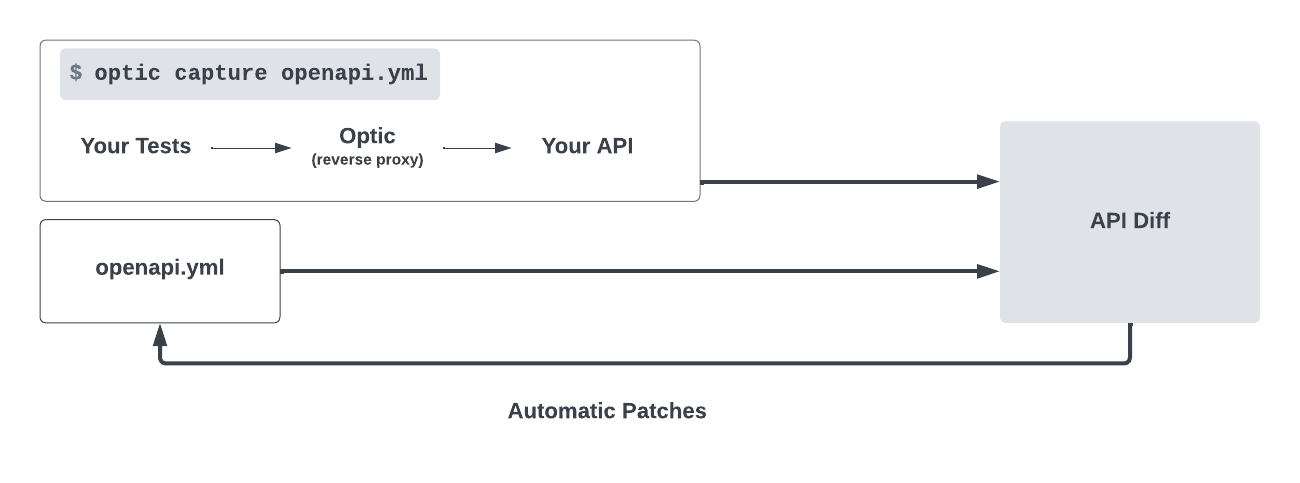
After capturing the OpenAPI spec, we can still use the same Optic lint or diff features.
yarn optic:lint-yml      # Lints the OpenAPI docs with Optic.
yarn optic:diff-yml      # Detects breaking schema changes with Optic.
Use case scenario:
-
Any black-box breaking change is made in our service code (not necessarily to types).
-
We find that breaking change with
optic:verify- this time using real e2e tests executing against localhost
- while Optic verifies these tests against our OpenAPI spec
-
At this point, if the reality does not match the current OpenAPI docs, we can use
optic:updateto update our OpenAPI docs.optic:verifywill give us a coverage of our OpenAPI docs, if it passes successfully -
optic:diff-ymlidentifies any breaking changes. -
We then decide whether to discard the change or update our API documentation with
optic:update, and communicate any upcoming breaking changes to service consumers. For the breaking change, we must update the version of our OpenAPI spec, so that the breaking change is communicated and Optic passes the test.