Documentation
To quickly summarize over a decade (two decades!) of open source development:
In the early days of 2000 Werner Schweer released the first version of MusE as the package muse-0.0.1.tar.gz. In it's first few releases (actually not few, Werner relentlessly churned out new releases) MusE was only a midi sequencer. The target was to create a fully fledged midi sequencer for the Linux operating system. Over the years audio was added among with other things implemented and sometimes abandoned. Today MusE is a stable and feature rich music creation environment which strives to encompass most of the music recording process, creation, editing, mixing, mastering.
CTRL refers to the control key on the
keyboard, e.g. CTRL+C means to press and
hold the control key while pressing the c key. Make sure you know where
you have it so you won't accidentally lose control (bad jokes are the
best jokes, so say we all!).
SHIFT refers to the shift key on the
keyboard, see above for usage
ALT refers to the alt key on the keyboard,
see above for usage
$> is used as a generic definition for a terminal prompt. When the
manual lists a command that shall be typed, the prompt is not part of
the command.
Keys are always referred to in bold uppercase, e.g.
A. For instance
SHIFT+A for the key a pressed together with
the shift key.
Sometimes terminal examples are written tabbed in with a fixed font to
visualize more closely what something looks like on the screen. E.g.
$> muse4
Install MusE from the repository of your chosen distribution. To get
decent performance start http://jackaudio.org/Jack with the following
command in a terminal:
$> jackd -d alsa -d hw:0 -p 256
Or, if you prefer, use the launcher utility
http://qjackctl.sourceforge.net/QJackCtl to get some help starting
Jack. After this, start MusE from the menu or fire up another terminal
and type muse4.
If this didn't work out read on for the slightly more complete route for
getting things started.
MusE now supports PulseAudio, in this scenario you don't even need Jack. For realtime playing, the latency will likely be an issue though but there are use cases, for instance mixing where it works perfectly.
Type muse4 -t to start MusE with the PulseAudio backend.
There are several ways to install MusE depending on your situation. The most convenient way is to install a prepackaged version from your chosen distribution. The drawback of this is that it may not be the most recent version.
Starting with version 4.0, MusE is available as a distro-independent AppImage, both for the (pre-)releases and the current development version (master). All you have to do is download the desired AppImage and make the downloaded file executable (some desktops offer to do that for you and also create a start menu entry automatically).
Building MusE from source is not hard, there are a number of prerequisites that must be met but the actual building should be painless (ha, famous last words).
Have a look at the detailed instructions in the README file in the package file, or at: https://github.com/muse-sequencer/muse
MusE on the Linux platform supports midi through ALSA and jack-midi and audio through Jack and PulseAudio. For information on what hardware is generally supported there are some convenient places to check:
- Alsa soundcard matrix at http://www.alsa-project.org/main/index.php/Matrix:Main
- http://FFADO.org for firewire devices.
Also, as is often a very good approach for Linux and open source, the various forums available on the internet often contain good information. Chances are someone has already tried your configuration and/or had your specific problem and the solution is already written down.
These days (2021) most soundcards are USB based and many work out of the box. But please do not take this as gospel if you are in the market to buy a sound card. Please research it before buying.
In the standard case MusE expects to find and connect to the Jack audio server http://jackaudio.org. Make sure Jack is installed (if MusE was installed with a distribution-package Jack will very likely already be installed). For Jack to run with best performance your system should be sufficiently tuned to allow it to run with realtime capabilities. The realtime configuration of the operating system roughly consists of two parts:
- By default on most distros only the superuser lets applications setup realtime capabilities. Please see the APPENDIX for setting up realtime.
- Maximizing performance. A standard linux installation may not be able to reach the performance required by a power user. This requires exchanging the linux kernel for a so called lowlatency or realtime kernel, this is also covered by the realtime APPENDIX.
After installation, the binary muse4 is installed on your computer. If MusE was installed from a distribution repository the binary may have a different name depending on the distribution policies. Most distributions do however install a menu entry so MusE should be conveniently available from there.
Find MusE in the menu or open a terminal and enter muse4.
$> muse4
A splash screen should pop up followed by the main application window and you are off!
If an error like the screenshot below pops up the Jack audio server is either not running or started as a different user than what you are trying to start MusE as.

MusE can now conveniently be started without Jack, either by changing audio device configuration in MusE's settings (and restarting) or by starting MusE with the argument -t, like this:
$> muse4 -t
Do note however that running with PulseAudio might not be good enough if you want to record in realtime and listening to what you are doing. The latency of PulseAudio (though not bad) is probably a bit much for playing along. The RTaudio/PulseAudio driver does not support latency reporting so no latency correction is possible (like with the Jack driver). For editing and mixing it is however perfectly usable.
MusE can also be started in Midi-only mode, where MusE does not have any external dependencies apart from ALSA midi. In this case start MusE from a terminal:
$> muse4 -a
This is a remnant of old times, in general there should be very little reason to disable audio in this way, but the option is there if someone finds this to be useful.
MusE supports connecting to midi devices directly from ALSA or as exposed by jack. If Jack is running, by default MusE will not use ALSA devices, preferring jack-midi instead. To force ALSA devices to be used as well as jack-midi, start MusE with the -A option:
$> muse4 -A.
Note (2021), though the above is still more or less true, these days it is possible to turn on/off ALSA devices dynamically in the device configuration.
There is actually a case that could be made that ALSA midi is a better option due to potential latency issues with jack-midi. This is not a universal truth but in MusE's case it is still debated as true.
$> muse4 -h
Will list all command line parameters of MusE. Especially when trying to isolate some issue it may be good to play with the various parameters for limiting plugin loading or more verbose debug trace.
To get a quick grip of what MusE can achieve please follow this beginners tutorial.
There are also several videos on this subject here: Tutorials
Fire up MusE as was described in the previous chapter, try to make sure that the jack audio server is started with sufficient configuration to allow for audio output without breakup.
As an alternative you can opt for starting MusE with the Pulse Audio backend (see above).
Also, please make sure your system can actually make sound, for instance that you haven't left the volume at zero. Not that that has ever happened to anyone :).
With MusE up and running, right click in the track pane (see Arranger) and select Synth > MESS > vam soft synth. A Soft Synth track called vam-0 should appear.
Now right click once more in the track pane and select Midi Track. Another track appears called Track 1, and its track list Port column should show it is bound to the synth that was just created vam-0. If it for some reason is not, right-click on the Track 1 Port column to open a drop-down list of available devices and choose vam-0.
Now select the Pencil tool icon from the toolbar, alternatively press the shortcut key D. Move the mouse over to the arranger canvas as referenced in Arranger and point at the midi track, the mouse should have changed to a small pencil. Draw a part along the midi track using the mouse. For this exercise it is not important where or how large the drawn part is. When you are done double click on the drawn part. This will open up the Piano Roll editor. To the left of the Piano Roll there are piano keys in a vertical line, try clicking on the keys in this virtual keyboard - each click should be rewarded with a synth sound (maybe of questionable quality, a sound nevertheless).
If this produces sound you have successfully completed this test. Clicking ESC will close the midi editor and return you to the Arranger window.
As a last thing, locate the colum Port in the tracklist and find the entry for the vam synth, it should read as a number and the word vam-0, double clicking on the port should reward you with popping up the GUI for the Vam synthesizer, as shown in the screenshot below.
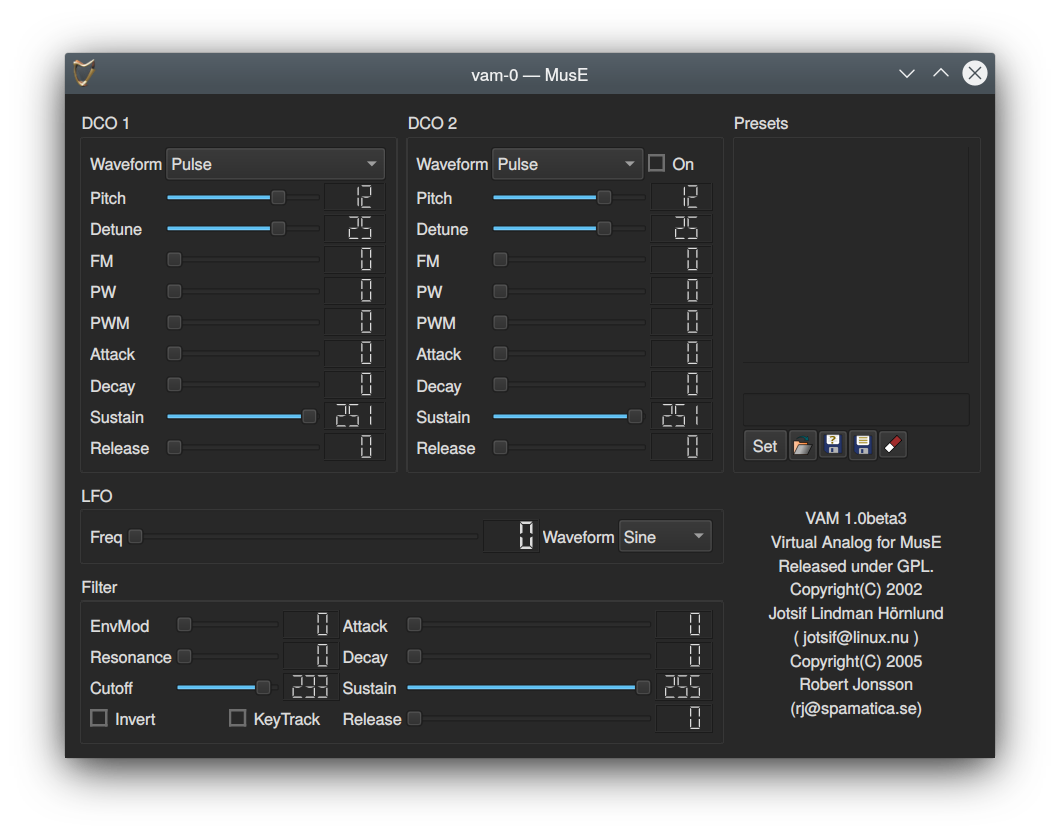
If you got sound from the previous exercise you can carry on to the next chapter, or keep reading for further enlightenment in case you come upon trouble later on.
If there is no sound we need to do some fault hunting. First off, open the Mixer window (F10) and look for the the vam-0 track there.
Now bring back Piano Roll window and align the windows so you can see the piano keys as well as the Mixer (see the 5 Function by function chapters for more information on these windows).
When pressing one of the keys on virtual Keyboard the Meter on the Mixer Strip should light up in green to visualize that the Synth is making sound, if it is not, try to back trace your steps and see if you did anything differently than described. Now, if the Meter lights up but there is still no sound we need to check the routing between the tracks.
To check the output routing, click on the Arranger window again and select the Out 1 track, this is the predefined output which MusE by default loads at startup. At the top of Mixer Strip there are two buttons looking like arrows, these bring up the inputs and outputs of the track.

Click on the right one, the output arrow, and make sure that it is connected to some valid outputs on your system.

Click on the outputs to select them, if you did changes here go back and try clicking on the Piano Roll keyboard again, hopefully it helped. If there still are problems make sure your system actually can make sound through Jack, this is however getting outside the scope of this manual. On tip however is to try the jack_simple_client application which is usually bundled with jack. This is a command line tool that when executed should output a tone on jacks output device.
$> jack_simple_client
This might be the time to bring up the concept of community support. Open source software could never be what it is without the support given by individuals on forums and mailinglists, if the information given in this document is not enough, try googling your problem and/or get in touch with one of the online forums for MusE or Linux audio in general. See some pointers in the Support section.
At this point we'll make a slight detour into full on audio recording. Getting audio out of MusE has already been covered in the previous chapters so we will concentrate on the additional steps needed to record sound onto an audio track.
When MusE is first fired up, the output track has already been created (more about this in the templates chapter), to proceed with audio recording we need to add two additional tracks, a wave track and an input track. When MusE is first started, right click in an empty space on the track view.

and select Audio Input. Right click again and also select Wave Track. Two additional tracks are now visible in the Arranger, "Input 1" and "Track 1". Bringing up the mixer with F10 should show the following configuration.

Do note all the buttons on each mixer strip. Hover over them to see their respective functionality. For more information on all the buttons see the chapter about the mixer.
For now lets just do what we must. Note that the first three steps are likely not needed as this should already be their default setting but are listed to highlight their functionality as they are common errors
- Click on the stereo symbol over the slider to change the input to a mono track (optional step).
- Do the same for the wave track (optional step) .
- Click on the Mute icon on the input track to unmute it (optional step).
- Click on the input routing button on the input track and select an appropriate connection from your system, where you hopefully have an audio source connected.
- Click on the output routing button on the input track and select Track 1
Already after step 4, the meter on the input track should come alive if there is incoming sound from your sound source.
We are now nearly ready to start recording. First we need to select a location to store the files as MusE does not use a centralized storage of soundfiles. MusE instead uses the path of the song-file (extension .med) as guidance as to where the audio files will be placed.
As it happens MusE will prohibit us from starting a recording until the songfile has been stored. So lets take advantage of this behaviour and just go ahead and try to record.
In the mixer click on the red record dot on the Audio Track to ARM it for recording (or enable if you prefer). Now when there is audio coming into the input it will also show up on the Audio Track. Also note that all the input and output routing buttons on the tracks now have the same active color, this means that all of the tracks have a proper connection.

All fine and dandy. Now bring up the arranger window and find the round, red on white record button and click on it. This is your command to MusE to prepare for recording. However since we have (deliberately) not saved our song, we are presented with a dialog to do just that.

Note the check box for Create project subfolder, when working with audio this is very much recommended or you may soon loose track of what audio files belong to which song.
Finally we are ready to start recording! The process is completed by clicking on the Play button in the Arranger.
If all went well, MusE then starts to record a wave file from the Input Track placed in your song directory. At this point, do try to make some noise so something is indeed recorded.
When you wish to stop recording press the Stop button. Now the resulting waveform should be visible on the created part in the Arranger. After rewinding the Play position and pressing Play again the resulting sound should be played through the connected output.
A quick note about rewinding: This may not be necessary as there is a setting for doing automatic Rewind on Stop on the Settings menu, if this was checked it will already have returned to the starting point upon pressing stop!
Let us briefly complete this beginners tutorial by going over how to record MIDI into MusE from an external keyboard.
First complete the steps in the first tutorial, Soft synth test. This will ensure that we have a synthesizer connected that can play back the recorded MIDI.
If you want to use some other synth from the Soft synth list, or for that matter an hardware synth that is fine too. If clicking on the piano in the Piano Roll produces sound you are good to go.
Nowadays most external MIDI devices have a USB connector, connecting this to your computer should yield a USB-MIDI device. If your device is more old-style (some would say better) it has a traditional MIDI connector, to connect this to your computer you need to have a MIDI port on your computer. Many more advanced soundcards have MIDI connectors builtin but there are also stand alone USB-MIDI converters for this purpose.
For the purpose of this guide, let's assume you have a means to connect your external MIDI keyboard to your computer.
Here is an example configuration:
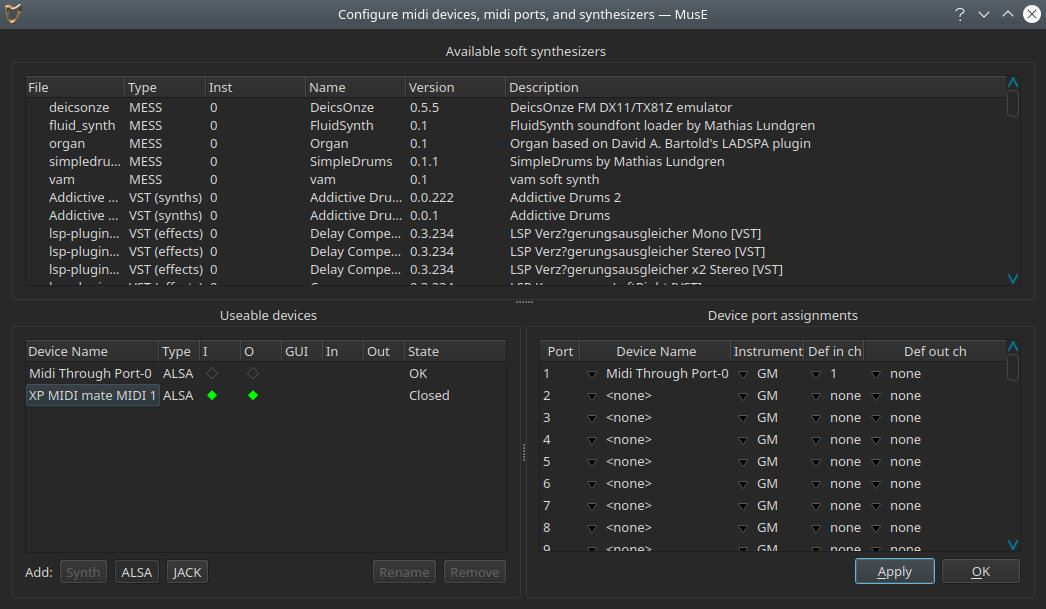
The XP MIDI mate MIDI 1 listed in the Useable devices is a USB-MIDI adapter through which I have my external MIDI keyboard connected.
Note that the device State says Closed. This signals that this device has not been assigned to a Port. It can quickly be remedied by clicking on the first non configured Device Name in the Device port assignments dialog and select the XP MIDI mate MIDI 1 device. More about this in the midi ports chapter.
After doing this, the State of the device will change to OK. Also note the green diamonds in the I and O columns, which signifies that the device is capable of both receiving and sending MIDI information. These should already be set to the right state but if they for some reason do not, enable them and click Apply and/or OK.
With the external MIDI device configured in MusE go back to the arranger. Set up a software synth as in chapter Soft Synth Test and add a MIDI track connected to this track.
Now click on the input monitor button, green circle, for the midi track in the track list. If everything was configured OK you should now be able to play on the keyboard and hear the sound from the software synth!
Now let us quickly enable the metronome so we have a beat to play to. Among the toolbars there are two toolbars, Metronome and Tempo. Make sure the Metronome button is checked, more reading about the metronome here The tempo is not necessary to change for this test but for future reference this is where the tempo is changed. By default the tempo-map is enabled which can complicate things but more on that later on.
In this section we will make a step by step walk-through of all the different editors, their purpose and what functions they support.

Above is the main window of MusE, the Arranger, this is what greets you when launching MusE. The Arranger consists of two main parts, the Track-pane and the Arranger canvas. The Track-pane lists all currently visible tracks and the Arranger canvas contains all Parts of the composition. The screenshot above shows an empty project. Below is MusE with a song in progress, turns out it wasn't a very good song, but for our purposes it is fine. In the below screenshot there are a lot of tracks visible in the Track-pane, each have an icon which indicate it's type, wave-track, input, output etcetera, more about that later. In the Arranger canvas a number of parts are visible, the ones in yellow are in this composition wave files, the multicolored line are different Parts of a drum track.

Choosing View > Mixer A or B from the menu in the main window will bring up the mixer as viewed below. The mixer will open with all options enabled, showing channel strips for all tracks in the current setup, depending on how far you have gotten this view may become very large, at which point it may be a good idea to limit what is viewed in the Mixer. From the view menu all the different kinds of tracks can be toggled on/off from the mixer. Some may find it a good idea to use the two mixers A and B setup with different setup and store this in your song template(s), more about this in the Song Template section. It can be argued that everything in MusE is a track analogous to the Unix idiom that everything is a file.

The types of tracks visible in the mixer (and track-pane) are:
- Audio output
- Audio input
- Group track
- Aux track
- Wave track
- Synth track
- Midi track
- Drum track
Checkout the chapter about shortcuts for more information here.
MusE projects consist of one .med file and any number of audio files, if recorded audio is used. As was noted in the quick start tutorial it is recommended to check the Create project subfolder if your projects will record audio files.
Note that this is for audio files that MusE creates, if you have external audio files that are imported into MusE it does not matter in this respect as MusE will reference the original wave file location. To make your project portable and more easy to backup it is however a good idea to put imported wave files in the project folder too, before importing them.
MusE will create projects under the global project folder, which initially is $HOME/MusE. It will be created if it does not exist. So, as an example, if a project named GreatSong is created with the subfolder option checked the path to the .med file will be $HOME/MusE/GreatSong/GreatSong.med. Furthermore any audio files that MusE creates will be placed in the $HOME/MusE/GreatSong folder.
The Global project folder can be changed from within the New project dialog.
After you have begun to have a deeper understanding on how you prefer to work with MusE you may find that there are certain configuration parameters that always want to have. For instance, always create Input tracks for all your physical inputs on your sound card, or maybe create some instances of your favourite soft synths that you always use a bunch of. This can be achieved in MusE by creating templates.
Infact MusE always uses templates. By default when MusE is started a template called default.med is loaded, this template contains only an Output track which should be connected to the sound card, if a sound card exists.
In the Settings->Global Settings dialog under the Application tab the startup template can be changed to any template that exists on your system.
To create a template for a specific use-case, simply configure the things that you want to have pre-setup in your projects as you usually would when making a song, but before you start actually creating music select File->Save As Template and give the template a descriptive file name and save it in the selected folder.

Note: It is not against the rules to actually add music to a template, by all means do if you have a specific use-case, but for most people it probably does not belong there
The File->New from Template... will show a list of available templates. By default the dialog will show templates from the Global view, which are some templates bundled with MusE as examples. Clicking on the User button will display the template that was just created.

The MIDI editor in MusE is a traditional pianoroll type editor that exist in the majority of MIDI editors out there so hopefully you are already accustomed to their workflow.
Basically the editing start with having a midi track and either recording midi unto this track from an external midi keyboard OR creating a midi part by hand using the draw tool (keyboard shortcut D) in the arranger.
When a midi part exists in the arranger you can simply double click on it OR select it and press Ctrl+E to open the pianoroll.

Omitting the channel strip on the far left, the pianoroll consists of three parts, piano keys, canvas and the controller view.
To the left are the piano keys, a representation of a piano. Clicking on the piano keys plays the relevant note using the midi device connected to this midi track.
Next is the canvas which extends lanes from each piano key over the canvas where notes can be placed and edited over the duration of the part.
Actually notes can be placed after the part too and the part will be automatically extended. Events can however not be placed before the part start, in that case the part must be resized in the arranger prior to editing.
Finally, at the bottom is the default controller view, which shows Velocity. The controller view can be changed to show any other available controller by clicking on the Select controller button to the left of the view.
If there is space for it, additional controller views can be added from the Display->Add controller view menu alternative.
As in the screenshot above the controller view will show a representation of the controller the view shows, in this case velocity. The events in the view can be changed using the mouse with the Pencil or Draw tool.
In the case of Velocity only the available events can be manipulated, but for most other controllers, for instance Pan, new events can be added with the same procedure.

If you explicitly do not want to add new events but only change existing events while editing, hold down the CTRL key while drawing.
Also you may sometimes want to remove controllers, in that case check out the chapter about the Event editor.
In the pianoroll there are a number of tools on the toolbar for manipulating notes in the pianoroll. They are also listed in the right click menu on the canvas:

-
Pointer this is the default tool where clicking on parts selects them and clicking and dragging moves parts.
-
Pan and Zoom tools are still available and reminders of past without mice with scroll-wheels, which is the recommended way pan and zoom.
- mouse wheel to pan up/down
- shift+mouse wheel to pan left/right
- ctrl+mouse wheel to zoom in/out
The letters to the right of each tool is the currently selected keyboard shortcut.
Checkout the chapter about shortcuts for more information here.
Adds a controller view as described in the controller chapter.
Another way to record midi into the pianoroll is with Step recording, available on the Pianoroll tools toolbar.

When checked each click on the Piano will produce a recorded note for the key clicked, the length of the note is derived from the Snap value in the Pos/Snap/Solo-tools toolbar.

if the Midi input button is checked any configured Midi input device will produce the same result as clicking on the Piano.
If checked it will play the note being clicked with the mouse. If the dropdown is set to Play Chords all notes will be played when multiple notes are dragged.
The drum editor in MusE follows the matrix editor design which is very common in MIDI editors and as the pianoroll consist of three different parts. For the drum editor they are: Drum list, Canvas and Controller view.

This one works exactly the same as with the Piano Roll so refer to that chapter.
The Drum Canvas works in a similar way as the Piano Roll Canvas but not completely. For starters, all notes in the Drum Canvas look like tiny (usually blue) diamonds and they are nearly always placed exactly on the vertical lines. As in the Piano Roll they are placed on the horizontal lines, but the horizontal lines do not represent piano keys but instead a unique drum sound as defined in the Drum list.
Works the same as in the Piano Roll, see this chapter.
The mastertrack contains tempo, time signature and key of your song. All of these can be changed to your liking at any point during the song. There are two mastertrack editors, the List editor and the Graphical editor.

This example shows the Mastertrack list editor with all parameters initially set at the beginning of the song but also a number of tempo changes later on.
The buttons at the top of the dialog can be used to modify the entries. Double clicking can also be used to achieve the same thing.

Here is the same example but the Mastertrack graphical editor is also shown. A tempo ramp where the song slows down, has been made with the drawing tool.
A common beginners mistake is that tempo changes have been added to the mastertrack by mistake. This can be remedied by selecting the offending line in the Mastertrack list editor and clicking the Delete button.

Due to the way MIDI works there is sometimes a need to reinitialize the state of MIDI devices, this functionality is collected on this toolbar.
In rare cases some midi notes may be stuck on, and you just want them to shut up immediately.
The 'panic' button sends the midi controller 'all sounds off' and 'reset all controls' mode commands (controllers 0x78 and 0x79) to all channels on all MusE midi ports.
The panic button is found in the Arranger and Midi Editor toolbars, and several other window toolbars.
The local off sends the midi controller 'local off' mode command (controller 0x7a) to all channels on all MusE midi ports.
The 'reset instrument' button sends note-offs to all channels on all MusE midi ports.
The 'init instrument' button re-sends initialization messages (typically mode sysex messages) as defined by the instrument (see the Edit Instrument dialog).
This is usually done automatically on project load but can be turned off in Settings, hence the manual button here.
MusE arranges your music in tracks and parts. The following section will provide an overview of how things are done with MusE. If you are or were a Cubase or Cakewalk user, you will feel familiar with this.
There are two general classes of tracks: MIDI tracks and audio tracks. MIDI tracks (and drum tracks which are internally MIDI tracks) can hold note data. The Wave track is a type of audio track which holds wave data. There are also several other kinds of audio tracks.
MIDI and drum tracks hold MIDI event data. They don't differ much, except that drum tracks offer a special editor which is more suitable for drum editing.
MIDI and drum tracks send their MIDI information to a MIDI output device, this is either a device externally to MusE or even the computer, for instance a Yamaha DX7 to give a retro example. The MIDI output device may also be an internal soft synth, represented by the Synthesizer track type below.
They hold audio data which can be just played back or be piped through effect plugin chains. They offer automation for these plugins.
These provide the path for your audio data from outside MusE into your project. Set up the physical audio inputs you want to connect your audio input track with, and then route the input tracks to various other tracks such as wave tracks.
These provide the path for your project's audio data to outside. Set up the physical audio outputs you want to connect your audio out track with, and then route various other tracks, such as wave tracks, to the output tracks.
Group tracks are like busses, where you can route other tracks to them, then route the groups to other tracks. Since group tracks have all the features of other audio tracks, like volume and pan, they provide a convenient common routing point where you have control of the sound before it is passed to other tracks.
These provide a more convenient way to mix several audio tracks together. With each audio aux track added, other audio tracks will gain a common send knob for adjusting the level sent to the aux track. This can be more convenient than using several group tracks.
This type of track is a software synthesizer which MIDI and drum tracks can be assigned to. Meaning that the notes played on the MIDI or drum track will be sent to the synth for generating audio.
You can create a track by either right-clicking in the arranger's track list and then adding the desired track, or via the edit menu.
Tracks have several attributes:
-
Mute:
If you click on the Mute field, the track gets muted and stops producing sound. -
Solo:
The solo button singles out a track for listening. It mutes some other tracks but may phantom solo others. For more info see the section on soloing and phantom soloing. -
Record:
The record column "arms" your track for recording. When you rec-arm your song and have no tracks rec-armed, you won't be able to record anything. See also the config option "move rec-arm with selection". -
Track name:
Double-click to edit the track name. -
Port:
For MIDI tracks, this lets you select the MIDI port to which the events should be routed. This can be your physical synthesizer or a software synthesizer. For soft synths, this is the port the synth is associated to. For other track types, this is disabled. -
Channel:
For MIDI tracks, this is the MIDI channel the output is sent to. For any kind of audio tracks, this is the number of channels (mono, stereo). -
Automation:
For audio tracks, this lets you set up the automation display in the arranger. (See automation). Clicking this will provide you with a popup menu with lots of submenus. Clicking on a submenu will select or unselect it showing or hiding the automation parameter as a graph overlaid on top of the track.
The submenus let you select the color you want to associate with the automation parameter. There you can also assign midi controllers to the parameters, a dialog is shown where you can manually choose the midi controller, with a learn button to 'listen for' and automatically recognize any midi controller operated by you.
-
Clef:
For MIDI tracks, you can specify a clef here. This only affects the score editor.
In the arranger and the part editors, you'll have a mixer sidebar on the left side. You can set up track-type specific things there.
The MIDI sidebar lets you change program, volume, pan and more.
They are handled exactly like plain MIDI tracks (staying compatible with them), and offer all of the functionality, though in a different way. They allow you to re-order the drum map efficiently, you can open parts from multiple drum tracks in one drum editor (MusE will separate the sounds from different tracks according to your settings, see the "Display" menu), and you can set programs as with normal MIDI tracks.
-
Output port:
This drop-down list selects the midi port to send midi output from this track. -
Output channel:
This box selects the midi channel to be used on the output port. -
Input and output routing:
Selects midi ports and channels to receive midi from, and soloing paths. (See Routes).
-
Transpose:
This transposes midi input notes up or down in pitch. This is very useful if your midi keyboard hasn't enough keys or the selected output device plays an octave too low or high, and you would like to shift the octave of the incoming notes to compensate. -
Delay:
Adjusts the delay of the notes. -
Length:
Adjusts the length of the notes. -
Velocity:
Adjusts the velocity of incoming notes. Use it to compensate for a too-loud or too-soft keyboard. -
Compression:
Adjusts the compression of incoming note velocities. Use it to make soft incoming notes louder, and loud notes not so loud. -
Instrument:
Selects the midi instrument patch to be used by the selected output port. This is equivalent of dialing the patch in the bank and program boxes, except it displays a more friendly patch name as defined by the selected output port's midi instrument. See instruments, or port configuration -
H-Bank:
Selects the high bank number of the current patch. -
L-Bank:
Selects the low bank number of the current patch. -
Prog:
Selects the program number of the current patch. -
Volume:
Adjusts the midi volume controller. -
Pan:
Adjusts the midi pan controller.
Tip: If the Song Type is GM, GS, or XG, you may need to store desired values at transport position zero, otherwise your adjustments may be overridden by the instrument when the transport is moved back to position zero.
The side bar, also called Track-Pane, is an embedded mixer strip, the exact same strip as found in the mixers. (See mixer).
On the top of the audio sidebar, there is an effects rack which allows you to apply various plugins on the audio. For more information on this, refer to effects rack.
Within MIDI, drum and wave tracks, you can create parts. Parts are chunks of coherent notes or wave data which can be moved around, copied, cloned and deleted independent from other parts.
Parts are created by selecting the Pencil tool and then drawing onto the right part area in the arranger. You can move them with the Arrow tool, delete them using the DEL key, and a right-click opens a popup menu. This menu allows you even more stuff, such as setting the part's color, saving the part to disk etc.. You can use CTRL+C and CTRL+V for copying and pasting parts. CTRL+B pastes the part as a clone. Pressing SHIFT additionally provides you a dialog which allows you to paste the part multiple times and set more stuff.
You can also copy parts with the mouse by moving the part with the mouse while holding down the CTRL key.
Routes are how tracks are connected together and to the outside world. (They are also how Jack midi ports connect to the outside world. See midi port configuration). Each track strip has two buttons whose icons look like arrows. One button is for input routing and the other is for output routing. Clicking on these buttons will pop up a menu of available input or output routes that you can connect to. Most audio tracks list other tracks to connect to, but audio input and output tracks are special: Audio input track input routing menus list available Jack audio input ports. Conversely audio output track output routing menus list available Jack audio output ports.
Meanwhile MIDI and drum tracks allow you to route available MIDI ports and channels to the track using a handy popup matrix.

Any routing menu item which would cause a circular routing condition is grayed out. Find out why the condition would exist by examining routing paths involved and correct the situation if required.
Also, you cannot use a track's aux sends if the track has an input route path from ANY Aux Track. (See aux tracks). Aux send knobs and labels are disabled in that case.
Soloing chains (see solo chains) are really just routes like any other. The available solo chaining paths are displayed in the routing popup menus.
Soloing allows you to single out a track for listening while muting others, without you having to mute the other tracks. (See soloing track attribute).
In order to solo a track and mute others so that it is heard, MusE employs 'phantom' soloing: When a track is soloed, MusE automatically solos all tracks routed to and from this track. (See routes). A phantom soloed track is indicated in the track pane solo column. (See track attributes).

When an audio output track sends audio to some external entity, such as an external running application, and audio from the external entity is fed back into a MusE audio input track, solo chains allow you to solo the input or output, and MusE will complete the path automatically soloing the other, and all paths that came before or after it.
Solo chains also work with MIDI tracks chained to audio inputs: When a MIDI track drives some MIDI device whose audio is fed into MusE, solo chains allow the entire chain to be soloed.
Solo chains are accessed via routing menus. (See solo chain routes).
MusE has a script interface for creating or manipulating midi through external programs.
MIDI scripts operate on midi and drum tracks, and are found in the Scripts menu (or Plugins in MusE < 4.0). In the Arranger this is a submenu of the Functions menu (or Midi menu in MusE < 4.0).
It is mostly useful for making the same change on a lot of places at once. As an example there is a script that processes all selected notes and makes them the same length. There are a number of bundeled scripts but more can be added by the user when a need arises.
To make a script, read through the documentation, also available in the source distribution.
Plugins are small add-ons which can process a track's data.
Audio plugins can be applied to any track handling audio (that is, inputs, outputs, wave tracks, synth tracks). The effects rack section describes this. (See effects rack).
All audio track types (Input, Output, Group, Wave, Synth, and Aux) have an effects rack into which audio plugins can be inserted in a chain. Currently each rack can accommodate up to eight plugins.
MusE currently supports LADSPA effect plugins and DSSI/LV2/VST2 synth and effects plugins.
Plugins can be added by double-clicking on an entry in the effect rack in the track info pane (which is shown at the left side of the arranger when the according track is selected). Right-clicking the rack items offers a self-explanatory popup menu.
All plugin controls can be automated. (See audio automation).
One must carefully consider how many audio inputs and outputs a plugin has, and how may channels the particular audio track has (1 mono or 2 stereo), and how MusE uses the plugins in the rack.
Learn more about this in
Understanding the Effects Rack.
Once a plugin is added, you need a way to manipulate its controls, which affect its behaviour and operate on the sound. MusE can show a generic GUI which contains all of the plugin's controls arranged in a rather plain generic fashion. Many plugins do however have a native GUI which usually looks better (it was specifically designed for the plugin). Both GUI types are opened from the effects rack right-click popup menu.
The Metronome in MusE is enabled either with the Metronome toolbar toolbutton or the keyboard shortcut C
Configuration of the Metronome can be done with the Settings->Metronome dialog.

It can be configured to output clicks on the audio output and/or emit MIDI to be played back by an external MIDI device. By default audio output is enabled but not MIDI.
A few sound samples are bundled with MusE to be used as metronome sound. If you have a favourite metronome sound it is also possible to copy this file as a .WAV to the metronome folder in the local configuration directory $HOME/.config/MusE/MusE/metronome, the supplied metronome samples are placed under the installation directory in share/muse-4.0/metronome.
The default setting for the metronome is 120 bpm, but it would be a bit sad if this was not configurable. This can be changed on the Tempo toolbar or the Transport panel View->Transport Panel or keyboard shortcut F11.
Forthermore, by default the mastertrack-tempo is enabled (the green button on the Tempo toolbar or the Transport panel). This can be a bit confusing for the beginner but for making music with tempo changes this is a necessity.
What it means in practice is that changing the tempo will be added as a tempo change where the play position is currently at. So if you are not making music with tempo changes, make sure to either uncheck the mastertrack-tempo button or always make the change after having rewinded the song to the beginning.
*If you happen to have done a tempo change unintentionally and it is a little late to undo the Master track list editor is your friend. More about this here
Automation is the ability to record (or construct) and playback exact sequences of control movements.
MusE can automate both MIDI and audio but they are handled somewhat differently although they share a number of similarities.
Almost all graphical audio controls in MusE can be automated. This includes an audio track's volume and pan, and the controls of any plugins in the effects rack, and if the track is a synthesizer track, all of the synth's controls.
Each control has a manual adjustment value. This value is shown when there is no automation data at all, or automation has been disabled.
For plugin and synth controls, it is usually more desirable to manipulate automation with the generic plugin GUIs, because MusE has full control over their behaviour. (See plugin GUIs).
There are a few ways to enter audio automation data:
- By adjusting audio controls while the transport is rolling. MusE will record the exact movements.
- By adjusting audio controls while the transport is stopped, at different transport positions. TOUCH mode allows this.
- By right-clicking any audio control and choosing an operation from the automation popup menu. This includes storing, erasing, and clearing automation events, and seeking the next or previous event.
- By drawing the data on the audio track's automation graphs. (See track automation).
Each audio track strip has an automation mode button at the bottom. There are four automation modes:
-
OFF:
Disables all automation, uses manual value always. -
READ:
Automation data is applied to controls. If any automation data exists, the manual value is overridden and has no effect. -
TOUCH:
Allows you to alter a control at any time, while transport is stopped or rolling, If rolling, when the control is released it returns to reading from automation data. -
WRITE:
Allows to adjust an initial value before rolling the transport. While rolling, when the control is released it does not return to reading from automation data.
Here is a screenshot of automation WRITE mode, and some automation data, with the track pane automation popup menu showing (see track automation):
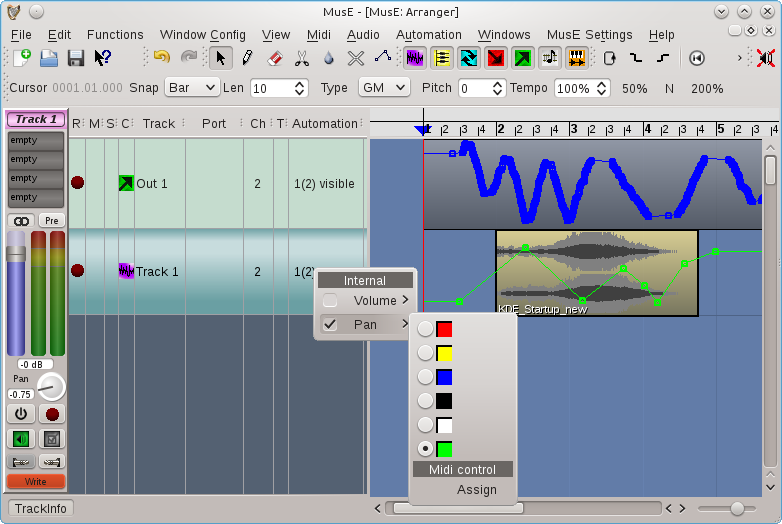
MIDI automation is a slightly different concept: Unlike audio automation, currently there is no automation 'mode' and it doesn't record graphical control movements. Data is viewed from within the pianoroll and drum editors, by clicking on the 'Ctrl' button on those canvases.
Similar to audio controls, each midi control has a manual adjustment value. This value is overridden when there is midi automation data.
There are a few ways to enter MIDI automation data:
- By adjusting external MIDI controls (such as a midi keyboard pitch or modulation wheel) while the transport is rolling and both the transport and midi track are in record mode. MusE will record the exact movements. As mentioned earlier, note that graphical control movements are not recorded.
- By right-clicking any midi control and choosing an operation from the automation popup menu. This includes storing and erasing automation events.
- By drawing the data on a midi part's automation graphs.
Here is a screen shot of a midi track, containing a midi part which has been opened with the pianoroll editor and automation data showing.
The 'Ctrl' popup menu (bottom left) shows available midi controllers and the green dot indicates there is some data.

MIDI ports provide an abstraction layer for your MIDI hardware and synthesizers (which can be both software and hardware synthesizers), and other MIDI applications. Ports are numbered. In order to produce sound, each MIDI track is assigned to exactly one MIDI port, to which the MIDI events are then sent.
The advantage of this abstraction layer is that if your system changes, for example you change MIDI hardware, then you need only modify the ports instead of all the tracks using those ports. This is similar to the audio input and output track abstraction to the outside world.
In the midi/softsynth configuration dialog, you must map the port numbers to the actual devices (by selecting ALSA or jack midi ports, or synth plugins).
Try the context menu of the "Port" column of some MIDI track to see and change the settings per track. If you use a soft synth, right-clicking the Track type column of the synth or any midi track using the synth lets you launch the synth's GUI (generic and/or native if available).

-
GUI:
For synthesizer devices, indicates if a gui is available and if it is showing. Click to show or hide. -
I:
If present, the port can accept MIDI input. Click to enable or disable it. -
O:
If present, the port can send MIDI output. Click to enable or disable it. -
Instrument:
Selects the instrument to be used when MIDI is played through the port. -
Device name:
Selects or creates a MIDI device assigned to the port. These can be Jack MIDI devices or ALSA MIDI devices (if ALSA is enabled), or soft synthesizers. Jack MIDI devices are created by selecting Create Jack Device from the Device name drop-down menu. Jack MIDI devices can be renamed as you wish by clicking the device name. Soft synthesizers are created by clicking in the soft synthesizer list and then Add Instance. Or you can simply create a new synthesizer track from the arranger track list, or even the mixer menus. -
In and Out routes:
These are for Jack MIDI devices, they are the routes to and from available Jack MIDI ports. Jack may provide different alias names for these ports, you can select which alias is shown. -
Default in channels:
Auto-connect these port channels to new midi or drum tracks. -
Default out channel:
Auto-connect new midi or drum tracks to this channel on the port. -
State:
Indicates the state of the port including any errors opening it.
Plugins can usually process an arbitrarily small (or large) amount of samples. If some plugin control value changes continuously, to provide ideal listening experience, MusE would need to call the plugin 44100 times a second, asking for one single value at a time. With the minimum control period setting, the user can force MusE to ask the plugin for at least N values. Setting this value to 64 would in this situation make MusE call the plugin 689 = 44100/64 times a second, asking for 64 values at a time. While doing this will reduce accuracy of control changes, it may also reduce CPU usage, because calling the plugin more often, requesting smaller chunks, is more expensive than calling it seldomly, requesting larger chunks.
If you have no performance problems, or if you want to do the final downmix of your project, setting this to a low value ensures fine grained parameter changes which could mean improved sound quality.
And conversely, if you're experiencing performance problems, increasing this value might help.