Web Application build on InterSystems IRIS for Health and Docker to demonstrate Authentication, Authorization AND Auditing basics. By using the application New user can be created programmatically along with auditing, roles and SQL privileges, Option to Enable/Disable, Authenticate/Unauthenticate web application and OAuth2 Authentication with GitHub
- Authentication, Authorization and Auditing basics
- OAuth2 Authentication with GitHub
- Create New User by code
- Add Audit Log Programatically
- Create Role and Assign SQL table priviliges by code
- Grant all privileges to user by assigning %All role by code
- Enable/Disable Web Terminal Application by code
- Authenticate/Unauthenticate Web Terminal Application by code
https://dappsecurity.demo.community.intersystems.com/csp/user/index.csp by using SuperUser | SYS
https://community.intersystems.com/post/programmatically-create-users-grant-privileges-enabledisable-and-authenticateunauthenticate-web For OAuth2 GitHub authentication https://community.intersystems.com/post/oauth2-authentication-github-account-iris-web-application
zpm:USER>zpm "install scw-Patient"

- InterSystems online course (InterSystems Security Basics) : https://learning.intersystems.com/course/view.php?id=1774
- Read related documentations (Authentication and Authorization) : https://docs.intersystems.com/latest/csp/docbook/DocBook.UI.Page.cls?KEY=TSQS_preface
- Read related documentations (Auditing Guide) : https://docs.intersystems.com/irislatest/csp/docbook/DocBook.UI.Page.cls?KEY=AAUDIT
- Dockerfile, docker-compose.yml, and Installer.cls to create container
- iris.script, contains script to execute during container initialization
- /src with source files
- /.vscode/settings.json for automatic server connections when opened in VS Code.
- Docker desktop
- Get the latest InterSystems IRIS for Health image for use in the Dockerfile: https://hub.docker.com/_/intersystems-iris-for-health
	git clone https://github.com/mwaseem75/Data_APP_Security.git
	cd Data_APP_Security
	docker-compose up -d
	git clone https://github.com/mwaseem75/Data_APP_Security.git
	cd Data_APP_Security
	docker-compose up -d
Log in with credentials: SuperUser | SYS
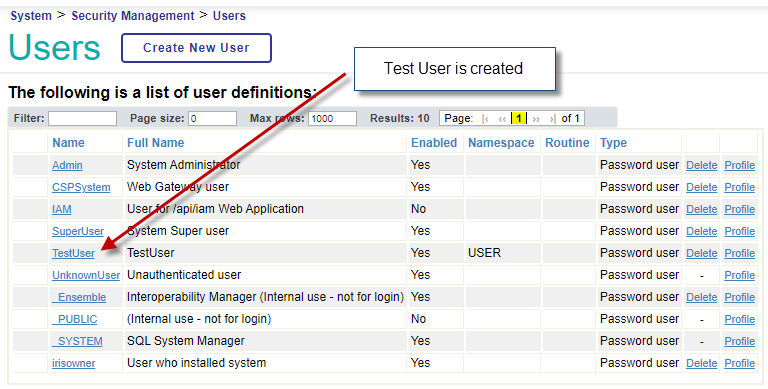
- Navigate to http://localhost:52773/csp/user/index.csp index page, First of all create New user by cliking "Create TestUser" button. Make sure to login as SUPERUSER OR _SYSTEM in order to create new User.
Newly created user can be viewed from management portal (System > Security Management > User)

- 1-Navigate to online Demo https://dappsecurity.demo.community.intersystems.com/csp/user/index.csp by using SuperUser | SYS
- 2-Select menu option "Login with Github account"
- 3-Enter your github credentials in Github login screen
- 4-For details see the article : https://community.intersystems.com/post/oauth2-authentication-github-account-iris-web-application
Upon creating user, record with Description "Audit Log inserted from DATA_APP_Security" is added in auditing database which can be viewed from Management portal
(Security > Security Management > View Audit Database)

-
Navigate to http://localhost:52773/csp/user/scw.DataForm.cls data form by using TestUser | demo By clicking search button system will raise error: "ERROR #5580: SQL Privilege Violation: 'User TestUser is not privileged for the operation'"

-
Navigate to http://localhost:52773/csp/user/index.csp by using SuperUser | SYS and assign read access by clicking "Grant Read/Write Access" Now navigate back to http://localhost:52773/csp/user/scw.DataForm.cls for data form by using TestUser | demo and data can be viewed and updated successfully

-
Log in to management portal from docker http://localhost:52773/csp/sys/%25CSP.Portal.Home.zen using TestUser | demo System will raise the "ERROR #940: Insufficient privilege for operation"

-
Navigate to http://localhost:52773/csp/user/index.csp index page by using SuperUser | SYS and Grant all privileges to TestUser by pressing "Grant All Privilege" button. Now login to management portal http://localhost:52773/csp/sys/%25CSP.Portal.Home.zen by using TestUser | demo and now user has all privileges

-
Navigate to web terminal application by clicking Web Terminal menu option

-
After providing credentials web terminal application will open

-
Let's disable web terminal application by clicking "Disable WebTerminal Application". Now Navigate to web terminal application by clicking Web Terminal menu option and system will display message that application not found

Web terminal application can be enabled by clicking "Enable WebTerminal Application" button.
- Now Let's disable all the authentications for Web Terminal Application by pressing "Disable WebTerminal Authentication".
System will not allow to enter even providing correct credentials

Web terminal application Authentication can be enabled by clicking "Enable WebTerminal Authentication" button.
Thanks
Evgeny Shvarov for: https://openexchange.intersystems.com/package/secured-rest-api template for guidance