Getting Started
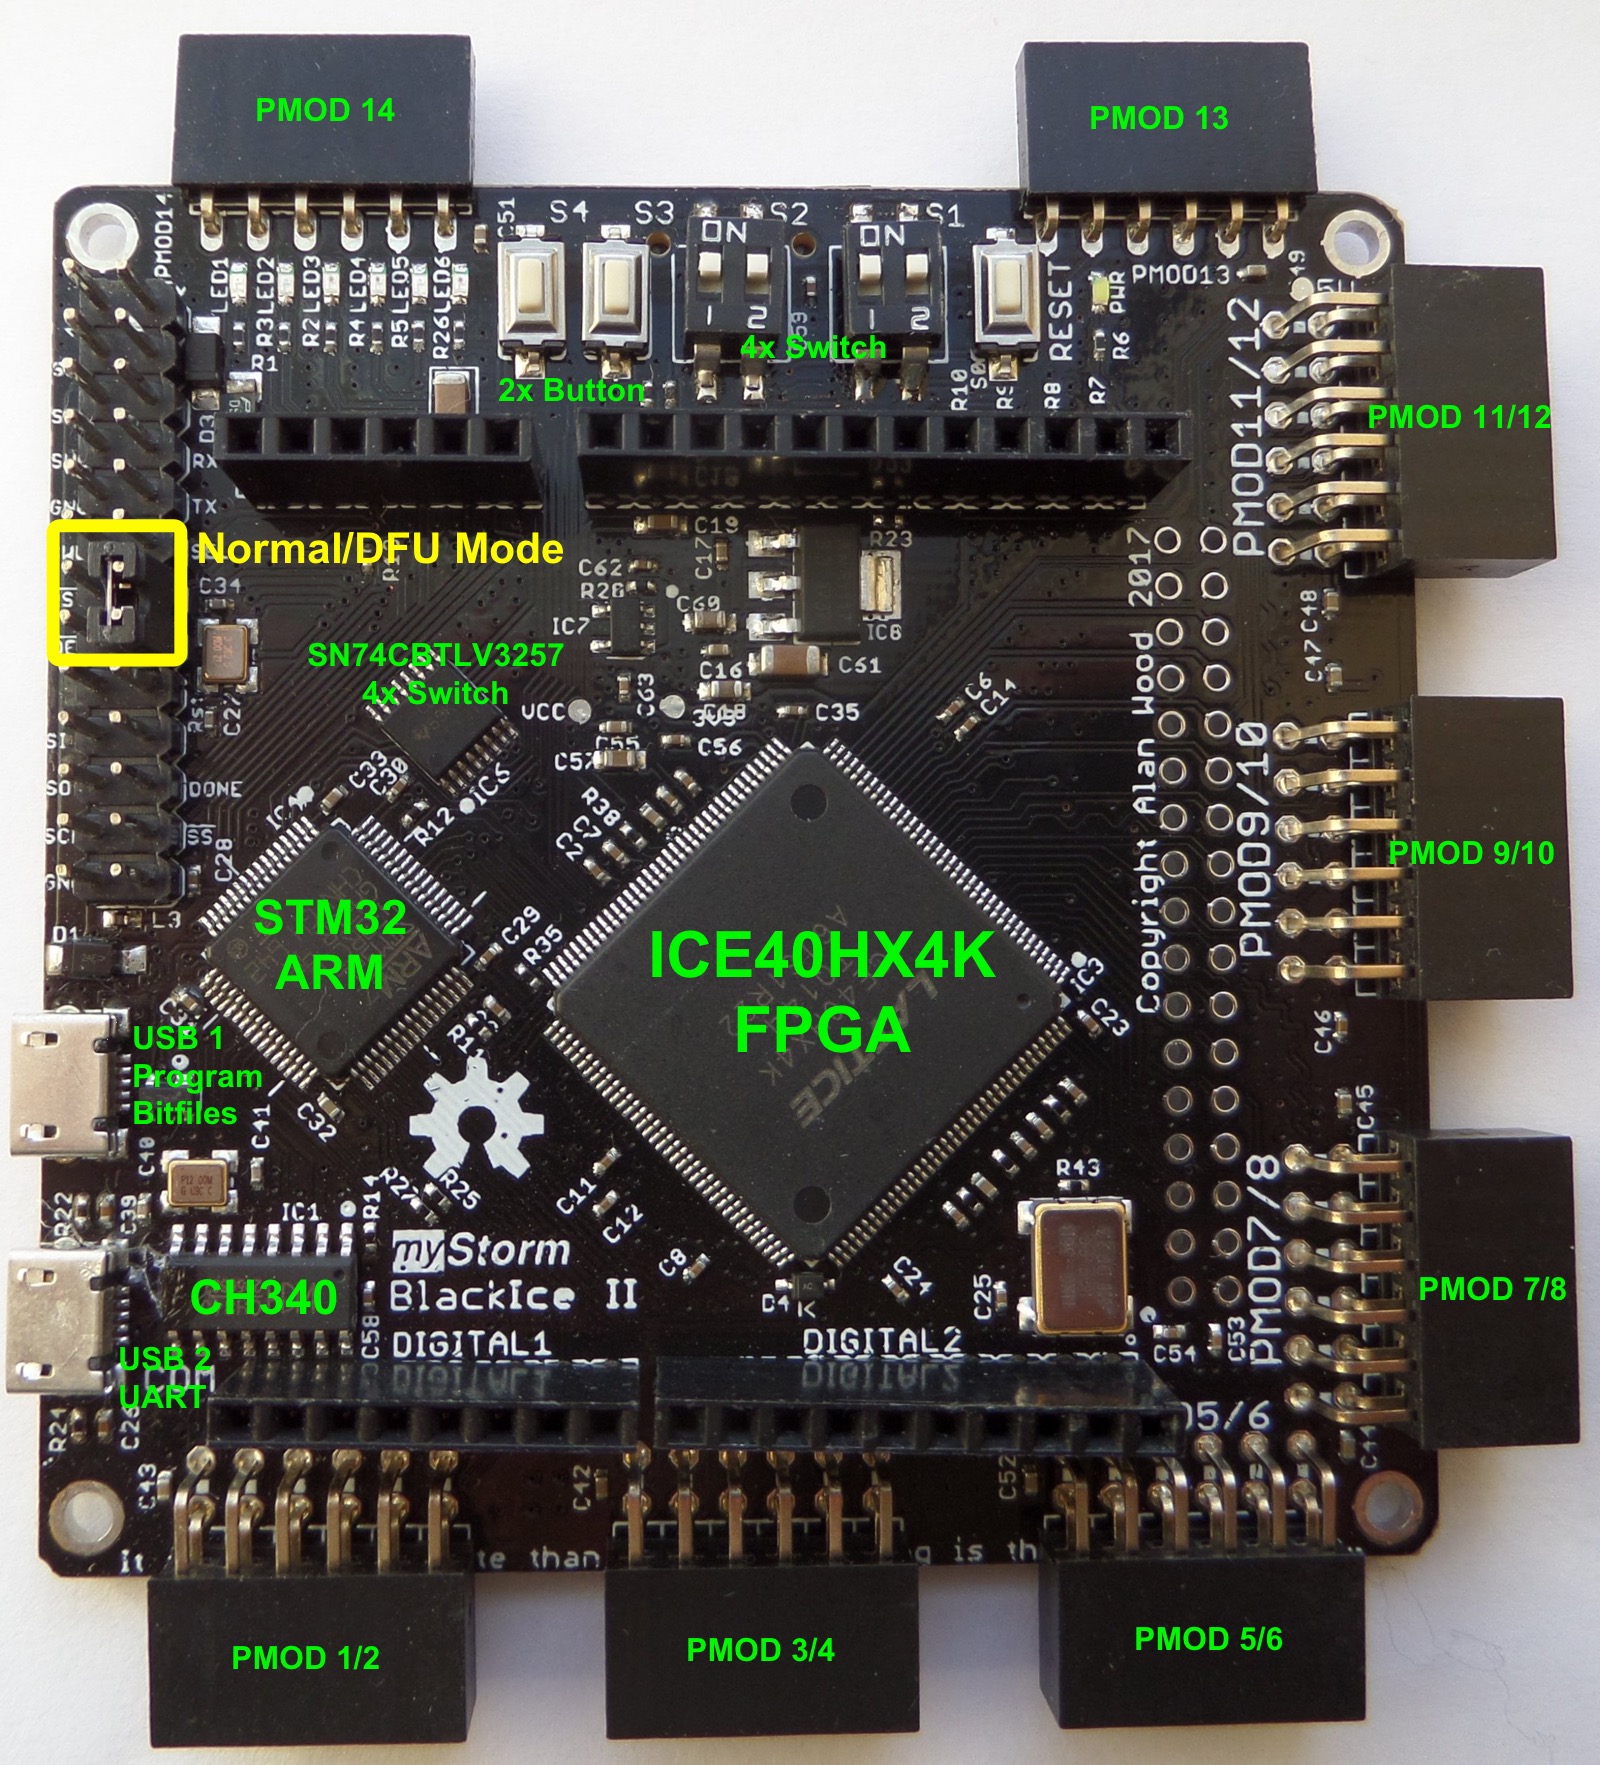
Make sure you plug your usb cable into USB1 before using this guide.
You need to install the Yosys tool chain. All software is free and open source.
The following steps are for installing software on Ubuntu 16.04 or later, and cover the building and installation of three tools, which are required for programming the myStorm board. You can use these for a laptop running Linux, or to install the tools on a Raspberry Pi. Users of other flavours of Linux will.
Downloading and installing pre-requisites
These are needed for compiling and installing the icestorm, Arachne-PNR and yosys tools later.
For Debian-based distributions, use the following command:
sudo apt-get install build-essential clang bison flex libreadline-dev gawk tcl-dev libffi-dev git mercurial graphviz xdot pkg-config python python3 libftdi-dev vim htop screen iverilogFor Fedora-based distributions, use the following command:
nf install @development-tools clang bison flex readline-devel
gawk tcl-devel libffi-devel git mercurial graphviz python-xdot
pkgconfig python python3 libftdi-devel vim htop screen iverilog
Note that the tools work fine on RaspberryPi.
You need to install the Yosys tool chain. All software is free and open source.
The following steps are for installing software on macOS and cover the building and installation of three tools, which are required for programming the myStorm board.
This guide assumes you have Homebrew installed.
Enabling xcode command line tools
xcode-select --installDownloading and installing pre-requisites
These are needed for compiling and installing the icestorm, Arachne-PNR and yosys tools later.
brew install libftdi0 python3 gawk pkg-config libffi bison mercurialDownloading and installing IceStorm
Starting in an empty directory:
git clone https://github.com/cliffordwolf/icestorm.git icestorm
cd icestorm
make -j8
sudo make install
Downloading and installing arachne-pnr
Starting in the same directory:
git clone https://github.com/cseed/arachne-pnr.git arachne-pnr
cd arachne-pnr
make -j8
sudo make install
Downloading and installing Yosys
Starting in the same directory:
git clone https://github.com/cliffordwolf/yosys.git yosys
cd yosys
make -j8
sudo make installThe following steps are for installing software on windows 10 and cover the installation of APIO, required to compile programs for the myStorm board.
Downloading and installing Python
From the official python website download and install Python 3
Then add to your path. With the default install locations open a command line and type:
set PATH=%PATH%;C:\Python3;C:\Python27\Lib;C:\Python27\DLLs;C:\Python27\ScriptsDownloading and installing APIO
Also refer to BlackIce Apio changes
In a command line:
pip install -U apio==0.3.0rc1Then to download all the apio packages
apio install -aYou will want to access four repositories:
The MyStorm tutorial
git clone https://github.com/mystorm-org/BlackIce-II.gitCompleted examples are in the tutorial directory. We'll build the very
simplest of these to drive the red LED on the board. First change into the
directory with the completed examples
cd BlackIce-II/examples/blinkThen make the Blink example
make
This will synthesize the code in blink/blink.v to a bitstream in
chip.bin.
From cheat_sheet, change to the blink directory
cd BlackIce-II\examples\blinkThen synthesize the Blink example with apio
apio build --size 8k --type hx --pack tq144:4kThis will synthesize the code in blink.v to a bitstream in
hardware.bin.
For Linux:
In first monitor terminal:
sudo bash
usermod -a -G tty yourUserName
usermod -a -G dialout yourUserName
stty -F /dev/ttyACM0 raw
cat /dev/ttyACM0
The usermod changes allow your user name to access /dev/ACM0 without root later, however, this will only work when logging into a new terminal
Then in another new programming terminal:
cat chip.bin >/dev/ttyACM0You should see something like this in the first terminal :
<Iceboot 0.4> Config done
Waiting for USB serial
By leaving the first terminal open and using the 2nd to cat your bitfile you get to see the response. If you unplug the BlackIce-II (or close terminals, always close them before unplugging!) you will need to reissue:
stty -F /dev/ttyACM0 raw
cat /dev/ttyACM0
For your monitor terminal and in 2nd working terminal:
cat chip.bin >/dev/ttyACM0For Mac:
In first monitor terminal:
sudo bash
stty -f /dev/cu.usbmodem1421 raw
cat /dev/cu.usbmodem1421
Then in another programming terminal:
cat chip.bin >/dev/cu.usbmodem1421You should see something like this in the first terminal :
<Iceboot 0.4> Config done
Waiting for USB serial
You may need to use a different device for SERIAL depending on your
machine.
If you are also using the second USB connector for debugging with the FPGA: MacOS - Beware that if you have an earlier version of the CH340 driver you may get a kernel panic restart try updating to a newer
Make sure you know which COM port you device is connected to by checking under
Ports (COM & LPT) in Device Manager. If in doubt unplug and plug in the
device to make sure.
Start up teraterm
- Select the Serial option and the COM port of your device, then go to the
Setup>Serial port...menu item - Delete the Baud rate option
- Set data as 8 bit, no parity, 1 bit stop and no flow control.
- Ensure new lines are correctly set up by going to
Setup>Terminal...menu item and setReceivetoAUTO - Then select the
File>Send file...menu item and navigate to directory containinghardware.bin - Tick the
Binaryoption box and open
Note. If you experience very slow download rates, unplug the device from your computer. Then plug it in again and re-check all settings above.