How to add Custom Fonts in Flutter
In this article we will learn how to add Custom Fonts in Flutter Application. We will add .ttf fonts in this example. Google Fonts provide free fonts so we will download fonts from there. We will add Pacifico and RobotoCondensed fonts in this example. So let’s add Custom Fonts in Flutter app in below example.

Step 1: First and basic step to create new application in flutter. If you are a beginner in flutter then you can check my blog Create a first app in Flutter. I have created an app named as “flutter_custom_fonts”.
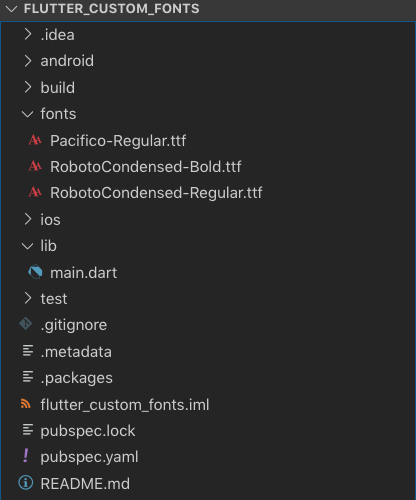
Step 2: Now, Download fonts from Google Fonts or from other site and put the fonts project. Create a folder named as “fonts” under project root directory and put the fonts in to that folder. Check out below screenshot for more understanding.
Step 3: Now configure the fonts in pubspec.yaml file. pubspec.yaml file is configuration file for plugins, fonts, images etc. check out below code that you need to configure in your pubspec.yaml file.
fonts:
   - family: Pacifico
     fonts:
       - asset: fonts/Pacifico-Regular.ttf
   - family: RobotoCondensed
     fonts:
       - asset: fonts/RobotoCondensed-Regular.ttf
       - asset: fonts/RobotoCondensed-Bold.ttf
         weight: 700
Step 4: Now in main.dart file we will use the fonts to style our text. Below is the programming implementation of that.
import 'package:flutter/material.dart';

void main() => runApp(MyApp());

class MyApp extends StatelessWidget {
 @override
 Widget build(BuildContext context) {
   return MaterialApp(
     theme: ThemeData(
       primarySwatch: Colors.purple,
     ),
     home: MyHomePage(),
   );
 }
}

class MyHomePage extends StatefulWidget {
 @override
 _MyHomePageState createState() => _MyHomePageState();
}

class _MyHomePageState extends State<MyHomePage> {
 @override
 Widget build(BuildContext context) {
   return Scaffold(
     appBar: AppBar(
       title: Text('Flutter Custom Fonts'),
     ),
     body: Center(
       child: Column(
         mainAxisAlignment: MainAxisAlignment.center,
         children: <Widget>[
           Text(
             'Pacifico Regular',
             style: TextStyle(
                 fontFamily: 'Pacifico', fontSize: 32.0, color: Colors.purple),
           ),
           Text(
             'Pacifico Bold',
             style: TextStyle(
                 fontFamily: 'Pacifico',
                 fontWeight: FontWeight.bold,
                 fontSize: 32.0,
                 color: Colors.purple),
           ),
           Text(
             'RobotoCondensed Regular',
             style: TextStyle(
                 fontFamily: 'RobotoCondensed', fontSize: 32.0, color: Colors.purple),
           ),
           Text(
             'RobotoCondensed Bold',
             style: TextStyle(
                 fontFamily: 'RobotoCondensed',
                 fontWeight: FontWeight.w700,
                 fontSize: 32.0,
                 color: Colors.purple),
           ),
         ],
       ),
     ),
   );
 }
}
Hurrey…. Run the app and Test It on emulator/simulator or device :)))
We have learnt that how to add custom fonts in flutter application. There are three steps for that 1. Download the fonts and place into fonts folder 2. Configure fonts into pubspec.yaml file and 3. Use the fonts to style the text.