🧑🎓 Natthanich Hirunchavarod Student ID: 633020552-8
| ᴄʟᴀꜱꜱ | ᴅᴀᴛᴇ | ᴅᴇꜱᴄʀɪᴘᴛɪᴏɴ | ʟᴇᴄᴛᴜʀᴇ | ᴠɪᴅᴇᴏ |
|---|---|---|---|---|
| 1 | ɴᴏᴠ 14, 2023 | ᴜʙᴜɴᴛᴜ ᴄᴏᴍᴍᴀɴᴅ ʟɪɴᴇ | ʟᴇᴄᴛᴜʀᴇ | |
| 2 | ɴᴏᴠ 21, 2023 | ᴠᴍ, ꜱꜱʜ, ꜱᴄᴘ, ᴜɴɪx ᴘᴇʀᴍɪꜱꜱɪᴏɴ, ꜱᴜᴅᴏ ᴀᴅᴅᴜꜱᴇʀ | ʟᴇᴄᴛᴜʀᴇ | |
| 3 | ɴᴏᴠ 28, 2023 | ɪɴꜱᴛᴀʟʟ ᴘʀᴏɢʀᴀᴍ, ᴘᴀᴄᴋᴀɢᴇ, ᴄʀᴇᴀᴛᴇ ᴇɴᴠ, ᴊᴜᴘʏᴛᴇʀ, ɢɪᴛʜᴜʙ, ᴍᴀᴘ ᴅʀɪᴠᴇ (ᴘᴄ ᴀɴᴅ ᴛᴇʀᴍɪɴᴀʟ) | ʟᴇᴄᴛᴜʀᴇ ʟᴇᴄᴛᴜʀᴇ | |
| 4 | ᴅᴇᴄ 12, 2023 | ᴘʏᴛʜᴏɴ ꜱᴄʀɪᴘᴛ, ᴍᴀɪɴ ꜰᴜɴᴄᴛɪᴏɴ ᴘʏᴛʜᴏɴ, ᴀʀɢᴘᴀʀꜱᴇ | ʟᴇᴄᴛᴜʀᴇ | |
| 5 | ᴅᴇᴄ 25, 2023 | ꜱᴜʙᴘʀᴏᴄᴇꜱꜱ, ꜱᴜʙᴘʀᴏᴄᴇꜱꜱ.ᴘᴏᴘᴇɴ | ʟᴇᴄᴛᴜʀᴇ | |
| 6 | ᴊᴀɴ 1, 2024 | ᴡᴇʙ ᴘᴀɢᴇ | ʟᴇᴄᴛᴜʀᴇ | |
| 7 | ᴊᴀɴ 15-16, 2024 | ᴡᴇʙ ᴀᴘᴘʟɪᴄᴀᴛɪᴏɴ | ʟᴇᴄᴛᴜʀᴇ | |
| 8 | ꜰᴇʙ 12-13, 2024 | ᴅᴇᴇᴘ ʟᴇᴀʀɴɪɴɢ, ᴄɴɴ | ʟᴇᴄᴛᴜʀᴇ | |
| 9 | ꜰᴇʙ 19-20, 2024 | ᴛᴇɴꜱᴏʀꜰʟᴏᴡ (ᴅᴇᴇᴘ ʟᴇᴀʀɴɪɴɢ ɪᴍᴘʟᴇᴍᴇɴᴛᴀᴛɪᴏɴ) | ʟᴇᴄᴛᴜʀᴇ |
ᴘꜱ. ᴀʟʟ ᴠɪᴅᴇᴏꜱ ᴀʀᴇ ꜱᴇᴛ ᴛᴏ ᴘʀɪᴠᴀᴛᴇ.
ᴜʙᴜɴᴛᴜ ᴄᴏᴍᴍᴀɴᴅ ʟɪɴᴇ
- list ทุกๆ file/folder ที่อยู่ใน folder ปัจจุบัน
$ls$ls -{option} #ex $ls -ltr # บอกรายบละเอียดไฟล์ - ระบุตำแหน่งปัจจุบันที่เราอยู่ในระบบ
$pwd
- create folder
$mkdir {foldername} - create file
เวลาจะพิมพ์ กด i แล้วมันจะขึ้นว่า INSERT แล้วถึงพิมพ์ได้ หลังจากนั้นเมื่อพิมพ์เสร็จต้องการที่จะบันทึกให้กด esc แล้วพิมพ์ :wq (write and quit)
$vi {filename} # สร้างและเปิดไฟล์ขึ้นมาแก้ไข $vi {filename.py} # python file #กด i เพื่อแก้ไข #กด esc + :wq (ออกแบบ save สิ่งที่เราพิมพ์เข้าไป) #กด esc + :q! (ออกแบบไม่ save สิ่งที่อัปลงไป) - เปิดไฟล์ขึ้นมาดูที่เขียนเฉยๆ
$cat {filename} - run code Python
$python {filename.py} - delete folder
$rm -R {foldername} - delete file
$rm {filename} - เปลี่ยนชื่อ file
$mv {file เดิม} {file ใหม่} $mv ./{file เดิม} ./{file ใหม่} # $mv file1 filex # เปลี่ยนชื่อจาก file1 เป็น filex - change directory (เข้าไปในfolder)
$cd {foldername} - ออกจาก folder
$cd # home
$cd ~ # home
$cd .. # ออกมา 1 step
$cd ../.. # ออกมา 2 step
ที่อยู่ของ File/Folder ในตอนสุดท้าย

- หลักการ
$cp {ที่อยู่ต้นทางของ file/folder ที่ต้องการคัดลอก} {ที่อยู่ปลายทางที่ต้องการที่จะคัดลอก file/folder ไป} $mv {ที่อยู่ต้นทางของ file/folder ที่ต้องการย้าย} {ที่อยู่ปลายทางที่ต้องการที่จะย้าย file/folder ไป} - Copy file
$cp ./filex ~/testfolder1/testfolder1_1/. # ~ กลับไปที่ home ก่อน# copy file1 in testfolder1 to testfolder1_1_1 $cp ./file1 ./testfolder1_1/testfolder1_1_1/. # cp ที่นี่/ชื่อไฟล์ ที่นี่/เข้าไปที่1_1/เข้าไปที่1_1_1/เอาไว้ตรงนี้ - Copy and change the file name
คัดลอกไฟล์ 1 ไปที่ testfolder1_1_1 โดยให้มีชื่อว่า file2
$cp ./file1 ./testfolder1_1/testfolder1_1_1/file2 - Copy folder
# copy folder + change folder name แต่เอาไว้ที่เดิม $cp -R ./testfolder1_1_1 ./testfolder1_1_2 - Move file
$ mv ./filex ~/testfolder2/. # ~ home
$ mv ./filex ../../../testfolder2/.
ctrl+c
copy filex in testfolder1_1 to testfolder1_1_2 and change file name to filey
cp ./filex ~/testfolder1/testfolder1_1/testfolder1_1_2/filey
ᴠɪʀᴛᴜᴀʟ ᴍᴀᴄʜɪɴᴇ(ᴠᴍ)

เข้า Azure -> Education -> VM -> Create a virtual machine
password: Nat{National ID}_
$ssh username@IP #login
$exit #logout //จบ section
ตอนย้ายต้องอยู่ในเครื่องเท่านั้น!!
- Format
$scp {ที่อยู่ต้นทาง} {ที่อยู่ปลายทาง} - ส่งไฟล์จากเครื่องเราไปบน Cloud
$scp ./xxx nattntn@IP:/xxx/xxx/. $scp -r testfolder1/ nattntn@IP:/home/nattntn/. # cp folder in PC to Cloud - ดึงไฟล์จาก cloud มาเครื่องเรา
$scp nattntn@IP:/xxx/xxx/yyy.py /home/nattntn
$scp nattntn@IP:/home/yoke/print.py /home/nattntn # move file from folder name york  on nattntn Cloud to PC
Shell.Azure.com
- ครั้งแรก ssh เข้า VM ก่อน
$ssh username@IP #login $exit #logout //จบ section - Upload file <ต้องอยู่บน shell แล้วค่อย scp to cloud >
# 1. upload file on shell # 2. scp file to cloud $scp rog.png nattntn@IP:/~/. # ย้ายมาhome // ทำบนshell-
- สร้างเครื่องให้เพื่อน
$sudo adduser {ชื่อเครื่อง} #sudo = super user (เจ้าของเครื่อง) do # password -
- ให้เพื่อนลองเข้า Cloud ที่เราสร้าง บน เครื่องเพื่อน
$ssh {ชื่อเครื่องที่สร้าง}@IP #IP super user $htop # ดูว่าเพื่อนเข้ามายัง -
- แก้ไข Permission ของเครื่องที่สร้าง super user แก้ไขได้
$sudo chmod 755 yoke # chmod = change mode // 7 = owner(r|w|x), 5 = group (r|-|x),5 =other (r|-|x)
-
ᴘʏᴛʜᴏɴ ɴᴏᴠ 28, 2023
-
- Install on cloud (VM)
mkdir -p ~/miniconda3
wget https://repo.anaconda.com/miniconda/Miniconda3-latest-Linux-x86_64.sh -O ~/miniconda3/miniconda.sh
bash ~/miniconda3/miniconda.sh -b -u -p ~/miniconda3
rm -rf ~/miniconda3/miniconda.sh
Paste and enter
~/miniconda3/bin/conda init bash
~/miniconda3/bin/conda init zsh
done!!
-
- Exit VM
-
- เข้า VM ใหม่ เพื่อให้ package ที่โหลดเพิ่มไปทำงาน
ถ้าใช้ได้เเล้วจะเป็นแบบ
(base) nattntn@nattntn:~$
- check version python and test code
(base) nattntn@nattntn:~$ python
>>> print('xx')
    xx
>>> exit() # ออกจาก python
- เข้า VM ใหม่ เพื่อให้ package ที่โหลดเพิ่มไปทำงาน
ถ้าใช้ได้เเล้วจะเป็นแบบ
- ย้ายไฟล์จาก cloud ของเพื่อน ลงเครื่องของเรา
ย้ายที่เครื่อง
$ nattntn@LAPTOP.......:~$ scp nattntn@IP:/home/yoke/{ชื่อไฟล์} /home/nattntn
- Format
ex.
$ sudo snap install {ชื่อโปรแกรม}$ atp install {ชื่อโปรแกรม}$ sudo snap install ffmpeg # มันจะทำการ download จาก internet ให้เลย or - ทุกโปรแกรมจะมีคำสั่ง $man
or
$ man ls # = manual ดูว่ามีคำสั่งอะไรให้เลือกใช้บ้าง$ {ชื่อโปรแกรม} -h # บอกว่าโปรแกรมนี้มี option อะไรให้ใช้บ้าง $ ffmpeg -h- ex.
$ ls -l # ดูรายละเอียดไฟล์
$ ls -lt # ดูรายละเอียดไฟล์แบบใหม่สุดอยู่บน
$ ls -ltr # ดูรายละเอียดไฟล์แบบใหม่สุดอยู่ล่าง
$ ls -ltrh # ดูรายละเอียดไฟล์แบบภาษาพูด --> ขนาดไฟล์ที่คนพูดกัน --> h=human
Linux เวลาคนใช้ จะใช้ร่วมกันหลายคน ดังนั้นถ้าเราโหลด program มาแบบ sudo คนอื่นก็จะสามารถใช้โปรแกรมเราได้ด้วย
แต่ถ้าไม่อยากให้คนอื่นใช้ด้วย/งานเรา version ไม่ตรงกับงานคนอื่น ก็สร้าง "Environment" ขึ้นมา เป็นโลกของเรา 1ใบ python ของเราคนเดียว
โดยปกติ
>> (base) คือ python version หลักที่ทุกคนใช้กัน ssh เข้ามาก็ใช้ได้เลยไม่ต้องมี env อะไร โดยจะเป็น version ใหม่ล่าสุด
แต่บางอัน เช่น tensorflow ก็ใช้ได้เเค่กับ python version 3.8 ก็เลยต้องสร้าง env 😿
ต้องมี miniconda ต้องอยู่ใน VM
-
- สร้าง Environment (แค่ตอนเริ่ม)
ex.
$ conda create -n {ชื่อ env} python = {versionที่ต้องการ}$ conda create -n deeptooth38 python = 3.8 # 3.8 จะโหลด v. ใหม่ล่าสุดของ 3.8 มา หรือถ้าเราต้องการเจาะจงก็ระบุลงไปได้เลย เช่น 3.8.2
- สร้าง Environment (แค่ตอนเริ่ม)
-
- เข้าไปใช้งาน env
ex.
$ conda activate {ชื่อ env}หน้าตาหลังจากเข้ามา$ conda activate deeptooth38(deeptooth38) nattntn@nattntn:$
- เข้าไปใช้งาน env
-
- เลิกใช้งาน env (ก่อนจะไปใช้ env อื่น)
ex.
$ conda deactivate {ชื่อ env}$ conda deactivate deeptooth38
- เลิกใช้งาน env (ก่อนจะไปใช้ env อื่น)
อยู่ใน VM และเข้า env แล้ว
$ conda install {ชื่อpackage}
$ conda install pandas(=versionที่ต้องการ ถ้าไม่ระบุจะเป็น version ใหม่ล่าสุด)
- check ว่า install ได้
$ import pandas #ได้
$ conda install notebook
แต่ยังไม่สามารถเรียกใช้ได้ ต้องใช้คำสั่งพิเศษในการเข้าใช้งาน ssh -L (tunnel)
The -L option is used to bind a port on the local machine with a remote port at the remote destination IP address. The port is bound through the connection to the user account at the ssh_server.

-
syntax:
$ ssh -L local_port:remote_destination:remote_port user@ssh_serverใน VM มี section ในการทำงาน โดยหากเราหลุดจาก VM/exit ทุกอย่างที่ run ไว้ก็จะหาย ซึ่งการ run code ใน jupyter ต้องใช้ระยะเวลา ดังนั้นจึงทีสิ่งที่เรียกว่า screen เข้ามาช่วยให้เวลาเราออกจาก VM สิ่งที่เรา run ทิ้งไว้จะไม่หยุด หากเรา run ค้างไว้ใน screen

screen คือการสร้าง section ใหม่ขึ้นมา โดยที่มันจะไม่เชื่อมกับ ```ssh`` ซึ่งมันก็จะ run ต่อไปเรื่อยๆ จนกว่าเราจะปิด screen / ปิด VM (ใน Azure)/คอม??
-
- สร้าง Screen
$ screen -S {ชื่อscreen} # S = start /section
# ex
$ screen -S sc1
มันจะเข้าไปใน screen -->
ctrl+aยกนิ้วขึ้น แล้วกดd(detach) คือการตัดตัวเองออกมาจาก screen แต่ screen ยัง run อยู่ เพราะเราไม่ได้ปิด -
- เข้าไปใน screen ที่สร้าง
$ screen -R {ชื่อscreen} # ex $ screen -R sc1-
- ลองออกจาก ssh
ออกจาก screen
ctrl+aยกนิ้วขึ้น แล้วกดdแล้ว ```exit``ออกจาก ssh
- ลองออกจาก ssh
ออกจาก screen
-
- เข้า ssh แล้ว เข้า screen ใหม่ จะเห็นว่า ที่ run ค้างไว้ยังคง run อยู่ เเม้เราจะออกจาก ssh
-
- เข้าไปใน screen ที่สร้าง
-
- ปิด screen /(delete?)
ctrl+aยกนิ้วขึ้น แล้วกดk(kill)
- ปิด screen /(delete?)
-
- ดูว่ามี screen อะไรบ้าง /(ที่รันอยู่??)

-
- เข้า VM
ssh username@IP
- เข้า VM
-
- สร้าง screen
$ screen -S notebook -
- activate env
$ conda activate deeptooth38
- activate env
-
- run jupyter
$jupyter notebook
- run jupyter
-
- ออกจาก screen
ctrl+aยกนิ้วขึ้น แล้วกดd
- ออกจาก screen
-
- ออกจาก ssh
exit
- ออกจาก ssh
-
- เข้า VM แบบTunnel
format
ex.
$ ssh -L myport:localhost:screenport username@IP$ ssh -L 8866:localhost:8888 nattntn@IP
- เข้า VM แบบTunnel
format
-
- เข้าไปใน screen ที่สร้าง
$ screen -R notebook
- เข้าไปใน screen ที่สร้าง
-
- copy URL มา แล้วไปวางไว้ที่ช่อง search บน browser แล้วเปลี่ยนจาก port 8888 เป็น 8866
ตอนนี้อยู่ในเครื่องเราแล้ว runได้นานเท่าที่ต้องการ
- copy URL มา แล้วไปวางไว้ที่ช่อง search บน browser แล้วเปลี่ยนจาก port 8888 เป็น 8866
ɢɪᴛʜᴜʙ
on vm
git config --global user.name "nattntn" # "{ชื่อgithubเรา}"
git config --global user.email "natthanich.h@kkumail.com" # "YOUR_EMAIL_sign in git"
-
- สร้าง folder รวบรวม code
$ mkdir codes
-
- เข้า GitHub ที่ต้องการ clone
-
-
กด ที่ <> codes ---> HTTPS---> copy

-
-
- clone (load repository to your VM)
$ git clone https://github.com/nattntn/AIPrototype2023.git
- clone (load repository to your VM)

-
- แก้ README (ลอง)
$ vi README.md
- แก้ README (ลอง)
-
- check ว่า file ไหนถูกแก้ไขไปบ้าง
$ git status
- check ว่า file ไหนถูกแก้ไขไปบ้าง
-
- save file ลงบน GitHub on Internet
$ git add "{filename}"
$ git commit -m "{comment}"
$ git push  # push file to GitHub
username: nattntn
password: personal access token on GitHub

- save file ลงบน GitHub on Internet

on PC
ทำให้เราสามารถแก้ Code บน VS Code ได้
-
- ออกมาให้เห็น File บน systems
$ cd ../..
- ออกมาให้เห็น File บน systems
-
- เข้าไปใน drive ในเครื่องทั้งหมด (c d e)
$ cd /mnt
- เข้าไปใน drive ในเครื่องทั้งหมด (c d e)
-
- เข้าไปใน drive C
$ cd /c
- เข้าไปใน drive C
-
- สร้าง drive ที่เชื่อมกันระหว่าง forder ของ window กับ Terminal
:/mnt/c$ mkdir Ubuntu #มี Ubuntu ในเครื่องแล้ว
- สร้าง drive ที่เชื่อมกันระหว่าง forder ของ window กับ Terminal
-
cdกลับมาอยู่ที่ /home/nattntn
-
- สร้าง forder บน Terminal ที่จะเอาไว้เชื่อมกับ PC
$ mkdir Outside -
- link drive in your PC and terminal
format
ex.
ln -s {drive ต้นทางที่จะ link} {ที่อยู่ปลายทางที่จะเก็บ} # ln = link, s = Symbolic (link แบบไม่ย้ายไฟล์มา)ตอนนี้ เมื่อเราลากไฟล์อะไรมาใส่ใน file Ubuntu on window มันก็จะมาอยู่บน teminal file outside ของเราด้วย/home/nattntn/outside:$ ln -s /mnt/c/Ubundu /home/nattntn/outside
- link drive in your PC and terminal
format
on PC
git config --global user.name "nattntn" # "{ชื่อgithubเรา}"
git config --global user.email "natthanich.h@kkumail.com" # "YOUR_EMAIL_sign in git"
-
- เข้า GitHub ที่ต้องการ clone
-
-
กด ที่ <> codes ---> HTTPS---> copy
-
-
- clone (load repository to your terminal/PC)
nattntn:LAP..:~outside/Ubuntu$ git clone https://github.com/nattntn/AIPrototype2023.git
- clone (load repository to your terminal/PC)
ᴘʏᴛʜᴏɴ ꜱᴄʀɪᴘᴛ
ปกติเวลาเขียน code จะมีทั้งแบบ .ipynb กับ .py
วันนี้จะมาเรียนเขียน Python Scrip (.py) ที่run บน command line
และ step ในการเขียน code ก่อนไป run บน server จริง ๆ
-
เปิด terminal ในเครื่องเรา
$ cd outside/Ubuntu/AIPrototype2023 -
$ git pullดึงไฟล์ล่าสุดจาก internet ลงมา ต้องทำก่อน code ทุกครั้ง -
ssh เข้า VM
-
มาอยู่ที่หน้า terminal ที่อยู่เครื่องเรา
-
สร้างไฟล์ . py ในเครื่องเรา
$ code firstpy.py
# ถ้ายังไม่มี file คำสั่ง code จะสร้าง file  ใหม่
# ถ้ามี file แล้ว คำสั่ง code จะไปดึง file name นี้มาแก้ไข
พิมพ์
print("First py")แล้ว save in VS code -
ออกมา
$ lsดูfile ใน terminal -
up ขึ้น GitHub
$ git status $ git add {file name} $ git commit -m "comment" $ git push -
เข้า ไปที่ VM แล้วดูว่าเรามี env อะไรที่สร้างไว้เเล้ว
(base) : $ conda env list -
activate env
$ conda activate deeptooth38 -
run firstpy.py
(deeptooth38) :$ python firstpy.pyoutput
First py
Main Function ใช้ควบคุม flow ของ program โดยลำดับการทำงานจะทำตาม Main fc ดังนั้น จึงจำเป็นต้องมี Main fc เพื่อที่เวลาเริ่ม program มา จะได้รู้ว่าต้อง run อะไรก่อน โดยดูจาก main fc (ถ้าไม่มีอะไรต้อง run ก่อน)
// Python program to demonstrate
// main() function


print("Hello")

// Defining main function
def main():
   print("hey there")  // have only process


// Using the special variable
// __name__
if __name__=="__main__":
   main()
Output
Hello
hey there
code ที่ดี ถ้าเสร็จแล้วไม่ควรมาแก้ซ้ำๆ ถ้าจะแก้แค่ input เฉยๆ
import argparse

def parse_input(): // จำแนก input
    parser = argparse.ArgumentParser() // เรียก Parser มาใช้

// กำหนด argument ของ input กี่ตัวก็ได้แล้วแต่เรา

    parser.add_argument( // กำหนด argument โดย input ตัวแรกจะใส่คำว่า "--num" เพื่อให้เอาตัวเลขไปใช้ใน code ของเราได้
        '--num',
        type=int,
        required=True, // ถ้าไม่ใส่argument นี้ code จะ error
        help= 'input for the multiplyby9 function' // เพื่อเอาไว้ดูว่า argument นี้เราเอาไว้เติมอะไร
    )
    parser.add_argument( //ใส่  input เข้าไปอีกตัว
        '--xx',
        type=int,
        default=7,
        help= 'input for xx'
    )
    args = parser.parse_args()
    return args // return ค่าที่เก็บมา

def printHello():
    print("Hello world!") // have only process

def multiplyby9(inputV):
    print(9*inputV) // have input and process

if __name__ == "__main__":
    input_v = parse_input() // ดึง input ที่ใส่เข้ามาก่อน
    print(f'the input XX is {input_v.xx}')//.xx เอา ตห.ที่ xx  มาแสดงผล
    print('we are in the main function')
    multiplyby9(input_v.num)
    printHello()
-- input หลายตัว
- input ตัวเดียว
$ python firstpy.py --num {numberที่ต้องการ}
$ python firstpy.py --help
output
the input XX is {xx}
we are in the main function 9*inputV (ตัวเลขที่คูณแล้ว)
Hello world!
- run code ซ้ำ ๆ ธรรมดา
- .Popen ดึง output จาก Program อื่น มาใช้ต่อ
file python แบบพิเศษที่สามารถไปเรียกใช้ program อื่น หรือ python อื่นๆ ที่เขียนจบแล้วมาใช้ร่วม เพื่อลดการเขียน Code ซ้ำซ้อน
เราจะต้องใช้ subprocess เมื่อ...
ต้องการ run งานร่วมกับ Program สำเร็จรูปอื่น ๆ หรือ code python อื่น ๆ ที่เขียนเสร็จแล้ว
import subprocess // สำหรับ run terminal command (ทุกอันที่สามารถ run บน terminal ได้เราจะสามารถใช้ subprocess run ได้)// นำที่มี Output/~output มาแสดง

if __name__ == "__main__":
    //basic terminal command
    subprocess.run(["ls", "-ltr"]) // command ใน subprocess จะเขียนเป็น list ช่องว่าง ใช้  ,
git push to GitHub
เข้า VM ```ssh``
git pull
output

import subprocess // สำหรับ run terminal command (ทุกอันที่สามารถ run บน terminal ได้เราจะสามารถใช้ subprocess run ได้)// นำที่มี Output/~output มาแสดง

if __name__ == "__main__":
    //basic terminal command
    subprocess.run(["ls", "-ltr"]) // command ใน subprocess จะเขียนเป็น list ช่องว่าง ใช้  ,
    subprocess.run(["rm","-r","/้home/nattntn/testfolder1"])//ลบ testfolder1
git push to GitHub
เข้า VM ```ssh``
git pull
output
import subprocess // สำหรับ run terminal command (ทุกอันที่สามารถ run บน terminal ได้เราจะสามารถใช้ subprocess run ได้)// นำที่มี Output/~output มาแสดง

if __name__ == "__main__":
    print('first run num = 100 xx= 90') \\ แค่ print
    subprocess.run(["python","firstpy.py", "--num", "100","--xx", "90"])
    print("-"*80)
    print('second run num = -10 xx= -90')
    subprocess.run(["python","firstpy.py", "--num", "-10","--xx", "-90"])
    print("-"*80)
    print('third run num = 0')
    subprocess.run(["python","firstpy.py", "--num", "0"])
    print("-"*80)
git push to GitHub
เข้า VM ```ssh``
git pull
output

Popen --> เพื่อไปรับ output
import subprocess // สำหรับ run terminal command (ทุกอันที่สามารถ run บน terminal ได้เราจะสามารถใช้ subprocess run ได้)// นำที่มี Output/~output มาแสดง

if __name__ == "__main__":
    //use output from other program
    process_output = subprocess.Popen(["python","firstpy.py", "--num", "0"],
                                      stdout=subprocess.PIPE,
                                      stderr=subprocess.PIPE)
//process_output เก็บ output , error
    out, err = process_output.communicate()
    print(out.decode('utf-8')) // เรียกดู output
    print(len(out.decode('utf-8'))) // นับจำนวนพยางค์ชนะ Output


    //HW เขียน subprocess sum output ทั้งหมดของ command 3 อันข้างบน (ตัวเลขก่อน Hello world!)
git push to GitHub
เข้า VM ```ssh``
git pull
output

$ vi python_subprocess_HW1.pyแก้เลข ต่างๆgit checkout python_subprocess_HW1.pyให้ไฟล์นี้กลับไปเหมือนตอนแรกที่ยังไม่แก้เลขgit pullดูการเปลี่ยนแปลง
ᴡᴇʙ ᴘᴀɢᴇ ᴀɴᴅ ᴡᴇʙ ᴀᴘᴘʟɪᴄᴀᴛɪᴏɴ
-
- Web page
เป็น web ที่เราเอาข้อมูลของเราใส่เข้าไป เพื่อให้คนอื่นเข้ามาดูข้อมูลของเรา
ภาษาที่ใช้ HTML(จัดรูปแบบบหน้า), CSS(ช่วย HTML ในการจัดหน้าให้สวยงาม), javascript (ควบคุมการทำงาน การกดปุ่มของเครื่อง) -
- Web application
ภาษาที่ใช้ HTML(จัดรูปแบบบหน้า), CSS(ช่วย HTML ในการจัดหน้าให้สวยงาม), javascript (ควบคุมการทำงาน การกดปุ่มของเครื่อง) + Server side script (ใช้ในการคิดคำนวณผลลัพทธ์)
Server side script เช่น Python (Flask package) : ทำให้ user run บน com ที่ไม่ต้องแรงมากได้เพราะมัน run บน server และทำให้ code ของ dev ไม่หลุดไปไหน
-
- Web service
ใช้แค่ Server side script Python (Flask package) เพราะไม่ได้ต้องการให้คนมาใข้


ᴅᴇᴇᴘ ʟᴇᴀʀɴɪɴɢ
activation function หรือ transfer function เป็น ฟังก์ชันในโครงข่ายประสาทเทียมที่กำหนดวิธีการแปลงผลรวมถ่วงน้ำหนักของ input ให้เป็น output (กำหนดค่าให้อยู่ในเกณฑ์ ที่กำหนด)
Activation for Hidden Layers
- Rectified Linear Activation (ReLU) นิยม
- Logistic (Sigmoid)
- Hyperbolic Tangent (Tanh)

The ReLU function is calculated as follows:
max(0.0, x)
หมายความว่า ถ้าค่า Weighted Sum ที่ได้หลังจากรวม(Input x Weight) ทุกค่าแล้ว มี ค่าต่ำกว่า 0 จะให้ output เป็น 0 โดยทันที หากค่ามากกว่าหรือเท่ากับ 0 ก็จะได้ output เป็นค่านั้น ๆ

range (0, 1) ฟังก์ชันเป็น Curve รูปตัว S
หมายความว่า ถ้าค่า Weighted Sum ที่ได้หลังจากรวม(Input x Weight) ทุกค่าแล้ว Output จะมีค่าระหว่าง 0 – 1 ดังนั้นจึงเหมาะกับงานที่คำตอบเป็นแบบ binary (0,1) โดยยิ่ง Probability มาก (ลู่ เข้าหา 1) output ที่ได้จะเป็น 1 ในขณะที่ถ้า Probability (ลู่เข้าหา 0) output ที่ได้จะเป็น 0

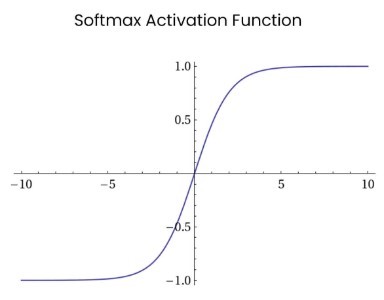
range (-1, 1) คล้าย Sigmoid และ ฟังก์ชันเป็น Curve รูปตัว S
- Linear
- Logistic (Sigmoid)
- Softmax
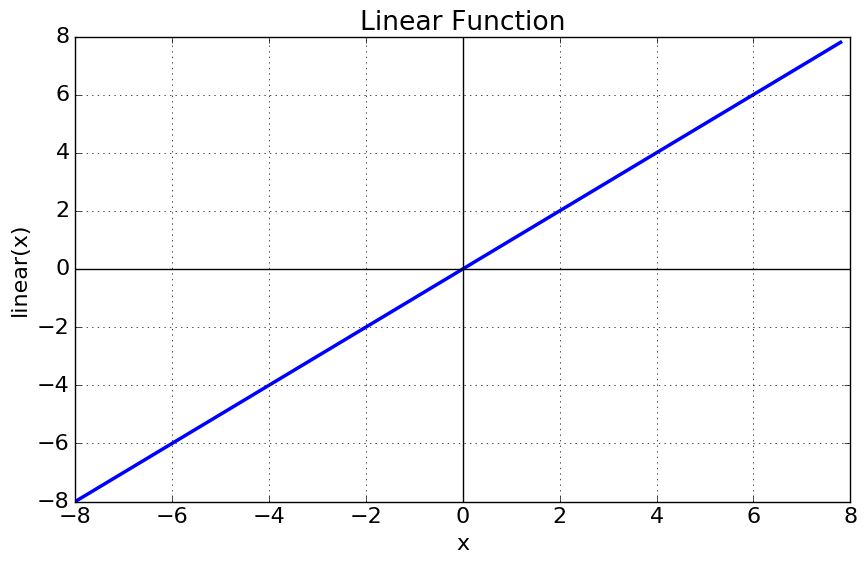
range (-infinity, infinity)
- Sequential (ง่าย แต่สร้างได้แต่แบบไม่ซับซ้อน (วิ่งได้เเต่แบบเส้นตรง))
- Functional (ยากขึ้นมาอีกนิด แต่สามารถปรับเส้นทาง ให้มีความซับซ้อนได้)
- Subclassing (ยากสุด แต่สามารถแก้ไขได้ตามที่เราต้องการ)
import tensorflow as tf # run
from tensorflow import keras #API / UI
from tensorflow.keras import layers
# Define Sequential model witn 3 layers
model = keras.Sequential(
    [
     keras.Input(shape=(4,)),
     layers.Dense(2, activation="relu",name="layer1"),
     layers.Dense(3, activation="relu",name="layer2"),
     layers.Dense(5, activation="softmax",name="output")
    ]
)
model2 = keras.Sequential()
model2.add(keras.Input(shape=(4,)))
model2.add(layers.Dense(2, activation="relu"))
model2.add(layers.Dense(3, activation="relu"))
model2.add(layers.Dense(5, activation="softmax"))
import numpy as np
import tensorflow as tf
from tensorflow import keras
from tensorflow.keras import layers
input_images = keras.Input(shape=(32, 32, 3), name="img") # input shape shape=(32, 32, 3)
model = layers.Conv2D(32, (3, 3), activation="relu", name="conv1")(input_images) # (input_images) input จาก output  layer ก่อนหน้า
model = layers.MaxPooling2D((2, 2), name="maxpool1")(model)
model = layers.Conv2D(64, (3, 3), activation='relu', name="conv2")(model)
model = layers.MaxPooling2D((2, 2), name="maxpool2")(model)
model = layers.Conv2D(64, (3, 3), activation='relu', name="conv3")(model)
model = layers.Flatten(name="Flatten")(model)
model = layers.Dense(64, activation='relu', name="activation")(model)
output = layers.Dense(10, name="output")(model)

my_model = keras.Model(input_images, output, name = "mymodel")
มี skip connection
inputs = keras.Input(shape=(32, 32, 3), name="img")
x = layers.Conv2D(32, 3, activation="relu")(inputs)
x = layers.Conv2D(64, 3, activation="relu")(x)
block_1_output = layers.MaxPooling2D(3)(x)

x = layers.Conv2D(64, 3, activation="relu", padding="same")(block_1_output)
x = layers.Conv2D(64, 3, activation="relu", padding="same")(x)
block_2_output = layers.add([x, block_1_output]) # รับ output ทั้งแบบปกติ และ ที่เป็น skip connection

x = layers.Conv2D(64, 3, activation="relu", padding="same")(block_2_output)
x = layers.Conv2D(64, 3, activation="relu", padding="same")(x)
block_3_output = layers.add([x, block_2_output])

x = layers.Conv2D(64, 3, activation="relu")(block_3_output)
x = layers.GlobalAveragePooling2D()(x) # sum ออกมาเป็นเส้นยาวๆ
x = layers.Dense(256, activation="relu")(x)
x = layers.Dropout(0.5)(x)
outputs = layers.Dense(10)(x)

resnet_model = keras.Model(inputs, outputs, name="toy_resnet")
resnet_model.summary()
- data augmentation
- ระบุ path
-
- flow_from_directory
-
- flow_from_dataframe
-