Kubernetes (K8s) is an open-source system for automating deployment, scaling, and management of containerized applications. Kubernetes is a Greek word which means helmsman or the pilot of a ship. K8s is an abbreviation derived by replacing the 8 letters "ubernete" with "8".
It is an open source project that was started by Google and derived from Borg, which is used inside Google for several years now for container management. Currently, it is hosted by Cloud Native Computing Foundation (CNCF).
Kubernetes is an abstraction that optimizes the utilization of resources like CPU and memory through containers, which allow for efficient distributions of applications across a cluster of nodes. K8s can run anywhere on bare metal or in any cloud provider infrastructure.
- Container grouping using pod
- Self-healing
- Auto-scalablility
- DNS management
- Load balancing
- Rolling update or rollback
- Resource monitoring and logging
A Kubernetes cluster is made of a master node and a set of worker/slave nodes. A K8s setup consists of several parts, some of them optional, some mandatory for the whole system to function.
This is a high-level diagram of the architecture:
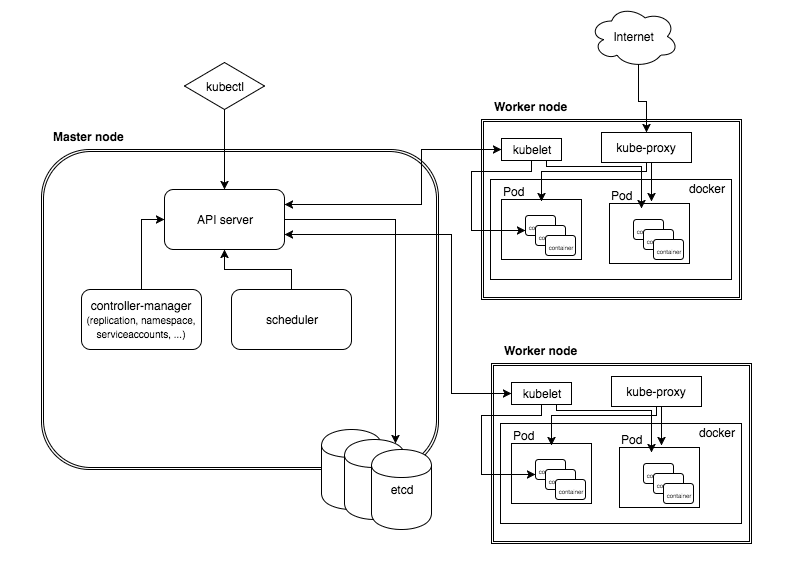
Let’s have a look into each of the component’s responsibilities:
The master node is responsible for the management of Kubernetes cluster. This is the entry point of all administrative tasks. The master node is the one taking care of orchestrating the worker nodes, where the actual services are running.
Let's dive into each of the components of the master node:
The API server is the entry points for all the REST commands used to control the cluster. It processes the REST requests, validates them, and executes the bound business logic. It is the only component which stores the desired state in etcd.
All configuration information about cluster states is stored in the etcd in the form of key/value pairs and it allows values to be watched for changes. An example of data stored by Kubernetes in etcd is jobs being scheduled, created and deployed, pod/service details and state, namespaces and replication information, etc.
It works with the API server to schedule workloads in the form of pods on the actual worker nodes. These pods include the various containers that make up our application stacks. By default, the basic Kubernetes scheduler spreads pods across the cluster and uses different nodes for matching pod replicas.
Optionally you can run different kinds of controllers inside the master node. An example of such a controller is the Replication controller, which works with the API server to ensure that the correct number of pod replicas are running at any given time. This is exemplary of the desired state concept. If our replication controller is defining three replicas and our actual state is two copies of the pod running, then the scheduler will be invoked to add a third pod somewhere on our cluster. In this way, K8s is always pushing towards that desired state.
A command line tool to communicate with the API service and send commands to the master node.
The pods are run here, so the worker node contains all the necessary services to manage the networking between the containers, communicate with the master node, and assign resources to the containers scheduled.
Pods allow you to keep related containers close in terms of the network and hardware infrastructure. Data can live near the application, so processing can be done without incurring a high latency from network traversal. Similarly, common data can be stored on volumes that are shared between a number of containers. Pods essentially allow you to logically group containers and pieces of our application stacks together.
While pods may run one or more containers inside, the pod itself may be one of many that is running on a Kubernetes worker node. Pods give us a logical group of containers that we can then replicate, schedule, and balance service endpoints across.
Docker runs on each of the worker nodes, and runs the configured pods. It takes care of downloading the images and starting the containers.
kubelet gets the configuration of a pod from the API server and ensures that the described containers are up and running. This is the worker service that’s responsible for communicating with the master node. It also communicates with etcd, to get information about services and write the details about newly created ones.
kube-proxy runs in each node for load distribution among the pods and makes services available to the external host. It uses iptable rules or round robin to forward requests to the correct containers.
Kubernetes is supported on a variety of platforms. Here we will use Amazon Web Services (AWS) and kops (Kubernetes Operations) which provides the easiest way to get a production grade Kubernetes cluster up and running.
You need an AWS account. Visit http://aws.amazon.com to get started.
If you install python 3, pip will be installed automatically in macOS.
brew install python3
pip install awscli --upgrade --user
After you install the AWS CLI, you may need to add the path to the executable file to your PATH variable.
vim ~/.zshrc
Add the line export PATH=~/.local/bin:$PATH in .zshrc and source the file.
source ~/.zshrc
aws --version
brew update && brew install kops
brew install kubernetes-cli
AWS IAM enables you to manage access to AWS services and resources securely. In order to build clusters within AWS we'll create a dedicated IAM user for kops. This user requires API credentials in order to use kops. You can create the kops IAM user from the command line using the following:
aws iam create-group --group-name kops

aws iam attach-group-policy --policy-arn arn:aws:iam::aws:policy/AmazonEC2FullAccess --group-name kops
aws iam attach-group-policy --policy-arn arn:aws:iam::aws:policy/AmazonRoute53FullAccess --group-name kops
aws iam attach-group-policy --policy-arn arn:aws:iam::aws:policy/AmazonS3FullAccess --group-name kops
aws iam attach-group-policy --policy-arn arn:aws:iam::aws:policy/IAMFullAccess --group-name kops
aws iam attach-group-policy --policy-arn arn:aws:iam::aws:policy/AmazonVPCFullAccess --group-name kops

aws iam create-user --user-name kops

aws iam add-user-to-group --user-name kops --group-name kops

aws iam create-access-key --user-name kops
You should record the SecretAccessKey and AccessKeyID in the returned JSON output, and then use them below:
# configure the aws client to use your new IAM user
aws configure           # Use your new access and secret key here
vim ~/.zshrc
Add the following two lines in .zshrc and source the file because "aws configure" does not export these vars for kops to use, we export them now:
export AWS_ACCESS_KEY_ID=$(aws configure get aws_access_key_id)
export AWS_SECRET_ACCESS_KEY=$(aws configure get aws_secret_access_key)
source ~/.zshrc
aws --version
You can see a list of all your IAM users here:
aws iam list-users
You can also check the config as well:
cat ~/.aws/credentials
cat ~/.aws/config
Please use this doc if you have any problem to configure.
If you bought a domain (e.g. rajughosh.me) from elsewhere then you have to create a hosted zone in Route53. Please login to your AWS account from browser and go to "Route53". Please click on "DNS Management" and then click on "Create Hosted Zone". Please fill the form like below and click on "Create" button.

Now you will get 4 NS (Name Servers) record for your domain (rajughosh.me).

Please copy this NS record and set it to your domain.

You should now able to dig your domain and see the AWS Name Servers on the other end.
dig ns rajughosh.me
Should return something similar to:
;; ANSWER SECTION:
rajughosh.me.           21599   IN      NS      ns-1429.awsdns-50.org.
rajughosh.me.           21599   IN      NS      ns-1873.awsdns-42.co.uk.
rajughosh.me.           21599   IN      NS      ns-358.awsdns-44.com.
rajughosh.me.           21599   IN      NS      ns-639.awsdns-15.net.
This is a critical component of setting up clusters. If you are experiencing problems with the Kubernetes API not coming up, chances are something is wrong with the cluster's DNS.
Please DO NOT MOVE ON until you have validated your NS records!
In order to store the state of your cluster, and the representation of your cluster, we need to create a dedicated S3 bucket for kops to use. This bucket will become the source of truth for our cluster configuration.
We recommend keeping the creation of this bucket confined to us-east-1, otherwise more work will be required.
aws s3api create-bucket \
    --bucket prefix-rajughosh-me-state-store \
    --region us-east-1
We STRONGLY recommend versioning your S3 bucket in case you ever need to revert or recover a previous state store.
aws s3api put-bucket-versioning --bucket prefix-rajughosh-me-state-store --versioning-configuration Status=Enabled
We're ready to start creating our first cluster! Let's first set up a few environment variables to make this process easier.
Please open ~/.zshrc file for editing using vim and add the following two lines and save:
export NAME=myfirstcluster.rajughosh.me
export KOPS_STATE_STORE=s3://prefix-rajughosh-me-state-store
source ~/.zshrc
We will need to note which availability zones are available to us. In this example we will be deploying our cluster to the us-east-2 region.
aws ec2 describe-availability-zones --region us-east-2
The output is similar to this:
{
    "AvailabilityZones": [
        {
            "State": "available",
            "Messages": [],
            "RegionName": "us-east-2",
            "ZoneName": "us-east-2a"
        },
        {
            "State": "available",
            "Messages": [],
            "RegionName": "us-east-2",
            "ZoneName": "us-east-2b"
        },
        {
            "State": "available",
            "Messages": [],
            "RegionName": "us-east-2",
            "ZoneName": "us-east-2c"
        }
    ]
}mkdir kops
cd kops
ssh-keygen
The below command will generate a cluster configuration, but not start building it.
kops create cluster \
    --zones us-east-2a \
    ${NAME}
All instances created by kops will be built within ASG (Auto Scaling Groups), which means each instance will be automatically monitored and rebuilt by AWS if it suffers any failure.
Now we have a cluster configuration, we can look at every aspect that defines our cluster by editing the description.
kops edit cluster ${NAME}
The configuration is loaded from the S3 bucket we created earlier, and automatically updated when we save and exit the editor.
Now we take the final step of actually building the cluster. This'll take a while.
kops update cluster ${NAME} --yes
Remember when you installed kubectl earlier? The configuration for your cluster was automatically generated and written to ~/.kube/config for you!
A simple Kubernetes API call can be used to check if the API is online and listening. Let's use kubectl to check the nodes.
kubectl get nodes
The output is similar to this:
NAME                                          STATUS     ROLES     AGE       VERSION
ip-172-20-53-65.us-east-2.compute.internal    Ready      master    1m        v1.9.3
ip-172-20-58-211.us-east-2.compute.internal   Ready      node      13s       v1.9.3
ip-172-20-63-67.us-east-2.compute.internal    Ready      node      25s       v1.9.3
Also kops ships with a handy validation tool that can be ran to ensure your cluster is working as expected.
kops validate cluster
The output is similar to this:
Validating cluster myfirstcluster.rajughosh.me

INSTANCE GROUPS
NAME                    ROLE    MACHINETYPE     MIN     MAX     SUBNETS
master-us-east-2a       Master  c4.large        1       1       us-east-2a
nodes                   Node    t2.medium       2       2       us-east-2a

NODE STATUS
NAME                                            ROLE    READY
ip-172-20-53-65.us-east-2.compute.internal      master  True
ip-172-20-58-211.us-east-2.compute.internal     node    True
ip-172-20-63-67.us-east-2.compute.internal      node    True
You can look at all the system components with the following command.
kubectl -n kube-system get po
The output is similar to this:
NAME                                                                 READY     STATUS    RESTARTS   AGE
dns-controller-754f45cb86-pgblh                                      1/1       Running   0          3m
etcd-server-events-ip-172-20-53-65.us-east-2.compute.internal        1/1       Running   0          3m
etcd-server-ip-172-20-53-65.us-east-2.compute.internal               1/1       Running   0          3m
kube-apiserver-ip-172-20-53-65.us-east-2.compute.internal            1/1       Running   0          2m
kube-controller-manager-ip-172-20-53-65.us-east-2.compute.internal   1/1       Running   0          3m
kube-dns-7785f4d7dc-bvcg9                                            3/3       Running   0          3m
kube-dns-7785f4d7dc-zcz6b                                            3/3       Running   0          1m
kube-dns-autoscaler-787d59df8f-bntg7                                 1/1       Running   0          3m
kube-proxy-ip-172-20-53-65.us-east-2.compute.internal                1/1       Running   0          3m
kube-proxy-ip-172-20-58-211.us-east-2.compute.internal               1/1       Running   0          1m
kube-proxy-ip-172-20-63-67.us-east-2.compute.internal                1/1       Running   0          1m
kube-scheduler-ip-172-20-53-65.us-east-2.compute.internal            1/1       Running   0          3m
You can see this video:

- Create an nginx deployment.
- Use kubectl to list information about the deployment.
- Update the deployment.
You can run an application by creating a Kubernetes Deployment object, and you can describe a Deployment in a YAML file.
mkdir learning
cd learning
touch deployment.yaml
Please open the file for editing and paste the following contents and save:
apiVersion: apps/v1 # for versions before 1.9.0 use apps/v1beta2
kind: Deployment
metadata:
  name: nginx-deployment
spec:
  selector:
    matchLabels:
      app: nginx
  replicas: 2 # tells deployment to run 2 pods matching the template
  template: # create pods using pod definition in this template
    metadata:
      # unlike pod-nginx.yaml, the name is not included in the meta data as a unique name is
      # generated from the deployment name
      labels:
        app: nginx
    spec:
      containers:
      - name: nginx
        image: nginx:1.7.9
        ports:
        - containerPort: 80
In this example:
- A Deployment named
nginx-deployment, indicated by themetadata: namefield. - The Deployment creates two replicated Pods, indicated by the
replicasfield. - The
selectorfield defines how the Deployment finds which Pods to manage. In this case, we simply select on one label defined in the Pod template (app: nginx). However, more sophisticated selection rules are possible, as long as the Pod template itself satisfies the rule. - The Pod template’s specification, or
template: specfield, indicates that the Pods run one container,nginx, which runs thenginxDocker Hub image at version1.7.9. - The Deployment opens port
80for use by the Pods.
The template field contains the following instructions:
- The Pods are labeled
app: nginx - Create one container and name it
nginx. - Run the
nginximage at version1.7.9. - Open port
80so that the container can send and accept traffic.
You can read from here
kubectl apply -f deployment.yaml
kubectl describe deployment nginx-deployment
The output is similar to this:
Name:                   nginx-deployment
Namespace:              default
CreationTimestamp:      Thu, 31 May 2018 11:59:10 +0600
Labels:                 app=nginx
Annotations:            deployment.kubernetes.io/revision=1
                        kubectl.kubernetes.io/last-applied-configuration={"apiVersion":"apps/v1","kind":"Deployment","metadata":{"annotations":{},"name":"nginx-deployment","namespace":"default"},"spec":{"replicas":2,"selecto...
Selector:               app=nginx
Replicas:               2 desired | 2 updated | 2 total | 2 available | 0 unavailable
StrategyType:           RollingUpdate
MinReadySeconds:        0
RollingUpdateStrategy:  25% max unavailable, 25% max surge
Pod Template:
  Labels:  app=nginx
  Containers:
   nginx:
    Image:        nginx:1.7.9
    Port:         80/TCP
    Host Port:    0/TCP
    Environment:  <none>
    Mounts:       <none>
  Volumes:        <none>
Conditions:
  Type           Status  Reason
  ----           ------  ------
  Available      True    MinimumReplicasAvailable
  Progressing    True    NewReplicaSetAvailable
OldReplicaSets:  <none>
NewReplicaSet:   nginx-deployment-6c54bd5869 (2/2 replicas created)
Events:
  Type    Reason             Age   From                   Message
  ----    ------             ----  ----                   -------
  Normal  ScalingReplicaSet  1m    deployment-controller  Scaled up replica set nginx-deployment-6c54bd5869 to 2
We can also see the list of all deployments:
kubectl get deployments
The output is similar to this:
NAME               DESIRED   CURRENT   UP-TO-DATE   AVAILABLE   AGE
nginx-deployment   2         2         2            2           4m
kubectl get pods -l app=nginx
The output is similar to this:
NAME                                READY     STATUS    RESTARTS   AGE
nginx-deployment-6c54bd5869-6nt5j   1/1       Running   0          5m
nginx-deployment-6c54bd5869-pzqnk   1/1       Running   0          5m
kubectl describe pod <pod-name>
where <pod-name> is the name of one of your pods.
Suppose we want to decrease the number of pods in your Deployment.
KUBE_EDITOR="vim" kubectl edit deployment nginx-deployment
Please update the replicas from 2 to 1 like below and save:
apiVersion: apps/v1
kind: Deployment
metadata:
  name: nginx-deployment
spec:
  selector:
    matchLabels:
      app: nginx
  replicas: 1 # Update the replicas from 2 to 1
  template:
    metadata:
      labels:
        app: nginx
    spec:
      containers:
      - name: nginx
        image: nginx:1.7.9
        ports:
        - containerPort: 80
When you save it then it will automatically apply the changes.
Another way to do an update of the image for a deployment is to edit to the deployment via the CLI:
kubectl scale deployment nginx-deployment --replicas=1
kubectl get pods -l app=nginx
The output is similar to this:
NAME                                READY     STATUS    RESTARTS   AGE
nginx-deployment-6c54bd5869-pzqnk   1/1       Running   0          9m
kubectl port-forward nginx-deployment-6c54bd5869-pzqnk 8080:80
curl localhost:8080
If you want to update the nginx index.html file then open the container in interactive mode:
kubectl exec -it nginx-deployment-6c54bd5869-pzqnk -c nginx bash
Running a Kubernetes cluster within AWS obviously costs money, and so you may want to delete your cluster if you are finished running experiments.
You can preview all of the AWS resources that will be destroyed when the cluster is deleted by issuing the following command.
kops delete cluster --name ${NAME}
When you are sure you want to delete your cluster, issue the delete command with the --yes flag. Note that this command is very destructive, and will delete your cluster and everything contained within it!
kops delete cluster --name ${NAME} --yes
You can learn more from kubectl Cheat Sheet and kubectl Commands.