OAuth2 Introduction
OAuth 2 is an authorization framework that enables applications to obtain limited access to user's resources on an HTTP service - normally exposed as a REST API. It works by delegating user authentication to an authorization service which contains all sorts of login service providers like LDAP for employees and database for customers.
OAuth 2 provides authorization flows for the following types of application to application communication:
- Web server to API
- Standalone application to API
- API to API
This informational guide is geared towards application developers, and provides an overview of OAuth 2 roles, authorization grant types, use cases, and flows.
OAuth defines four roles:
- Resource Owner
- Client
- Resource Server
- Authorization Server
We will detail each role in the following subsections.
The resource owner is the user who authorizes an application to access their resources. The application's access to the user's resource is limited to the "scope" of the authorization granted (e.g. read or write access).
The resource server hosts the protected user resources.
the authorization server verifies the identity of the user then issues access tokens to the application.
The client is the application that wants to access the user's resources. Before it may do so, it must be authorized by the user, and the authorization must be validated by the API.
Now that you have an idea of what the OAuth roles are, let's look at a diagram of how they generally interact with each other:
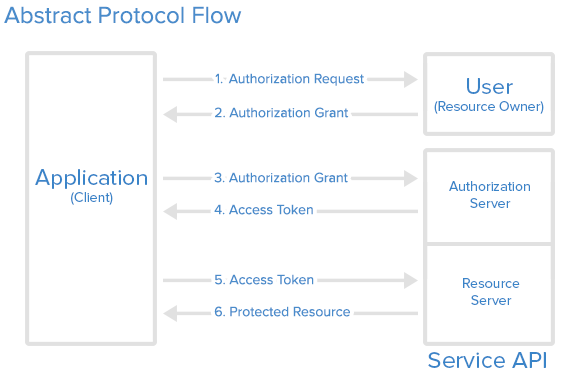
Here is a more detailed explanation of the steps in the diagram:
- The application requests authorization to access service resources from the user
- If the user authorized the request, the application receives an authorization grant
- The application requests an access token from the authorization server (API) by presenting authentication of its own identity, and the authorization grant
- If the application identity is authenticated and the authorization grant is valid, the authorization server issues an access token to the application.
- The application requests the resource from the resource server (API) and presents the access token for authentication.
- If the access token is valid, the resource server (API) serves the resource to the application.
The actual flow of this process will differ depending on the authorization grant type in use, but this is the general idea. We will explore different grant types in a later section.
Before using OAuth with your application, you must register your application with the service. This is done through a registration form in the "developer" or "API" portion of the service's website, where you will provide the following information (and probably details about your application):
- Application Name
- Application Website
- Redirect URI or Callback URL
- The redirect URI is where the service will redirect the user after they authorize (or deny) your application, and therefore the part of your application that will handle authorization codes or access tokens.
Once your application is registered, the service will issue "client credentials" in the form of a client identifier and a client secret. The Client ID is a publicly exposed string that is used by the service API to identify the application, and is also used to build authorization URLs that are presented to users. The Client Secret is used to authenticate the identity of the application to the service API when the application requests to access a user's resource, and must be kept private between the application and the API.
In the Abstract Protocol Flow above, the first four steps cover obtaining an authorization grant and access token. The authorization grant type depends on the method used by the application to request authorization, and the grant types supported by the Authorization server. OAuth 2 defines four grant types, each of which is useful in different cases:
- Authorization Code: used with server-side Applications
- Implicit: used with Mobile Apps or Web Applications (applications that run on the user's device)
- Resource Owner Password Credentials: used with trusted Applications, such as those owned by the service itself
- Client Credentials: used with Applications API access
Now we will describe grant types in more detail, their use cases and flows, in the following sections.
The authorization code grant type is the most commonly used because it is optimized for server-side applications, where source code is not publicly exposed, and Client Secret confidentiality can be maintained. This is a redirection-based flow, which means that the application must be capable of interacting with the user-agent (i.e. the user's web browser) and receiving API authorization codes that are routed through the user-agent.
Now we will describe the authorization code flow:

Step 1: Authorization Code Link
First, the user is given an authorization code link that looks like the following:
http://localhost:8888/oauth2/code?response_type=code&client_id=6e9d1db3-2feb-4c1f-a5ad-9e93ae8ca59d&redirect_uri=http://localhost:8080/authorization
Here is an explanation of the link components:
- http://localhost:8888/oauth2/code: the authorization endpoint
- client_id=6e9d1db3-2feb-4c1f-a5ad-9e93ae8ca59d: the application's client_id (how the API identifies the application)
- redirect_uri=http://localhost:8080/authorization: where the service redirects the user-agent after an authorization code is granted
- response_type=code: specifies that your application is requesting an authorization code grant
Step 2: User Authorizes Application
When the user clicks the link, they must first log in to the authorization service, to authenticate their identity (unless they are already logged in).
Step 3: Application Receives Authorization Code
If the user is authenticated, the service redirects the user-agent to the application redirect URI, which was specified during the client registration, along with an authorization code. The redirect would look something like this:
http://localhost:8080/authorization?code=rlbQn-mUT4ep-GLyRHaFsg
Step 4: Application Requests Access Token
The application requests an access token from the API, by passing the authorization code along with authentication details, including the client secret, to the API token endpoint. Here is an example POST request to token endpoint:
Url:
http://localhost:8888/oauth2/token

Header:
Authorization Basic Basic 6e9d1db3-2feb-4c1f-a5ad-9e93ae8ca59d:sQesTWAnTwaw-Nn0oK35GA

Body in x-www-form-urlencoded
grant_type=authorization_code
code=rlbQn-mUT4ep-GLyRHaFsg
Step 5: Application Receives Access Token
If the authorization is valid, the Authorization server will send a response containing the access token (and optionally, a refresh token) to the application. The entire response will look something like this:
{
  "access_token": "eyJhbGciOiJSUzI1NiJ9.eyJpc3MiOiJ1cm46Y29tOm5ldHdvcmtudDpvYXV0aDI6djEiLCJhdWQiOiJ1cm46Y29tLm5ldHdvcmtudCIsImV4cCI6MTQ3NDU3MDc3NiwianRpIjoiaXNRLWFMWGhFR21kcDZ1MVFNQWNsdyIsImlhdCI6MTQ3NDU3MDE3NiwibmJmIjoxNDc0NTcwMDU2LCJ2ZXJzaW9uIjoiMS4wIiwidXNlcl9pZCI6InN0ZXZlaHUiLCJ1c2VyX3R5cGUiOiJFTVBMT1lFRSIsImNsaWVudF9pZCI6IjZlOWQxZGIzLTJmZWItNGMxZi1hNWFkLTllOTNhZThjYTU5ZCIsInNjb3BlIjpbImFjY291bnQuciIsImFjY291bnQudyJdfQ.W8tUY-jsrwH5Z_4WkKRPGhO3H-GGFXMa3a_ng3CIzEkKdRcQpG_7x3T8e7qsMmMvo69zus4lo96k3Qb3nN29aMeYH7g1AoXAawNWLpahNQ9U1EIf_cHDY23qGCU0GudAyITBVqJJVei2LmlZTSnvPYbn2TpXjAC3tODNlWVLSmfn7rXDSEosllDyvrJrWOUV8-VOpBTgzjTLB8axwzoIZjmV6QoOHC9R4g27AbEDXNDNSPl4aEFh5rShkeF7Gd0h9XuA_PTY5WcFbhSZw7aXk1-tJQnLGMgznZwegcGjD_u7s9cWvuojjXTS-V7XUIokk88hIDprfKCmwlAO2yoeFA",
  "token_type": "bearer",
  "expires_in": 600
}
Now the application is authorized! It may use the token to access the user's resource via the service API, limited to the scope of access, until the token expires. If a refresh token was issued, it may be used to request new access tokens if the original token has expired.
The client credentials grant type provides an application a way to access its own service by passing client credentials through the header and specify grant_type in body to "client_credentials".
The application requests an access token by sending its credentials, its client_id and client_secret to the authorization server. An example POST request might look like the following:
Url:
http://localhost:8888/oauth2/token

Header:
Authorization Basic Basic 6e9d1db3-2feb-4c1f-a5ad-9e93ae8ca59d:sQesTWAnTwaw-Nn0oK35GA

Body in x-www-form-urlencoded
grant_type=client_credentials
If the client credentials is correct, the authorization server returns an access token to the application. Now the application is authorized to use its own resource!
{
  "access_token": "eyJhbGciOiJSUzI1NiJ9.eyJpc3MiOiJ1cm46Y29tOm5ldHdvcmtudDpvYXV0aDI6djEiLCJhdWQiOiJ1cm46Y29tLm5ldHdvcmtudCIsImV4cCI6MTQ3NDU3MDk3MywianRpIjoicVNxbnozaTJ3NWE4SVh4YURNNnBKUSIsImlhdCI6MTQ3NDU3MDM3MywibmJmIjoxNDc0NTcwMjUzLCJ2ZXJzaW9uIjoiMS4wIiwiY2xpZW50X2lkIjoiNmU5ZDFkYjMtMmZlYi00YzFmLWE1YWQtOWU5M2FlOGNhNTlkIiwic2NvcGUiOlsiYWNjb3VudC5yIiwiYWNjb3VudC53Il19.Dl6pMiQ6NQf4DKSA2Hz2qlrIAvJDnTfXPsvCa2EUq3QOASXN_tPsttW2BB33rIsa9UE1meP-ipI6mubtM18LyUex50OoegQVZsde4vTRd0oldTxWV8euqmCGZcrauvw_E4-CG00lDbuXYXX2_CpZO6GLlkXeG07IMEAjBVG__sXvybmMTKx32dT1OtrI32ePJZe9Nazt-TMCIqAVa_E6zeEAiatX6mgDXM62xX_AKLnXQ04TpeTD4TXkV-JUQ6ZMtdfCIgAR0tMB6fKLDfHiOb2vMEz3q1COVIsS3ce7rRjaQKEYq6Zrao91ft1Y0fYbRL-jRhXRfVPbUUdxxhbjrg",
  "token_type": "bearer",
  "expires_in": 600
}
Once the application has an access token, it may use the token to access the user's resource via the API, limited to the scope of access, until the token expires.
Here is an example of an API request, using curl. Note that it includes the access token:
curl -X POST -H "Authorization: Bearer ACCESS_TOKEN" "http://localhost:8080/customer/111"
Assuming the access token is valid, the API will process the request according to its API specifications. If the access token is expired or otherwise invalid, the API will return an 401 error.
After an access token expires, using it to make a request from the API will result in an "Invalid Token Error". At this point, if a refresh token was included when the original access token was issued, it can be used to request a fresh access token from the authorization server.
You should now have a good idea of how OAuth 2 works, and when a particular authorization flow should be used.
If you want to learn more about OAuth 2, check out these valuable resources: