Django Data Wizard is an interactive tool for mapping structured data (e.g. Excel, XML) into a normalized database structure via wq.io and the Django REST Framework. Django Data Wizard allows novice users to map spreadsheet columns to serializer fields (and cell values to foreign keys) on-the-fly during the import process. This reduces the need for preset spreadsheet formats, which most data import solutions require.

By default, Django Data Wizard supports any format supported by wq.io (Excel, CSV, JSON, and XML). Additional formats can be integrating by creating a custom wq.io class and then registering it with the wizard. For example, the Climata Viewer uses Django Data Wizard to import data from climata's wq.io-based web service client.
The Data Wizard supports straightforward one-to-one mappings from spreadsheet columns to database fields, as well as more complex scenarios like natural keys and Entity-Attribute-Value (or "wide") table mappings. It was originally developed for use with the ERAV data model provided by vera.


Django Data Wizard provides a JSON (and HTML) API for specifying a data set to import (by referencing a previously-uploaded file), selecting a serializer, mapping the data columns and identifiers, and (asynchronously) importing the data into the database.
# Recommended: create virtual environment
# python3 -m venv venv
# . venv/bin/activate

pip install data-wizard
See https://github.com/wq/django-data-wizard to report any issues.
Within a new or existing Django or wq project, configure the following:
- Celery / Redis
- A model for (up)loading source data
- One or more serializers for populating the destination models
- wq/progress.js plugin (if using wq)
Django Data Wizard requires Celery to handle asynchronous tasks, and is usually used with Redis as the memory store. These should be configured first or the REST API may not work. On Ubuntu, run the following command:
# Install redis on Ubuntu
sudo apt-get install redis-server
Once Redis is installed, you should be able to add the following to your project settings:
# myproject/settings.py

INSTALLED_APPS = (
   # ...
   'data_wizard',
   'myapp',
)

CELERY_RESULT_BACKEND = BROKER_URL = 'redis://localhost:6379/1'
Then, define a celery app:
# myproject/celery.py
from __future__ import absolute_import
from celery import Celery
from django.conf import settings
app = Celery('myproject')
app.config_from_object('django.conf:settings')
app.autodiscover_tasks(lambda: settings.INSTALLED_APPS)
And reference it from your project:
# myproject/__init__.py
from .celery import app as celery_app
Finally, make sure that celery is running in the background. You can test with the following command, then move to a more stable configuration (e.g. daemonization).
# celery.sh
export DJANGO_SETTINGS_MODULE=myproject.settings
celery -A myproject worker -l info
Note that any time you change your serializer registration, you should reload celery in addition to restarting the Django WSGI instance.
To use Data Wizard with the default configuration, your project should provide a Django model with a FileField named file. You will want to provide your users with the ability to upload spreadsheets and other files to this model, for example by registering it with wq.db. The actual import process can then be triggered after the file is uploaded, for example by adding a form to the detail page (see below).
# myapp/models.py
from django.db import models

class FileModel(models.Model):
    file = models.FileField(upload_to='spreadsheets')
    # ...
# myapp/rest.py
from wq.db import rest
from .models import FileModel
rest.router.register_model(
FileModel,
fields="__all__",
)You can use a model with a different FileField name by extending data_wizard.loaders.FileLoader and setting DATA_WIZARD_LOADER:
# myapp/models.py
from django.db import models

class FileModel(models.Model):
    spreadsheet = models.FileField(upload_to='spreadsheets')
# myapp/loaders.py
from data_wizard import loaders
class FileLoader(loaders.FileLoader):
file_attr = 'spreadsheet'# myapp/settings.py
DATA_WIZARD_LOADER = 'myapp.loaders.FileLoader'You can also customize the loader to load data from a custom wq.io class. For example, the Climata Viewer uses climata classes to load data directly from third-party webservices. To do this, extend data_wizard.loaders.BaseLoader with a custom load_io() function that returns the data from wq.io:
# myapp/models.py
from django.db import models

class WebSource(models.Model):
    url = models.URLField()
# myapp/loaders.py
from data_wizard import loaders
class UrlLoader(loaders.BaseLoader):
def load_io(self):
source = self.run.content_object
from wq.io import load_url # or e.g. JsonNetIO
return load_url(source.url)# myapp/settings.py
DATA_WIZARD_LOADER = 'myapp.loaders.UrlLoader'Note that there still should be a custom model to define the parameters for the IO class, even though there is no file being stored.
Data Wizard uses wq.io classes (via the loader) to determine the source columns present on the spreadsheet or other data source. It uses Django REST Framework's ModelSerializer class to determine the destination fields on the database model. You can register serializers by creating a wizard.py in your app directory (analogous to Django's admin.py and wq.db's rest.py). Multiple serializers can be registered with the wizard to support multiple import configurations and destination models.
# myapp/wizard.py
from rest_framework import serializers
from data_wizard import registry
from .models import TimeSeries

class TimeSeriesSerializer(serializers.ModelSerializer):
    class Meta:
        model = TimeSeries
        fields = '__all__'

registry.register("Time Series", TimeSeriesSerializer)
At least one serializer should be registered in order to use the wizard. Note the use of a human-friendly serializer label when registering. This name should be unique throughout the project, but can be changed later on without breaking existing data. (The class path is used as the actual identifier behind the scenes.)
If you are using the built-in Data Wizard interface for wq, be sure to enable the wq/progress.js plugin.
// myapp/main.js
define(['wq/app', 'wq/progress', ...],
function(app, progress, ...) {
    app.use(progress);
    app.init(config).then(...);
});The Data Wizard REST API provides the following capabilities. If you are using wq.db, the wizard will automatically register itself with the router. Otherwise, be sure to include data_wizard.urls in your URL configuration:
# with wq.db (automatic)
# rest.router.register_model(data_wizard.models.Run, ...)

# without wq.db
from django.conf.urls import include, url

urlpatterns = [
    # ...
    url(r'^', include('data_wizard.urls')),
]
The API is accessible as JSON and as HTML - though the HTML interface is (currently) only accessible when using the Mustache template engine (i.e. with wq.db).
Create a new instance of the wizard (i.e. a Run). The returned run id should be used in all subsequent calls to the API. Each Run is tied to the model containing the actual data via a generic foreign key.
| parameter | description |
|---|---|
object_id |
The id of the object containing the data to be imported. |
content_type_id |
The app label and model name of the referenced model (in the format app_label.modelname). |
loader |
(Optional) The class name to use for loading the dataset via wq.io. The default loader (data_wizard.loaders.FileLoader) assumes that the referenced model contains a FileField named file. |
serializer |
(Optional) The class name to use for serialization. This can be left unset to allow the user to select it during the wizard run. |
If you are using wq.db, you could allow the user to initiate an import run by adding the following to the detail HTML for your model:
<!-- filemodel_detail.html -->
<h1>{{label}}</h1>
<a href="{{rt}}/media/{{file}}" rel="external">Download File</a>

<form action="{{rt}}/datawizard/" method="post" data-ajax="true" data-wq-json="false">
  {{>csrf}}
  <input type="hidden" name="content_type_id" value="myapp.filemodel">
  <input type="hidden" name="object_id" value="{{id}}">
  <button type="submit">Import Data from This File</button>
</form>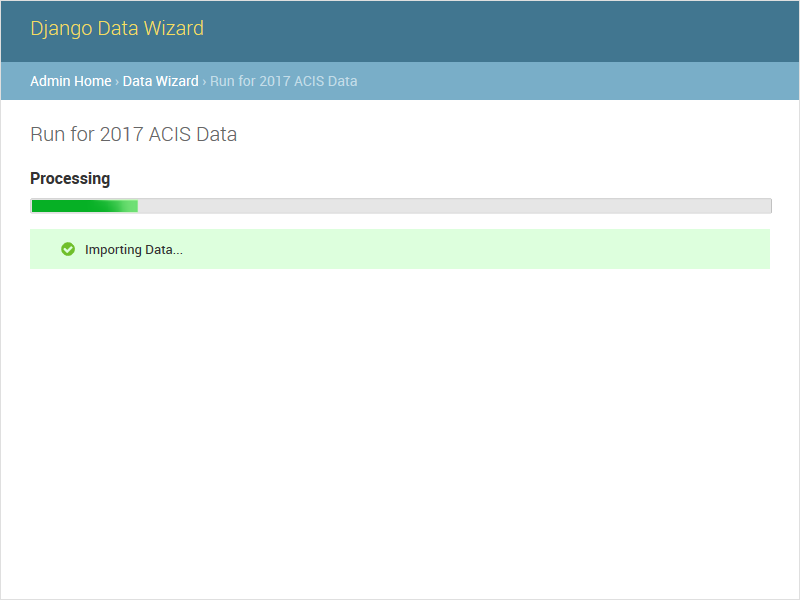
The auto task attempts to run the entire data wizard process from beginning to end. If any input is needed, the import will halt and redirect to the necessary screen. If no input is needed, the auto task is equivalent to starting the data task directly. This is an asynchronous method, and returns a task_id to be used with the status API.
The default run_detail.html template provides an example form to initiate the auto task.
The status API is used to check the status of an asynchronous task (one of auto or data). The API is designed to be used in conjunction with the wq/progress.js plugin for wq.app, which can be used as a reference for custom implementations. Unlike the other methods, this API should always be called as JSON (either as status.json or status?format=json). An object of the following format will be returned:
{
    // General properties
    "status": "PROGRESS", // or "SUCCESS", "FAILURE"
    "stage": "meta",      // or "data"
    "current": 23,        // currently processing row
    "total": 100,         // total number of rows

    // "FAILURE"
    "error": "Error Message",

    // Task complete ("SUCCESS")
    "action": "records",        // or "serializers", "columns" "ids"
    "message": "Input Needed",  // if action is not "records"
    "skipped": [...],           // rows that could not be imported
    "location": "/datawizard/[id]/records",
}
Note that the status field is directly derived from the underlying Celery task state. When running an auto task, the result is SUCCESS whenever the task ends without errors, even if there is additional input needed to fully complete the run.
The default run_auto.html and run_data.html templates include a <progress> element for use with wq/progress.js and the status task.
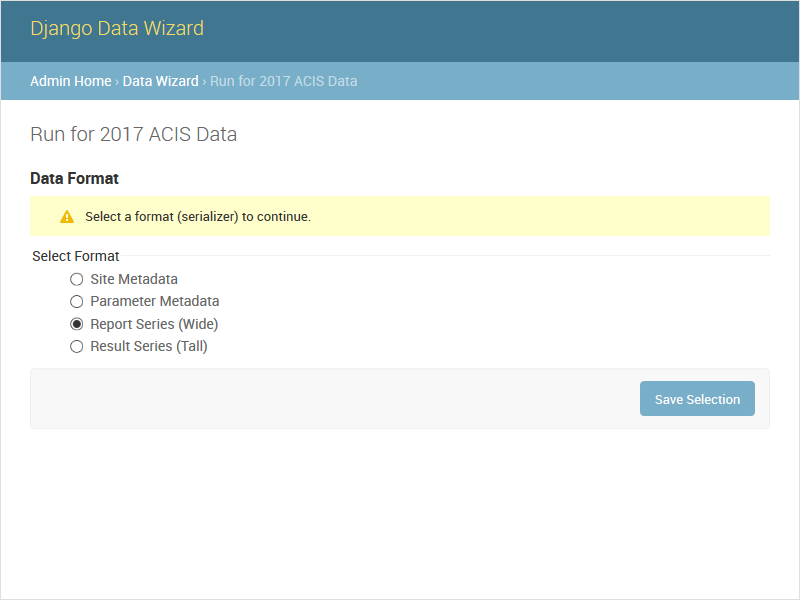
The serializers task provides a list of all registered serializers. This screen is shown by the auto task if a serializer was not specified when the Run was created. The default run_serializers.html template includes an interface for selecting a registered serializer. If a serializer is already selected, the template will display the label and a button to (re)start the auto task.
The updateserializer task updates the specified Run with the selected serializer class name. This is typically called from the form generated by the serializers task, and will redirect to that task when complete.
| parameter | description |
|---|---|
serializer |
The class name (or label) of the serializer to use for this run. |
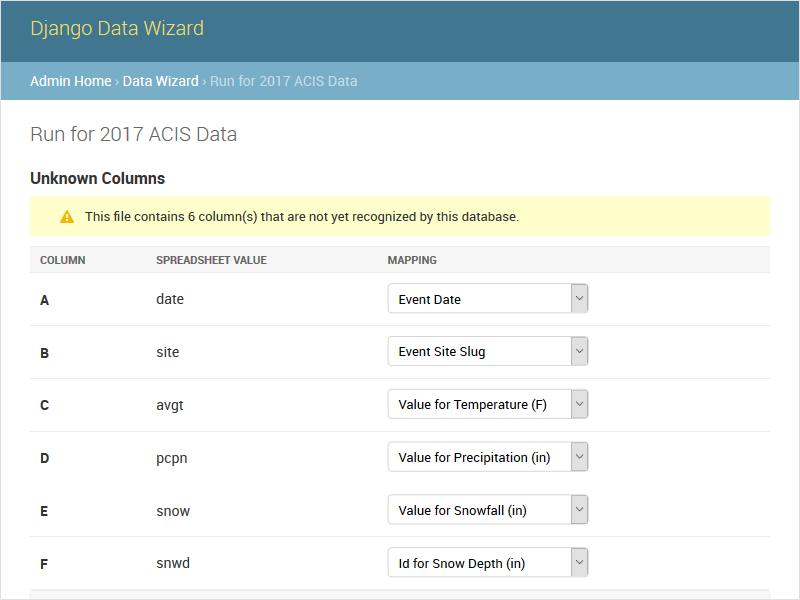
The columns task lists all of the columns found in the dataset (i.e. spreadsheet) and their mappings to serializer fields. This screen is shown by the auto task if there are any column names that could not be automatically mapped. The potential mappings are one of:
- simple serializer field names (e.g.
field) - nested field names (for natural keys, e.g.
nested[record][field]) - EAV attribute-value mappings (e.g.
values[][value];attribute_id=1).
To enable a natural key mapping, the registered serializer should be an instance of NaturalKeyModelSerializer, as in this example. To enable an EAV mapping, the registered serializer should include a nested serializer with many=True and at least one foreign key to the attribute table, as in this example.
The default run_columns.html template includes an interface for mapping data columns to serializer fields. If all columns are already mapped, the template will display the mappings and a button to (re)start the auto task.
The updatecolumns task saves the specified mappings from data columns to serializer fields. This is typically called from the form generated by the columns task, and will redirect to that task when complete.
| parameter | description |
|---|---|
rel_[relid] |
The column to map to the specified serializer field. The relid and the complete list of possible mappings will be provided by the columns task. |
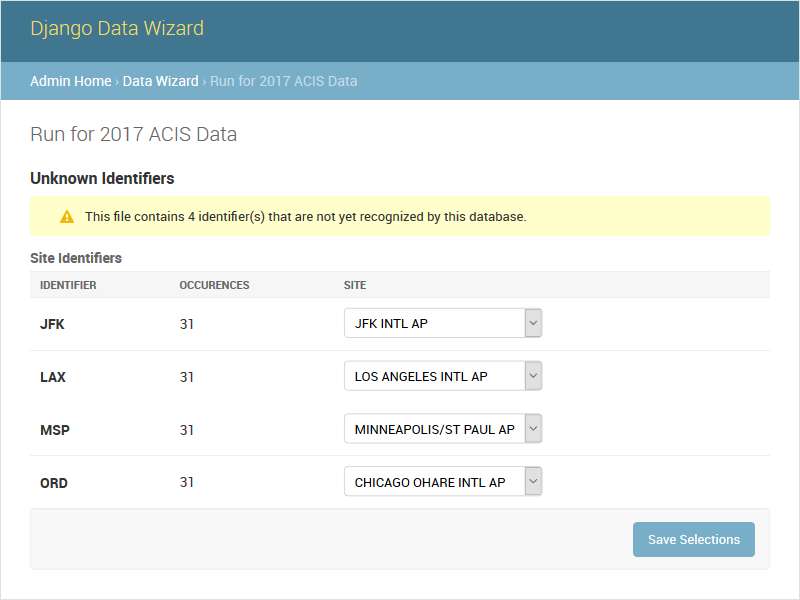
The ids task lists all of the identifiers found in the dataset (i.e. spreadsheet) that are in a column known to correspond to a foreign key. This screen is shown by the auto task if there are any identifiers that could not be automatically mapped to foreign key values. The potential mappings depend on the serializer field used to represent the foreign key.
- Existing record ID or slug (for PrimaryKeyRelatedField, SlugRelatedField, and NaturalKeySerializer)
"new"(NaturalKeySerializeronly)
The primary difference is that NaturalKeySerializer allows for the possibility of creating new records in the foreign table on the fly, while the regular related fields do not.
The default run_ids.html template includes an interface for mapping row identifiers to foreign key values. If all ids are already mapped (or indicated to be new natural keys), the template will display the mappings and a button to (re)start the auto task.
The updateids task saves the specified mappings from row identifiers to foreign key values. This is typically called from the form generated by the ids task, and will redirect to that task when complete.
| parameter | description |
|---|---|
ident_[identid]_id |
The identifier to map to the specified foreign key value. The identid and the complete list of possible mappings will be provided by the ids task. |
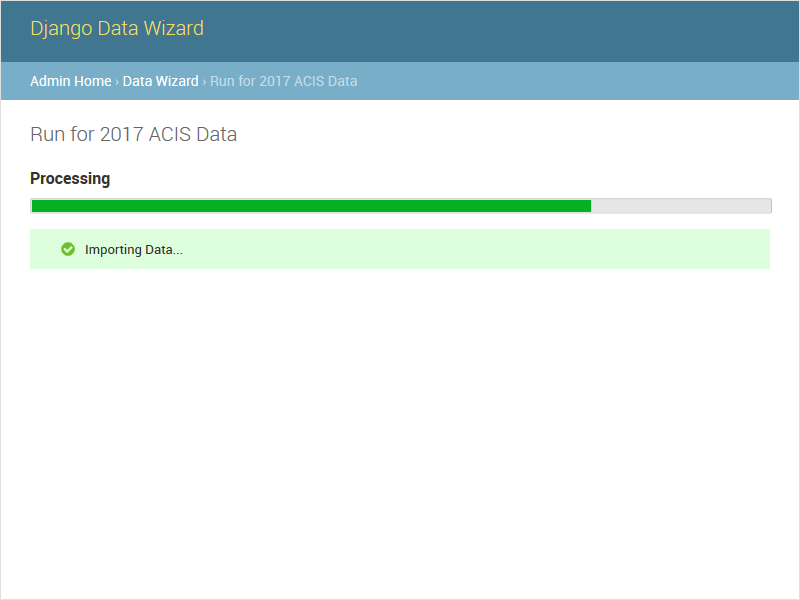
The data task starts the actual import process (and is called by auto behind the scenes). Unlike auto, calling data directly will not cause a redirect to one of the other tasks if any meta input is needed. Instead, data will attempt to import each record as-is, and report any errors that occured due to e.g. missing fields or unmapped foreign keys.
This is an asynchronous method, and returns a task_id to be used with the status API. The default run_data.html template includes a <progress> element for use with wq/progress.js and the status task.
The records task provides a list of imported rows (including errors). It is redirected to by the auto and data tasks upon completion. When used with wq.db, the records task includes links to the detail page for each newly imported record. The default run_records.html template includes an interface for displaying the record details.