Home
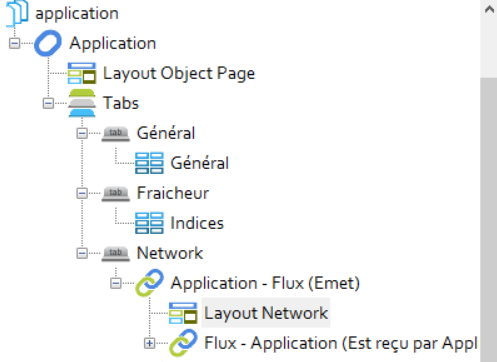
| Name | cwLayoutNetwork | Version |
|---|---|---|
| Updated by | Mathias PFAUWADEL | 7.1 |
- 7.0 : Support Diagram Item and Export Mode
- 6.2 : Can save to png very big network
- 6.1 : Adding Contextual Filter for objectPage
- 6.0 : Allow Duplicate item, Changing saving system (not compatible with 5.0 capinetwork)
- 5.1 : Traduction Menu
- 5.0 : Adding Image, Save, Link Type
- 4.1 : Can now select multiple element in externalFilter
- 4.0 : Cluster, Download Image, display association custom display string
- 3.9 : External Association Filter work with zippedEdges
- 3.8 : Adding 2 buttons to zip and unzip Edge and to disable physics
- 3.7 : Network is now correctly zoom at start
- 3.6 : Adding Focus on (that all you to zoom on a node of the network)
- 3.5 : Adding Legend (only for fontawesome icon)
- 3.4 : Working with the LayoutMap
- 3.3 : Adding Complementary Item
- 3.2 : Can be display in a tab for objectPage and Indexpage (this change the evolveNode Structure, please update your evolve designer configuration)
- 3.1 : Correct double item, adding shape option, correct edge color
- 3.0 : RightClick, Highlight by External Association, merging (with bigger size) arrow if several associations
- 2.0 : Adding group, icon, Impact, globalFilter, arrow
- 1.0 : 1st version working
- More Options
Since 6.1, you need https://github.com/nevakee716/Utils/wiki to be installed
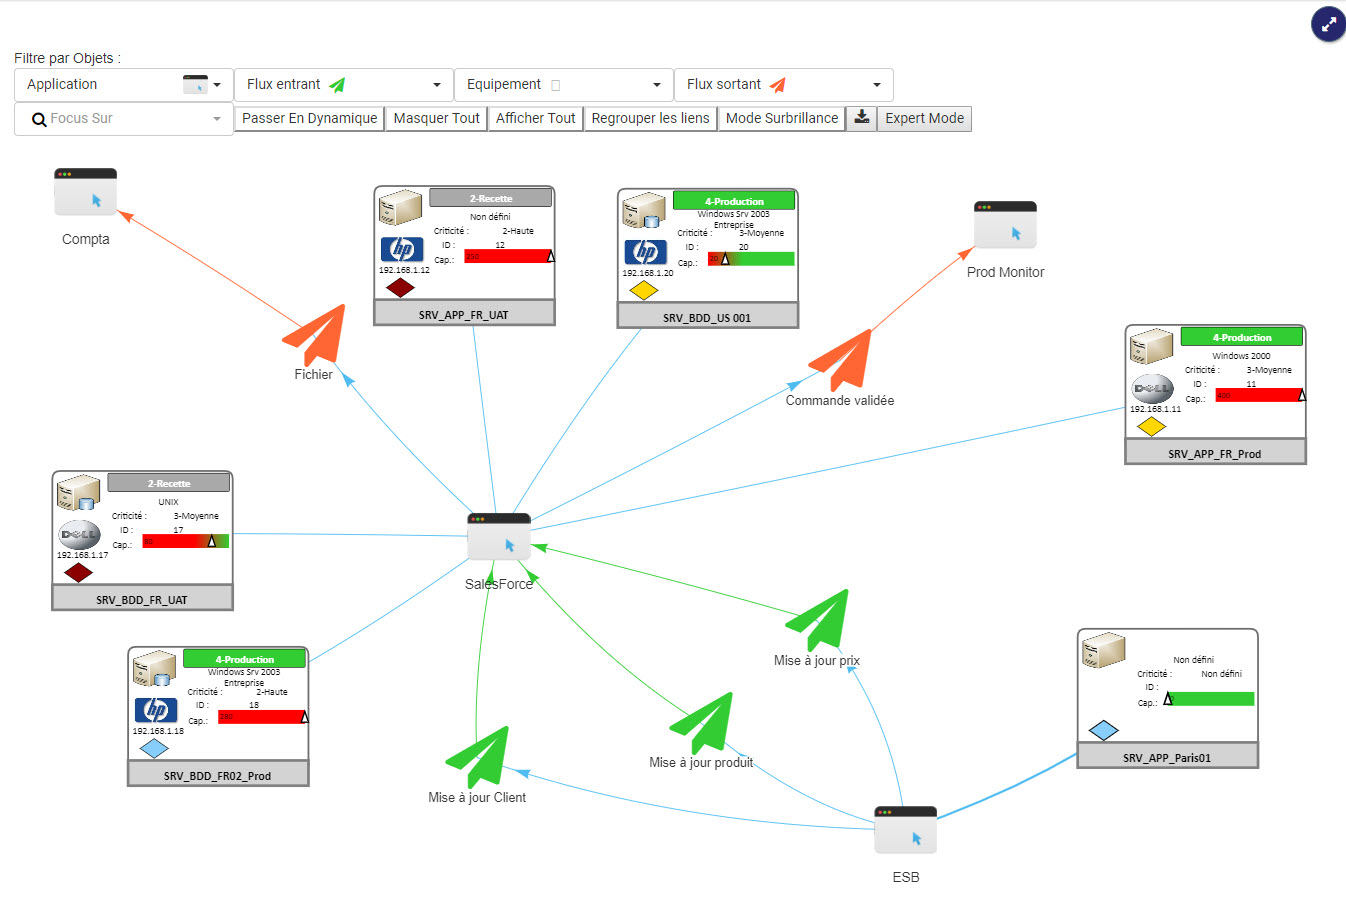
Allow you to display objects and their associations in a network. The layout provide the same interaction than diagram, simple click for popOUT and double click to go on the objectPage. This layout can be use on IndexPage of ObjectPage.
In case of several association, the layout will display only one edge between node, if arrow are in different way, it will display both. The size of the edge will depend of the number of association.
The layout will scan all of your hierarchy tree, and put it in a network. You can use filter to choose which item to display

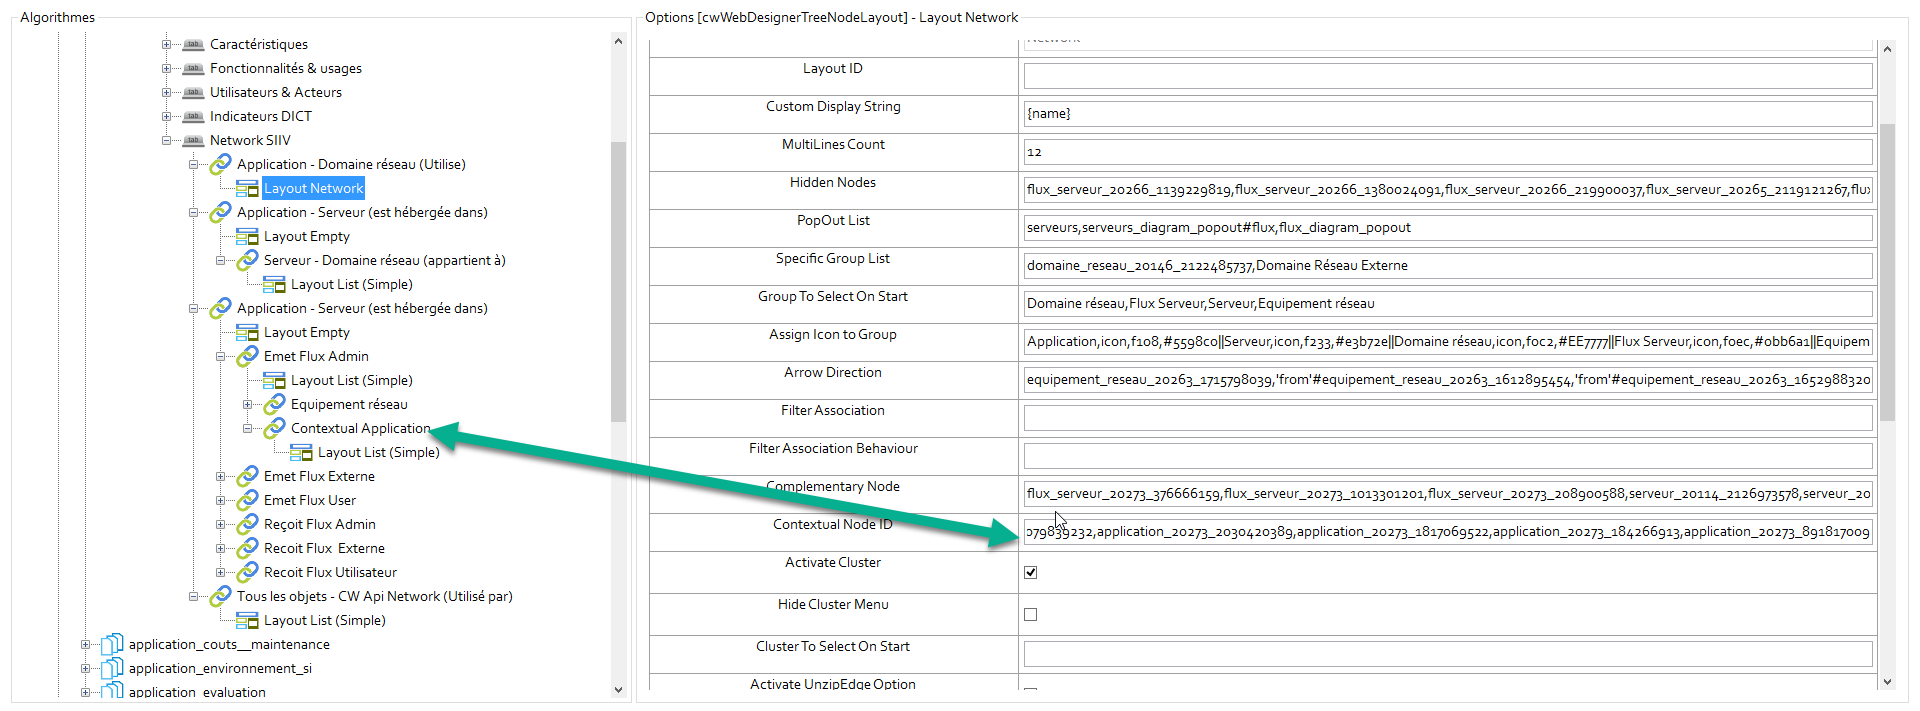
Enter the limit number of caracter where you will return line for the label of the node of the network
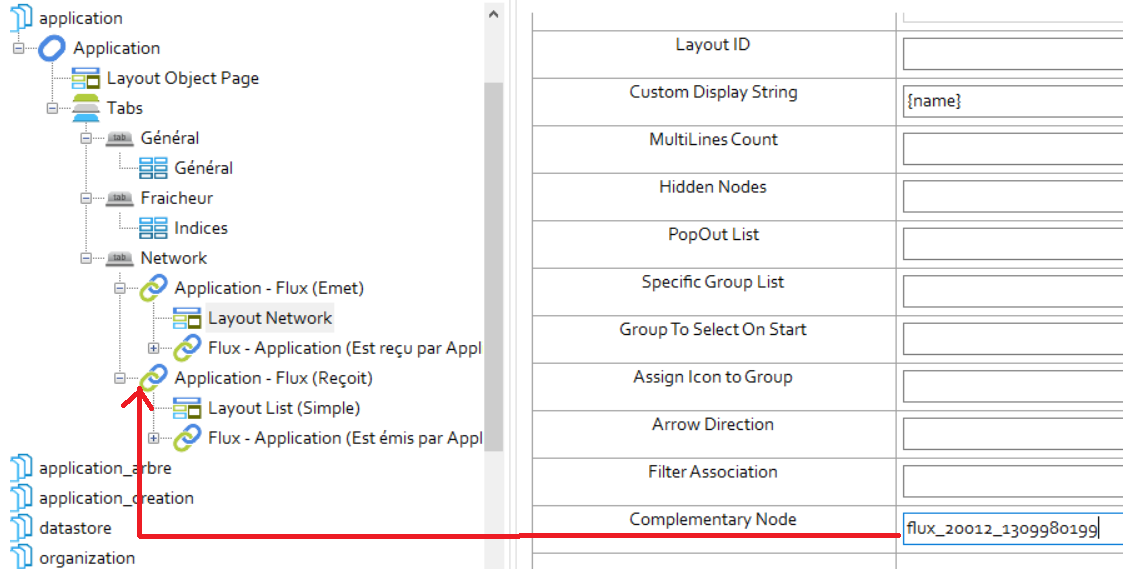
Hidden Nodes :
Set the ID of the nodes you don't want to appear in the tree, the children will be display instead. (Can be use for application flux See exemples below)
List the popOut that you want to be used. (ex:scriptname1,popOutName1#scriptname2,popOutName2)
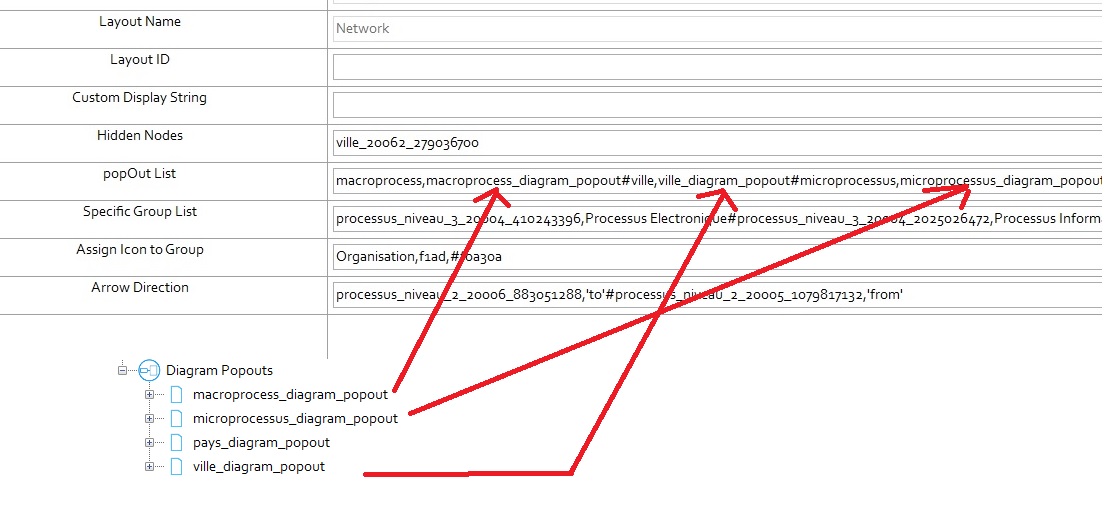
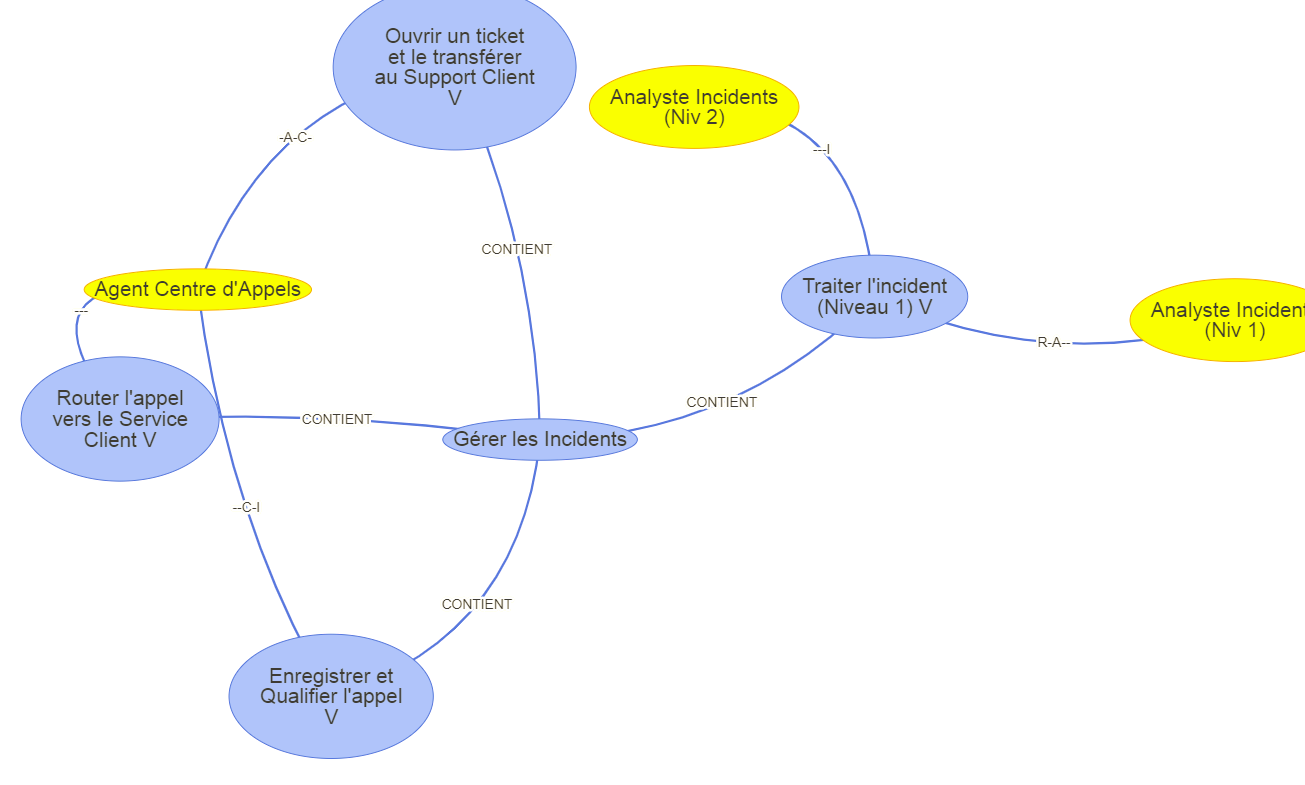
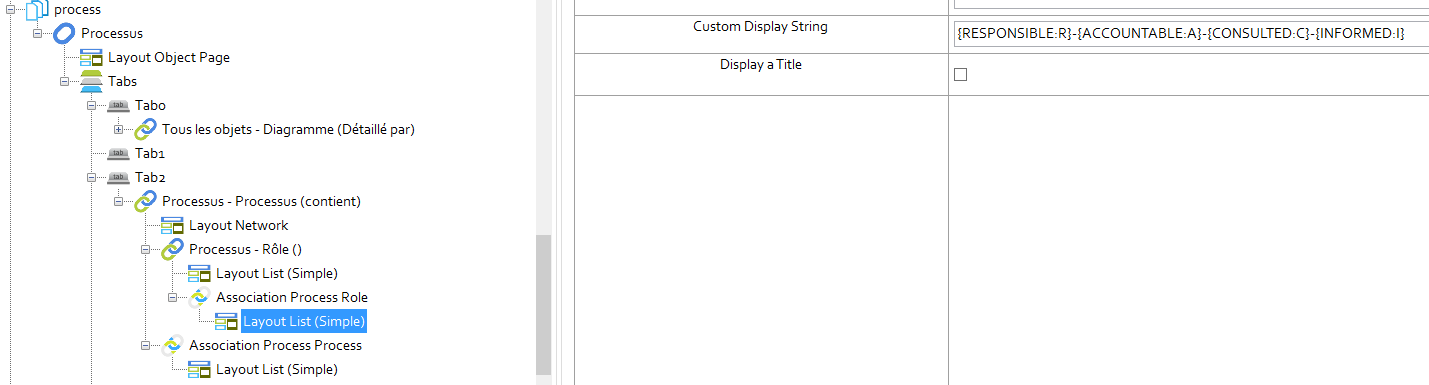
Group are the different filter box of the network, by default object are sort in to different group by ObjectType(name of the group is the name of the objectype). If you want objects of a node to be in a different group use this option : NodeID,GroupName#NodeID2,GroupName2#(ex:processus_niveau_3_20004_410243396,Processus Electronique#processus_niveau_3_20004_2025026472,Processus Informatique)
PS : If an object is present twice in the JSON object, one time in a group and one time in another group, it will only appear in the first group. So if you need to have different icon according to category or other, define all your node for them with filter and add a 3rd node after with all the objet without filter.
Be carefull when using the complementary node, the node will be place in the order of the complementary node and always after the regular node.
List the groups you want to display when the network is started. Use comma separator
You can assign a shape (ellipse, circle, database, box, diamond, dot, star, triangle, triangleDown, square ) to a group. Use NameGroup,shape,color,borderColor(optionnal)||NameGroup2,shape2,color2,borderColor2(optionnal)
You can also assign a FontAwesome Icon to a group.(go to this website to find the code https://fontawesome.com/v4.7.0/) Use NameGroup,icon,FontAwesomeUnicode,color||NameGroup2,icon,FontAwesomeUnicode2,color2.
You can also assign image. (the color is used for the edge color) Use NameGroup,image,imageURL,color
You can mix Icon and shape like that : Flux,icon,f0ec,#FF8C00||Application,icon,f10a,#4F90C1||Entité,box,#FF8C00,#4F90C1
You can also assign diagram shape : Use NameGroup,diagram,templateDiagramID,color (the color is used for the edge) Be carefull with diagram(some region may not be supported) and you need to check the property and association (see below Expert mode)

You can assign specific icon and color to item if you don't have group shape, just need to use a property with scriptname icon and color and check it in evolve designer
This option allows you to set arrows between nodes. The syntax is the following:
node_id,'direction'
You can use symbol # as a separator to set a list of directions.
The direction can be 'to' or 'from'.
For exemple, processus_niveau_2_20006_883051288,'to'#processus_niveau_2_20005_1079817132,'from'
Use to, if you want the arrow that arrive to this node.
Use from, if you want the arrow to leave from this node.
If you don't a direction to a node, it will be display without arrow.
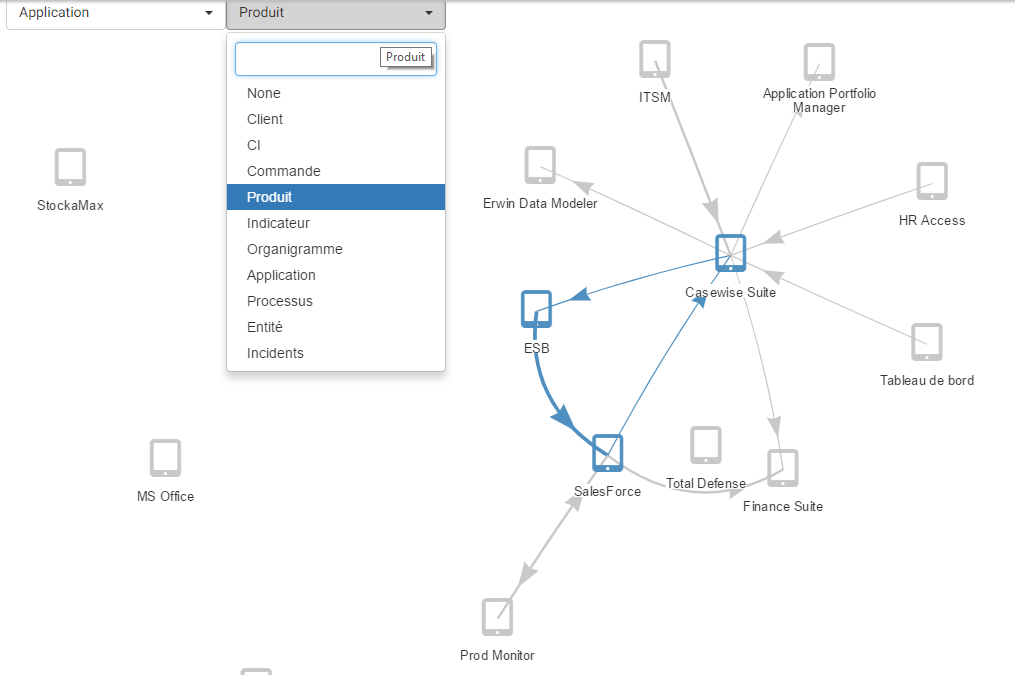
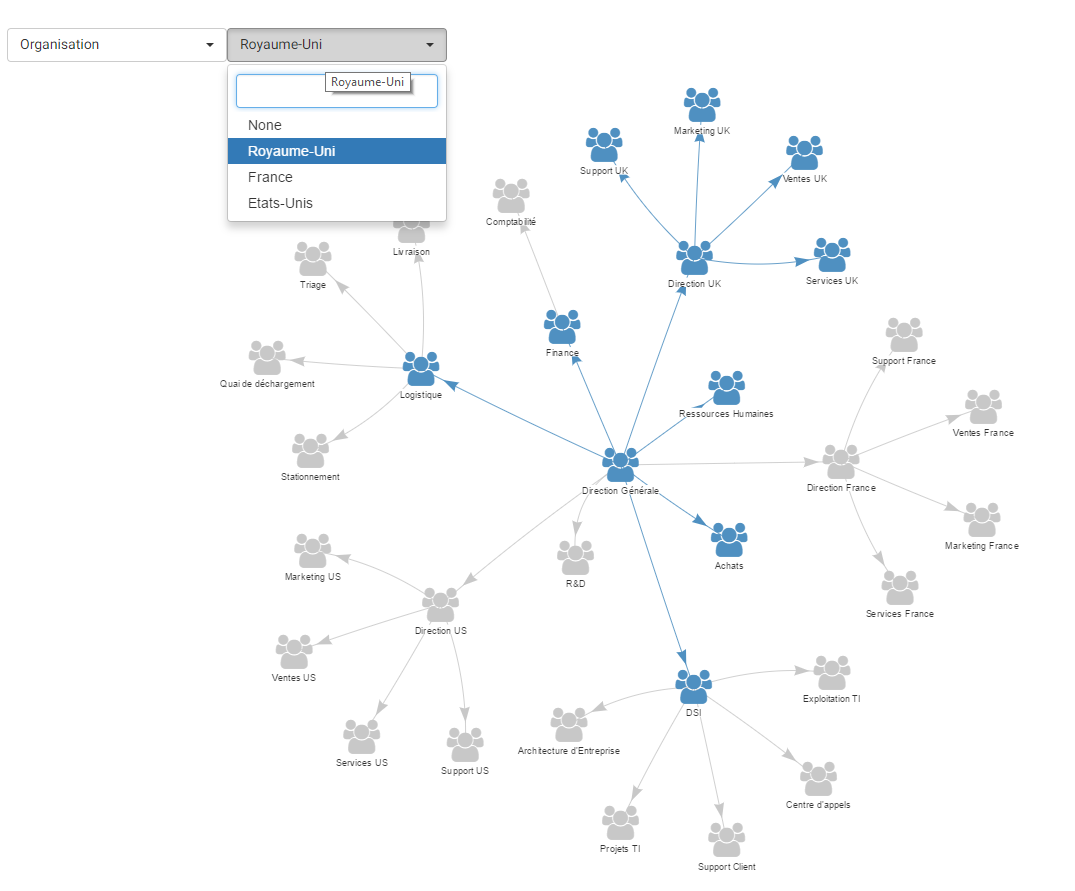
Select Evolve Nodes that will be use to filter your nodes. nodeID:Label of the filter For exemple : entite_20022_1066555881:Entity Filter (Can be use for application flux See exemples below) spliter is #
PS : the filter node should always be in first,
This option will define the way your action(add close node, add connected node..., and also association filter) will work * add : this will add the selected node to your network
- highlight : this will highlight the selected node
- absolute : this will only display the selected node
If you want to add a side Node, use this option For exemple, if you are on the objectPage of an application, you want to display sent and received flux. Put the network under the associationNode of the sent flux, then add the node id of the received flux in this option. Use comma as a splitter
If you want object to be associated to your objectPage object, use this option like that :
 Here in the node Emet Flux Admin, only the flow that are associated to my applications of my objects page will be display, others will be deleted
Activate the cluster option, that allow you to cluster element according to the group. PS : the cluster doesn't duplicate the object, and it try to put the element in the bigger cluster. To move a cluster click on the first element
Hide the cluster menu, you can still init the cluster
List the cluster you want to apply when the network started. The syntax is Head#Child,Child2.
Activate the button to unzip edge
Hide the button to zip or unzip edge
Zip the edge on start
Activate the Physics
Hide the button to activate or deactivate the physics
Check in order to have the physics initially activated
With Expert mode, you can change the way the physics of the network will behave (gravity, edge contrainst...) Copy the string generated by expert mode here, to activate the configuration by default
Check to activate this Expert, this mode will help to configure your network and see the result directly (check below for more detail)
Activate the option to remove lonely object. When you click on the button, it will delete from the network the node that have no connection.
You can load capinetwork (node position, link selected, cluster, external filter ...) Contributor only can save or create a capinetwork .
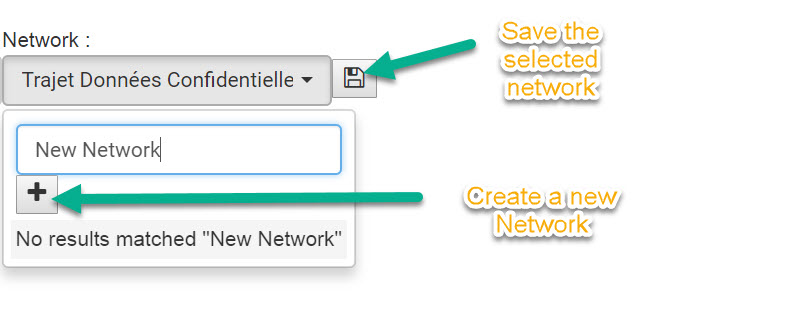
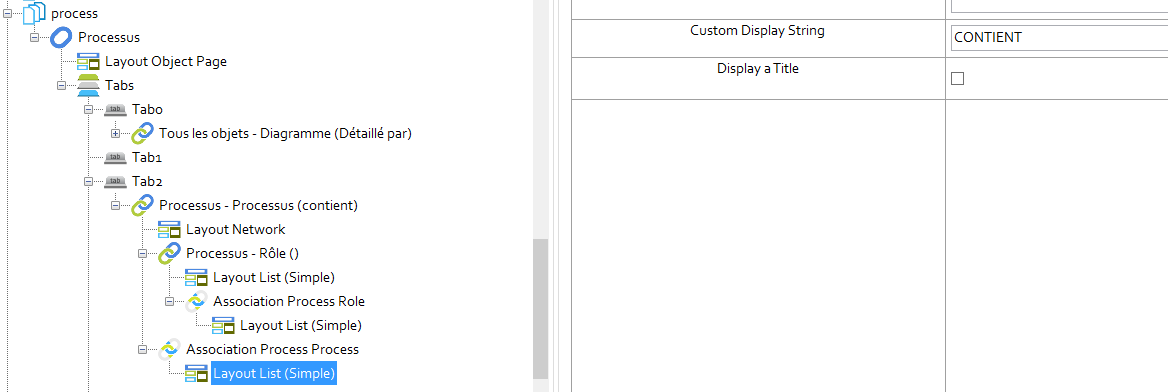
When you create a new network, it will create a new object and associate it with the object of your objectPage.
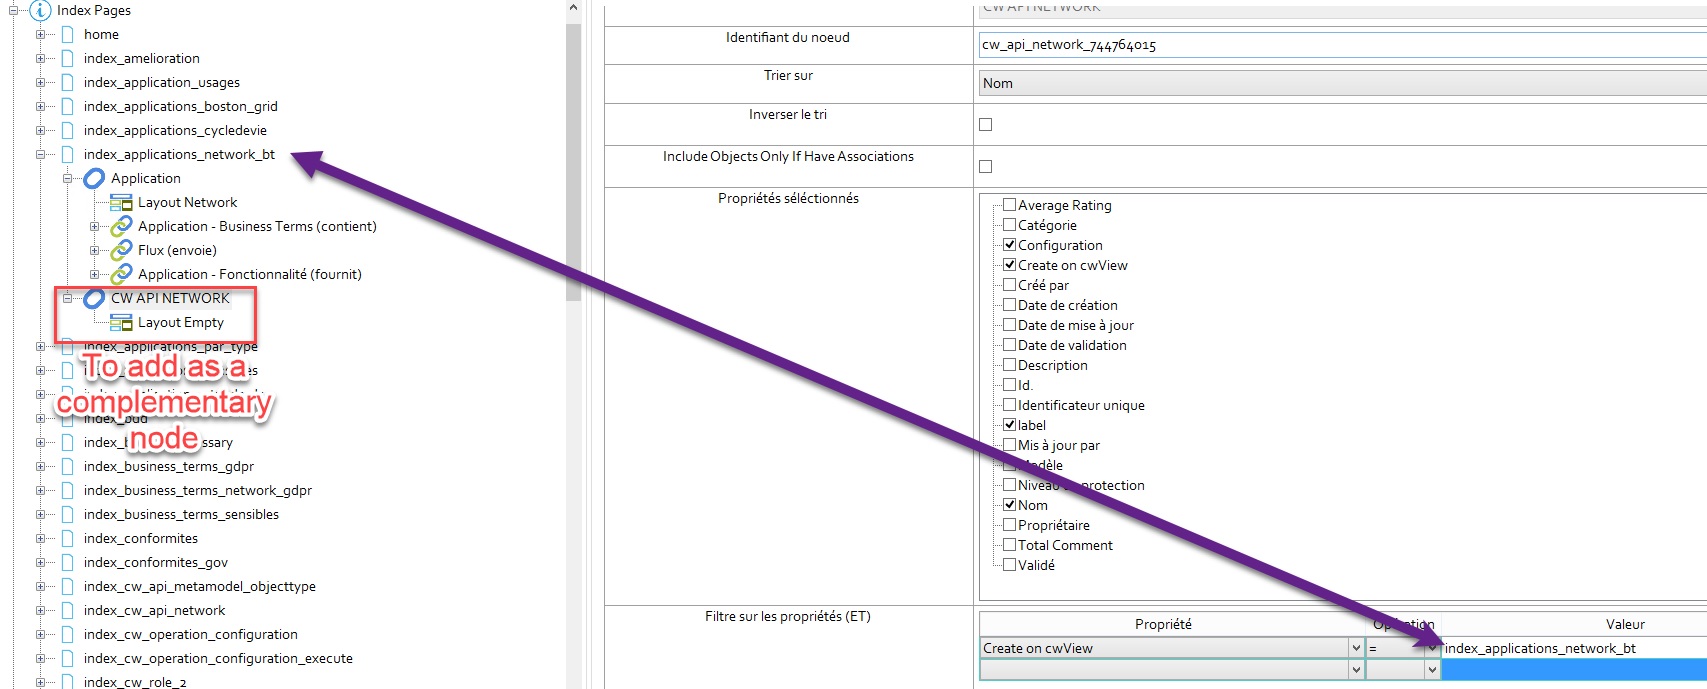
To use this option you need to have your metamodel ready : Create a new objectType : CW API NETWORK with 3 properties : Configuration (memoText), Label (string) and Create On cwView (string) Create also an association between CW API NETWORK and Any Objects Inside C:\Casewise\Evolve\Site\bin\webDesigner\custom\Marketplace\libs\Network\src\cwLayoutNetwork.js Fill theses variable with the scriptname of your model

Inside your evolve configuration You need to put the association to capinetwork to the main object if you are on an objectPage On an Indexpage, you need to add a new capinetwork node with a filter(createOnCWview = indexpage.nodeIDofTheNetworkLayout) (don't forget to use complementary node if needed)
If you check this option, the network layout will load the first capinetwork of the list
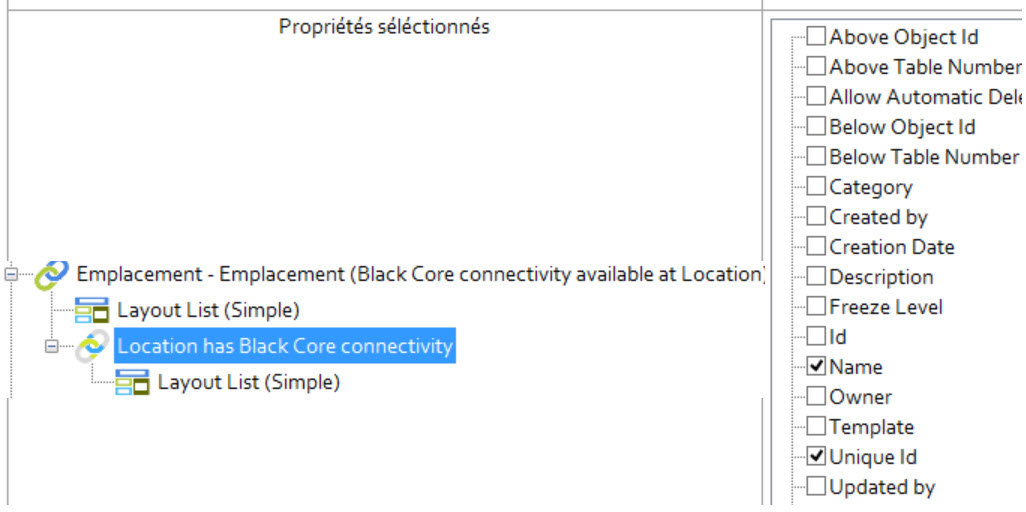
You can assign a color to an Edge Type following this structure
{
	"flux": {
		"label": "Flux Applicatif",
		"color": "#CCCC00"
	},
	"locationhasblackcoreconnectivity": {
		"color": "#000000",
		"label": "Black Connectivity"
	}
}
Edge Type is by default the associationTypeScriptname or the objectTypeScriptName(in case of hiddenNode) To use association in the EdgeType, you need to add the intersection node, and select the uuid.
List the link Type you want to select On Start. Splitter is a comma
In the same way, you assign group with Node, you can do that with the EdgeType For exemple : emplacement_20196_1480647536,toto#emplacement_20196_148043224,tata
Put the ID of the node that will be duplicate, so when the network parse your json tree, if the object already exist it will create a new node.
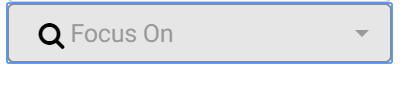
This menu allow you to zoom on a object prevent on the network, it will go to his position, zoom on it, and select it.
Disable / Enable Physics : Allow to disable the physics and freely move the node
Zip/ UnZip Edges: Allow to unmerge the edges, in case of hidden nodes, this will disable the name od the hidden object on the edge.
You can rightClick on a node to display :
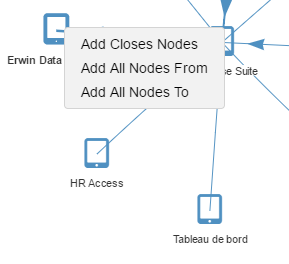
This will add on the network, the node that are connected to the selected node
This will add on the network, the node that have a path (even indirect) that leave from the selected Node
This will add on the network, the node that have a path (even indirect) that go in the selected Node
This will remove the node
This will remove all the node that are directly connected to the object
this will add all node that are connected directly and indirectly to the selected node
By clicking, on the button you can change the behaviour of the external association filter :
- Absolute : disable all node, then add the node of the external filter
- Addition : Add the node of the external filter
- Highlight : Hightlight the node of the external filter
You can click on the download button , to download a png of the network (on huge network, it work only with edge)
If you use the expert mode, you need to create a evolve index page, which contains all the diagram template
z_diagram_template
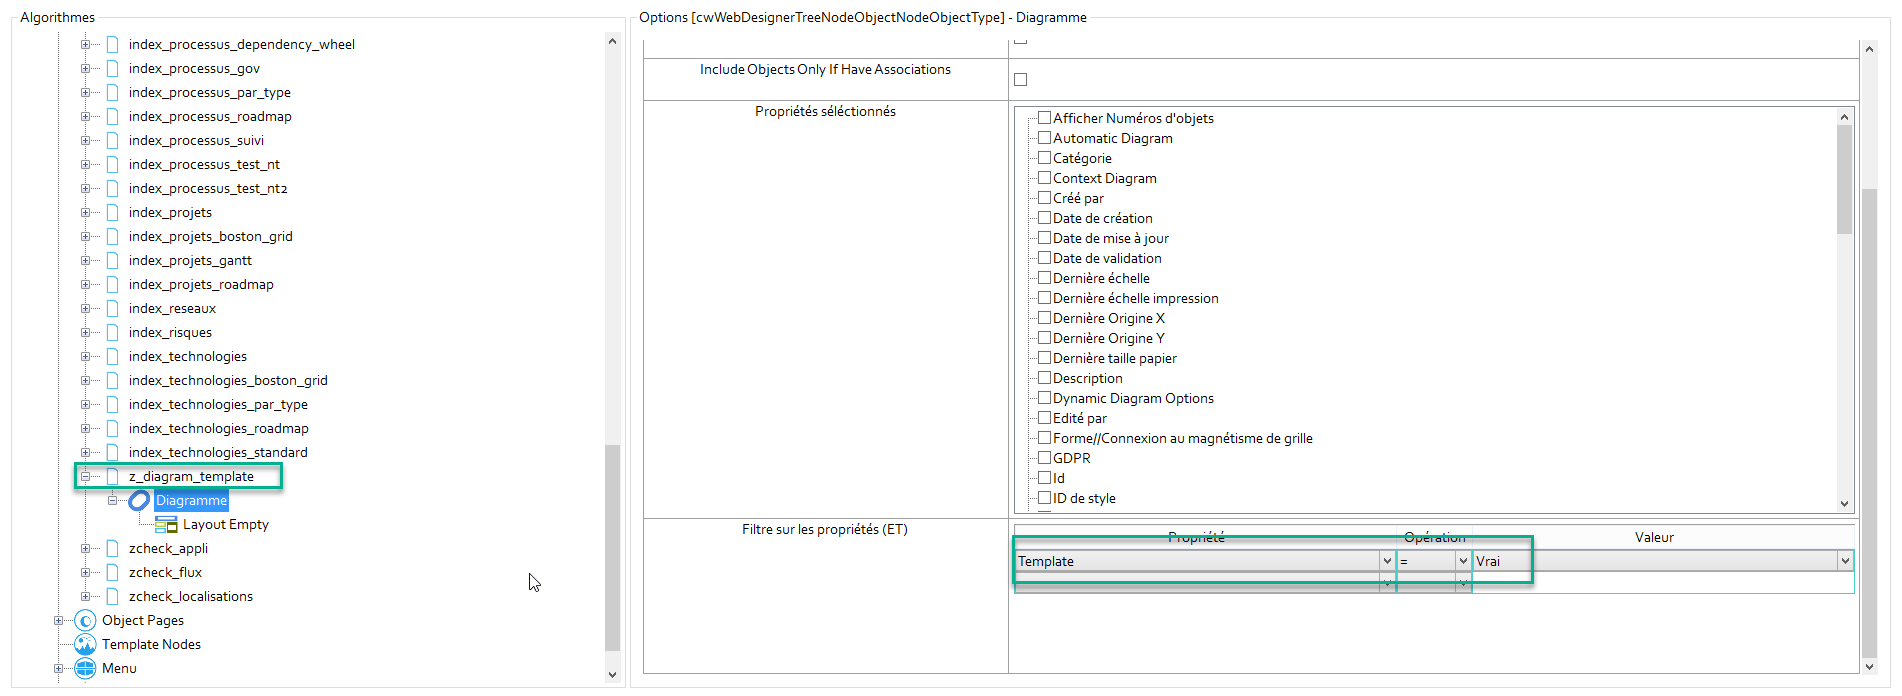
Click on the button to activate the expert mode
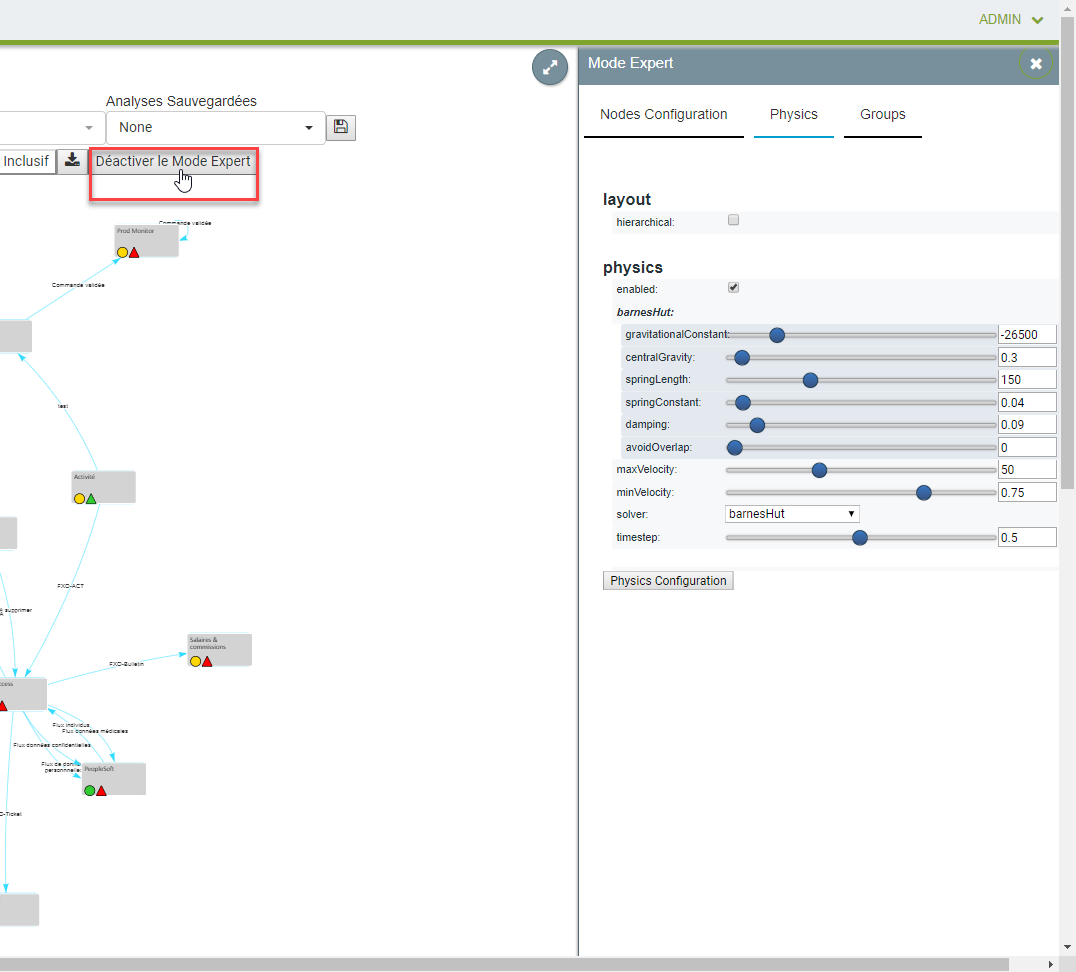
The Expert mode contains 3 tabs
This tabs allow to play with the physics of the network Once you find a physics that you like, click on the physics configuration button, this will copy the json string config inside your clipboard, you can now paste it inside evolve configuration.
You can find details about the option here http://visjs.org/docs/network/physics.html
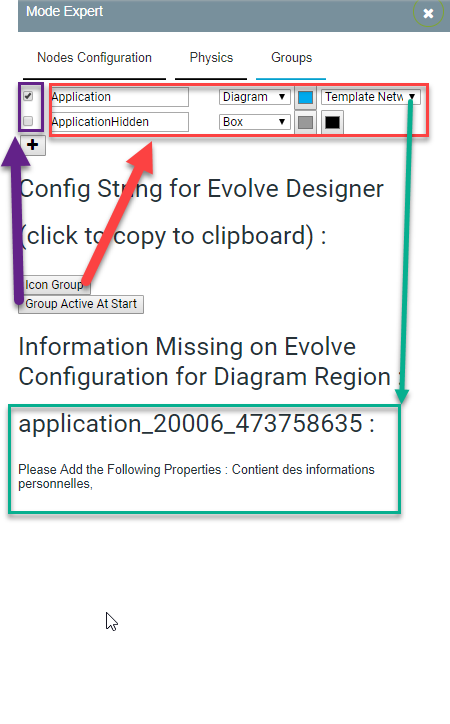
On this tabs, you can manage your groups styles and directly see the result in your diagram.
If you select diagram, you can choose your template and on the menu Information Missing on Evolve Configuration for Diagram Region, you will see all the data that are missing from your evolve configuration. In the screen, you can see that on the node application_20006_47375863, we need to select the property <> in order to have the diagram region fully functionnal.
Once you configure your group style, click on icon group button to copy the configuration string inside the clipboard, then paste it inside your evolve designer layout network configuration inside Assign Icon to Group
You can also check the group that will be selected on start using the checkbox. Once done, click on the button group Active at start to copy the configuration string inside the clipboard then paste it inside evolve
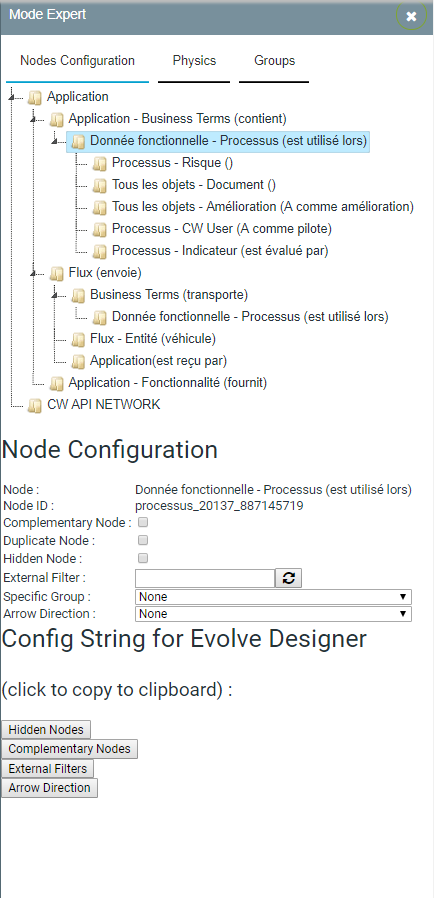
On this tabs, you can play on with the option hidden nodes, complementary nodes, filter association and Arrow Direction. On the top area you can see a reproduction of your evolve node, select a node and configure the option.
Once done, click on the button group Active at start to copy the configuration string inside the clipboard then paste it inside evolve.
PS : After changing option inside this tabs, the focus search might stop working, reload your page to correct the issue
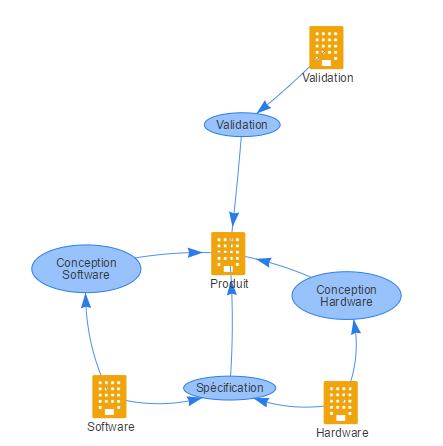
Here we have the following metamodel :
Application connected to flux connected to Application and flux connected to Entity On the network, we want to display the Application and display the flux as arrow (depending if the flux is emit or receive)
For that, we use the following configuration :
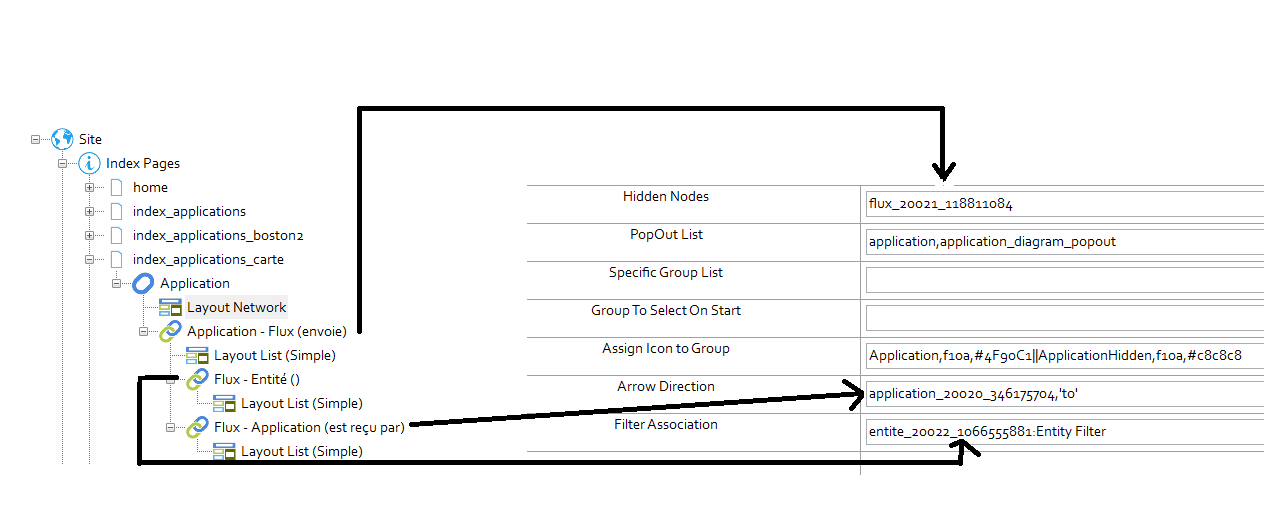
ApplicationHidden correspond to the icon and the colour that the unhighlighted node will take.
You can now go in the Entity Filter and highlight only the node that are connected to a flux that use the selected entity.
PS : if you selected an entity, and all the node connected to the entity are not on the network yet, the entity will add them
don't forget to enable this unzip edge, cause label of the edge will be only visible if edge are unzip