Home
The installation of the connector is based on transport files for One Identity Manager's version 9.1. The data retrieved from ServiceNow is the out of the box schema of the San Diego version. Installing using transport files has the drawback that you have a dependency on the initial deployment used to create the files. We tried to minimize the surface area of the source installation but take into account that the source installation had the following modules installed.
| Module | Display name |
|---|---|
| ADS | Active Directory Module |
| ARS | Active Roles Module |
| AOB | Application Governance Module |
| ATT | Attestation Module |
| AAD | Azure Active Directory Module |
| RMB | Business Roles Module |
| CHS | Cloud HR Systems Module |
| CSM | Cloud Systems Management Module |
| POL | Company Policies Module |
| CPL | Compliance Rules Module |
| QBM | Configuration Module |
| CCC | Customer configured content |
| EXH | Exchange Hybrid Module |
| EX0 | Exchange Module |
| O3E | Exchange Online Module |
| CAP | Governance Base Module |
| QER | Identity Management Base Module |
| LDP | LDAP Module |
| O3T | Microsoft Teams Module |
| OLG | OneLogin Module |
| RPS | Report Subscription Module |
| SCN | ServiceNow Module |
| O3S | SharePoint Online Module |
| SCC | Starling Connect Connector |
| RMS | System Roles Module |
| TSB | Target System Base Module |
| DPR | Target System Synchronization Module |
| UCI | Universal Cloud Interface Module |
The required modules as listed in the transport files is:
| Module | Display name |
|---|---|
| CCC | Customer configured content |
| QBM | Configuration Module |
| ADS | Active Directory Module |
| TSB | Target System Base Module |
| DPR | Target System Synchronization Module |
| QER | Identity Management Base Module |
Note that the dependency on the ADS module is temporary, we still have in the code base references to icons used in the ADS module.
The transport files listed in the order of installation are:
| Name | Notes |
|---|---|
| 00001-v91-Patch36326AndSNOWLibrary.zip | A cumulative transport file containing the patch #36326 and the ServiceNow REST API library. Note that both transports are file transports and will require a restart of the job service and administrative tools. |
| 00002-v91-SchemaExtensionsAndPermissions.zip | Schema extensions. |
| 00003-v91-SynchronizationProjects.zip | The custom PowerShell based synchronization projects used to synchronize and provision entities in the ServiceNow instance, and an One Identity database synchronization project that synchronizes the ServiceNow accounts, groups and group memberships to the corresponding UNSB tables in order to be used in entitlement inheritance operations. |
| 00004-v91-ProcessUIScriptAndTemplate.zip | Related provisioning, single object synchronization processes and user interface changes required to present the data in Manager . |
- Import the transport files above in listed order.
- Verify or assign in for example Designer the server function 'Windows PowerShell Connector' to a job server. See screenshot below:

- Create or request on the ServiceNow instance a service account with the required permissions on the tables you choose to expose on ServiceNow, and define which authentication method will be used. We will show an example below that is provided as the default in the connector. The default settings in the connector is to use an administrative account as service account and authenticate by registering an application as an OAuth client. The OAuth client application provides access to the REST endpoint and the access permissions of the service account gives you access to the tables on the instance.
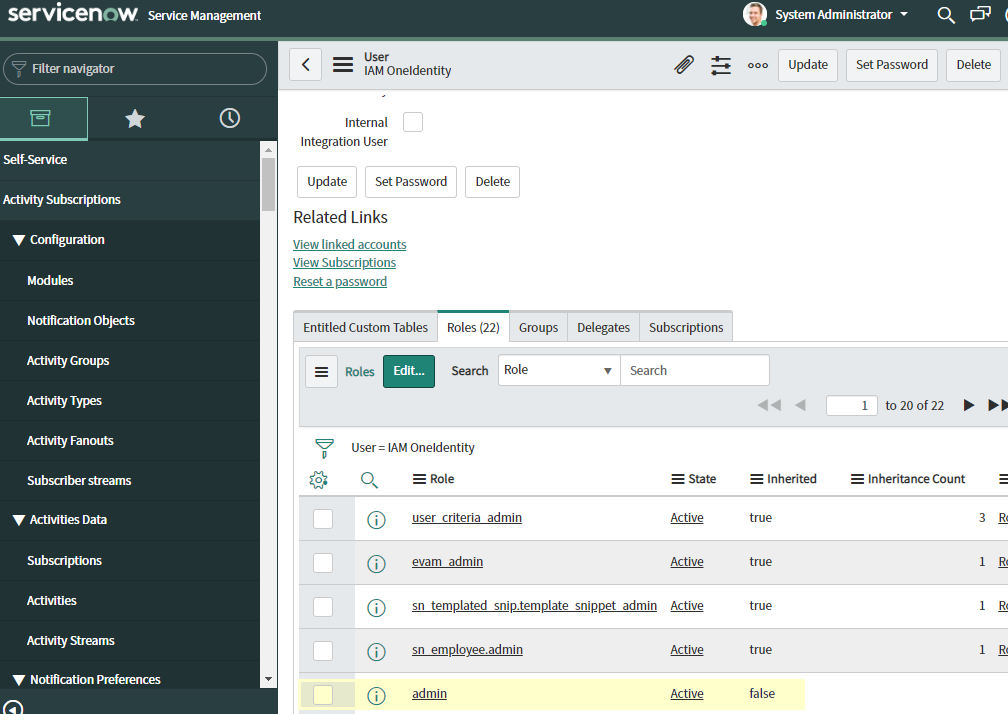
In our example we create the service account with the following details:
| User id | IAM_ONEIDENTITY |
|---|---|
| Assigned role | admin |
| Web service access only | The attribute Web service access only is set. |
See screenshots below for an example:
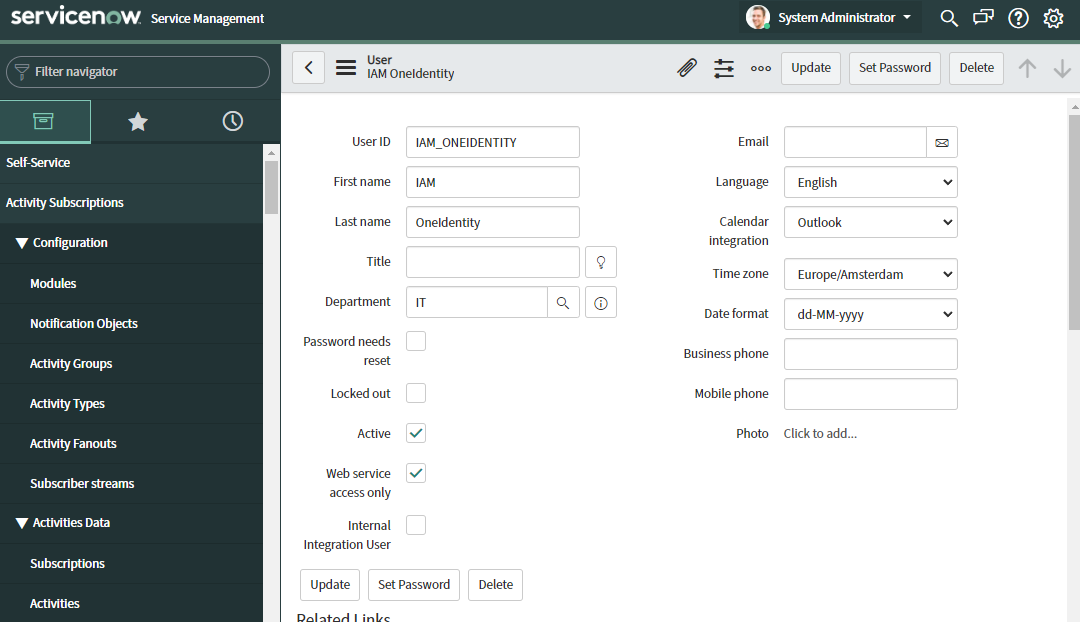
Set the password for the service account and save your changes.
Registering the OAuth client application
In the admin interface of ServiceNow you can register the OAuth client application. Navigate to System OAuth -> Application Registry in the menu. See below for an example:
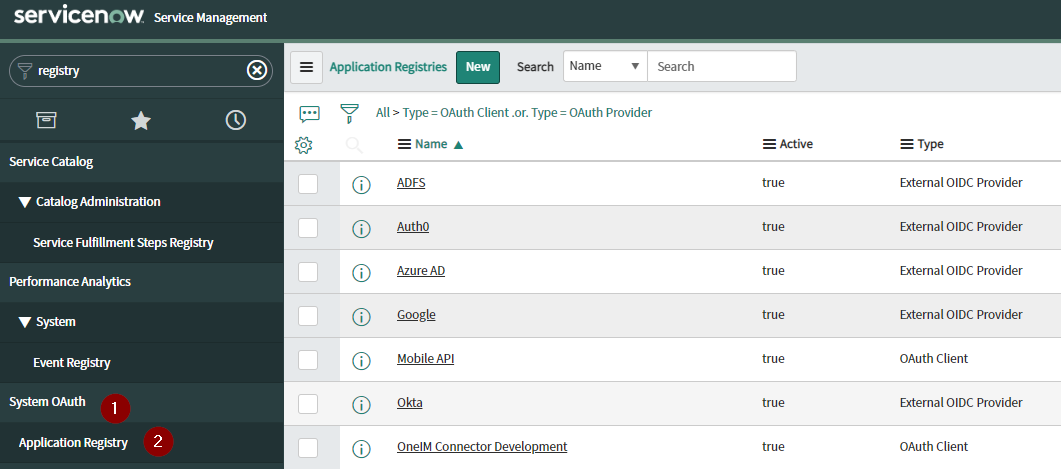 Create a new OAuth application by selecting the Create an OAuth API endpoint for external clients option. Provide the requested details and save OAuth application. See screenshot below for an example:

- Configuring the connector in the Synchronization editor
After registering the OAuth client application and creating the service account we need the make a note of the following details in ordet to configure the connector.
- From the client application we need the client id and the client secret.
- The user-id and password of the service account.
- The hostname of the ServiceNow instance.
- The file path to the library (dll) of the connector. The library is loaded in the database by the first transport file. One Identity Manager will distribute the library on the job server and the installation directory of the administration tools. The default installation is the sub director libs\servicenow.
Example values provided as variables in the synchronization project:
| Variable | Example value | Notes |
|---|---|---|
CP_Posh_ClientId |
ebb4e3ebb911111036da1c50be99bd25 | Client-id of the registered application. |
CP_Posh_ClientSecret |
VerySecureWW | Client secret of the OAuth application. |
CP_Posh_LibraryPath |
C:\OneIdentity\jobservers\Snow\libs\servicenow\ServiceNow.Graph.dll |
Absolute path to the interface library. |
CP_Posh_UserName |
IAM_ONEIDENTITY | User id (actually the value of the column user_name in the table 'sys_user') of the service account. |
CP_Posh_UserPassword |
SecurePWServiceAccount | Password of the service account. |
CP_OneIM_UserID |
Snow_Config | User id of the One Identity Manager's database account. |
CP_OneIM_Password |
SecureOneIMPW | Password of the One Identity Manager's database account. |
CP_UID_Instance |
07e9ec78-28fd-47ac-81c4-3a1f1585e7c2 | The value of column UID_CCCSNWInstance@CCCSNWInstance. The connector supports multiple instances wothin the OneIM database. We will walk through the steps for defining the instance in the database. |
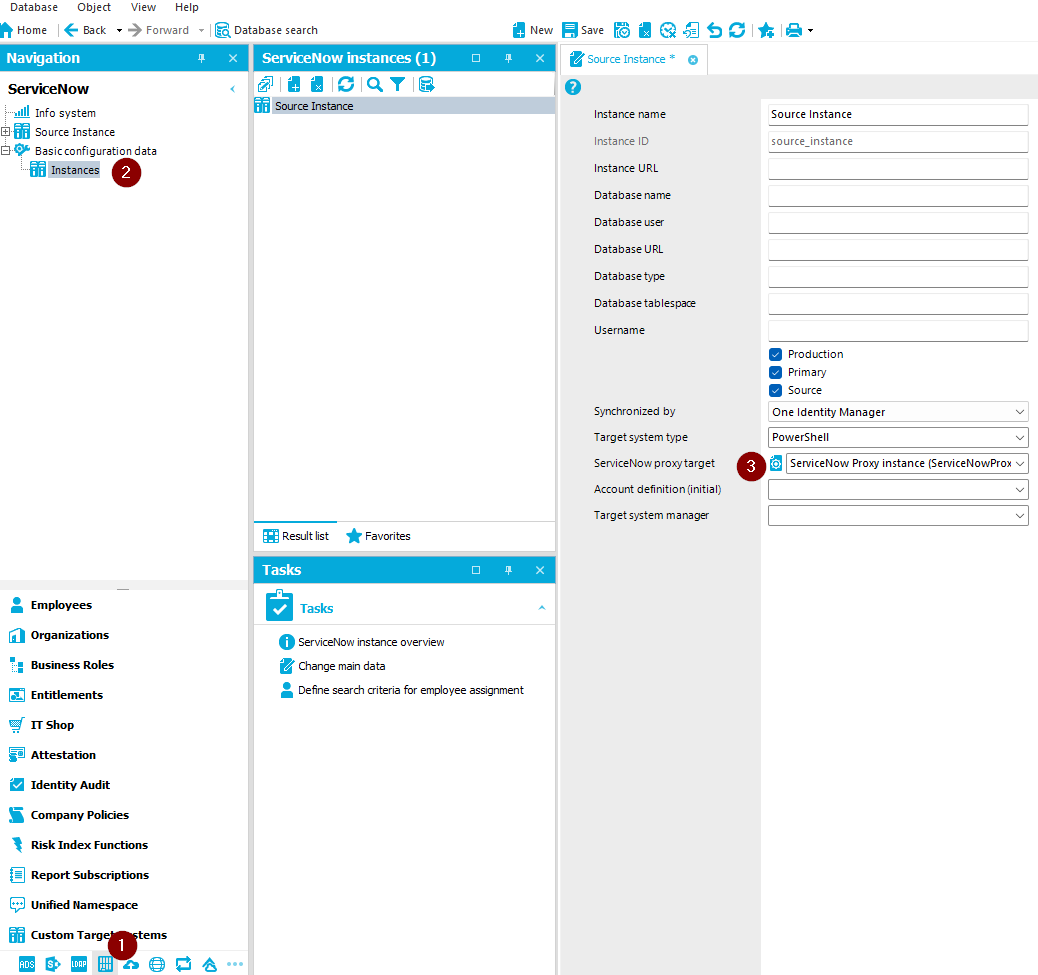
- Create the ServiceNow instance in OneIM
The ServiceNow specific values of the instance (CCCSNWInstance) are retrieved from the table instance on your ServiceNow instance. You can find the values by typing the command instance.list in the Filter Navigator of the admin console. See screenshot below for the steps:
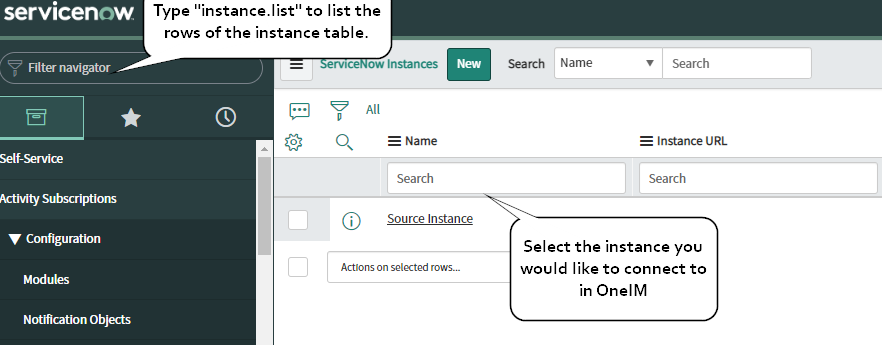
Note: You can have multiple instances defined in the instance table. For example when synchronizing the production instance to the acceptance instance you will see both instances listed. Select the needed instance.
To define the instance in OneIM we actually only need the instance_id and the instance_name. See screenshot below for the steps needed to retrieve the values:

In Manager navigate to ServiceNow -> Basic configuration data -> Instances and create a new instance. See screenshot below for an example:

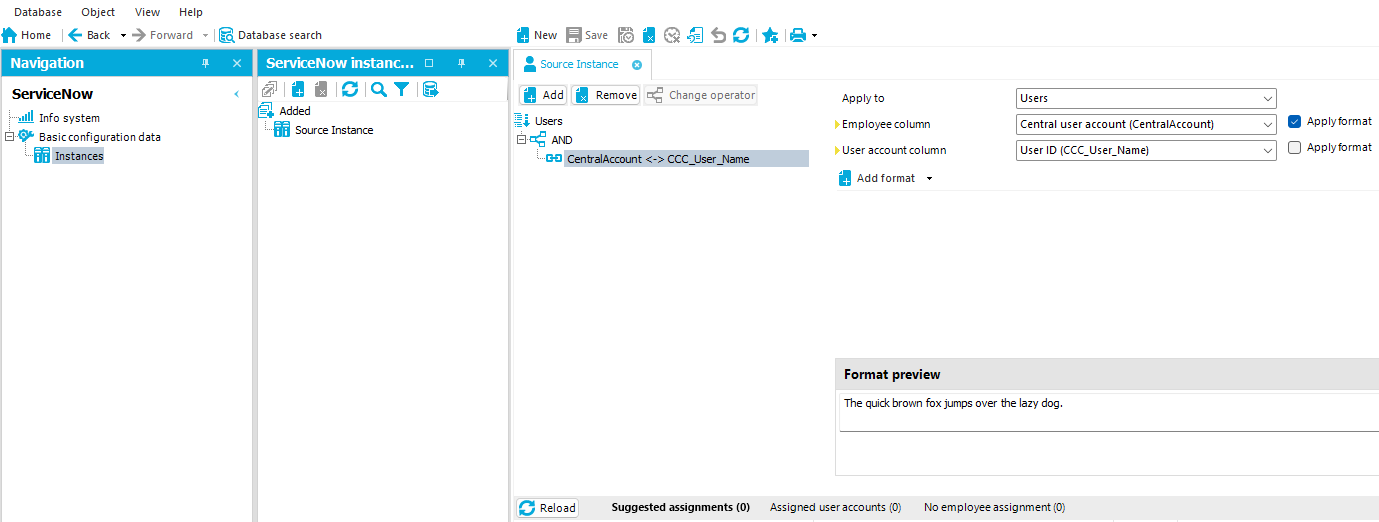
Set the search criteria for employee assignment:
-
Create the base object and startup configuration in the synchronization project.
-
Adjust the default
ServiceNow - Initial Synchronizationworkflow, out of the box we are synchronizing approximately 26 tables from ServiceNow. -
Run the synchronization. Note that you need to run the synchronization at least 3 times in order to get the duration with the revision counters fully active.
-
Verify user interface presentation. The ServiceNow instance data is shown in it's own menu category in Manager. For example the overview page for an user account after synchronization should look like:

-
Installation of the proxy custom target system. The connector tries to mimic a connected system module without access to the internal entitlement inheritance mechanisms that are calculated in the database queue. To achieve this we have a bi-directional synchronization to a proxy custom target system. The proxy target system contains:
- User accounts.
- Groups. Roles can be added as a group type as well.
- Group memberships.
Since the proxy data is contained in a custom target sysem (UNSX table structure) we can add the entitlement to business / system roles. The inheritance calculations are carried out and the assignment and provisioning to ServiceNow is done by assignment processes. The implementation of this functionality has custom processes and a database synchronization project. The database synchronization startup configuration should be added as the last step in a startup sequence (Note: In the 9.1 environment we are using for testing is the startup sequence functionality broken. A hotfix is available, the hotfix number is #36226). The installation steps for the proxy target system are:
-
Add a custom target system of the type ServiceNow Instance, with the Group system entitlement used type, synchronized by One Identity Manager, and with container support. See below for an example:
 .
. -
Create a group and user container for the target system.
-
Set the link between the custom target system and ServiceNow instance synchronized by the PowerShell connector. See screenshot below for the steps:
-
Configure the synchronization project
ServiceNow database proxyby setting the connection details, creating a base object and startup configuration, and provide values for the variables listed in the table below.
| Variable | Example value | Notes |
|---|---|---|
CP_GroupContainer_RootDN |
CN=Group,system=ServiceNowProxy | Distinguished name of the group container. |
CP_UID_UNSContainerBGroups |
f00ae0dc-996e-4eac-927e-c71c77093f49 | Primary key of the group container. |
CP_UserContainer_RootDN |
CN=User,system=ServiceNowProxy | Distinguished name of the user container. |
CP_UID_UNSContainerBUsers |
3ca291ee-51ec-4c5d-92dd-36c3f817e645 | Primary key of the user container. |
CP_Uid_UNSRootB |
f292a96d-39ac-4de1-a7a4-f18c3b0f1023 | Primary key of the proxy target system (UID_UNSRootB@UNSRootB). |
CP_Uid_CCCSNWInstance |
de12f329-40ee-4927-aed7-78b312ce2ed3 | Primary key of the ServiceNow instance, the value of UID_CCCSNWInstance@CCCSNWInstance). |
- Run the synchronization
Note: The proxy target system is only used for entitlement inheritance purposes and account definitions should not be assigned. Account definitions can be assigned to the table CCCSNWSys_User.