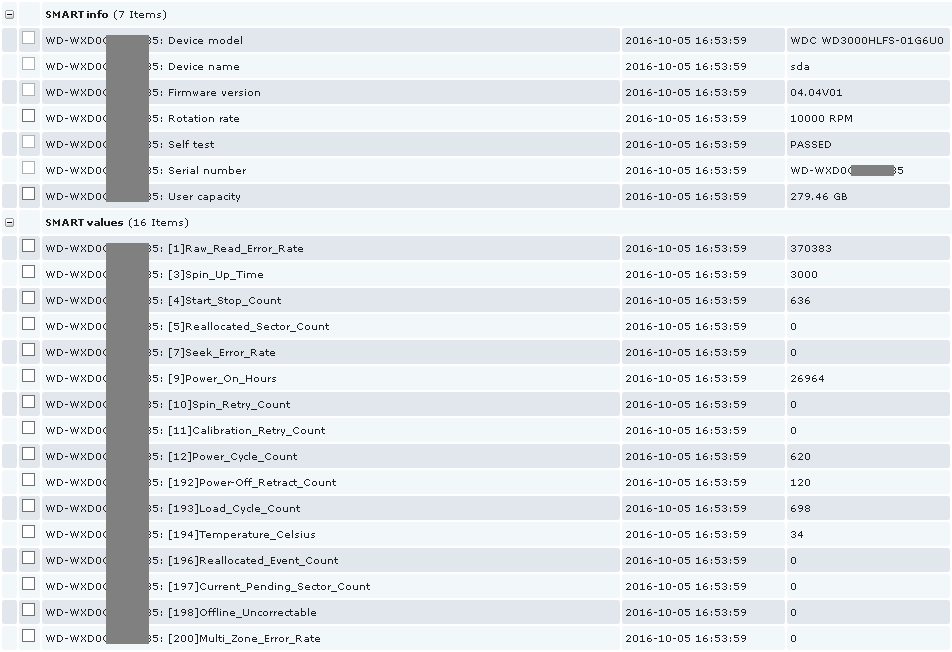
Cross-platform SMART monitoring scripts with two display modes: device and serial. LLD discovers and sends data in one pass, using minimal number of utilities. Supports any SMART name and displays it as is.
- Utilises smartctl error return codes
- Low-Level Discovery
- SAS support
- SSD wear monitoring (SAS only)
- csmi support
- Efficient: no unnecessary processes are spawned
- Bulk items upload with zabbix-sender
- Error-proof configuration: various safeguard triggers
- Automatic RAID passthrough (when smartctl detects the drives)
Note: disk temperature is monitored using different approach.
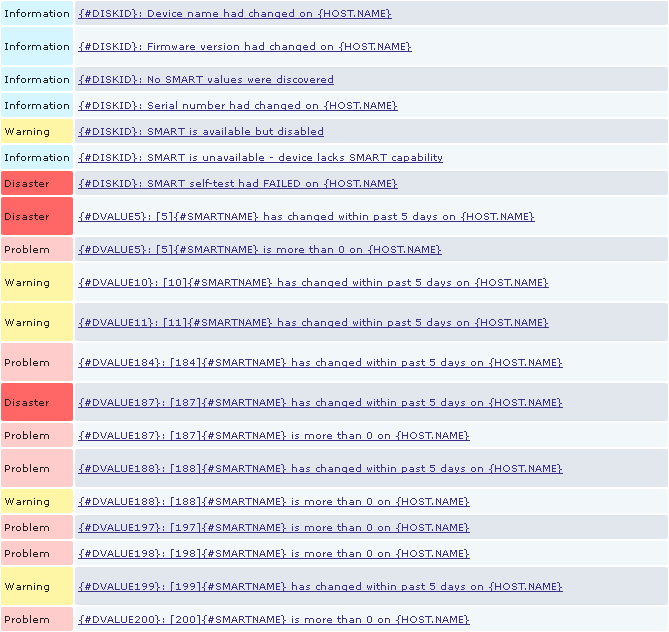
Triggers that contain delta(5d)>0 and last()>0 will fire on any change unless last value is zero. E.g. when disk is replaced with zero values the trigger will not fire, but if value is less or more - it will. Therefore, replacing a faulty drive with faulty one will still trigger a problem that stays for 5 days (default).
As prerequisites you need python3, smartmontools, sudo and zabbix-sender packages. For testing, zabbix-get is also required.
Take a look at scripts first lines and provide paths if needed. If you have a RAID configuration, also provide that manually. Choose device or serial mode. Import Template_App_smartmontools.xml in zabbix web interface.
client# apt-get install zabbix-agent zabbix-sender smartmontools sudo
server# apt-get install zabbix-get # testingclient# yum install zabbix-agent zabbix-sender smartmontools sudo
server# yum install zabbix-get # testingNote: Your include directory may be either
zabbix_agentd.dorzabbix_agentd.conf.ddependent on the distribution.
client# mv smartctl-lld.py sender_wrapper.py /etc/zabbix/scripts/
client# mv sudoers.d/zabbix /etc/sudoers.d/   # place sudoers include for smartctl sudo access
client# mv userparameter_smartctl.conf /etc/zabbix/zabbix_agentd.d/ # move zabbix items include hereclient# mv smartctl-lld.py sender_wrapper.py /usr/local/etc/zabbix/scripts/
client# mv sudoers.d/zabbix /usr/local/etc/sudoers.d/
client# mv userparameter_smartctl.conf /usr/local/etc/zabbix/zabbix_agentd.d/client> move smartctl-lld.py "C:\Program Files\Zabbix Agent\scripts\"
client> move sender_wrapper.py "C:\Program Files\Zabbix Agent\scripts\"
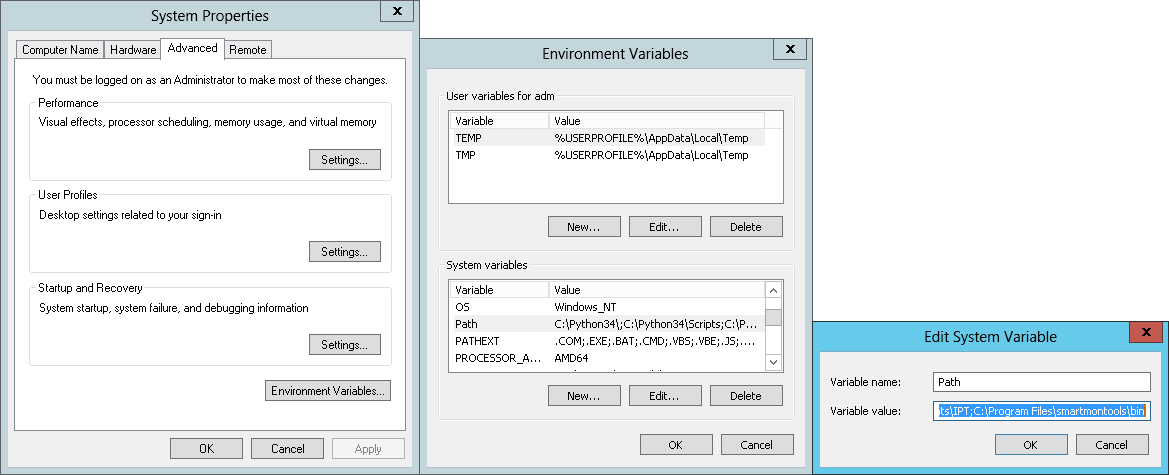
client> move userparameter_smartctl.conf "C:\Program Files\Zabbix Agent\zabbix_agentd.d\"Install python3 for all users, adding it to PATH during installation. Install smartmontools and add its bin folder to PATH in environment variables (or specify absolute path to smartctl binary in smartctl-lld.py).
Dependent on the distribution, you may need to include your zabbix conf folder in zabbix_agentd.conf, like this:
Include=/usr/local/etc/zabbix/zabbix_agentd.d/
Its recomended to add at least Timeout=10 to agent and server config files to allow drives spun up in some cases.
Thats all for Windows. For others run the following to finish configuration:
client# chmod 755 smartctl-lld.py sender_wrapper.py   # apply necessary permissions
client# chown root:zabbix smartctl-lld.py sender_wrapper.py
client# chmod 644 userparameter_smartctl.conf
client# chown root:zabbix userparameter_smartctl.conf
client# chmod 400 sudoers.d/zabbix
client# chown root sudoers.d/zabbix
client# visudo # test sudoers configuration, type :q! to exitserver$ zabbix_get -s 192.0.2.1 -k smartctl.discovery[get,"Example host"]Default operation mode. Displays json that server should get, detaches, then waits and sends data with zabbix-sender. Example host is your Host name field in zabbix.
server$ zabbix_get -s 192.0.2.1 -k smartctl.discovery[getverb,"Example host"]or locally:
client$ /etc/zabbix/scripts/smartctl-lld.py getverb "Example host"
client_admin!_console> python "C:\Program Files\Zabbix Agent\scripts\smartctl-lld.py" getverb "Example host"
Verbose mode. Does not detaches or prints LLD. Lists all items sent to zabbix-sender, also it is possible to see sender output in this mode.
Note: before scripts would work, zabbix server must first discover available items. It is done in 12 hour cycles by default. You can temporary decrease this parameter for testing in
template -> Discovery -> SMART disk discovery -> Update interval.
These scripts were tested to work with following configurations:
- Debian 11 / Server (5.0, 6.0) / Agent 4.0 / Python 3.9
- Ubuntu 22.04 / Server (5.0, 6.0) / Agent 5.0 / Python 3.10
- Windows Server 2012 / Server 6.0 / Agent 4.0 / Python (3.7, 3.11)
- Windows 10 / Server 6.0 / Agent 4.0 / Python (3.10, 3.11)
- Windows 7 / Server 6.0 / Agent 4.0 / Python (3.4, 3.7, 3.8)
- Centos 7 / Zabbix 3.0 / Python 3.6
- FreeBSD 10.3 / Zabbix 3.0 / Python 3.6
- Windows XP / Zabbix 3.0 / Python 3.4
Overwrite scripts and UserParameters. If UserParameters were changed - agent restart is required. If template had changed from previous version - update it in zabbix web interface marking all Delete missing checkboxes.
Note: low values in php settings
/etc/httpd/conf.d/zabbix.confmay result in request failure. Especiallyphp_value memory_limit.
Q: Trigger fires when it clearly shouldn't.
Q: Trigger's macro does not expand.
Q: Triggers from older version does not expire after update.
A: Reassign the template with Unlink and clear on the host for individual resolution. Or reupload the tempate marking all Delete missing checkboxes.
Q: Is it possible to monitor specific drives or exclude some of them?
Q: SCSI drive returns empty results while -A option working correctly.
A: Specify diskListManual in smartctl-lld.py:
diskListManual = ['/dev/sda -d sat+megaraid,4', '/dev/sda -d sat+megaraid,5']
diskListManual = ['/dev/csmi0,0 -d scsi', '/dev/csmi0,1 -d scsi']
Q: Old triggers are misleading after disk replacement.
A: Wait for 24 hours (default) or perform Unlink and clear on the host. You can also adjust the interval at template -> Discovery -> SMART disk discovery -> Keep lost resources period.
Q: Triggers Command line did not parse and Device open failed serves identical purpose in zabbix-smartmontools and zabbix-mini-IPMI.
A: Disable unneeded pair in either template.
Q: Script exits with exception/error.
A: Report it.
- Zabbix web panel displays an error on json discovery, but everything works fine (#7)
- Data on some systems may be absent right after boot due to ACHI warmup (#14)
- Windows version does not detaches, and data will only be gathered on second pass
- SSD life monitoring (SATA)
- ERC / TLER / CCTL is-enabled check
- https://www.smartmontools.org
- https://unlicense.org
- The 5 SMART stats that actually predict hard drive failure
- What SMART Stats Tell Us About Hard Drives
- SMART attributes detailed explanation
- Оцениваем состояние жёстких дисков при помощи S.M.A.R.T. (Russian)
- Disk and CPU temperature monitoring solution